
Popular categories
Looking for a yarn?


|
||||||||||||||||
DROPS 57-14 |
||||||||||||||||
|
|
||||||||||||||||
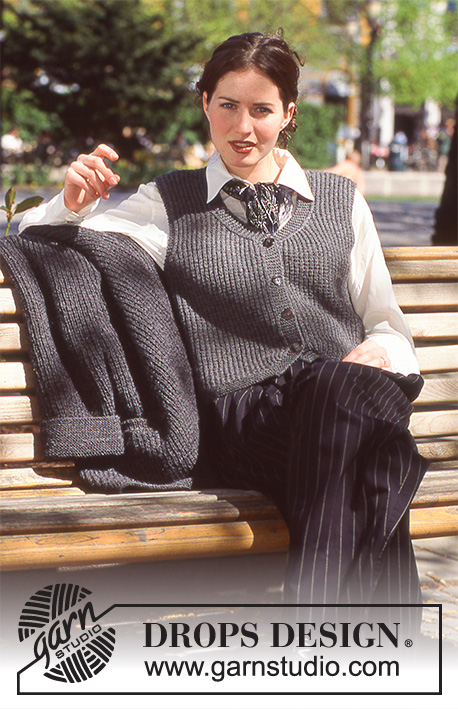
DROPS Sweater in Karisma-Angora Tweed
DROPS 57-14 |
||||||||||||||||
|
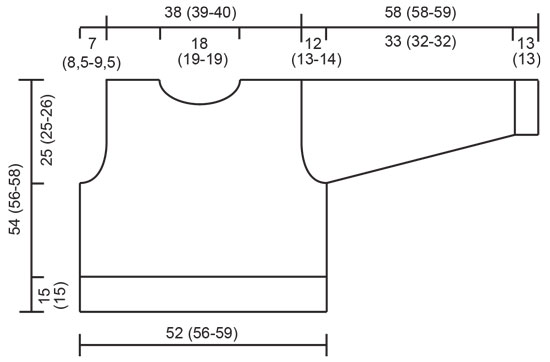
Gauge: 22 sts x 28 rows on larger needles in Pattern 2 = 10 x 10 cm [4"x4"]. Pattern: See chart. Garter Stitch, when knitting flat: Knit all sts, all rows. Garter Stitch, when knitting in the round: *Rnd 1, knit. Rnd 2, purl.* Repeat from * - *. Body: Cast on 216 (234-243) sts on smaller circular needles; join and place a marker at the join. Knit Pattern 1 for approximately 19 cm [7.5»] (finish after the first row of Pattern 1). Then knit 4 rows garter st and at the same time inc 12 (12-15) sts evenly distributed on the row = 228 (246-258) sts. Change to larger circular needles and knit 1 row stockinette stitch and then knit Pattern 2. When the work measures 29 (31-32) cm [11-3/8» (12.25» – 12-5/8»)], bind off 4 (5-5) sts at each side for armholes and knit the rest of the front and back separately. Front: = 110 (118-124) sts. Bind off for armholes on every other row: 3 sts 1 (2-2) times, 2 sts 4 (4-4) times, 1 st 2 (2-4) times = 84 (86-88) sts. When the work measures 47 (49-51) cm [18.5» (19.25» - 20»)], bind off the center 20 (22-22) sts for the neck. Then bind off at each neck edge every other row: 3 sts 1 time, 2 sts 2 times, 1 st 3 times. Bind off when the work measures 54 (56-58) cm [21.25» (22» - 22-7/8»)]. Back: = 110 (118-124) sts. Bind off for armholes as on the front. When the work measures 52 (54-56) cm [20.5» (21.25» - 22»)], bind off the center 36 (38-38) sts for the neck. Then bind off 2 sts at each neck edge on the next row. Bind off when the work measures 54 (56-58) cm [21.25» (22» - 22-7/8»)]. Sleeves: Cast on 54 (54-54) sts on smaller double pointed needles; join and place a marker at the join. Knit Pattern 1 for approximately 13 cm [5-1/8»] (finish after the 1st row of Pattern 1). Then knit 4 rows garter st. Change to larger double pointed needles and knit 1 row stockinette stitch, then Pattern 2 to finished dimensions. At the same time, after Pattern 1, inc 1 st each side of marker 26 (26-28) times: Sizes S/M + M/L: alternately every 3rd and every 4th row Size XL: every 3rd row = 106 (106-110) sts. When the work measures 46 (45-45) cm [18-1/8» (17.75» - 17.75»)], bind off 2 (3-3) sts on each side of marker and knit the rest back and forth on the needles. Then bind off for sleeve caps on each side every other row: 4 sts 1 time, 3 sts 3 (2-2) times, 2 sts 11 (14-15) times, 3 sts 2 times, bind off all sts. The work measures approximately 58 (58-59) cm [22-7/8» (22-7/8» - 22.25»)]. Assembly: Sew shoulder seams. Pick up 108 sts (divisible by 9 sts) around the neck on smaller double pointed needles; join and place a marker at the join. Purl 1 row, knit 1 row, purl 1 row, knit 1 row, then knit Pattern 1 for approximately 8 cm [3-1/8»] (finish after the 1st row of Pattern 1), bind off all sts loosely in pattern. Sew on the sleeves. |
||||||||||||||||
Diagram explanations |
||||||||||||||||
|
||||||||||||||||

|
||||||||||||||||
|
||||||||||||||||
|
Have you made this or any other of our designs? Tag your pictures in social media with #dropsdesign so we can see them! Do you need help with this pattern?You'll find tutorial videos, a Comments/Questions area and more by visiting the pattern on garnstudio.com. © 1982-2024 DROPS Design A/S. We reserve all rights. This document, including all its sub-sections, has copyrights. Read more about what you can do with our patterns at the bottom of each pattern on our site. |
||||||||||||||||


With over 40 years in knitting and crochet design, DROPS Design offers one of the most extensive collections of free patterns on the internet - translated to 17 languages. As of today we count 304 catalogs and 11422 patterns - 11417 of which are translated into English (US/in).
We work hard to bring you the best knitting and crochet have to offer, inspiration and advice as well as great quality yarns at incredible prices! Would you like to use our patterns for other than personal use? You can read what you are allowed to do in the Copyright text at the bottom of all our patterns. Happy crafting!
Comments / Questions (14)
Angående dette spørgsmål jeg har sendt, glemte jeg at oplyse at det er til model 57-14 Hej Håber I kan hjælpe mig. I opskriften står der at man skal bruge 500 går Drops Karisma Angora Tweed. Jeg er tvivl om, om det er enten Karisma eller Angora Tweed, da jeg ikke kan finde en garn der hedder Karisma Angora Tweed. Hilsen Kirsten 03.04.2023 - 20:24
04.04.2023 - 08:07Hej Håber I kan hjælpe mig. I opskriften står der at man skal bruge 500 går Drops Karisma Angora Tweed. Jeg er tvivl om, om det er enten Karisma eller Angora Tweed, da jeg ikke kan finde en garn der hedder Karisma Angora Tweed. Hilsen Kirsten
03.04.2023 - 20:24DROPS Design answered:
Hej Kirsten, DROPS Angora tweed er udgået, men du kan strikke den i DROPS Soft Tweed eller i DROPS Karisma :)
13.04.2023 - 11:47In de beschrijving staat hoogte boord voor- en achterpand 19 cm en op de tekening staat 15 cm. Wat is juist?
04.04.2022 - 15:23DROPS Design answered:
Dag Hanneke,
Verwarrend inderdaad. Je kunt de beschrijving aanhouden, dus 19 cm.
07.04.2022 - 23:53Eva Strocholcova wrote:
Hello, I would like to ask how long needles would I need for this pattern, both circular and double pointed? Thanks a lot for your answer! Eva
20.08.2017 - 10:49DROPS Design answered:
Dear Eva, for the body, you should use circular needles of 80 cm. For the sleeves, you should start with double pointed needles of standard size and then use circular needles of 40 cm.
20.08.2017 - 12:36Bonjour, je n'avais pas compris car lorsque je tricot avec des aiguilles on diminue le devant et aussi le dos je croyais qu'il fallait enlever 5mailles donc 10 mailles pour le dos et 10 mailles pour le devant 5et5 donc les 5 mailles que j'enlève ce sont le début des emmanchure 2et2de chaque côté dos et devant et1maille pour la moitié enfin j'ai compris je vous remercie
04.12.2014 - 16:12DROPS Design answered:
Bonjour Mme Marlier, on tricote effectivement le dos et le devant en rond jusqu'aux emmanchures, on rabat alors 5 m sur les côtés (début des emmanchures) et on continue chaque pièce séparément en allers et retours en rabattant pour les emmanchures de chaque côté tous les 2 rangs 2 fois 3 m, 4 fois 2 m et 2 fois 1 m (en taille M/L), puis on forme l'encolure et les épaules. Bon tricot!
04.12.2014 - 17:37Bonjour , je suis bloquer au niveau des diminution des emmanchures car on me dit de rabatre de chaque côté 5maillesest que je dois diminuer aussi le devant ? Mais je n'ais plus que 113maille car 246:2=123mailles pour partager le dos et devant donc 123m - 5 et 5m cela fait 113 pour le dos et c'est écrit 118m pouvez vous m'expliquez merci et à bientôt
01.12.2014 - 18:46DROPS Design answered:
Bonjour Mme Marlier, vous avez 246 m et rabattez 5 m pour les emmanchures sur chacun des côtés = 246 - (2x5m) = 236 / 2 = 118 m pour le devant et 118 m pour le dos. Bon tricot!
02.12.2014 - 09:09Je vous remercie
01.12.2014 - 13:21Je vous remercie
28.11.2014 - 13:15Bonjour, je voudrais savoir pourquoi on ne fait pas les manche avec des aiguilles circulaires Merci
27.11.2014 - 19:36DROPS Design answered:
Bonjour Mme Marlier, on tricote en général les manches sur doubles pointes car on n'a pas suffisamment de mailles pour les loger sur une circulaire, au moins au début de la manche. Toutefois, vous pouvez également les tricoter en rond sur aiguille circulaire avec la technique du magic loop - voir vidéo ci-dessous. Bon tricot!
28.11.2014 - 09:13Merci
27.11.2014 - 14:42