
Popular categories
Looking for a yarn?


|
|||||||||||||||||||||||||||||||
River Rock |
|||||||||||||||||||||||||||||||
|
|
|||||||||||||||||||||||||||||||
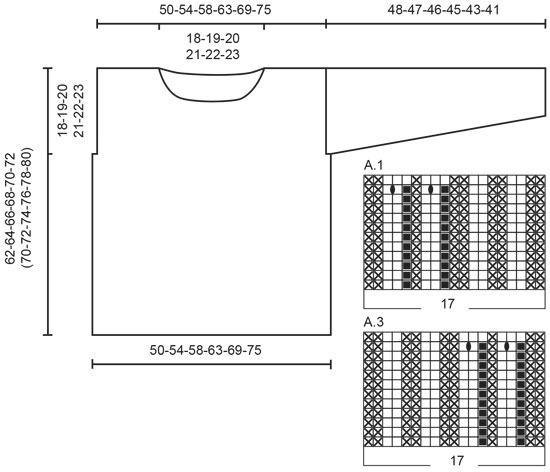
Knitted sweater with cables in DROPS Nepal. Size: S - XXXL
DROPS 205-17 |
|||||||||||||||||||||||||||||||
|
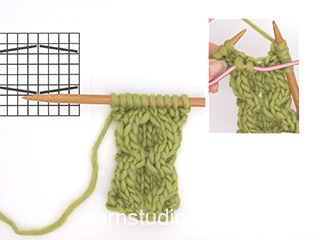
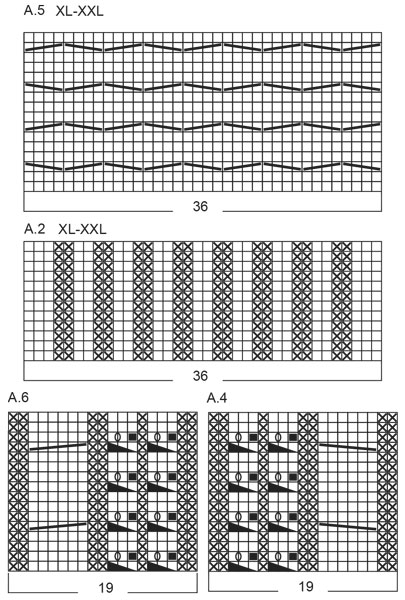
---------------------------------------------------------- EXPLANATION FOR THE PATTERN: ---------------------------------------------------------- GARTER STITCH (back and forth): Knit all rows. 1 ridge vertically = knit 2 rows. INCREASE/DECREASE TIP (evenly): To calculate how to increase/decrease evenly, use the total number of stitches on row (e.g. 50 stitches) and divide stitches by number of increases/decreases to be done (e.g. 6) = 8.3. In this example increase by making 1 yarn over after approx. every 8th stitch. On next round work yarn over twisted to avoid hole. To decrease in this example knit approx. every 7th and 8th stitch together. PATTERN: See diagrams A.1 to A.8. See diagram for your size in A.2 and A.5. INCREASE TIP (applies to sleeves): Work until 1 stitch remains before marker thread, 1 yarn over, knit 2 (marker thread is in the middle of these stitches), 1 yarn over. On next round knit yarn overs twisted to avoid holes. ---------------------------------------------------------- START THE PIECE HERE: ---------------------------------------------------------- SWEATER - SHORT OVERVIEW OF THE PIECE: Front piece and back piece are worked back and forth on circular needle, bottom-up. Work back piece 8 cm = 3⅛" longer than front piece, and there is a vent in the side at the bottom. Work sleeves in the round on double pointed needles/a short circular needle. BACK PIECE: Cast on 104-112-120-128-144-152 stitches on circular needle size 4.5 mm = US 7 with Nepal. Purl 1 row from wrong side, then work as follows from right side: Work 3 stitches in GARTER STITCH - see explanation above, * knit 2, purl 2 *, repeat from *-* over the next 20-24-24-28-32-36 stitches, knit 2, A.1 (= 17 stitches), A.2 (see diagram for your size = 20-20-28-28-36-36 stitches), A.3 (= 17 stitches), * knit 2, purl 2 *, repeat from *-* over the next 20-24-24-28-32-36 stitches, knit 2, 3 stitches in garter stitch. Continue this pattern until A.1, A.2 and A.3 have been worked (= 108-116-124-132-148-156 stitches). Switch to circular needle size 5.5 mm = US 9. REMEMBER THE KNITTING GAUGE! Work next row as follows from right side: Work 3 stitches in garter stitch, knit over the next 22-26-26-30-34-38 stitches, AT THE SAME TIME decrease 4-5-5-5-7-6 stitches evenly over these stitches – read INCREASE/DECREASE TIP, work A.4 over stitches in A.1, A.5 over stitches in A.2, and A.6 over stitches in A.3, knit over the next 22-26-26-30-34-38 stitches, AT THE SAME TIME decrease 4-5-5-5-7-6 stitches over these stitches, work 3 stitches in garter stitch = 100-106-114-122-134-144 stitches. Continue with garter stitch in each side, stockinette stitch and A.4, A.5 and A.6. When piece measures 18 cm = 7", cast on 1 edge stitch in each side, now continue with only 1 edge stitch in garter stitch in each side, stockinette stitch and A.4, A.5 and A.6 as before = 102-108-116-124-136-146 stitches. When piece measures 52-53-54-55-56-57 cm = 20½"-21"-21¼"-21⅝"-22"-22½", bind off 1 edge stitch in each side = 100-106-114-122-134-144 stitches. Continue pattern as before. When piece measures 68-70-72-74-76-78 cm = 26¾"-27½"-28⅜"-29⅛"-30"-30¾", slip the middle 46-48-52-54-58-58 stitches on a stitch holder for neck and finish each shoulder separately. NOTE: Continue the stitches that do not fit the pattern in knit and purl as in A.4, A.5 and A.6 (without cables). On next row decrease 1 stitch towards the neck = 26-28-30-33-37-42 stitches remain on shoulder. When piece measures 70-72-74-76-78-80 cm = 27½"-28⅜"-29⅛"-30"-30¾"-31½", bind off all stitches. Work the other shoulder the same way. FRONT PIECE: Cast on 104-112-120-128-144-152 stitches on circular needle size 4.5 mm = US 7 with Nepal. Purl 1 row from wrong side, then work as follows from right side: Work 3 stitches in garter stitch, * knit 2, purl 2 *, repeat from *-* over the next 20-24-24-28-32-36 stitches, knit 2, A.1 (= 17 stitches), A.2 (see diagram for your size = 20-20-28-28-36-36 stitches), A.3 (= 17 stitches), * knit 2, purl 2 *, repeat from *-* over the next 20-24-24-28-32-36 stitches, knit 2, 3 stitches in garter stitch. Continue this pattern until A.1, A.2 and A.3 have been worked (= 108-116-124-132-148-156 stitches). Switch to circular needle size 5.5 mm = US 9. Work next row as follows from right side: Work 3 stitches in garter stitch, knit over the next 22-26-26-30-34-38 stitches, AT THE SAME TIME decrease 4-5-5-5-7-6 stitches evenly over these stitches, work A.4 over stitches in A.1, A.5 over stitches in A.2, and A.6 over stitches in A.3, knit over the next 22-26-26-30-34-38 stitches, AT THE SAME TIME decrease 4-5-5-5-7-6 stitches over these stitches, work 3 stitches in garter stitch = 100-106-114-122-134-144 stitches. Continue with garter stitch in each side, stockinette stitch and A.4, A.5 and A.6. When piece measures 10 cm = 4", cast on 1 edge stitch in each side, now continue with only 1 edge stitch in garter stitch in each side, stockinette stitch and A.4, A.5 and A.6 as before = 102-108-116-124-136-146 stitches. When piece measures 44-45-46-47-48-49 cm = 17¼"-17¾"-18"-18½"-19"-19¼", bind off 1 edge stitch in each side = 100-106-114-122-134-144 stitches. Continue pattern as before. When piece measures 56-58-60-62-64-66 cm = 22"-22¾"-23⅝"-24⅜"-25¼"-26", slip the middle 40-42-46-48-52-52 stitches on a stitch holder for neck and finish each shoulder separately. NOTE: Continue the stitches that do not fit the pattern in knit and purl as in A.4, A.5 and A.6 (without cables). Then bind off towards neck: 2 stitches 1 time and 1 stitch 2 times = 26-28-30-33-37-42 stitches remain for shoulder. When piece measures 62-64-66-68-70-72 cm = 24⅜"-25¼"-26"-26¾"-27½"-28⅜", bind off all stitches. Work the other shoulder the same way. SLEEVE: Work sleeve in the round on double pointed needles/a short circular needle, top down. Cast on 44-44-44-52-52-52 stitches on circular needle size 4.5 mm = US 7 with Nepal. Knit 1 round, work next round as follows: Knit 1, work rib purl 2, knit 2 until 3 stitches remain, purl 2 and finish with knit 1. Switch to double pointed needles/short circular needle size 5.5 mm = US 9 when piece measures 6 cm = 2⅜" and work next round as follows: Knit over the first 17-17-17-21-21-21 stitches, AT THE SAME TIME decrease 3-2-2-5-4-3 stitches evenly over these stitches, work A.7, knit the last 17-17-17-21-21-21 stitches, AT THE SAME TIME decrease 3-2-2-5-4-3 stitches evenly over these = 38-40-40-42-44-46 stitches on round. Insert 1 marker thread at beginning of round. When piece measures 7 cm = 2¾", begin increase mid under sleeve – read INCREASE TIP, increase 1 stitch on each side of marker thread the beginning of round, increase every 4-4-3-3-2½-2½ cm = 1½"-1½"-1⅛"-1⅛"-⅞"-⅞" 10-10-12-13-13-14 times in total = 58-60-64-68-70-74 stitches. When piece measures 47-46-45-44-42-40 cm = 18½"-18"-17¾"-17¼"-16½"-15¾", decrease 2 stitch over cable in A.7 = 56-58-62-66-68-72 stitches. When piece measures 48-47-46-45-43-41 cm = 19"-18½"-18"-17¾"-17"-16⅛", bind off all stitches. Work the other sleeve the same way, but work A.8 instead of A.7. ASSEMBLY: Sew the shoulder seams. Sew side seams inside 1 edge stitch, the bottom 10/18 cm = 4"/7" = vent. Back piece is longer than front piece. Sew in sleeves. NECK: Pick up approx. 100-120 stitches around the neck (including stitches on stitch holder mid front and mid back) on a short circular needle size 4.5 mm = US 7. Knit 1 round and purl 1 round. Then work rib knit 2/purl 2. When piece measures 10 cm = 4", increase all 2 knit stitches to 3 knit stitches = 125-150 stitches. Continue until rib measures 16 cm = 6¼" in all sizes, bind off with knit over knit and purl over purl. |
|||||||||||||||||||||||||||||||
Diagram explanations |
|||||||||||||||||||||||||||||||
|
|||||||||||||||||||||||||||||||
|
|||||||||||||||||||||||||||||||

|
|||||||||||||||||||||||||||||||
|
|||||||||||||||||||||||||||||||
|
Have you made this or any other of our designs? Tag your pictures in social media with #dropsdesign so we can see them! Do you need help with this pattern?You'll find tutorial videos, a Comments/Questions area and more by visiting the pattern on garnstudio.com. © 1982-2024 DROPS Design A/S. We reserve all rights. This document, including all its sub-sections, has copyrights. Read more about what you can do with our patterns at the bottom of each pattern on our site. |
|||||||||||||||||||||||||||||||


With over 40 years in knitting and crochet design, DROPS Design offers one of the most extensive collections of free patterns on the internet - translated to 17 languages. As of today we count 304 catalogs and 11422 patterns - 11417 of which are translated into English (US/in).
We work hard to bring you the best knitting and crochet have to offer, inspiration and advice as well as great quality yarns at incredible prices! Would you like to use our patterns for other than personal use? You can read what you are allowed to do in the Copyright text at the bottom of all our patterns. Happy crafting!
Comments / Questions (25)
I diagrammen står det att ärmmönstren A7 och A8 ska innehålla 19 maskor, men räknar man rutorna så är det 10 st! Alltså är diagrammen 10 maskor breda, inte 19. Kanske dags att korrigera mönstret?
30.12.2022 - 16:34DROPS Design answered:
Hei Susann. Her er det bare en tastefeil (skal stå 10, ikke 19), dette skal vi få ordnet. Takk for at du gjorde oss oppmerksom på dette. mvh DROPS Design
05.01.2023 - 13:21Estoy haciendo la parte delantera y no entiendo la disminución de los puntos en las mangas: ¿Qué quiere decir rematar los puntos hacia el escote? ¿Tengo que rematarlos en el lado del escote o el de la manga? ¿Y como se haría 2 puntos 1 vez y un 1 punto dos veces? Gracias
27.11.2022 - 13:06DROPS Design answered:
Hola Laura, para rematar puntos hacia el escote tienes que rematar puntos en el lado del escote, para dar forma al escote. Para rematar 2 puntos 1 vez, rematas 2 puntos (no juntos, sino que uno por uno) en la misma fila. Cuando rematas 1 punto 2 veces, tienes que cerrar 1 punto en la primera fila desde el escote y 1 punto en la siguiente fila desde el escote.
27.11.2022 - 13:21Danke jetzt habe ich verstanden! Danke
29.09.2022 - 10:28In a4/6 soll ich 1 Masche abheben die nächsten 2 Stricken die abgehobene rüberziehen? Da bleibt nur 1 Masche übrig es sollen 2 sein da dazwischen ein Umschlag nächste Reihe sollen das 3 Maschen sein sind es nicht nur 2
28.09.2022 - 19:44DROPS Design answered:
Liebe Frau Krause, ja genau aber so sind noch 2 Maschen übrig: 1 Masche abheben, die 2 nächsten Maschen stricken (nicht zusammen, aber separat stricken), dann die abgehobene Masche über die 2 gestrickten Maschen überziehen; bei der nächsten Runde/Reihe machen Sie 1 Umschlag, so sind es wieder 3 Maschen. Dieses Video zeigt, wie man so einen Zopf strickt. Viel Spaß beim stricken!
29.09.2022 - 08:31Merci pour cette réponse rapide! Bonne journée!
13.01.2022 - 12:44Bonjour, Je souhaite réaliser le modèle DROPS 205-17 avec le fil DROPS LOVES YOU8 en remplacement du fil NEPAL pour une taille L. NEPAL demande 900 gr, soit 18 pelotes de 75 mm, soit 1350 mètres. Suis-je dans le bon en commandant 16 pelotes de LOVES YOU8? En essayant le convertisseur, LOVES YOU8 n'apparaît pas. Pourriez-vous m'éclairer? Merci par avance.
12.01.2022 - 14:41DROPS Design answered:
Bonjour Andrée, DROPS Loves You 8 a été ajoutée dans le convertisseur, ainsi vous pouvez l'utiliser tranquillement pour calculer la nouvelle quantité, merci pour votre retour. Bon tricot!
13.01.2022 - 10:52The sleeves include instructions for the rib but they are not included in the instructions for the Front or Back sections. The picture shows the Front beginning with a rib for a few centimetres. Am I missing something? Thanks
10.04.2021 - 02:52DROPS Design answered:
Dear Amanda, the second sentence says "then work as follows from right side", and from the third sentence (Work 3 stitches in GARTER STITCH - see explanation above, * knit 2, purl 2 *, repeat from *-* over the next 20-24-24-28-32-36 stitches, knit 2, A.1 (= 17 stitches), A.2 (see diagram for your size = 20-20-28-28-36-36 stitches), A.3 (= 17 stitches), * knit 2, purl 2 *, repeat from *-* over the next 20-24-24-28-32-36 stitches, knit 2, 3 stitches in garter stitch.) it tells you how to set up the rows for a ribbed pattern that could be continued kind of seamlessly into the cabled pattern. Happy Knitting.
10.04.2021 - 05:18Ik ben net begonnen met het rugpand. Wat doe ik op de verkeerde kant van het werk? het patroon volgen? of 'gewoon' alle steken net anders om breiden als aan de voorkant? Ik kan dat niet helemaal terug vinden in het patroon. iemand een tip?
29.03.2020 - 16:47DROPS Design answered:
Dag RJ,
Op de verkeerde kant brei je de steken zoals ze zich voordoen, dus waar je aan de goede kant recht breid, brei je aan de verkeerde kant averecht en vice versa. Dit staat ook aangegeven bij de telpatronen. (In de telpatronen staan alle naalden aangegeven, dus zowel aan de goede als aan de verkeerde kant.)
29.04.2020 - 10:14Bedankt voor uw reactie, nu kan ik met een gerust hart verder breien:-) Met vriendelijke groet, Geeske
26.03.2020 - 08:37Goedendag, Ik brei maat L, met Drops Nepal. De boord is 72 cm breed i.p.v. 58 cm. Mijn stekenproeflapje klopte precies met de beschrijving. Het lijken me zoveel steken voor zulke dikke wol. Moet het zo'n wijde trui worden? Nog een vraag: Is er een vertaalfunctie op de site, zodat ik de vragen van andere breisters kan lezen? Alvast bedankt voor uw reactie. Vriendelijke groet, Geeske Alvast dank
24.03.2020 - 07:56DROPS Design answered:
Dag Geeske,
In dit patroon is de boord redelijk wijd, dus niet aansluitend. Dat zal bij gaan trekken wanneer je met de kabel begint, omdat het breiwerk daardoor samen gaat trekken. Als de stekenverhouding klopt kun je de stekenaantallen gewoon aanhouden.
We hebben geen vertaalfunctie op de site, maar je kan google translate hiervoor gebruiken.
25.03.2020 - 10:53