DROPS Brushed Alpaca Silk
77% Alpaca, 23% Silk
from 3.95 $ /25g
Get the yarn to make this pattern from 19.75$.

The yarn cost is calculated from the pattern’s smallest size and the yarn’s cheapest product type. Looking for an even better price? You might find it on the DROPS Deals!

DROPS SS24

Footprints in the Sand

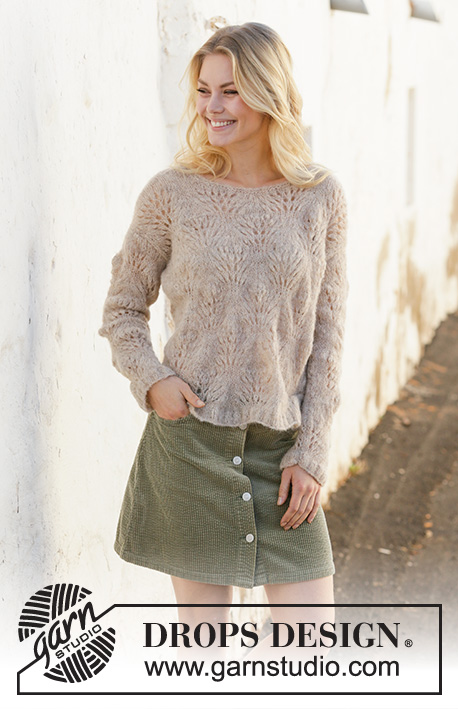
Knitted sweater with wave pattern in DROPS Brushed Alpaca Silk. Sizes S - XXXL.

DROPS 202-3
DROPS Design: Pattern no as-110
Yarn group C or A + A
-------------------------------------------------------

SIZES:
S - M - L - XL - XXL – XXXL

Finished measurements:
Chest measurements: 98-106-114-126-138-150 cm = 38½"-41¾"-45"-49½"-54¼"-59"
Full length: 50-52-54-56-58-60 cm = 19¾"-20½"-21¼"-22"-22¾"-23⅝"

All measurements in charts are in cm.

MATERIALS:
DROPS BRUSHED ALPACA SILK from Garnstudio (belongs to yarn group C)
125-150-150-175-175-200 g color 04, light beige

KNITTING GAUGE:
16 stitches in width and 22 rows in height with stockinette stitch = 10 x 10 cm = 4" x 4".
Approx 18 stitches with wave pattern = 10 cm = 4" in width.

NEEDLES:
DROPS CIRCULAR NEEDLE SIZE 5.5 MM = US 9: length 60 cm = 24" or 80 cm = 32" for pattern.
DROPS CIRCULAR NEEDLE SIZE 4 MM = US 6: length 40 cm = 16" and 80 cm = 32" for rib/garter stitch edge.
The needle size is only a guide. If you get too many stitches on 10 cm = 4", change to a larger needle size. If you get too few stitches on 10 cm = 4", change to a smaller needle size.

-------------------------------------------------------

Alternative Yarn – See how to change yarns here
Yarn Groups A to F – Use the same pattern and change the yarn here
Yarn usage using an alternative yarn – Use our yarn converter here

-------------------------------------------------------

DROPS Brushed Alpaca Silk
77% Alpaca, 23% Silk
from 3.95 $ /25g
Get the yarn to make this pattern from 19.75$.

The yarn cost is calculated from the pattern’s smallest size and the yarn’s cheapest product type. Looking for an even better price? You might find it on the DROPS Deals!

Pattern instructions

NOTE: This pattern is written in American English. All measurements in charts are in cm. For conversion from inches to cm - click here. There are different terms for crocheting in American and British English. If this pattern includes crochet, click for "crochet terms" here. For this pattern in British English, please click here.
-------------------------------------------------------

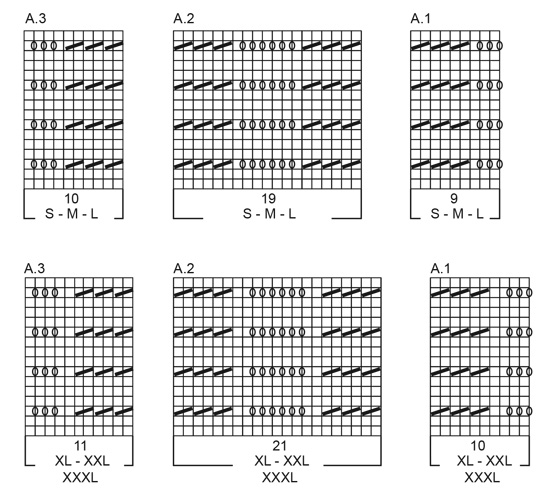
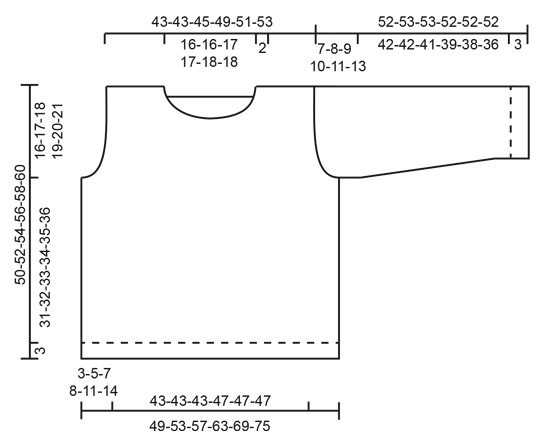
EXPLANATIONS FOR THE PATTERN:

-------------------------------------------------------

RIDGE/GARTER STITCH (worked back and forth):
Knit all rows.
1 ridge in height = Knit 2 rows.

RIDGE/GARTER STITCH (worked in the round):
1 ridge in height = 2 rounds, i.e. knit 1 round and purl 1 round.

PATTERN:
See diagrams A.1 to A.3. Choose diagram for your size. The diagrams show all the rows in the pattern seen from the right side.

DECREASE TIP (evenly spaced):
To work out how to decrease evenly, count the total number of stitches on the needle (e.g.124 stitches) minus edge stitches (= 2 stitches) and divide the remaining stitches by number of decreases to be made (e.g. 36) = 3.38.
In this example, decrease by alternately knitting together each 2nd and 3rd stitch and each 3rd and 4th stitch.

INCREASE TIP (for sleeves):
Increase 1 stitch by making 1 yarn over inside the 1 edge stitch on each side. On the next row work the yarn overs twisted to avoid holes.

-------------------------------------------------------

START THE PIECE HERE:

-------------------------------------------------------

SWEATER - SHORT OVERVIEW OF THE PIECE:
The piece is worked back and forth with circular needle, bottom up and sewn together to finish.

BACK PIECE:
Cast on 124-132-140-156-172-180 stitches (including 1 edge stitch on each side) with circular needle size 4 mm = US 6 and Brushed Alpaca Silk. Purl 1 row from the wrong side, then work rib from the right side as follows:
1 edge stitch in GARTER STITCH – read description above, (knit 2, purl 2) until there are 3 stitches left, knit 2 and 1 edge stitch in garter stitch. Continue this rib back and forth for 3 cm = 1⅛" – adjust so that the next row is worked from the right side. Knit 1 row with 1 edge stitch in garter stitch on each side where you decrease 36-38-40-44-50-50 stitches evenly spaced – read DECREASE TIP = 88-94-100-112-122-130 stitches. Work 1 row stockinette stitch back from the wrong side with 1 edge stitch in garter stitch on each side. Change to circular needle size 5.5 mm = US 9. Now work pattern – choose diagram for your size, as follows: 1 edge stitch in garter stitch, stockinette stitch over the next 5-8-11-13-18-22 stitches, A.1 over the next 9-9-9-10-10-10 stitches, A.2 over the next 57-57-57-63-63-63 stitches (= 3 repeats in width), A.3 over the next 10-10-10-11-11-11 stitches, 5-8-11-13-18-22 stitches in stockinette stitch and 1 edge stitch in garter stitch. Continue back and forth like this until the diagrams have been completed in height. REMEMBER THE KNITTING GAUGE!
Now work pattern – choose diagram for your size, as follows: 1 edge stitch in garter stitch, 5-8-11-13-18-22 stitches in stockinette stitch, A.2 over the next 76-76-76-84-84-84 stitches (= 4 repeats in width), 5-8-11-13-18-22 stitches in stockinette stitch and 1 edge stitch in garter stitch. When the diagram has been completed in height, continue this pattern, i.e. work first A.1, A.2 and A.3 as described at the beginning of the piece and then 4 repeats of A.2 in width so that the wave pattern is displaced each time it is worked in height. The remaining stitches are worked in stockinette stitch and 1 edge stitch in garter stitch on each side. When the piece measures 34-35-36-37-38-39 cm = 13⅜"-13¾"-14¼"-14½"-15"-15¼" from the cast-on edge (measure from where the rib at the beginning of the piece slopes downwards/is longest) bind off for armholes in each side as follows: Bind off 4 stitches 1-1-1-1-2-2 times, 2 stitches 0-1-1-2-2-3 times and 1 stitch 1-2-3-3-3-4 times (= 5-8-9-11-15-18 stitches bind off on each side) = 78-78-82-90-92-94 stitches. When the armhole measures approx. 13-14-15-16-17-18 cm = 5⅛"-5½"-6"-6¼"-6¾"-7" from where the binding off began (there is approx. 3 cm = 1⅛" left to finished length) bind off the middle 26-26-28-28-30-30 stitches from the right side at the same time as the 2 first and 2 last of these 26-26-28-28-30-30 stitches are knitted together before casting off (= 24-24-26-26-28-28 stitches for neck) = 26-26-27-31-31-32 stitches for shoulder on each side. Continue with as many whole repeats as there is room for in width and the remaining stitches are worked in stockinette stitch with 1 edge stitch in garter stitch on each side. AT THE SAME TIME on the next row from the neck bind off 1 stitch = 25-25-26-30-30-31 stitches for shoulder. When the armhole measures 16-17-18-19-20-21 cm = 6¼"-6¾"-7"-7½"-8"-8¼" work stockinette stitch with 1 edge stitch in garter stitch on each side where you decrease 2-2-3-3-3-2 stitches evenly on row = 23-23-23-27-27-29 stitches. Bind off. Make sure that the bind-off edge is not tight. Work the other shoulder in the same way.
The piece measures a total of 50-52-54-56-58-60 cm = 19¾"-20½"-21¼"-22"-22¾"-23⅝" from the shoulder down.

FRONT PIECE:
Cast on, work pattern and bind off for the armhole in the same way as for the back piece = 78-78-82-90-92-94 stitches. When the piece measures 41-43-44-46-47-49 cm = 16⅛"-17"-17¼"-18"-18½"-19¼" from the cast-on edge work the next row from the right side as follows: Work pattern as before over the first 31-31-33-37-37-38 stitches, knit the next 16-16-16-16-18-18 stitches and at the same time decrease 2 stitches evenly (= 14-14-14-14-16-16 stitches) and place these stitches 14-14-14-14-16-16 on a thread for the neck, work pattern as before over the remaining 31-31-33-37-37-38 stitches. Then work each shoulder separately. Continue with as many repeats of the pattern in width as there is room for and the remaining stitches are worked in stockinette stitch with 1 edge stitch in garter stitch on each side. AT THE SAME TIME bind off stitches for the neck on each row as follows: Bind off 3 stitches 1 time, 2 stitches 1 time and 1 stitch 1-1-2-2-2-2 times = 25-25-26-30-30-31 stitches on shoulder. When the armhole measures 16-17-18-19-20-21 cm = 6¼"-6¾"-7"-7½"-8"-8¼" work stockinette stitch with 1 edge stitch in garter stitch on each side where you decrease 2-2-3-3-3-2 stitches evenly on row = 23-23-23-27-27-29 stitches. Bind off. Make sure that the bind-off edge is not tight. Work the other shoulder in the same way.
The piece measures a total of 50-52-54-56-58-60 cm = 19¾"-20½"-21¼"-22"-22¾"-23⅝" from the shoulder down.

SLEEVES:
The sleeves are worked back and forth with circular needle, bottom up.
Cast on 54-54-58-62-66-66 stitches with circular needle size 4 mm = US 6 and Brushed Alpaca Silk. Purl 1 row from the wrong side and then work rib from the right side as follows: 1 edge stitch in garter stitch, (knit 2, purl 2) until there is 1 stitch left on row and 1 edge stitch in garter stitch. Continue this rib back and forth for 3 cm = 1⅛" – adjust so that the next row is worked from the right side. Knit 1 row with 1 edge stitch in garter stitch on each side where you decrease 12-10-12-14-16-16 stitches evenly spaced = 42-44-46-48-50-50 stitches. Work 1 row stockinette stitch back from the wrong side with 1 edge stitch in garter stitch on each side. Change to circular needle size 5.5 mm = US 9.

READ THIS WHOLE SECTION BEFORE CONTINUING.
Work pattern – choose diagram for your size, as follows:
1 edge stitch in garter stitch, 1-2-3-2-3-3 stitches in stockinette stitch, A.1 over the next 9-9-9-10-10-10 stitches, A.2 over the next 19-19-19-21-21-21 stitches, A.3 over the next 10-10-10-11-11-11 stitches, 1-2-3-2-3-3 stitches stockinette stitch and 1 edge stitch in garter stitch. When A.1 to A.3 have been completed in height, work 2 repeats of A.2 in width – choose diagram for your size, over the 38-38-38-42-42-42 stitches in the pattern. When the 2 repeats of A.2 have been completed in height, work A.1, A.2 and A.3 as before over the 38-38-38-42-42-42 stitches with pattern. Continue this pattern upwards, i.e. work alternately in height first A.1, A.2 and A.3 and then A.2 (2 repeats in width). AT THE SAME TIME when the piece measures 9-8-7-7-6-6 cm = 3½"-3⅛"-2¾"-2¾"-2⅜"-2⅜" increase 1 stitch on each side of the piece – read INCREASE TIP (for sleeves). Increase as follows in the different sizes:
Size S: Increase every 8 cm = 3⅛" a total of 5 times.
Size M: Increase alternately every 5 cm = 2" and 6 cm = 2⅜" a total of 7 times.
Size L: Increase alternately every 5 cm = 2" and 6 cm = 2⅜" a total of 7 times.
Size XL: Increase alternately every 4 cm = 1½" and 5 cm = 2" a total of 8 times.
Size XXL Increase every 4 cm = 1½" a total of 9 times.
Size XXXL: Increase every 3 cm = 1⅛" a total of 11 times.
When all the increases are finished there are 52-58-60-64-68-72 stitches on the needle. The new stitches are worked in stockinette stitch.

When the piece measures 45-45-44-42-41-39 cm = 17¾"-17¾"-17¼"-16½"-16⅛"-15¼" (shorter measurements in larger sizes due to wider yoke) continue the pattern as before and bind off stitches for the sleeve cap on the beginning of each row on each side as follows: Bind off 4 stitches 1 time, 2 stitches 2 times, 1 stitch 0-2-2-2-2-4 times, 2 stitches 2-2-4-5-6-5 times and 4 stitches 2-2-1-1-1-1 time = 12-14-16-16-16-20 stitches left. Bind off the remaining stitches. The sleeve measures approx. 52-53-53-52-52-52 cm = 20½"- 21"-21"-20½"-20½"-20½". Work the other sleeve in the same way.

ASSEMBLY:
Sew shoulder seams with grafting stitches. Sew sleeves to body inside the 1edge stitch in garter stitch on body and inside the bind-off edge on sleeves. Make sure that the seam is not tight! Sew sleeve and side seams in one go. Repeat on the other side.

NECK:
Start mid top of shoulder and knit up 74-74-82-82-88-88 stitches with Brushed Alpaca Silk and circular needle size 4 mm = US 6. Work 2 ridges and bind off.

Diagram

All measurements in charts are in cm.

symbols = knit from right side, purl from wrong side
symbols = between 2 stitches make 2 yarn overs; on the next row (from the wrong side) purl the first yarn over and drop the second (there will be a hole)
symbols = knit 2 together
diagram
diagram

Each of our patterns has specific tutorial videos to help you.

Do you have a question? See a list of frequently asked questions (FAQ)

Knitting tension is what determines the final measurements of your work, and is usually measured per 10 x 10 cm. It is provided like so: number of stitches in width x number of rows in height - eg: 19 stitches x 26 rows = 10 x 10 cm.

The knitting tension is very individual; some people knit/crochet loosely while others work tightly. You adjust the knitting tension with the needle size, which is why the suggested needle size only serve as a guide! You need to adjust this (up or down) to ensure that YOUR knitting tension matches the knitting tension provided in the pattern. If you work with a different knitting tension than provided you will have a different yarn consumption, and your work will have different measurements than what the pattern suggests.

The knitting tension also determines which yarns can replace each other. As long as you achieve the same knitting tension you can replace one yarn with another.

See DROPS lesson: How to measure your tension/gauge

See DROPS video: How to make a gauge tension swatch

The required amount of yarn is provided in grams, eg: 450 g. To calculate how many balls you’ll need you first need to know how many grams are in 1 ball (25g, 50g or 100g). This information is available if you click on the individual yarn quality on our pages. Divide the amount required with the amount of each ball. For example, if each ball is 50g (the most common amount), the calculation will be as follows: 450 / 50 = 9 balls.

The important thing when changing from one yarn to another is that the knitting/crochet tension remains the same. This is so that the measurements of the finished piece will be the same as on the sketch provided. It is easier to achieve the same knitting tension using yarns from the same yarn group. It is also possible to work with multiple strands of a thinner yarn to achieve the knitting tension of a thicker one. Please try our yarn converter. We recommend you to always work a test swatch.

Please NOTE: when changing yarn the garment might have a different look and feel to the garment in the photo, due to individual properties and qualities of each yarn.

See DROPS lesson: Can I use a different yarn than the one mentioned in the pattern?

All our yarns are categorised into yarn groups (from A to F) according to thickness and knitting tension – group A contains the thinnest yarns and group F the thickest. This makes it easier for you to find alternative yarns to our patterns, should you wish to switch yarn. All yarns within the same group have a similar knitting tension and can easily replace each other. However, different yarn qualities have different structures and properties which will give the finished work a unique look and feel.

Click here for an overview of the yarns in each yarn group

At the top of all our patterns you’ll find a link to our yarn converter, which is a helpful tool should you wish to use a different yarn than suggested. By filling in the yarn quality you wish to replace, the amount (in your size) and number of strands, the converter will present good alternative yarns with the same knitting tension. Additionally it will tell you how much you’ll require in the new qualities and whether you’ll need to work with multiple strands. Most skeins are 50g (some are 25g or 100g).

If the pattern is worked with multiple colours, every colour will have to be converted separately. Similarly, if the pattern is worked with several strands of different yarns (for example 1 strand Alpaca and 1 strand Kid-Silk) you will have to find alternatives for each, individually.

Click here to see our yarn converter

Since different yarns have different qualities and textures we have chosen to keep the original yarn in our patterns. However, you can easily find options among our available qualities by using our yarn converter, or simply pick a yarn from the same yarn group.

It is possible that some retailers still have discontinued yarns in stock, or that someone has a few skeins at home that they would like to find patterns for.

The yarn converter will provide both alternative yarn as well as required amount in the new quality.

If you think it's hard to decide what size to make, it can be a good idea to measure a garment you own already and like the size of. Then you can pick the size by comparing those measures with the ones available in the pattern's size chart.

You'll find the size chart at the bottom of the pattern.

See DROPS lesson: How to read size chart

The needle size provided in the pattern serves only as a guide, the important thing is to follow the knitting tension. And since knitting tension is very individual, you will have to adjust the needle size to ensure that YOUR tension is the same as in the pattern – maybe you’ll have to adjust 1, or even 2 needle sizes, up or down to achieve the correct tension. For this, we recommend that you work test swatches.

Should you work with a different knitting tension than the one provided, the measurements of the finished garment might deviate from the measurement sketch.

See DROPS lesson: How to measure your tension/gauge

See DROPS video: How to make a gauge tension swatch

Working a garment top-down provides more flexibility and room for personal adjustment. For example it is easier to try the garment on while working, as well as making adjustments to length of yoke and shoulder caps.

The instructions are carefully explaining every step, in the correct order. Diagrams are adjusted to the knitting direction and are worked as usual.

The diagram depicts all rows/rounds, and every stitch seen from the right side. It is read from bottom to top, from right to left. 1 square = 1 stitch.

When working back and forth, every other row is worked from the right side and every other row is worked from the wrong side. When working from the wrong side, the diagram will have to be worked reversed: from left to right, knit stitches are purled, purl stitches are knit etc.

When working in the round every round is worked from the right side and the diagram are worked from right to left on all rounds.

See DROPS lesson: How to read knitting diagrams

The diagram depicts all rows/rounds, and every stitch seen from the right side. It is worked from bottom to top, from right to left.

When working back and forth every other row is worked from the right side: from right to left and every other row is worked from the wrong side: from left to right.

When working in the round, every row in the diagram are worked from the right side, from right to left.

When working a circular diagram you start in the middle and work your way outwards, counter clockwise, row by row.

The rows usually start with a given number of chain stitches (equivalent to the height of the following stitch), this will either be depicted in the diagram or explained in the pattern.

See DROPS lesson: How to read crochet diagrams

Instructions for working several diagrams after each other on the same row/round, will often be written like so: “work A.1, A.2, A.3 a total of 0-0-2-3-4 times". This means you work A.1 once, then A.2 is worked once, and A.3 is repeated (in width) the number of times provided for your size – in this case like so: S = 0 times, M = 0 times, L=2 times, XL= 3 times and XXL = 4 times.

The diagrams are worked as usual: begin with the first row in A.1, then work the first row in A.2 etc.

See DROPS lesson: How to read knitting diagrams

See DROPS lesson: How to read crochet diagrams

The total width of the garment (from wrist-to-wrist) will be larger in the larger sizes, despite the actual sleeves being shorter. The larger sizes have longer sleeve caps and wider shoulders, so there will be a good fit in all sizes.

The measurement sketch/schematic drawing provides information regarding the full length of the garment. If it’s a jumper or a jacket the length is measured from the highest point on the shoulder (usually closest to the neckline), and straight down to the bottom of the garment. It is NOT measured from the tip of shoulder. Similarly, the length of yoke is measured from the highest point on the shoulder and down to where yoke is split into body and sleeves.

See DROPS lesson: How to read a schematic drawing

Diagrams are often repeated on the round or in height. 1 repeat is the diagram the way it appears in the pattern. If it says to work 5 repeats of A.1 in the round, then you work A.1 a total of 5 times after/next to each other in the round. If it says to work 2 repeats of A.1 vertically/in height you work the entire diagram once, then begin again at the start and work the entire diagram one more time.

Chain stitches are slightly narrower than other stitches and to avoid working the cast-on edge too tight, we simply chain more stitches to begin with. The stitch count will be adjusted on the following row to fit the pattern and measurement sketch.

The rib edge is more elastic and will contract slightly compared to, for example, stocking stitch. By increasing before the rib edge, you avoid a visible difference in width between the rib edge and the rest of the body.

It’s very easy to cast off too tightly, and by making yarn overs while casting off (and simultaneously casting these off) you avoid a too tight cast off edge.

See DROPS video: How to bind off with yarn overs (yo)

To achieve an even increase (or decrease) you can increase on, for example: every 3rd and 4th row alternately, like so: work 2 rows and increase on the 3rd row, work 3 rows and increase on the 4th. Repeat this until the increase is complete.

See DROPS lesson: Increase or decrease 1 st on every 3rd and 4th row alternately

Should you prefer to work in the round instead of back and forth, you may of course adjust the pattern. You’ll need to add steeks mid-front (usually 5 stitches), and follow the instructions. When you would normally turn and work from the wrong side, simply work across the steek and continue in the round. At the end you’ll cut the piece open, pick up stitches to work bands, and cover the cut edges.

See DROPS video: How to knit steeks and cut open

Should you prefer to work back and forth instead of in the round, you may of course adjust the pattern so you work the pieces separately and then assemble them at the end. Divide the stitches for the body in 2, add 1 edge stitch in each side (for sewing) and work the front and back pieces separately.

See DROPS lesson: Can I adapt a pattern for circular needles into straight needles?

Pattern repeats can vary slightly in the different sizes, in order to get the correct proportions. If you’re not working the exact same size as the garment in the photo, yours might deviate slightly. This has been carefully developed and adjusted so that the complete impression of the garment is the same in all sizes.

Make sure to follow instructions and diagrams for your size!

If you have found a pattern you like which is available in women’s size it’s not very difficult to convert it to men’s size. The biggest difference will be the length of sleeves and body. Start working on the women size that you think would fit across the chest. The additional length will be worked right before you cast off for the armhole/sleeve cap. If the pattern is worked top-down you can add the length right after the armhole or before the first decrease on sleeve.

Regarding additional yarn amount, this will depend on how much length you add, but it is better with a skein too many than too few.

All yarns will have excess fibres (from production) that might come off as lint or shedding. Brushed yarns (ie hairier yarns) have more of these loose, excess fibres, causing more shedding.

Shedding also depends on what is worn under or over the garment, and whether this pulls at the yarn fibres. It’s therefore not possible to guarantee that there will be no shedding

Below are some tips on how to get the best result when working with hairier yarns:

1. When the garment is finished (before you wash it) shake it vigorously so the looser hairs come off. NOTE: do NOT use a lint roller, brush or any method that pulls at the yarn.

2. Place the garment in a plastic bag and put it in your freezer - the temperature will cause the fibres to become less attached to each other, and excess fibres will come off easier.

3. Leave in the freezer for a few hours before taking it out and shaking it again.

4. Wash the garment according to the instructions on the yarn label.

Pilling is a natural process that happens to even the most exclusive of fibers. It's a natural sign of wear and tear that is hard to avoid, and that is most visible in high friction areas of your garment like a sweater's arms and cuffs.

You can make your garment look as new by removing the pilling, using a fabric comb or a pill/lint remover.

Still can't find the answer you need? Then scroll down and leave your question so one of our experts can try to help you. This will be done normally within 5 to 10 working days.
In the meantime, you can read the questions and answers that others have left to this pattern or join the DROPS Workshop on Facebook to get help from fellow knitters/crocheters!

You might also like...

Footprints in the Sand

Frau Strick Strickt, Germany

Footprints in the Sand

Guðrún Kristín Sveinbjörnsdóttir, Iceland

Footprints

Viktoria, Germany

Post a comment to pattern DROPS 202-3

We would love to hear what you have to say about this pattern!

If you want to leave a question, please make sure you select the correct category in the form below, to speed up the answering process. Required fields are marked *.

Comments / Questions (54)

country flag Merete wrote:

Kan dere lage denne oppskriften som rundstrikk?

24.02.2024 - 14:23

DROPS Design answered:

Hej Merete, vi kan ikke skrive opskriften om ;) ....men det kan du selv gøre, sørg for at rapporten i din størrelse går op i maskeantallet (de 3 mindste størrelser har 19 masker i en rapport) :)

01.03.2024 - 14:13

country flag Myriam Boyer wrote:

I made this jumper and followed the pattern and measurements to the letter. The final result was very disappointing, the body was too short whilst the width was too large. I used the right wool and needles. It is not tje first time that your patterns do not correspond to the size indicated.

08.02.2024 - 18:06

country flag Loredana Cardinale wrote:

Buongiorno, vorrei creare un cardigan con questo modello come posso fare?

27.01.2023 - 13:47

DROPS Design answered:

Buonasera Loredana, purtroppo in questa sede non possiamo adattare i modelli alle singole esigenze: per un'assistenza così personalizzata può rivolgersi al suo rivenditore DROPS di fiducia. Buon lavoro!

28.01.2023 - 23:04

country flag Ms Lucia White wrote:

When doing the twice yarn over as the symbol is on the line does this mean that you knit a stitch before the yarn overs and finish with a knit stitch at the end of the yarn overs. The symbol is on the line and this is confusing. Any help would be appreciated.

05.09.2022 - 19:50

DROPS Design answered:

Dear Mrs White, work diagrams in size S,M,L for example work: (double YO, K1, double YO, K1, double YO, K1, k2 tog, k2 tog, K2 tog) - A.2 = (K2 tog, K2 tog, K2 tog, K1, double YO, K1, double YO,K1, double YO,K1, double YO,K1, double YO,K1, double YO, K1, K2 tog, K2 tog, K2 tog) repeat from (to), A.3=K2 tog, K2 tog, K2 tog, K1, double YO, K1, double YO, K1, double YO, K1, Happy knitting!

06.09.2022 - 09:20

country flag Henriette wrote:

Kan det passe at der skal bruges så lidt garn fleks 5 nøgler af 25 gr til str. s

05.04.2022 - 22:08

DROPS Design answered:

Hej Henriette, ja det stemmer, husk det er et hulmønster :)

08.04.2022 - 08:35

country flag Sab wrote:

Bonjour, J'aimerai tricoter ce pull en rond, donc en supprimant les mailles lisières au pt mousse, cela ne va t'il pas poser problème pour le motif fantaisie lors des diminutions pour les emmanchures ? Même question en ce qui concernes les manches Merci

04.02.2022 - 22:02

DROPS Design answered:

Bonjour Sab, vous pourrez probablement adapter le point fantaisie pour le tricoter en rond, puis, lors des emmanchures, vous rabattrez 2 mailles en moins de chaque côté la 1ère fois (= pas de mailles lisières). Pareil pour les manches, rabattez 2 m en moins . Bon tricot!

07.02.2022 - 08:41

country flag Anne Jolivot wrote:

Bonjour , j'aimerai savoir la taille du modéle qui est en photos pour me donner une idée . Merci d'avance et bonne journée à vous

22.11.2021 - 05:52

DROPS Design answered:

Bonjour Mme Jolivot, le modèle porte probablement soit une taille S soit une taille M, mais pour choisir votre taille, mesurez un pull similaire dont vous aimez la forme et comparez ces mesures à celles du schéma. Retrouvez plus d'infos sur les tailles ici. Bon tricot!

22.11.2021 - 08:47

country flag Pia wrote:

Jeg er i tvivl, om jeg skal strikke en str. L eller XL. Hvordan finder jeg brystvidden i opskriftens størrelser??

18.10.2021 - 15:33

DROPS Design answered:

Hej Pia, du finder målene i måleskitsen nederst i opskriften, her finder du også en video som viser hvordan man bruger måleskitsen :)

21.10.2021 - 09:08

country flag Florence wrote:

Je ne comprends pas en quoi consiste de tricoter 4 motifs de A2 en largeur après avoir tricoté A1 A2 et A3. Doit on faire simplement les 3 diagrammes une seule fois? Que signifie les 4 motifs de A2 en largeur?

20.07.2021 - 16:15

DROPS Design answered:

Bonjour Florence, vous devez tricoter A.1, A.2, A3 et ensuite 4 x A.2. Regardez la lecon DROPS ICI, a voir 'Plusieurs diagrammes tricotés consécutivement sur le rang/tour'. Bon tricot!

20.07.2021 - 21:10

country flag Laura Hansen wrote:

Hej. Er det muligt at strikke denne opskrift rundt på rundpind, istedet for at strikke for- og bagstykke hver for sig?

12.04.2021 - 08:51

DROPS Design answered:

Hej Laura, ja det kan du gøre :)

12.04.2021 - 13:33