
Popular categories
Looking for a yarn?


|
|||||||||||||||||||||||||
Blue Nostalgia |
|||||||||||||||||||||||||
 |
 |
||||||||||||||||||||||||
Knitted sweater with raglan in DROPS Sky. The piece is worked top down with lace pattern on sleeves. Sizes S – XXXL.
DROPS 199-3 |
|||||||||||||||||||||||||
|
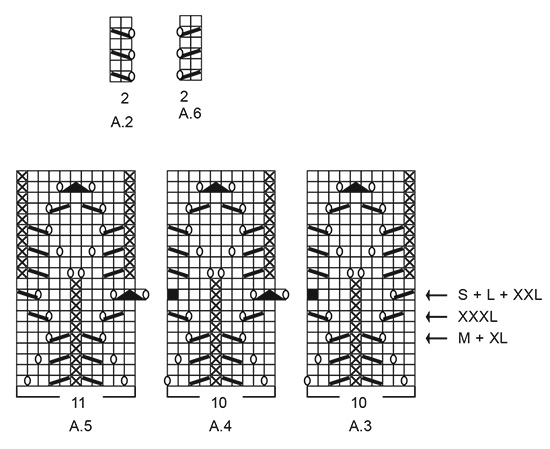
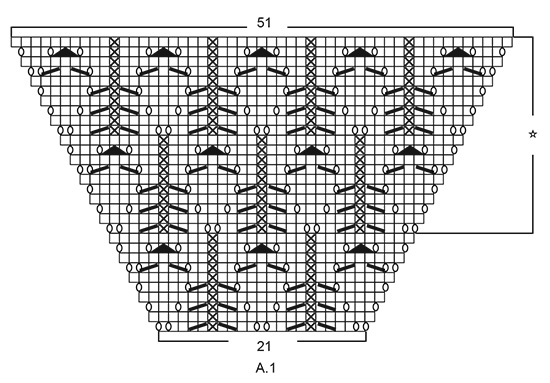
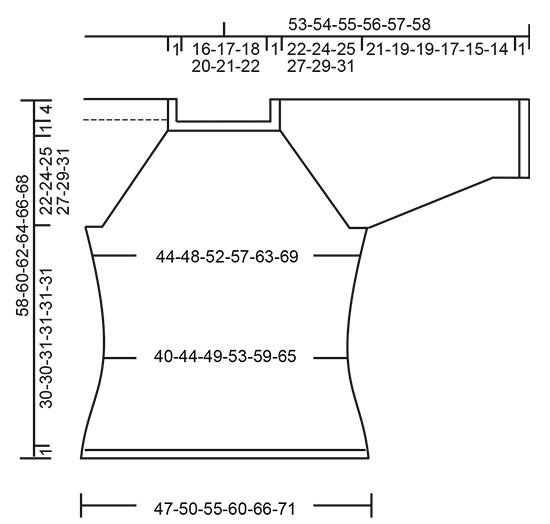
------------------------------------------------------- EXPLANATIONS FOR THE PATTERN: ------------------------------------------------------- RIDGE/GARTER STITCH (worked in the round): 1 ridge in height = 2 rounds; knit 1 round and purl 1 round. INCREASE TIP-1 (evenly spaced): To work out how to increase evenly, count the total number of stitches on the needle (e.g. 100 stitches), and divide by the number of increases to be made (e.g. 10) = 10. In this example, increase by making 1 yarn over after each 10th stitch. On the next round work the yarn overs twisted to avoid holes. PATTERN: See diagrams A.1 to A.6. Find your size in the diagrams (applies to A.3 to A.5). The diagrams show all rows in the pattern seen from the right side. DECREASE TIP (for sides of body and sleeves): Work until there are 3 stitches left before marker thread, knit 2 together, knit 2 (marker thread sits between these stitches), slip 1 stitch, knit 1 and pass the slipped stitch over the knitted stitch. INCREASE TIP-2 (for sides of body): Work until there are 2 stitches left before marker thread, 1 yarn over, knit 4 (marker thread sits in the middle of these stitches), 1 yarn over. On the next round work the yarn overs twisted to avoid holes. Then work the new stitches in stockinette stitch. ------------------------------------------------------- START THE PIECE HERE: ------------------------------------------------------- SWEATER - SHORT OVERVIEW OF THE PIECE: Yoke and body are worked in the round with circular needle from mid back, top down. Sleeves are worked in the round with short circular needle/double pointed needles, top down. YOKE: Cast on 100-106-110-116-120-126 stitches with circular needle size 3.5 mm = US 4 and Sky. Work 2 RIDGES – read description above. Knit 1 round where you increase 10-8-8-10-10-8 stitches evenly spaced – read INCREASE TIP-1 = 110-114-118-126-130-134 stitches. Change to circular needle size 4 mm = US 6. Knit 1 round. The next round is worked as follows: Work stockinette stitch over the first 15-16-17-19-20-21 stitches (= half back piece), 1 yarn over, 2 stitches in stockinette stitch, work A.1 over 21 stitches (= sleeve), 2 stitches in stockinette stitch, 1 yarn over, work 30-32-34-38-40-42 stitches in stockinette stitch (= front piece), 1 yarn over, 2 stitches stockinette stitch, work A.1 over 21 stitches (= sleeve), 2 stitches in stockinette stitch, 1 yarn over, work stockinette stitch over the last 15-16-17-19-20-21 stitches (= half back piece). There are now 118-122-126-134-138-142 stitches on the needle. Continue this pattern onwards; i.e. on the sleeves increase on each side as shown in A.1. On the next round knit the yarn overs (= holes) and the increased stitches are worked into the pattern as you go as shown in A.1. On front and back pieces increase with yarn overs before/after the 2 stitches in stockinette stitch in each side (there will be 2 stitches stockinette stitch between each raglan increase). On the next round knit the yarn overs twisted (= no holes) and the increased stitches are worked in stockinette stitch. Increase like this every 2nd round. You increase a total of 8 stitches on each increase-round (= 4 yarn overs + 4 stitches increased in A.1). REMEMBER THE KNITTING GAUGE! When A.1 has been worked 1 time in height there are 230-234-238-246-250-254 stitches on the needle. Continue this pattern onwards, i.e. the pattern repeats itself as shown in A.1. Each time you have worked 20 rounds there will be room for 1 more repeat of lace pattern in width on each sleeve. When you have increased a total of 24-27-29-32-34-38 times there are 302-330-350-382-402-438 stitches on the needle and the piece measures 18-20-22-24-25-28 cm = 7"-8"-8¾"-9½"-9¾"-11" from the cast-on edge mid front. Continue with stockinette stitch and pattern as before, but without increasing; i.e. the 69-75-79-85-89-97 stitches in A.1 are worked as follows: Work A.2 (= 2 stitches), 2-0-2-0-2-1 stitches in stockinette stitch, starting on the round marked with an arrow for your size work A.3 (= 10 stitches), A.4 over the next 40-50-50-60-60-70 stitches (= 4-5-5-6-6-7 reports of 10 stitches), A.5 (= 11 stitches), 2-0-2-0-2-1 stitches in stockinette stitch and A.6 (= 2 stitches). Continue until the piece measures approx. 23-25-26-28-30-32 cm = 9"-9¾"-10¼"-11"-11¾"-12½" from the cast-on edge mid front. The next round is worked as follows: Work 41-45-49-54-59-65 stitches in stockinette stitch (= half back piece), place the next 69-75-77-83-83-89 stitches on 1 thread for sleeve, cast on 10-10-12-12-14-14 new stitches on the needle (= in side under sleeve), work 82-90-98-108-118-130 stitches stockinette stitch (= front piece), place the next 69-75-77-83-83-89 stitches on 1 thread for sleeve, cast on 10-10-12-12-14-14 new stitches on the needle (= in side under sleeve) and work the remaining 41-45-49-54-59-65 stitches in stockinette stitch (= half back piece). Body and sleeves are finished separately. THE PIECE IS NOW MEASURED FROM HERE! BODY: = 184-200-220-240-264-288 stitches. Insert 1 marker thread on each side in the middle of the 10-10-12-12-14-14 stitches cast on under each sleeve. Allow them to follow your work onwards; they will be used a little later when decreasing/increasing. Work stockinette stitch. When the piece measures 2 cm = ¾" from the division decrease 1 stitch on each side of both marker threads - read DECREASE TIP = 4 stitches decreased. Decrease like this every 3 cm = 1⅛" a total of 4 times = 168-184-204-224-248-272 stitches. Continue working until the piece measures 14 cm = 5½" from the division. Now increase 1 stitch on each side of both marker threads – read INCREASE TIP-2 = 4 stitches increased. Increase like this every 2 cm = ¾" a total of 7 times = 196-212-232-252-276-300 stitches. Continue working until the piece measures 30-30-31-31-31-31 cm = 11¾"-11¾"-12¼"-12¼"-12¼"-12¼" from the division. Change to circular needle size 3.5 mm = US 4 and work 2 ridges. Loosely bind off, but to avoid the bind-off edge being tight you can bind off with needle size 4 mm = US 6. The sweater measures approx. 58-60-62-64-66-68 cm = 22¾"-23⅝"-24⅜"-25¼"-26"-26¾" from the shoulder down. SLEEVE: Place the 69-75-77-83-83-89 stitches from the thread on the one side of the piece on short circular needle/double pointed needles size 4 mm = US 6 and knit up 1 stitch in each of the 10-10-12-12-14-14 stitches cast on under the sleeve = 79-85-89-95-97-103 stitches. Insert 1 marker thread in the middle of the 10-10-12-12-14-14 stitches cast on under the sleeve and allow it to follow your work onwards; it will be used a little later when decreasing. Start the round at the marker thread. Start on the correct round in the diagrams so that the pattern continues from the yoke and work as follows: Work 4-2-4-2-3-1 stitches in stockinette stitch, A.3 (= 10 stitches), A.4 over the next 50-60-60-70-70-80 stitches (= 5-6-6-7-7-8 repeats of 10 stitches), A.5 (= 11 stitches) and 4-2-4-2-3-1 stitches in stockinette stitch. Continue this pattern. When the piece measures 2 cm = ¾" from the division, decrease 2 stitches mid under sleeve – remember DECREASE TIP. Decrease like this every 3rd-3rd-3rd-2nd-2nd-2nd round a total of 14-15-15-16-15-16 times = 51-55-59-63-67-71 stitches. The stitches which do not fit into the pattern as you decrease are worked in stockinette stitch, but make sure that if decreases are in the pattern you also make a yarn over. Continue working until the piece measures 21-19-19-17-15-14 cm = 8¼"-7½"-7½"-6¾"-6"-5½" from the division (shorter measurements in larger sizes due to longer yoke). Change to double pointed needles size 3.5 mm = US 4 and work 2 ridges. Loosely bind off, but to avoid the bind-off edge being tight you can bind off with needle size 4 mm = US 6. Sleeve measures approx. 22-20-20-18-16-15 cm = 8¾"-8"-8"-7"-6¼"-6" from the division. Work the other sleeve in the same way. |
|||||||||||||||||||||||||
Diagram explanations |
|||||||||||||||||||||||||
|
|||||||||||||||||||||||||
|
|||||||||||||||||||||||||
|
|||||||||||||||||||||||||
|
|||||||||||||||||||||||||
|
Have you made this or any other of our designs? Tag your pictures in social media with #dropsdesign so we can see them! Do you need help with this pattern?You'll find tutorial videos, a Comments/Questions area and more by visiting the pattern on garnstudio.com. © 1982-2024 DROPS Design A/S. We reserve all rights. This document, including all its sub-sections, has copyrights. Read more about what you can do with our patterns at the bottom of each pattern on our site. |
|||||||||||||||||||||||||


With over 40 years in knitting and crochet design, DROPS Design offers one of the most extensive collections of free patterns on the internet - translated to 17 languages. As of today we count 304 catalogs and 11422 patterns - 11417 of which are translated into English (US/in).
We work hard to bring you the best knitting and crochet have to offer, inspiration and advice as well as great quality yarns at incredible prices! Would you like to use our patterns for other than personal use? You can read what you are allowed to do in the Copyright text at the bottom of all our patterns. Happy crafting!
Comments / Questions (119)
Je suis rendue a diviser les manches et le corps . J’ai 97 mailles pour les manches et je dois mettre en attente 89 mailles. Est-ce que je transfère A2 sur le devant et A6 sur le dos? Merci
16.12.2023 - 17:36DROPS Design answered:
Bonjour Hélène, les 4 premières mailles de la manche et les 4 dernières mailles de la manche vont être attribuées au dos/devant et seront donc tricotées en jersey, ainsi, vous avez bien le bon nombre de mailles pour chaque pièce. Bon tricot!
18.12.2023 - 08:30Ohje on hankala ja monimutkainen. Kun olin neulonut A1 loppuun, muuttui ohje ihan käsittämättömäksi. Tein neuleen valmiiksi maalaisjärjelläni.
06.11.2023 - 15:51Olen nyt neulonut kertaalleen A1:n. Mutta en ymmärrä, mitä tarkoittaa, että jatka samaan tapaan, kunnes silmukoita on ( L- koko) 350. Mitä kohtaa katson kuviosta A1? Siinähän on alussa 21 silmukkaa ja olen nyt 51 silmukassa.
26.10.2023 - 15:56DROPS Design answered:
Hei, piirrosten A.1 mallikerrat neulotaan toistensa yläpuolella. Eli aloita 1.kerros piirroksen A.1 edellisen kerroksen yläpuolella ja neulo piirroksen mukaan kuten aiemmin. Kerroksen uudet mallikerrat ovat kerroksen alussa ja lopussa.
02.11.2023 - 17:24Bonjour, merci pour votre réponse, mais ce n'est toujours pas clair pour moi. Vous décrivez comment commencer au marqueur mais quand je commence mon tricot je suis 5 mailles après puisque je viens de relever les mailles, je dois donc déduire ces 5 mailles de votre explication?
10.10.2023 - 10:47DROPS Design answered:
Bonjour Lucie, relevez les mailles sans les tricoter, ce sera ainsi plus simple de commencer au milieu de ces 10 mailles. Bonne continuation!
10.10.2023 - 16:18Bonsoir, j’en suis aux manches : je ne comprends pas comment commencer mon tour au fil marqueur au milieu des 10 mailles relevées , alors que je suis déjà 5 mailles après (puisque je viens de relever les 10 mailles). Pouvez-vous m’aider?
09.10.2023 - 22:18DROPS Design answered:
Bonjour, Il suffit de placer ce marqueur au milieu des 10 mailles relevées. Les noveaux tours commenceront au marqueur. Bon tricot!
10.10.2023 - 09:02Ho difficoltà a interpretare la prima riga delllo schema A1. Io lo leggo così: * 2 gett., 2 dritti, diminuzione, 1 rovescio, dimin., 2 dritti *, ripetere 1 volta da * a * finire con 2 gett. Totale 20 maglie. Dove ho "perso" la 21ma maglia? Grazie
29.09.2023 - 21:38DROPS Design answered:
Buongiorno Paola, in mezzo ai due gettati iniziali e finali c'è una maglia diritto. Buon lavoro!
30.09.2023 - 12:36Hallo, ich bin jetzt an folgenden Punkt in der Anleitung angelangt: Weiter glatt rechts und im Muster wie zuvor stricken, jedoch ohne Zunahmen. Bedeutet dies (ohne Zunahmen), dass ab diesen Abschnitt keine Raglanzunahmen mehr gestrickt werden? Danke!!!
30.05.2023 - 14:04DROPS Design answered:
Liebe Evelyn, ja genau, die Ärmel stricken Sie mit Lochmuster wie zuvor und Vorder- + Rückenteil stricken Sie glatt rechts wie zuvor, aber Zunahmen sind jetzt fertig - Ärmel stricken Sie wie im nächstren Satz beschrieben, bis die Arbeit die gewünschte Länge misst. Viel Spaß beim stricken!
30.05.2023 - 16:09Hej, stickar just nu Blue Nostalgia i L. När man kommer till den del där man slutar med ökningar, så står det i beskrivn att man stickar över A1 - sticka A2(=2 maskor), 2 maskor slätstickn i min storl. Därefter sticka A3, A4, A5, 2 mask slätst o A6. Maskantalet stämmer inte med mönstret när jag stickar vidare. Får ju mindre maskor i början o slutet. Ska jag göra ett omslag som det var i början på arbetet. (Samma fråga som Eva 10.02.2023)
26.04.2023 - 11:46DROPS Design answered:
Hej Marica, du har 79 m i A.1 som stickas så här: Sticka A.2 (= 2 m), 2 m slät börja på varvet markerat med pil i din storlek och sticka A.3 (= 10 m), A.4 över de nästa 50 m (= 5rapporter à 10 m), A.5 (= 11 m), 2 m slät och A.6 (= 2 m). 2+2+10+50+11+2+2=79m
26.04.2023 - 15:19Which, how and where do 1 add the repeat pattern after I am finished with the A1. "Continue this pattern onwards, i.e. the pattern repeats itself as shown in A.1. Each time you have worked 20 rounds there will be room for 1 more repeat of lace pattern in width on each sleeve."
24.04.2023 - 03:57DROPS Design answered:
Hi Jennifer, The repeats of A.1 are above each other, so start row 1 above the last row in A.1 and work the same stitches. The new repeats in width will be at the end/beginning of the round. Happy knitting!
24.04.2023 - 06:45Which, how and where do 1 add the repeat pattern after I am finished with the A1. "Continue this pattern onwards, i.e. the pattern repeats itself as shown in A.1. Each time you have worked 20 rounds there will be room for 1 more repeat of lace pattern in width on each sleeve."
24.04.2023 - 03:55DROPS Design answered:
Dear Mrs Carvalho, when A.1 is done in height, continue the part framed with a star increasing at the beginning of A.1 as on the right side of A.1, repeat lace pattern and finish diagram as shown on the left side of diagram. Happy knitting!
24.04.2023 - 10:25