DROPS Sky
DROPS Sky
74% Alpaca, 18% Polyamide, 8% Wool
from 5.10 £ /50g
Get the yarn to make this pattern from 25.50£.

The yarn cost is calculated from the pattern’s smallest size and the yarn’s cheapest product type. Looking for an even better price? You might find it on the DROPS Deals!

DROPS SS24

Raspberry Delight

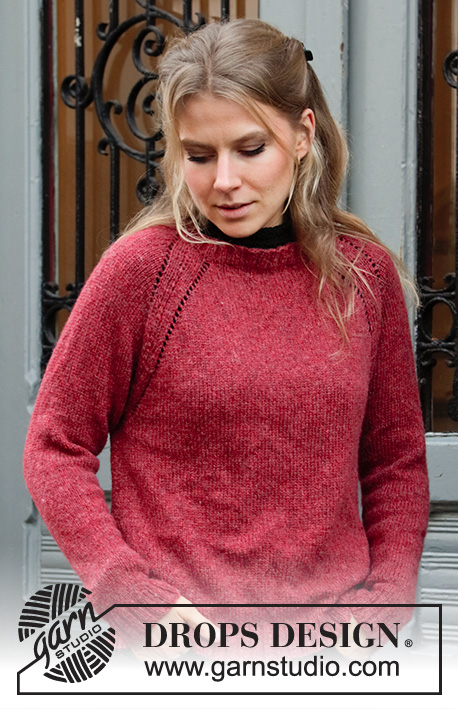
Knitted jacket with raglan in DROPS Sky. The piece is worked top down. Sizes S - XXXL.

DROPS 197-22
DROPS Design: Pattern no sk-014
Yarn group B
-------------------------------------------------------

Sizes: S - M - L - XL - XXL - XXXL
Materials:
DROPS SKY from Garnstudio (belongs to yarn group B)
250-300-300-350-400-400 g colour 09, brick red

-------------------------------------------------------
ACCESSORIES FOR THE PIECE:

KNITTING TENSION:
20 stitches in width and 26 rows in height with stocking stitch = 10 x 10 cm.

NEEDLES:
DROPS DOUBLE POINTED NEEDLES SIZE 4.5 MM.
DROPS CIRCULAR NEEDLE SIZE 4.5 MM: length 40 cm and 80 cm for stocking stitch.
DROPS DOUBLE POINTED NEEDLES SIZE 3.5 MM.
DROPS CIRCULAR NEEDLE SIZE 3.5 MM: length 80 cm for rib.
The needle size is only a guide. If you get too many stitches on 10 cm, change to a larger needle size. If you get too few stitches on 10 cm, change to a smaller needle size.

DROPS MOTHER OF PEARL BUTTONS, Round (red) NO 610: 6-6-6-7-7-7 items.

-------------------------------------------------------

-------------------------------------------------------

Alternative Yarn – See how to change yarns here
Yarn Groups A to F – Use the same pattern and change the yarn here
Yarn usage using an alternative yarn – Use our yarn converter here

-------------------------------------------------------

DROPS Sky
DROPS Sky
74% Alpaca, 18% Polyamide, 8% Wool
from 5.10 £ /50g
Get the yarn to make this pattern from 25.50£.

The yarn cost is calculated from the pattern’s smallest size and the yarn’s cheapest product type. Looking for an even better price? You might find it on the DROPS Deals!

Pattern instructions

NOTE: This pattern is written in British English. All measurements in charts are in cm. For conversion from cm to inches - click here. There are different terms for crocheting in British and American English. If this pattern includes crochet, click for "crochet terms" here. For this pattern in American English, please click here.
EXPLANATIONS FOR THE PATTERN:

-------------------------------------------------------

RIDGE/GARTER STITCH (worked back and forth):
1 ridge = Knit 2 rows.

INCREASE TIP (evenly spaced):
All increases are made from the right side!
To work out how to increase evenly, count the total number of stitches on the needle (e.g. 108 stitches) minus the bands (e.g. 10 stitches) and divide the remaining stitches by the number of increases to be made (e.g. 10) = 9.8.
In this example, increase by making 1 yarn over after approx. each 10th stitch. On the next row (the wrong side) purl the yarn overs twisted to avoid holes.

ELEVATION (back of neck):
Skip this section if you do not want an elevation.
Insert 1 marker in the middle of the row = mid back. Start from the right side and knit 9-10-11-12-13-14 stitches past the marker, turn, tighten the strand and purl 18-20-22-24-26-28 stitches, turn, tighten the strand and knit 27-30-33-36-39-42 stitches, turn, tighten the strand and purl 36-40-44-48-52-56 stitches, turn, tighten the strand and knit 45-50-55-60-65-70 stitches, turn, tighten the strand and purl to end of row (band is worked in garter stitch). Then work YOKE as described in the text.

RAGLAN:
All increases made from the right side!
Increase to raglan in each transition between body and sleeves as follows: Work until there are 3 stitches left before the marker thread, make 1 yarn over, knit 6 stitches (the marker thread sits in the middle of these 6 stitches), make 1 yarn over (= 2 stitches increased). On the next row (wrong side) purl the yarn overs to leave holes. Then work the new stitches in stocking stitch. You increase a total of 8 stitches on each increase row.

PATTERN (applies to raglan line):
See diagram A.1. The diagram shows all the rows in the pattern seen from the right side.

DECREASE TIP (for mid under sleeves): 
Decrease 1 stitch on each side of the marker thread as follows: Work until there are 3 stitches left before the marker thread, knit 2 together, knit 2 (the marker thread sits in the middle of these 2 stitches), slip 1 stitch as if to knit, knit 1 and pass the slipped stitch over the knitted stitch (= 2 stitches decreased).

BUTTONHOLES (top down):
Work buttonholes on right band. 1 BUTTONHOLE = Knit from the right side until there are 3 stitches left on the row, make 1 yarn over, knit 2 together and knit the last stitch. On the next row (wrong side) knit the yarn over to leave a hole.
The first buttonhole is worked when the neck measures approx. 1½ cm. Then work the next 5-5-5-6-6-6 buttonholes with approx. 8-8½-9-8-8-8½ cm between each.

-------------------------------------------------------

START THE PIECE HERE:

-------------------------------------------------------

JACKET - SHORT OVERVIEW OF THE PIECE:
Neck, yoke and body are worked back and forth with circular needle from mid front, top down.
After the neck, you can work an elevation in the back of the neck for a better fit; the yoke will then be slightly higher at the back. This elevation can be left out; the neck is then the same front and back – see description in text. The sleeves are worked in the round with short circular needle/double pointed needles, top down.

NECK:
Cast on 108-112-116-124-128-132 stitches (including 5 band stitches in each side towards mid front) with circular needle size 3.5 mm and Sky, Purl 1 row (= wrong side). The next row is worked as follows from the right side: 5 band stitches in GARTER STITCH – read description above, * knit 2, purl 2 *, work from *-* until there are 7 stitches left on the row, knit 2 and finish with 5 band stitches in garter stitch. Continue the rib like this for 3 cm – remember BUTTONHOLES on right band – read description above.
Knit 1 row from the right side where you increase 10-14-10-14-10-14 stitches evenly on row – read INCREASE TIP = 118-126-126-138-138-146 stitches. Change to circular needle size 4.5 mm. Purl 1 row from the wrong side (bands are worked in garter stitch).
You can now work an ELEVATION in back of neck – read description above, or go straight to YOKE.

YOKE:
Insert 4 marker threads in the piece as follows (without working the stitches): First marker thread is inserted after the first 25-26-27-28-29-30 stitches (= front piece), 2nd marker thread is inserted after the next 14-16-14-18-16-18 stitches (= sleeve), 3rd marker thread is inserted after the next 40-42-44-46-48-50 stitches (= back piece) and 4th marker thread is inserted after the next 14-16-14-18-16-18 stitches (= sleeve). There are 25-26-27-28-29-30 stitches left after the last marker thread (= front piece).
Continue with stocking stitch and 5 band stitches in garter stitch in each side towards mid front. AT THE SAME TIME on the first row from the right side increase to RAGLAN in each transition between body and sleeves – read description above. Continue increasing to raglan every 2nd row (i.e. every row from the right side) until you have increased a total of 22-25-28-30-33-35 times on each side of the 4 marker threads. After the last increase, there are 294-326-350-378-402-426 stitches on the needle.
Continue working without increasing until the piece measures 23-25-27-28-30-32 cm from the cast-on edge mid front, but to allow the row of holes to continue along the raglan line after the increases are finished, work A.1 in each transition between body and sleeves until the yoke is finished (the marker threads on the raglan line sit in the middle of A.1).
The next row is worked as follows from the right side: Knit 51-55-58-63-68-73 stitches (= front piece), place the next 50-58-64-68-70-72 stitches on 1 thread for sleeve, cast on 8-8-10-10-12-14 new stitches on the needle (= in side under sleeve), knit 92-100-106-116-126-136 stitches (= back piece), place the next 50-58-64-68-70-72 stitches on 1 thread for sleeve, cast on 8-8-10-10-12-14 new stitches on the needle (= in side under sleeve), and knit the remaining 51-55-58-63-68-73 stitches (= front piece). Body and sleeves are finished separately. THE PIECE IS NOW MEASURED FROM HERE!

BODY:
= 210-226-242-262-286-310 stitches. Continue with stocking stitch and 5 band stitches in garter stitch in each side (first row from wrong side).
When the piece measures 23 cm from the division in all sizes, knit 1 row from the right side where you increase 42-42-46-50-54-62 stitches evenly on row – remember INCREASE TIP = 252-268-288-312-340-372 stitches.
Change to circular needle size 3.5 mm. The next row is worked as follows from the wrong side: 5 band stitches in garter stitch, * purl 2, knit 2 *, work from *-* until there are 7 stitches left on the row, purl 2 and finish with 5 band stitches in garter stitch. Continue the rib like this for 4 cm. Loosely cast off with garter stitch over garter stitch, knit over knit and purl over purl, but to avoid the cast-off edge being tight you can cast off with size 4.5 mm needle. The jacket measures approx. 54-56-58-60-62-64 cm from the shoulder down.

SLEEVE:
Place the 50-58-64-68-70-72 stitches from the thread on the one side of the piece on short circular needle or double pointed needles size 4.5 mm and knit up 1 stitch in each of the 8-8-10-10-12-14 stitches cast on under the sleeve = 58-66-74-78-82-86 stitches. Insert 1 marker thread in the middle of the 8-8-10-10-12-14 stitches under the sleeve and start the round here. Work stocking stitch in the round. When the piece measures 2-3-3-3-3-3 cm from the division, decrease 2 stitches mid under sleeve – read DECREASE TIP. Decrease like this every 4-2½-2-2-1½-1½ cm a total of 10-13-16-17-18-19 times = 38-40-42-44-46-48 stitches. Continue working until the sleeve measures 39-38-36-36-35-33 cm from the division (shorter measurements in larger sizes due to longer yoke). Knit 1 round where you increase 6-4-6-8-6-8 stitches evenly on round = 44-44-48-52-52-56 stitches. Change to double pointed needles size 3.5 mm and work rib in the round (= knit 2 / purl 2) for 5 cm. Loosely cast off with knit over knit and purl over purl, but to avoid the cast-off edge being tight you can cast off with size 4.5 mm needles. The sleeve measures approx. 44-43-41-41-40-38 cm from the division. Work the other sleeve in the same way.

ASSEMBLY:
Sew buttons onto left band.

Diagram

symbols = knit from right side, purl from wrong side
symbols = between 2 stitches make 1 yarn over
symbols = knit 2 together
symbols = slip 1 stitch as if to knit, knit 1, and pass the slipped stitch over the knitted stitch
diagram

Each of our patterns has specific tutorial videos to help you.

Do you have a question? See a list of frequently asked questions (FAQ)

Knitting tension is what determines the final measurements of your work, and is usually measured per 10 x 10 cm. It is provided like so: number of stitches in width x number of rows in height - eg: 19 stitches x 26 rows = 10 x 10 cm.

The knitting tension is very individual; some people knit/crochet loosely while others work tightly. You adjust the knitting tension with the needle size, which is why the suggested needle size is only meant as a guide! You need to adjust this (up or down) to ensure that YOUR knitting tension matches the knitting tension provided in the pattern. If you work with a different knitting tension than provided you will have a different yarn consumption, and your work will have different measurements than what the pattern suggests.

The knitting tension also determines which yarns can replace each other. As long as you achieve the same knitting tension you can replace one yarn with another.

See DROPS lesson: How to measure your tension/gauge

See DROPS video: How to make a gauge tension swatch

The required amount of yarn is provided in grams, eg: 450 g. To calculate how many balls you’ll need you first need to know how many grams are in 1 ball (25g, 50g or 100g). This information is available if you click on the individual yarn quality on our pages. Divide the amount required with the amount of each ball. For example, if each ball is 50g (the most common amount), the calculation will be as follows: 450 / 50 = 9 balls.

The important thing when changing from one yarn to another is that the knitting/crochet tension remains the same. This is so that the measurements of the finished piece will be the same as on the sketch provided. It is easier to achieve the same knitting tension using yarns from the same yarn group. It is also possible to work with multiple strands of a thinner yarn to achieve the knitting tension of a thicker one. Please try our yarn converter. We recommend you to always work a test swatch.

Please NOTE: when changing yarn the garment might have a different look and feel to the garment in the photo, due to individual properties and qualities of each yarn.

See DROPS lesson: Can I use a different yarn than the one mentioned in the pattern?

All our yarns are categorised into yarn groups (from A to F) according to thickness and knitting tension – group A contains the thinnest yarns and group F the thickest. This makes it easier for you to find alternative yarns to our patterns, should you wish to switch yarn. All yarns within the same group have a similar knitting tension and can easily replace each other. However, different yarn qualities have different structures and properties which will give the finished work a unique look and feel.

Click here for an overview of the yarns in each yarn group

At the top of all our patterns you’ll find a link to our yarn calculator, which is a helpful tool should you wish to use a different yarn than suggested. By filling in the yarn quality you wish to replace, the amount (in your size) and number of strands, the calculator will present good alternative yarns with the same knitting tension. Additionally it will tell you how much you’ll require in the new qualities and whether you’ll need to work with multiple strands. Most skeins are 50g (some are 25g or 100g).

If the pattern is worked with multiple colours, every colour will have to be calculated separately. Similarly, if the pattern is worked with several strands of different yarns (for example 1 strand Alpaca and 1 strand Kid-Silk) you will have to find alternatives for each, individually.

Click here to see our yarn calculator

Since different yarns have different qualities and textures we have chosen to keep the original yarn in our patterns. However, you can easily find options among our available qualities by using our yarn calculator, or simply pick a yarn from the same yarn group.

It is possible that some retailers still have discontinued yarns in stock, or that someone has a few skeins at home that they would like to find patterns for.

The yarn calculator will provide both alternative yarn as well as required amount in the new quality.

If you think it's hard to decide what size to make, it can be a good idea to measure a garment you own already and like the size of. Then you can pick the size by comparing those measures with the ones available in the pattern's size chart.

You'll find the size chart at the bottom of the pattern.

See DROPS lesson: How to read size chart

The needle size provided in the pattern serves only as a guide, the important thing is to follow the knitting tension. And since knitting tension is very individual, you will have to adjust the needle size to ensure that YOUR tension is the same as in the pattern – maybe you’ll have to adjust 1, or even 2 needle sizes, up or down to achieve the correct tension. For this, we recommend that you work test swatches.

Should you work with a different knitting tension than the one provided, the measurements of the finished garment might deviate from the measurement sketch.

See DROPS lesson: How to measure your tension/gauge

See DROPS video: How to make a tension/gauge swatch

Working a garment top-down provides more flexibility and room for personal adjustment. For example it is easier to try the garment on while working, as well as making adjustments to length of yoke and shoulder caps.

The instructions are carefully explaining every step, in the correct order. Diagrams are adjusted to the knitting direction and are worked as usual.

The diagram depicts all rows/rounds, and every stitch seen from the right side. It is read from bottom to top, from right to left. 1 square = 1 stitch.

When working back and forth, every other row is worked from the right side and every other row is worked from the wrong side. When working from the wrong side, the diagram will have to be worked reversed: from left to right, knit stitches are purled, purl stitches are knit etc.

When working in the round every round is worked from the right side and the diagram are worked from right to left on all rounds.

See DROPS lesson: How to read knitting diagrams

The diagram depicts all rows/rounds, and every stitch seen from the right side. It is worked from bottom to top, from right to left.

When working back and forth every other row is worked from the right side: from right to left and every other row is worked from the wrong side: from left to right.

When working in the round, every row in the diagram are worked from the right side, from right to left.

When working a circular diagram you start in the middle and work your way outwards, counter clockwise, row by row.

The rows usually start with a given number of chain stitches (equivalent to the height of the following stitch), this will either be depicted in the diagram or explained in the pattern.

See DROPS lesson: How to read crochet diagrams

Instructions for working several diagrams after each other on the same row/round, will often be written like so: “work A.1, A.2, A.3 a total of 0-0-2-3-4 times". This means you work A.1 once, then A.2 is worked once, and A.3 is repeated (in width) the number of times provided for your size – in this case like so: S = 0 times, M = 0 times, L=2 times, XL= 3 times and XXL = 4 times.

The diagrams are worked as usual: begin with the first row in A.1, then work the first row in A.2 etc.

See DROPS lesson: How to read knitting diagrams

See DROPS lesson: How to read crochet diagrams

The total width of the garment (from wrist-to-wrist) will be larger in the larger sizes, despite the actual sleeves being shorter. The larger sizes have longer sleeve caps and wider shoulders, so there will be a good fit in all sizes.

The measurement sketch/schematic drawing provides information regarding the full length of the garment. If it’s a jumper or a jacket the length is measured from the highest point on the shoulder closest to the neckline, and straight down to the bottom of the garment. It is NOT measured from the tip of shoulder. Similarly, the length of yoke is measured from the highest point on the shoulder and down to where yoke is split into body and sleeves.

On a jacket measures are never taken along bands, unless specifically stated. Always measure inside band stitches when measuring the length.

See DROPS lesson: How to read a schematic drawing

Diagrams are often repeated on the round or in height. 1 repeat is the diagram the way it appears in the pattern. If it says to work 5 repeats of A.1 in the round, then you work A.1 a total of 5 times after/next to each other in the round. If it says to work 2 repeats of A.1 vertically/in height you work the entire diagram once, then begin again at the start and work the entire diagram one more time.

Chain stitches are slightly narrower than other stitches and to avoid working the cast-on edge too tight, we simply chain more stitches to begin with. The stitch count will be adjusted on the following row to fit the pattern and measurement sketch.

The rib edge is more elastic and will contract slightly compared to, for example, stocking stitch. By increasing before the rib edge, you avoid a visible difference in width between the rib edge and the rest of the body.

It’s very easy to cast off too tightly, and by making yarn overs while casting off (and simultaneously casting these off) you avoid a too tight cast off edge.

See DROPS video: How to bind off with yarn overs (yo)

To achieve an even increase (or decrease) you can increase on, for example: every 3rd and 4th row alternately, like so: work 2 rows and increase on the 3rd row, work 3 rows and increase on the 4th. Repeat this until the increase is complete.

See DROPS lesson: Increase or decrease 1 st on every 3rd and 4th row alternately

Should you prefer to work in the round instead of back and forth, you may of course adjust the pattern. You’ll need to add steeks mid-front (usually 5 stitches), and follow the instructions. When you would normally turn and work from the wrong side, simply work across the steek and continue in the round. At the end you’ll cut the piece open, pick up stitches to work bands, and cover the cut edges.

See DROPS video: How to knit steeks and cut open

Should you prefer to work back and forth instead of in the round, you may of course adjust the pattern so you work the pieces separately and then assemble them at the end. Divide the stitches for the body in 2, add 1 edge stitch in each side (for sewing) and work the front and back pieces separately.

See DROPS lesson: Can I adapt a pattern for circular needles into straight needles?

Pattern repeats can vary slightly in the different sizes, in order to get the correct proportions. If you’re not working the exact same size as the garment in the photo, yours might deviate slightly. This has been carefully developed and adjusted so that the complete impression of the garment is the same in all sizes.

Make sure to follow instructions and diagrams for your size!

If you have found a pattern you like which is available in women’s size it’s not very difficult to convert it to men’s size. The biggest difference will be the length of sleeves and body. Start working on the women size that you think would fit across the chest. The additional length will be worked right before you cast off for the armhole/sleeve cap. If the pattern is worked top-down you can add the length right after the armhole or before the first decrease on sleeve.

Regarding additional yarn amount, this will depend on how much length you add, but it is better with a skein too many than too few.

All yarns will have excess fibres (from production) that might come off as lint or shedding. Brushed yarns (ie hairier yarns) have more of these loose, excess fibres, causing more shedding.

Shedding also depends on what is worn under or over the garment, and whether this pulls at the yarn fibres. It’s therefore not possible to guarantee that there will be no shedding

Below are some tips on how to get the best result when working with hairier yarns:

1. When the garment is finished (before you wash it) shake it vigorously so the looser hairs come off. NOTE: do NOT use a lint roller, brush or any method that pulls at the yarn.

2. Place the garment in a plastic bag and put it in your freezer - the temperature will cause the fibres to become less attached to each other, and excess fibres will come off easier.

3. Leave in the freezer for a few hours before taking it out and shaking it again.

4. Wash the garment according to the instructions on the yarn label.

Pilling is a natural process that happens to even the most exclusive of fibers. It's a natural sign of wear and tear that is hard to avoid, and that is most visible in high friction areas of your garment like a sweater's arms and cuffs.

You can make your garment look as new by removing the pilling, using a fabric comb or a pill/lint remover.

Still can't find the answer you need? Then scroll down and leave your question so one of our experts can try to help you. This will be done normally within 5 to 10 working days.
In the meantime, you can read the questions and answers that others have left to this pattern or join the DROPS Workshop on Facebook to get help from fellow knitters/crocheters!

You might also like...

Post a comment to pattern DROPS 197-22

We would love to hear what you have to say about this pattern!

If you want to leave a question, please make sure you select the correct category in the form below, to speed up the answering process. Required fields are marked *.

Comments / Questions (7)

country flag Marica wrote:

Salve , il diagramma mostra che bisogna fare un gettato e poi una diminuzione a 3 m dal marker, e quindi il n di m resta invariato, e allora l’aumento dei raglan dove si fa? E se deve essere aggiunto perché non fare un gettato e basta?

04.05.2022 - 05:31

DROPS Design answered:

Buonasera Marica, gli aumenti per il raglan si lavorano in ogni punto di passaggio tra il raglan e il corpo: deve seguire le istruzioni riportate nel paragrafo "RAGLAN" all'inizio delle spiegazioni. Buon lavoro!

07.05.2022 - 17:17

country flag Annamaria wrote:

Quando devo iniziare a lavorare il diagramma a1 ? Grazie...

04.04.2022 - 21:01

DROPS Design answered:

Buongiorno Annamaria, il diagramma A.1 si lavora sullo sprone sulle linee del raglan. Buon lavoro!

05.04.2022 - 08:14

country flag Zette wrote:

La dernière boutonnière se situe avant de tricoter la bordure de côtes, est-ce juste? Il n'y en a pas tout en bas?

05.09.2021 - 17:55

DROPS Design answered:

Bonjour Mme Zette, tout à fait, la dernière boutonnière ne se situe pas tout en bas, dans les côtes (cf photo, on voit le bouton même juste avant les côtes sur le devant gauche). Bon tricot!

06.09.2021 - 07:51

country flag Hanne Rasmussen wrote:

Hej. Jeg har strikket hele bærestykket, her er noget galt, maskeantallet passer ikke ved deling til ærmer. Når jeg lægger antal udtagningerne sammen med antal masker, hvor mærkerne sættes, er der for mange på ærmer og for få på for og bag stykker. Det samme i norske opskrift, men på bluse 197/23 passer maskeantallet - ikke på cardigan. Str xxxl deles 30-18-50-18-30m =146m 35 udt giver 65-88-120-88-65 m. = 426 m.

25.04.2021 - 17:29

DROPS Design answered:

Hej Hanne, jo men det stemmer at du skal tage nogle af ærmemaskerne til forstykket, 73-72-136-72-73= 426. Så når du strikker ryg og forstykke har du 310 masker (73-14-136-14-73) God fornøjelse!

29.04.2021 - 15:36

country flag Martina wrote:

Hallo! Müssen die Knopflöcher nicht in der Rückreihe gestrickt werden? Sonst kommt es bei mir nicht auf die richtige Seite.

11.12.2018 - 07:31

DROPS Design answered:

Liebe Martina, die Knopflöcher werden am Ende einer Hinreihe gestrickt, damit sie an die richtige Stellen sein werden. Viel Spaß beim stricken!

11.12.2018 - 09:01

country flag Murielle wrote:

Très beau modèle

11.07.2018 - 12:43

country flag Amparo wrote:

Original y versátil.

21.06.2018 - 23:35