DROPS Karisma
DROPS Karisma
100% Wool
from 2.30 £ /50g
Get the yarn to make this pattern from 18.40£.

The yarn cost is calculated from the pattern’s smallest size and the yarn’s cheapest product type. Looking for an even better price? You might find it on the DROPS Deals!

DROPS SS24

Narvik Jacket

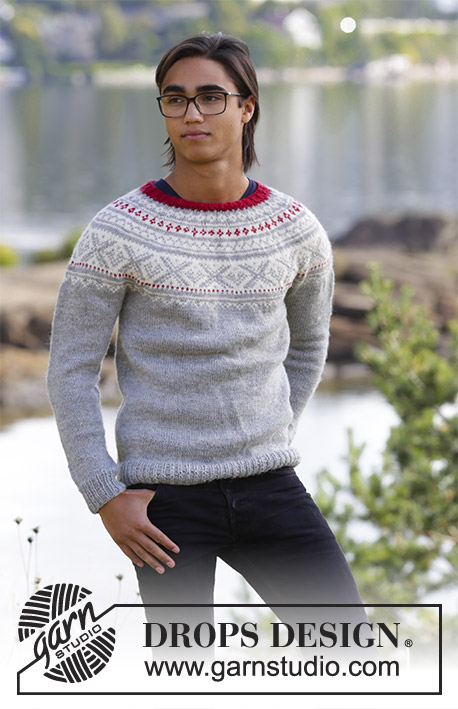
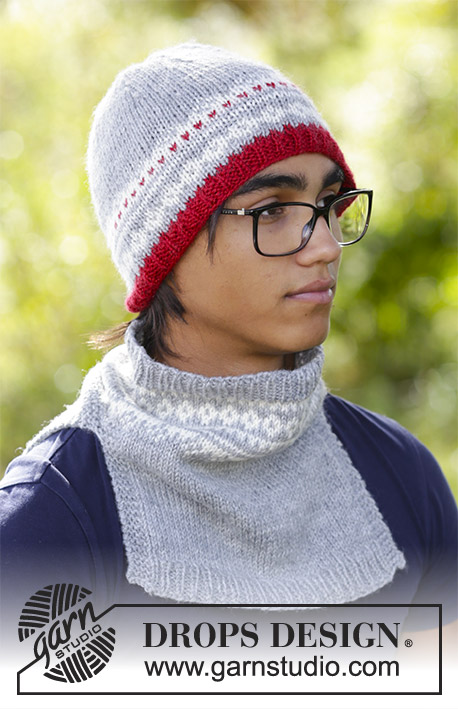
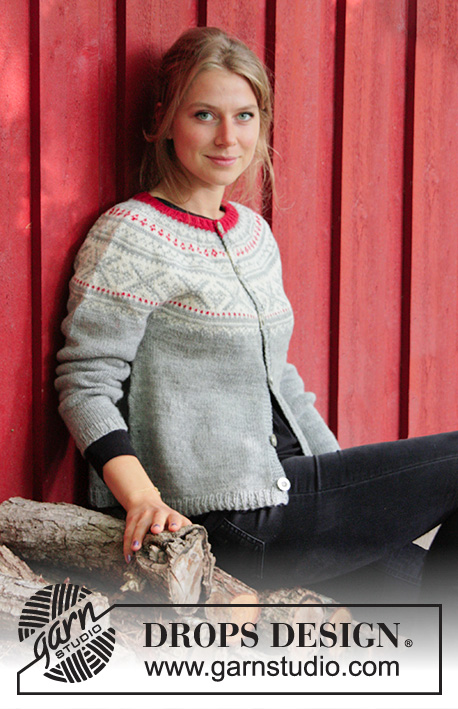
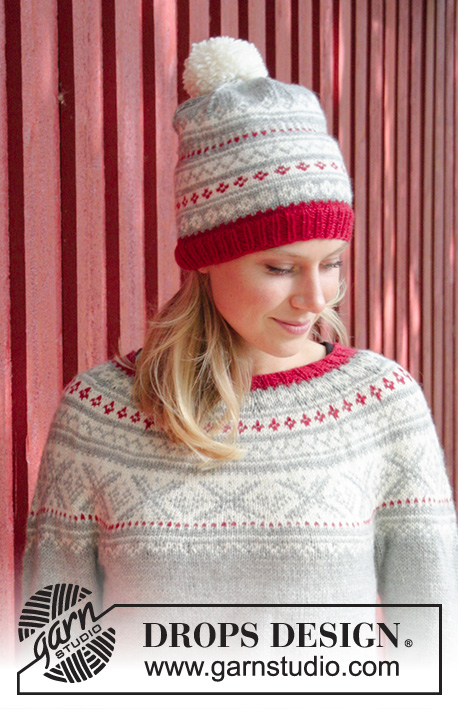
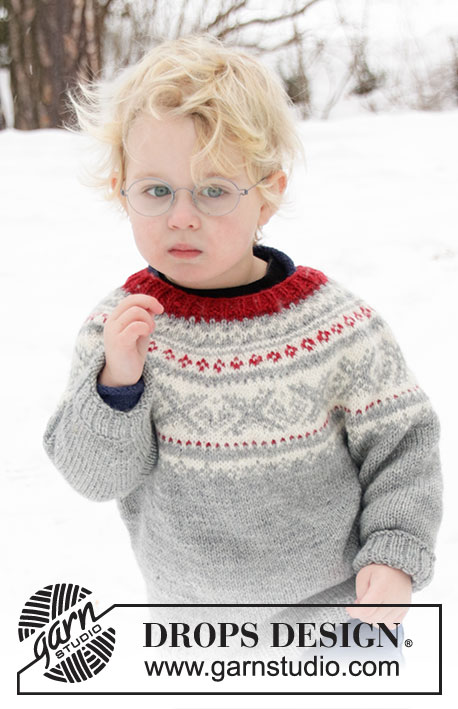
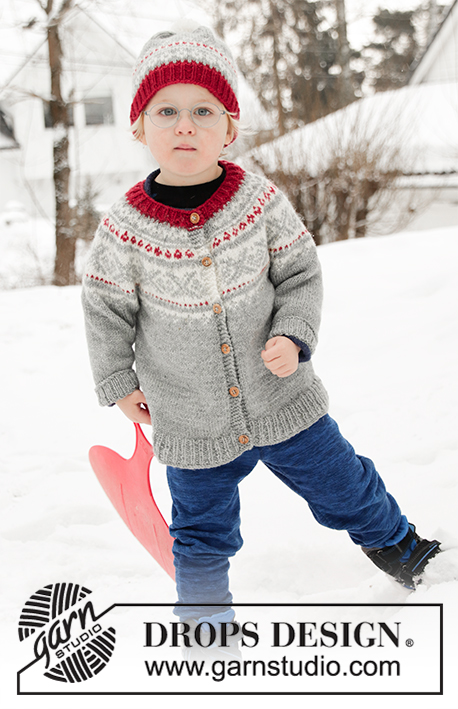
Knitted children’s jacket in DROPS Karisma. The piece is worked top down with round yoke and Nordic pattern on the yoke. Sizes 2 – 12 years. Knitted hat in DROPS Karisma. The piece is worked with Nordic pattern and a pom pom.

DROPS Children 32-11
DROPS Design: Pattern no u-075-bn
Yarn group B
-------------------------------------------------------

YARN FOR WHOLE SET:
Sizes: 2 - 3/4 - 5/6 - 7/8 - 9/10 - 11/12 years
Sizes equivalent to approx. height of child in cm:
92 - 98/104 - 110/116 - 122/128 - 134/140 - 146/152
Fits head size: 48/50 - 50 /52 - 52/54 - 52/54 - 54/56 - 54/56 cm
Materials:
DROPS KARISMA from Garnstudio (belongs to yarn group B)
250-300-300-350-400-450 g colour 44, light grey
100-100-100-100-100-150 g colour 01, off white
50-50-100-100-100-100 g colour 48, wine red

YARN FOR JACKET:
Sizes: 2 - 3/4 - 5/6 - 7/8 - 9/10 - 11/12 years
Sizes equivalent to approx. height of child in cm:
92 - 98/104 - 110/116 - 122/128 - 134/140 - 146/152
Materials:
DROPS KARISMA from Garnstudio (belongs to yarn group B)
200-250-300-300-350-400 g colour 44, light grey
50-100-100-100-100-100 g colour 01, off white
50-50-50-50-50-50 g colour 48, wine red

YARN FOR HAT:
Sizes: 2 - 3/4 - 5/8 - 9/12 years
Fits head size: approx. 48/50 - 50/52 - 52/54 - 54/56 cm
Materials:
DROPS KARISMA from Garnstudio (belongs to yarn group B)
50-50-50-50 g colour, 44, light grey
50-50-50-50 g colour 01, off white
50-50-50-50 g colour 48, wine red

-------------------------------------------------------
ACCESSORIES FOR THE PIECE:

JACKET:

KNITTING TENSION:
21 stitches in width and 28 rows in height with stocking stitch and Nordic pattern = 10 x 10 cm.

NEEDLES:
DROPS DOUBLE POINTED NEEDLES SIZE 4 MM.
DROPS CIRCULAR NEEDLE SIZE 4 MM: length 80 cm for stocking stitch and Nordic pattern.
DROPS DOUBLE POINTED NEEDLES SIZE 3 MM.
DROPS CIRCULAR NEEDLE SIZE 3 MM: length 80 cm for rib.
The needle size is only a guide. If you have too many stitches on 10 cm, change to a larger needle size. If you have too few stitches on 10 cm, change to a smaller needle size.

DROPS WOOD BUTTONS, Cedar NO 513: 5-6-6-7-7-8 items.

HAT:

KNITTING TENSION:
22 stitches in width and 30 rows in height with stocking stitch and Nordic pattern = 10 x 10 cm.

NEEDLES:
DROPS DOUBLE POINTED NEEDLES SIZE 3.5 MM.
DROPS CIRCULAR NEEDLE SIZE 3.5 MM: length 40 cm for stocking stitch and Nordic pattern.
DROPS CIRCULAR NEEDLE SIZE 2.5 MM: length 40 cm for rib.
The needle size is only a guide. If you have too many stitches on 10 cm, change to a larger needle size. If you have too few stitches on 10 cm, change to a smaller needle size.

----------------------------------------------------------

-------------------------------------------------------

Alternative Yarn – See how to change yarns here
Yarn Groups A to F – Use the same pattern and change the yarn here
Yarn usage using an alternative yarn – Use our yarn converter here

-------------------------------------------------------

DROPS Karisma
DROPS Karisma
100% Wool
from 2.30 £ /50g
Get the yarn to make this pattern from 18.40£.

The yarn cost is calculated from the pattern’s smallest size and the yarn’s cheapest product type. Looking for an even better price? You might find it on the DROPS Deals!

Pattern instructions

NOTE: This pattern is written in British English. All measurements in charts are in cm. For conversion from cm to inches - click here. There are different terms for crocheting in British and American English. If this pattern includes crochet, click for "crochet terms" here. For this pattern in American English, please click here.
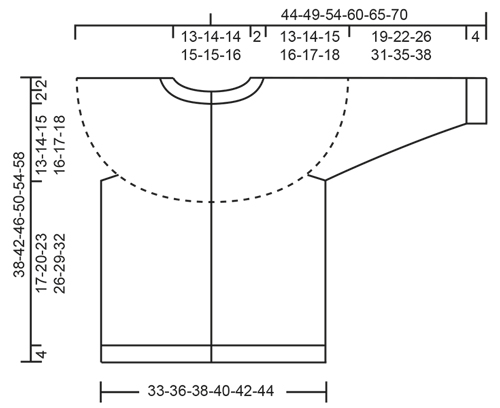
EXPLANATIONS FOR THE PATTERN:

-------------------------------------------------------

RIDGE/GARTER STITCH (worked back and forth):
1 ridge = Knit 2 rows.

ELEVATION (back of neck):
Skip this section if you do not want an elevation; the neck will then be the same front and back.
Insert 1 marker in the middle stitch on the row (= mid back). Start from the right side with light grey and knit 12-13-14-14-15-16 stitches past the stitch with marker, turn, tighten the strand and purl 25-27-29-29-31-33 stitches. Turn, tighten the strand and knit 37-40-43-43-46-49 stitches, turn, tighten the strand and purl 49-53-57-57-61-65 stitches. Turn, tighten the strand and knit 61-66-71-71-76-81 stitches, turn, tighten the strand and purl 73-79-85-85-91-97 stitches. Turn, tighten the strand and knit to the end of row. Purl 1 row from wrong side with 5 band stitches in garter stitch in each side.Then work YOKE as described in the text.

PATTERN: 
Jacket: See diagrams A.1 and A.2 (A.2 for sizes 2 and 3/4 years only). Choose diagram for your size.
Hat: See diagram A.3.
The whole pattern is worked in stocking stitch.

KNITTING TIP-1 (for bands):
On the rows with stripes or pattern border, use the stripe colour or the background colour in the border for the 5 band stitches in each side.

KNITTING TIP-2 (for Nordic pattern):
To avoid the knitting tension becoming tighter when working pattern it is important that the strands at the back of the piece are not tight. You can use a larger needle size when working pattern if this is a problem.

INCREASE TIP (evenly spaced):
To work out how to increase evenly, count the total number of stitches on the needle (e.g. 92 stitches) minus the bands (e.g.10 stitches) and divide the remaining stitches by the number of increases to be made (e.g. 21) = 3.9. 
In this example, increase by making 1 yarn over after approx. each 4th stitch. On the next round work the yarn overs twisted to avoid holes. Do not increase over the bands.

DECREASE TIP-1 (for mid under sleeve): 
Start 2 stitches before the marker thread, knit 2 together, marker thread, slip 1 stitch as if to knit, knit 1 and pass the slipped stitch over the knitted stitch (= 2 stitches decreased).

DECREASE TIP-2: (for hat):
To work out how to decrease evenly, count the total number of stitches on the needle (e.g. 102 stitches) and divide by the number of decreases to be made (e.g. 6) = 17. 
In this example, decrease by knitting each 16th and 17th stitch together.

DECREASE TIP-3 (for hat):
Decrease after the marker as follows: Slip 1 stitch as if to knit, knit 1 and pass the slipped stitch over the knitted stitch (= 1 stitch decreased).

BUTTONHOLE:
Work buttonholes on right band (when the garment is worn). 1 buttonhole = Work from the right side until there are 3 stitches left on the row, make 1 yarn over, knit 2 together and knit 1. On the next row (wrong side) knit the yarn over to leave a hole. 
The first buttonhole is worked when the neck measures approx.1½ cm. Then work the next 4-5-5-6-6-7 buttonholes with approx. 8-7½-8-7½-8-7½ cm between each one.

-------------------------------------------------------

START THE PIECE HERE:

-------------------------------------------------------

JACKET - SHORT OVERVIEW OF THE PIECE:
Neck, yoke and body are worked back and forth with circular needle from mid front and top down. The sleeves are worked in the round with double pointed needles, top down.

NECK:
Cast on 92-95-98-101-104-107 stitches (including 5 band stitches in each side towards mid front) with circular needle size 3 mm and wine red. Purl 1 row (= wrong side). The next row is worked as follows from the right side: 5 band stitches in GARTER STITCH – read description above, * knit 1, purl 2 *, work from *-* until there are 6 stitches left on the row, knit 1 and finish with 5 band stitches in garter stitch. Continue the rib like this – remember BUTTONHOLES on right band – read description above. When the rib measures approx. 2-2½ cm purl 1 row from the wrong side where you increase 21-24-27-30-33-36 stitches evenly on row – read INCREASE TIP = 113-119-125-131-137-143 stitches. Change to circular needle size 4 mm.
You can now work an elevation in the back of the neck so that the neck is slightly higher at the back. This elevation can be left out; the neck is then the same front and back – work ELEVATION – read description above, or go straight to YOKE.

YOKE:
Read KNITTING TIP-1 and KNITTING TIP-2!
The first row is worked as follows from the right side: 5 band stitches in garter stitch, work A.1A until there are 6 stitches left on the row (= 17-18-19-20-21-22 repeats of 6 stitches), work A.1B (= 1 stitch) and finish with 5 band stitches in garter stitch. Continue with this pattern. AT THE SAME TIME on each row marked with an arrow in A.1A increase evenly as described below (all increases are worked from the right side). REMEMBER THE KNITTING TENSION and INCREASE TIP.
Arrow-1: Increase 10-12-14-16-18-20 stitches evenly on row = 123-131-139-147-155-163 stitches (there is now room for 14-15-16-17-18-19 repeats of 8 stitches).
Arrow-2: Increase 24-32-32-40-32-40 stitches evenly on row = 147-163-171-187-187-203 stitches (there is now room for 17-19-20-22-22-24 repeats of 8 stitches – NOTE: Make sure that you work the increases between arrow-2 and arrow-3 which are drawn in the diagrams).
Arrow-3: There are now 181-201-211-231-231-251 stitches on the row. Increase 22-18-24-20-32-30 stitches evenly on row = 203-219-235-251-263-281 stitches (there is now room for 12-13-14-15-14-15 repeats of 16-16-16-16-18-18 stitches).
Arrow-4: Increase 18-26-16-6-6-6 stitches evenly on row = 221-245-251-257-269-287 stitches (there is now room for 35-39-40-41-43-46 repeats of 6 stitches).
When A.1 has been completed, the piece measures approx. 15-16-17-18-19-20 cm from the cast-on edge mid front. If the piece is shorter than this, you can work stocking stitch with light grey and 5 band stitches in each side to the right length.
The next row is worked as follows from the right side and with light grey: Knit 37-40-42-43-45-48 stitches (= front piece), place the next 42-48-47-48-50-53 stitches on 1 thread for sleeve, cast on 6-6-6-8-8-6 new stitches on the needle (= in side under sleeve), knit 63-69-73-75-79-85 stitches (= back piece), place the next 42-48-47-48-50-53 stitches on 1 thread for sleeve, cast on 6-6-6-8-8-6 new stitches on the needle (= in side under sleeve), knit 37-40-42-43-45-48 stitches (= front piece). Body and sleeves are finished separately. THE PIECE IS NOW MEASURED FROM HERE!

BODY:
= 149-161-169-177-185-193 stitches. Continue as follows:

SIZES 2 and 3/4 years:
Purl 1 row from the wrong side with light grey and 5 band stitches in garter stitch in each side. The next row is worked as follows from the right side: 5 band stitches in garter stitch, work A.2A until there are 6 stitches left on the row (23-25 repeats of 6 stitches), work A.2B (= 1 stitch) and finish with 5 band stitches in garter stitch. Continue with this pattern. When A.2 has been completed, work stocking stitch with light grey and 5 band stitches in garter stitch in each side until the piece measures 17-20 cm from the division. Then work RIB as described below.

SIZES 5/6, 7/8, 9/10 and 11/12 years:
Work stocking stitch back and forth with light grey and 5 band stitches in garter stitch in each side until the piece measures 23-26-29-32 cm from the division. Then work RIB as described below.

RIB:
Knit 1 row from the right side where you increase 30-33-34-35-39-40 stitches evenly on row – remember INCREASE TIP = 179-194-203-212-224-233 stitches. Change to circular needle size 3 mm and work the next row as follows from the wrong side: 5 band stitches in garter stitch, * purl 1, knit 2 *, work from *-* until there are 6 stitches left on the row, purl 1 and finish with 5 band stitches in garter stitch. Continue the rib like this for 4 cm. Cast off with garter stitch over garter stitch, knit over knit and purl over purl; but make sure that the cast-off edge is not tight. The jacket measures approx. 38-42-46-50-54-58 cm from the shoulder down.

SLEEVE:
Place the 42-48-47-48-50-55 stitches from the thread on the one side of the piece on double pointed needles size 4 mm and knit up 1 stitch in each of the 6-6-6-8-8-6 stitches cast on under the sleeves = 48-54-53-56-58-59 stitches. Insert 1 marker thread in the middle of the 6-6-6-8-8-6 stitches under the sleeve and allow it to follow your work onwards. The marker thread will be used a little later when decreasing under the sleeve.

SIZES 2 and 3/4 years:
Start the round at the marker thread and knit 1 round with light grey. Then work A.2A in the round (= 8-9 repeats of 6 stitches). When A.2A has been completed continue with light grey as described under ALL SIZES.

SIZES 5/6, 7/8, 9/10 and 11/12 years:
Start the round at the marker thread and work stocking stitch in the round with light grey. Continue as described under ALL SIZES.

ALL SIZES:
AT THE SAME TIME when the piece measures 2-2-2-3-3-3 cm decrease 2 stitches mid under sleeve – read DECREASE TIP-1. Decrease like this every 3-2½-3½-4-4-4½ cm a total of 6-8-7-7-8-8 times = 36-38-39-42-42-43 stitches. Continue working until the sleeve measures 19-22-26-31-35-38 cm from the division. Knit 1 round where you increase 0-1-3-3-6-5 stitches evenly on round = 36-39-42-45-48-48 stitches. Change to double pointed needles size 3 mm. Work rib in the round (= knit 1 / purl 2) for 4 cm. Then cast off with knit over knit and purl over purl, but make sure that the cast-off edge is not tight. The sleeve measures approx. 23-26-30-35-39-42 cm from the division. Work the other sleeve in the same way.
ASSEMBLY:
Sew buttons onto left band.

----------------------------------------------------------

HAT:
The piece is worked in the round with short circular needle; change to double pointed needles when necessary. Cast on 102-105-114-117 stitches with short circular needle size 2.5 mm and wine red. Knit 1 round. Then work rib (= knit 1 / purl 2) for 3 cm. Change to circular needle size 3.5 mm. Knit 1 round where you decrease 6-9-6-9 stitches evenly in all sizes – read DECREASE TIP-2 = 96-96-108-108 stitches. Then work A.3 in the round (= 8-8-9-9 repeats of 12 stitches). REMEMBER THE KNITTING TENSION! When A.3 has been completed, work stocking stitch with light grey to finished length. When the piece measures 15-16-17-18 cm, insert 8-8-9-9 markers in the piece with 12 stitches between each one. On the next round decrease 1 stitch after each marker – read DECREASE TIP-3 (= 8-8-9-9 stitches decreased). Decrease like this every 2nd round a total of 6 times in all sizes = 48-48-54-54 stitches left on needles. * Knit 1 round, on the next round knit all stitches together 2 and 2 *, work from *-* one more time = 12-12-14-14 stitches left on needles. Cut the strand, pull it through the remaining stitches, tighten and fasten well. The hat measures approx. 20-21-22-23 cm from the top down.

POM POM:
Make a pom pom with off-white, approx. 4-5 cm in diameter and fasten to top of hat.

This pattern has been corrected.

Updated online: 10.02.2021
ELEVATION (back of neck):
... Turn, tighten the strand and knit 61-66-71-71-76-81 stitches, turn, tighten the strand and purl 73-79-85-85-91-97 stitches. Turn, tighten the strand and knit to the end of row. Purl 1 row from wrong side with 5 band stitches in garter stitch in each side.Then work YOKE as described in the text...

Diagram

symbols = light grey
symbols = off white
symbols = wine red
symbols = start on this row in your size
symbols = between 2 stitches make 1 yarn over with background colour in the pattern stripe; on the next row purl yarn over twisted to avoid a hole
symbols = increase row
diagram
diagram
diagram
diagram
diagram

Each of our patterns has specific tutorial videos to help you.

Do you have a question? See a list of frequently asked questions (FAQ)

Knitting tension is what determines the final measurements of your work, and is usually measured per 10 x 10 cm. It is provided like so: number of stitches in width x number of rows in height - eg: 19 stitches x 26 rows = 10 x 10 cm.

The knitting tension is very individual; some people knit/crochet loosely while others work tightly. You adjust the knitting tension with the needle size, which is why the suggested needle size is only meant as a guide! You need to adjust this (up or down) to ensure that YOUR knitting tension matches the knitting tension provided in the pattern. If you work with a different knitting tension than provided you will have a different yarn consumption, and your work will have different measurements than what the pattern suggests.

The knitting tension also determines which yarns can replace each other. As long as you achieve the same knitting tension you can replace one yarn with another.

See DROPS lesson: How to measure your tension/gauge

See DROPS video: How to make a gauge tension swatch

The required amount of yarn is provided in grams, eg: 450 g. To calculate how many balls you’ll need you first need to know how many grams are in 1 ball (25g, 50g or 100g). This information is available if you click on the individual yarn quality on our pages. Divide the amount required with the amount of each ball. For example, if each ball is 50g (the most common amount), the calculation will be as follows: 450 / 50 = 9 balls.

The important thing when changing from one yarn to another is that the knitting/crochet tension remains the same. This is so that the measurements of the finished piece will be the same as on the sketch provided. It is easier to achieve the same knitting tension using yarns from the same yarn group. It is also possible to work with multiple strands of a thinner yarn to achieve the knitting tension of a thicker one. Please try our yarn converter. We recommend you to always work a test swatch.

Please NOTE: when changing yarn the garment might have a different look and feel to the garment in the photo, due to individual properties and qualities of each yarn.

See DROPS lesson: Can I use a different yarn than the one mentioned in the pattern?

All our yarns are categorised into yarn groups (from A to F) according to thickness and knitting tension – group A contains the thinnest yarns and group F the thickest. This makes it easier for you to find alternative yarns to our patterns, should you wish to switch yarn. All yarns within the same group have a similar knitting tension and can easily replace each other. However, different yarn qualities have different structures and properties which will give the finished work a unique look and feel.

Click here for an overview of the yarns in each yarn group

At the top of all our patterns you’ll find a link to our yarn calculator, which is a helpful tool should you wish to use a different yarn than suggested. By filling in the yarn quality you wish to replace, the amount (in your size) and number of strands, the calculator will present good alternative yarns with the same knitting tension. Additionally it will tell you how much you’ll require in the new qualities and whether you’ll need to work with multiple strands. Most skeins are 50g (some are 25g or 100g).

If the pattern is worked with multiple colours, every colour will have to be calculated separately. Similarly, if the pattern is worked with several strands of different yarns (for example 1 strand Alpaca and 1 strand Kid-Silk) you will have to find alternatives for each, individually.

Click here to see our yarn calculator

Since different yarns have different qualities and textures we have chosen to keep the original yarn in our patterns. However, you can easily find options among our available qualities by using our yarn calculator, or simply pick a yarn from the same yarn group.

It is possible that some retailers still have discontinued yarns in stock, or that someone has a few skeins at home that they would like to find patterns for.

The yarn calculator will provide both alternative yarn as well as required amount in the new quality.

If you think it's hard to decide what size to make, it can be a good idea to measure a garment you own already and like the size of. Then you can pick the size by comparing those measures with the ones available in the pattern's size chart.

You'll find the size chart at the bottom of the pattern.

See DROPS lesson: How to read size chart

The needle size provided in the pattern serves only as a guide, the important thing is to follow the knitting tension. And since knitting tension is very individual, you will have to adjust the needle size to ensure that YOUR tension is the same as in the pattern – maybe you’ll have to adjust 1, or even 2 needle sizes, up or down to achieve the correct tension. For this, we recommend that you work test swatches.

Should you work with a different knitting tension than the one provided, the measurements of the finished garment might deviate from the measurement sketch.

See DROPS lesson: How to measure your tension/gauge

See DROPS video: How to make a tension/gauge swatch

Working a garment top-down provides more flexibility and room for personal adjustment. For example it is easier to try the garment on while working, as well as making adjustments to length of yoke and shoulder caps.

The instructions are carefully explaining every step, in the correct order. Diagrams are adjusted to the knitting direction and are worked as usual.

The diagram depicts all rows/rounds, and every stitch seen from the right side. It is read from bottom to top, from right to left. 1 square = 1 stitch.

When working back and forth, every other row is worked from the right side and every other row is worked from the wrong side. When working from the wrong side, the diagram will have to be worked reversed: from left to right, knit stitches are purled, purl stitches are knit etc.

When working in the round every round is worked from the right side and the diagram are worked from right to left on all rounds.

See DROPS lesson: How to read knitting diagrams

The diagram depicts all rows/rounds, and every stitch seen from the right side. It is worked from bottom to top, from right to left.

When working back and forth every other row is worked from the right side: from right to left and every other row is worked from the wrong side: from left to right.

When working in the round, every row in the diagram are worked from the right side, from right to left.

When working a circular diagram you start in the middle and work your way outwards, counter clockwise, row by row.

The rows usually start with a given number of chain stitches (equivalent to the height of the following stitch), this will either be depicted in the diagram or explained in the pattern.

See DROPS lesson: How to read crochet diagrams

Instructions for working several diagrams after each other on the same row/round, will often be written like so: “work A.1, A.2, A.3 a total of 0-0-2-3-4 times". This means you work A.1 once, then A.2 is worked once, and A.3 is repeated (in width) the number of times provided for your size – in this case like so: S = 0 times, M = 0 times, L=2 times, XL= 3 times and XXL = 4 times.

The diagrams are worked as usual: begin with the first row in A.1, then work the first row in A.2 etc.

See DROPS lesson: How to read knitting diagrams

See DROPS lesson: How to read crochet diagrams

The total width of the garment (from wrist-to-wrist) will be larger in the larger sizes, despite the actual sleeves being shorter. The larger sizes have longer sleeve caps and wider shoulders, so there will be a good fit in all sizes.

The measurement sketch/schematic drawing provides information regarding the full length of the garment. If it’s a jumper or a jacket the length is measured from the highest point on the shoulder closest to the neckline, and straight down to the bottom of the garment. It is NOT measured from the tip of shoulder. Similarly, the length of yoke is measured from the highest point on the shoulder and down to where yoke is split into body and sleeves.

On a jacket measures are never taken along bands, unless specifically stated. Always measure inside band stitches when measuring the length.

See DROPS lesson: How to read a schematic drawing

Diagrams are often repeated on the round or in height. 1 repeat is the diagram the way it appears in the pattern. If it says to work 5 repeats of A.1 in the round, then you work A.1 a total of 5 times after/next to each other in the round. If it says to work 2 repeats of A.1 vertically/in height you work the entire diagram once, then begin again at the start and work the entire diagram one more time.

Chain stitches are slightly narrower than other stitches and to avoid working the cast-on edge too tight, we simply chain more stitches to begin with. The stitch count will be adjusted on the following row to fit the pattern and measurement sketch.

The rib edge is more elastic and will contract slightly compared to, for example, stocking stitch. By increasing before the rib edge, you avoid a visible difference in width between the rib edge and the rest of the body.

It’s very easy to cast off too tightly, and by making yarn overs while casting off (and simultaneously casting these off) you avoid a too tight cast off edge.

See DROPS video: How to bind off with yarn overs (yo)

To achieve an even increase (or decrease) you can increase on, for example: every 3rd and 4th row alternately, like so: work 2 rows and increase on the 3rd row, work 3 rows and increase on the 4th. Repeat this until the increase is complete.

See DROPS lesson: Increase or decrease 1 st on every 3rd and 4th row alternately

Should you prefer to work in the round instead of back and forth, you may of course adjust the pattern. You’ll need to add steeks mid-front (usually 5 stitches), and follow the instructions. When you would normally turn and work from the wrong side, simply work across the steek and continue in the round. At the end you’ll cut the piece open, pick up stitches to work bands, and cover the cut edges.

See DROPS video: How to knit steeks and cut open

Should you prefer to work back and forth instead of in the round, you may of course adjust the pattern so you work the pieces separately and then assemble them at the end. Divide the stitches for the body in 2, add 1 edge stitch in each side (for sewing) and work the front and back pieces separately.

See DROPS lesson: Can I adapt a pattern for circular needles into straight needles?

Pattern repeats can vary slightly in the different sizes, in order to get the correct proportions. If you’re not working the exact same size as the garment in the photo, yours might deviate slightly. This has been carefully developed and adjusted so that the complete impression of the garment is the same in all sizes.

Make sure to follow instructions and diagrams for your size!

If you have found a pattern you like which is available in women’s size it’s not very difficult to convert it to men’s size. The biggest difference will be the length of sleeves and body. Start working on the women size that you think would fit across the chest. The additional length will be worked right before you cast off for the armhole/sleeve cap. If the pattern is worked top-down you can add the length right after the armhole or before the first decrease on sleeve.

Regarding additional yarn amount, this will depend on how much length you add, but it is better with a skein too many than too few.

All yarns will have excess fibres (from production) that might come off as lint or shedding. Brushed yarns (ie hairier yarns) have more of these loose, excess fibres, causing more shedding.

Shedding also depends on what is worn under or over the garment, and whether this pulls at the yarn fibres. It’s therefore not possible to guarantee that there will be no shedding

Below are some tips on how to get the best result when working with hairier yarns:

1. When the garment is finished (before you wash it) shake it vigorously so the looser hairs come off. NOTE: do NOT use a lint roller, brush or any method that pulls at the yarn.

2. Place the garment in a plastic bag and put it in your freezer - the temperature will cause the fibres to become less attached to each other, and excess fibres will come off easier.

3. Leave in the freezer for a few hours before taking it out and shaking it again.

4. Wash the garment according to the instructions on the yarn label.

Pilling is a natural process that happens to even the most exclusive of fibers. It's a natural sign of wear and tear that is hard to avoid, and that is most visible in high friction areas of your garment like a sweater's arms and cuffs.

You can make your garment look as new by removing the pilling, using a fabric comb or a pill/lint remover.

Still can't find the answer you need? Then scroll down and leave your question so one of our experts can try to help you. This will be done normally within 5 to 10 working days.
In the meantime, you can read the questions and answers that others have left to this pattern or join the DROPS Workshop on Facebook to get help from fellow knitters/crocheters!

You might also like...

Narvik

Aleksandra, Norway

Narvik Jacket

Ama La Lana, Spain

Post a comment to pattern DROPS Children 32-11

We would love to hear what you have to say about this pattern!

If you want to leave a question, please make sure you select the correct category in the form below, to speed up the answering process. Required fields are marked *.

Comments / Questions (14)

country flag Deb wrote:

Disregard earlier question. Misread the chart!

10.08.2023 - 23:32

country flag Deb wrote:

There are 147 stitches after inc @ arrow 2. (Size 2) "Arrow 3: There are now 181 stitches on the row." I found 2 increases between arrows 2 & 3. Where was the increase of 32 stitches made?

10.08.2023 - 20:43

DROPS Design answered:

Dear Deb, between arrow-2 and arrow-3 there are 2 increases worked in the diagram (see yarn over at the beg of diagram + at the end of diagram) so that you will increase a total of 2 sts x 17 times (17 repeats), and you will have: 147+(2sts x 17 repeats)= 181 stitches. Happy knitting!

11.08.2023 - 09:51

country flag Alicia wrote:

Muchas gracias. Me di cuenta de mi error de interpretación del patrón.

27.12.2022 - 22:23

country flag Alicia wrote:

Muchas gracias.

27.12.2022 - 19:07

country flag Alicia wrote:

Buenos días. Presento mis disculpas por haber enviado dos veces la misma pregunta. lo hice porque me pareció que la primera no había sido enviada. Otra vez mis disculpas.

23.12.2022 - 13:35

country flag Alicia wrote:

Buenas tardes. Estoy tejiendo este modelo para talle 5/6. Al llegar a los aumentos de la flecha 3 dice que tenemos 211 puntos. Pero al terminar la flecha 2 tenemos 171, más dos de entre las flechas 173.¿ Cuántos aumentos hay que hacer en flecha s 3 y 4. Gracias

22.12.2022 - 18:56

DROPS Design answered:

Hola Alicia, tienes que trabajar los aumentos en un lado de cada repetición de A.1A. Como tienes 20 repeticiones de A.1A, entonces aumentas 20 puntos. La siguiente vez que haya aumentos en A.1A, antes de la flecha 3, tienes que hacer lo mismo, aumentar después de cada repetición, por lo tanto, trabajas 20 aumentos más. 171 + 40 = 211.

25.12.2022 - 23:57

country flag Alicia wrote:

Buenas tardes. Estoy tejiendo el canesú de este modelo ( talla 5/6)y al llegar a la flecha 3 hay cantidad de puntos que no me dan. Al terminar los aumentos de la flecha 2 tengo los 171 puntos que dicen .Luego hago los dos aumentos indicados, son 173. Y a continuación en flecha 3 , no se indican aumentos . Dice que debemos tener 211 puntos. Agradezco me expliquen cuántos debe aumentar en flecha 3 y 4. Muchas gracias

22.12.2022 - 18:51

DROPS Design answered:

Hola Alicia, tienes que trabajar los aumentos en un lado de cada repetición de A.1A. Como tienes 20 repeticiones de A.1A, entonces aumentas 20 puntos. La siguiente vez que haya aumentos en A.1A, antes de la flecha 3, tienes que hacer lo mismo, aumentar después de cada repetición, por lo tanto, trabajas 20 aumentos más. 171 + 40 = 211.

25.12.2022 - 23:56

country flag Stephanie wrote:

Guten Tag, ich habe eine Frage zu der tollen Jacke: ich möchte sie gerne mit Erhöhung anfertigen. Laut Anleitung wird diese in ausschließlich hellgrau gestrickt. Aber ich erhalte immer eine asymmetrische Erhöhung, da auf der rechten Seite in der ersten Reihe von Reihenbeginn gestrickt wird und in der letzten Reihe bis Reihenende. Auf der linken Seite wird das Reihenende gar nicht erreicht. Habe ich einen Denkfehler?

27.11.2020 - 18:52

DROPS Design answered:

Liebe Stephanie, es sieht so aus, daß die Erhöhung ja unsymetrisch ist, unser DesignTeam wird das mal prüfen - danke für den Hinweis - gerne können Sie entweder nach der Rückreihe über 49-65 M noch eine Hinreihe über die übrigen Maschen + die Rückreihe über alle Maschen stricken - oder dann noch eine zusätzliche verkürtze Reihe stricken. Viel Spaß beim stricken!

30.11.2020 - 08:04

country flag Will V D Heerik wrote:

Ik wil dit patroon graag hebben ik kan helaas niet copiejirren kan ik hem ook op ge stuurt krijgen laat het me asjeblieft wat wetten groetjes wvd heerik

04.04.2020 - 13:05

DROPS Design answered:

Dag Will,

Onderaan bij de materialenlijst vindt je een afdrukknop waarmee je het patroon kunt printen. Je kunt evt ook je verkooppunt vragen of ze de brochure nog hebben liggen waar dit patroon in staat. Of je kunt een kennis vragen om een afdruk te maken.

04.04.2020 - 18:41

country flag Claudette Grenier wrote:

Merci pour vos bonnes explications. Ce qui m'avait trompé c'était que vous disiez: au tour suivant diminuer une maille après chaque marqueur- voir diminutions-3 (=on diminue 8-8-9-9-mailles). C'est là mon erreur j'ai fait une diminution de 9 fois sur ce rang-là et j'ai continué 6 fois de plus. Merci et bonne journée à vous et votre belle équipe.

31.01.2020 - 21:06