
Popular categories
Looking for a yarn?


|
|||||||||||||
Sun Dance |
|||||||||||||
 |
 |
||||||||||||
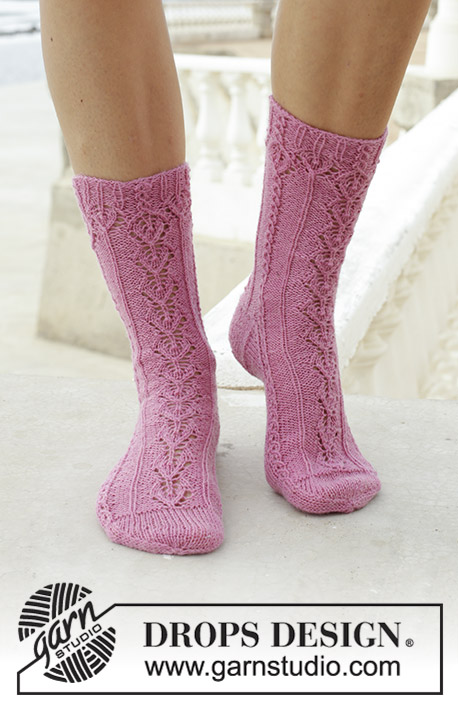
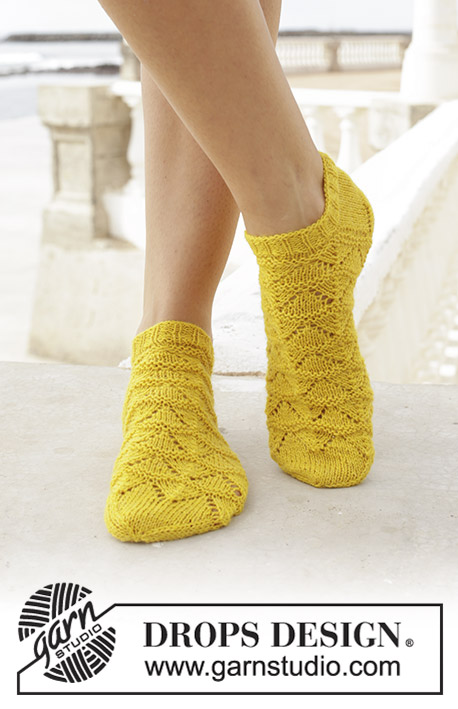
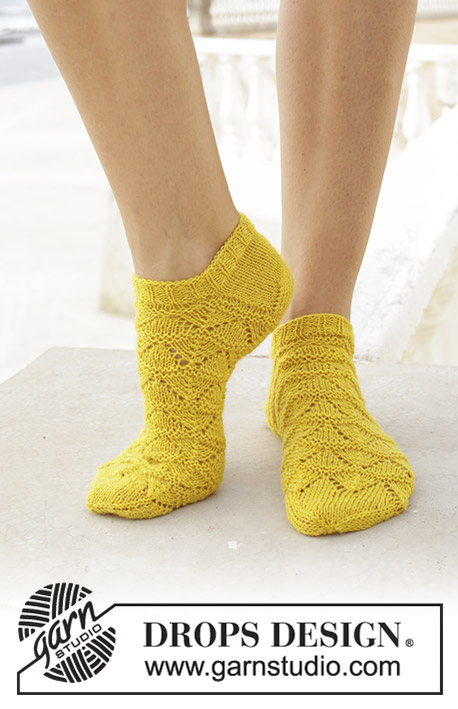
Knitted socks with lace pattern. The piece is worked in DROPS Flora.
DROPS 189-24 |
|||||||||||||
|
INFORMATION FOR THE PATTERN: DECREASE TIP-1: To work out how to decrease evenly, count the total number of stitches on the needle (e.g. 54 stitches) and divide by the number of decreases to be made (e.g. 4) = 13.5. In this example, knit together alternately the 12th and 13th stitch and the 13th and 14th stitch. KNITTING TIP: To strengthen the heel, the heel and heel decreases can be worked with 2 strands as follows: Use the strand from both the outside and inside of the ball and work 1 stitch alternately with the one strand then the other. In this way you get a slightly thicker heel without working with a double strand. PATTERN: See diagram A.1. HEEL DECREASE: ROW 1 (= right side): Knit until there are 8-8-9 stitches left, slip the next stitch as if to knit, knit 1, pass the slipped stitch over the knitted stitch, turn piece. ROW 2 (= wrong side): Purl until there are 8-8-9 stitches left, slip the next stitch as if to purl, purl 1, pass the slipped stitch over the purled stitch, turn piece. ROW 3 (= right side): Knit until there are 7-7-8 stitches left, slip the next stitch as if to knit, knit 1, pass the slipped stitch over the knitted stitch, turn piece. ROW 4 (= wrong side): Purl until there are 7-7-8 stitches left, slip the next stitch as if to purl, purl 1, pass the slipped stitch over the purled stitch, turn piece. Continue to decrease in this way, by working until there is 1 less stitch before slipping 1 stitch, until there are 16-16-14 stitches left on needle. DECREASE TIP-2 (for toe): Decrease as follows before the marker: Start 2 stitches before the marker and knit 2 together (= 1 stitch decreased). Decrease as follows after the marker: Slip 1 stitch as if to knit, knit 1, pass the slipped stitch over the knitted stitch (= 1 stitch decreased). ---------------------------------------------------------- SOCK: The piece is worked in the round with double pointed needles, top down. Cast on 54-54-63 stitches with double pointed needles size 2.5 mm / US 1.5 and Flora. Knit 1 round. Then work rib in the round (= knit 1 / purl 2) for 2-2-3 cm. Knit 1 round where you decrease 4-4-3 stitches evenly on round – read DECREASE TIP-1 = 50-50-60 stitches. The next round is worked as follows: Knit 35-35-45 stitches, then place the last 20-20-30 stitches worked on a thread (= mid top of foot), knit the remaining 15-15-15 stitches = 30-30-30 stitches on needle for heel. Read KNITTING TIP and work stockinette stitch back and forth over the heel stitches for 5-5½-6 cm / 2"-2¼"-2½". REMEMBER THE GAUGE! Insert 1 marker in the middle of the row - the piece is now measured from this marker. Then work HEEL DECREASE – see description above. After the heel decrease, work the next round as follows: Knit the 16-16-14 stitches from the heel, knit up 13-14-16 stitches along the side of the heel, knit the 20-20-30 stitches from the thread mid top of foot and knit up 13-14-16 stitches along the other side of the heel = 62-64-76 stitches on needle. Continue by working A.1 in the round – AT THE SAME TIME on the first round decrease 12-14-16 stitches evenly on round = 50-50-60 stitches. There is now room for 5-5-6 repeats of 10 stitches around the sock. Continue A.1 until the piece measures approx. 18-20-22 cm / 7"-8"-8¾" from the heel marker, but finish after a complete repeat in height. If the sock measures less than this after a complete repeat, work stockinette stitch in the round to the correct length (there are now 4-4-5 cm / 1½"-1½"-2" left to finished length). Insert 1 marker in each side of the sock so that there are 25-25-30 stitches on top of foot and 25-25-30 stitches under the foot. Work stockinette stitch in the round over all stitches. AT THE SAME TIME on the first round, decrease to toe on each side of both markers – read DECREASE TIP-2 (= 4 stitches decreased). Decrease like this every 2nd round a total of 6-6-7 times and then every round a total of 3-3-4 times = 14-14-16 stitches left on needle. Knit all stitches together 2 and 2 on the next round. Cut the strand, pull it through the remaining 7-7-8 stitches, pull tight and fasten well. Work the other sock in the same way. |
|||||||||||||
Diagram explanations |
|||||||||||||
|
|||||||||||||

|
|||||||||||||
|
Have you made this or any other of our designs? Tag your pictures in social media with #dropsdesign so we can see them! Do you need help with this pattern?You'll find tutorial videos, a Comments/Questions area and more by visiting the pattern on garnstudio.com. © 1982-2024 DROPS Design A/S. We reserve all rights. This document, including all its sub-sections, has copyrights. Read more about what you can do with our patterns at the bottom of each pattern on our site. |
|||||||||||||


With over 40 years in knitting and crochet design, DROPS Design offers one of the most extensive collections of free patterns on the internet - translated to 17 languages. As of today we count 304 catalogs and 11422 patterns - 11417 of which are translated into English (US/in).
We work hard to bring you the best knitting and crochet have to offer, inspiration and advice as well as great quality yarns at incredible prices! Would you like to use our patterns for other than personal use? You can read what you are allowed to do in the Copyright text at the bottom of all our patterns. Happy crafting!
Comments / Questions (10)
Votre énoncé est mauvais Avoir 54 mailles en diminuer 4 reste 50 là ça va Puis arriver au 2 cm on ne peux en mettre 35 mailles end puis 20 mailles de côté déjà et après je ne comprend pas qu’il faille tricoter les 15 dernières n mailles ? Merci à vous
01.03.2023 - 17:40DROPS Design answered:
Bonjour Dany, ce n'est pas exactement ce qu'il faut faire, vous tricotez 35 mailles endroit et placez les 20 dernières mailles tricotées en attente, autrement dit, il reste sur l'aiguille les 15 premières mailles tricotées pour la 1ère partie du talon; et les 20 m du dessus du pied sont mises en attente; vous tricotez les 15 dernières m du tour = 30 m pour le talon (15+15) et 20 m pour le dessus du pied, on a bien 50 m. Bon tricot!
02.03.2023 - 11:11Suomenkielisessä versiossa silmukkaluku ei täsmää kohdassa, jossa alkaa kantalapun kutominen
22.03.2022 - 11:38Bonjour, Pour le talon renforcé avec 2fils, et après avoir fait les 5 cm, jusqu'où doit-on continuer avec les 2 fils ? Merci de votre réponse et bonne journée.
23.09.2021 - 15:23DROPS Design answered:
Bonjour Martine, vous pouvez tricoter les diminutions du talon avec les 2 fils ou bien continuer simplement avec 1 fil après les 5 cm, au choix. Bon tricot!
24.09.2021 - 07:23Est-ce que ce patron est disponible en français? Merci beaucoup
18.08.2020 - 16:03DROPS Design answered:
Bonjour Mme Ramsay, tout à fait, tous nos modèles sont disponibles en français, cliquez sur le menu sous la photo pour changer la langue. Bon tricot!
18.08.2020 - 16:57Er klopt iets niet. Na de boord heb ik geminderd tot 50 steken. Bij de volgende stap moet ik steken op de hulpvraag zetten maar dan gaan ze van 70 steken uit. Help mij ik heb maar 50 steken. Hoe kan ik er dan 70 breien?
08.08.2019 - 10:36DROPS Design answered:
Dag Erika,
Je breit eerst 35 steken en dan zet je van die 35 steken de laatste 20 gebreide steken op een hulpdraad, dan brei je de overgebleven 15 steken.
08.08.2019 - 13:30Merci pour ce joli modèle. J'ai tricoté cette paire en coton jaune en commençant par les orteils. Et j'ai publié une photo dans le groupe Drops sur Facebook aujourd'hui.
01.08.2019 - 17:28Goedemorgen, wordt de sok met 2 breinaalden of met 4 breinaalden gebreid ?Ik denk met 2 omdat met spreekt van de goede en de averechtse kant ,maar waarom staat er dan dat de sok in de rondte wordt gebreid ?Groet van Henriette
04.07.2019 - 11:31DROPS Design answered:
Dag Henriette,
De sokken worden in de rondte gebreid met 4 sokkenbreinaalden. Bij de hiel wordt er steken tijdelijk op een hulpdraad gezet en wordt de hiel heen en weer gebreid, vandaar dat er bij de minderingen voor de hiel gesproken wordt over goede en verkeerde kant.
08.07.2019 - 11:20Bonjour je vien de commencer les chaussettes et cela ne correspond pas .. Je suis à la séparation du talon on a 50 mailles, je doit tricoter 35 mailles endroit mettre 20 mailles sur un fil et tricoter 15 mailles endroit, mais cela nous donne pas 50 mailles mais 70 !! Comment dois-je procéder ?
12.11.2018 - 15:26DROPS Design answered:
Bonjour Mme Sivet, vous tricotez 35 m et mettez les 20 dernières de ces 35 mailles en attente sur un fil (= il reste donc les 15 premières mailles sur l'aiguille), et tricotez les 15 dernières mailles = vous avez maintenant sur les aiguilles les 15 premières m du tour précédent + les 15 dernières mailles que vous avez tricoté soit un total de 30 m pour le talon (et 20 m en attente pour le dessus du pied). Bon tricot!
12.11.2018 - 15:36Tere! Kas siis alguses peab tegema 171 silmust? Või 63?
03.11.2018 - 09:49DROPS Design answered:
Tere! Number tuleb valida vastavalt suurusele. Suurusel 41/43 (talla pikkus: 27 cm) peab looma 63 silmust. Head kudumist!
09.12.2018 - 18:59Please give me more directions on knitting the diagram A. Is this pattern repeated every 10th stitch around and every 3th row?
12.06.2018 - 02:28DROPS Design answered:
Dear Barbara! We start A.1 when we have 50-50-60 stitches. There is now room for 5-5-6 repeats of 10 stitches around the sock (first size: 10 stitches of the diagram A.1 x 5 repeats = 50 stitches). Continue A.1 until the piece measures approx. 18-20-22 cm from the heel marker. Happy knitting!
12.06.2018 - 06:54