DROPS Snow
DROPS Snow
100% Wool
from 2.00 £ /50g
Get the yarn to make this pattern from 18.00£.

The yarn cost is calculated from the pattern’s smallest size and the yarn’s cheapest product type. Looking for an even better price? You might find it on the DROPS Deals!

DROPS SS24

Earl Grey

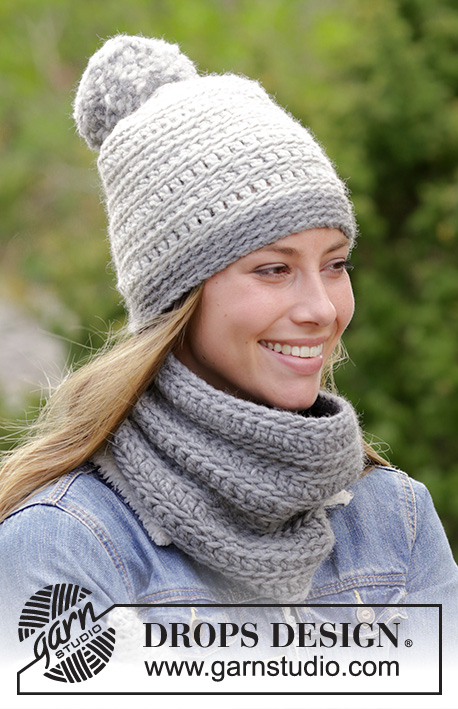
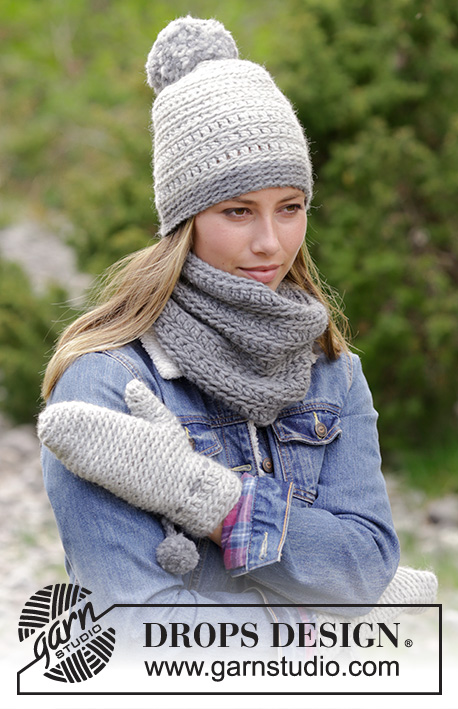
The set consists of: Crochet hat, neck warmer and mittens. The piece is worked in DROPS Snow.

DROPS 182-33
DROPS Design: Pattern no ee-617
Yarn group E or C + C
-----------------------------------------------------------
For the whole set you will need approx. 250 g light grey and 200 g medium grey.
-----------------------------------------------------------

HAT:
Sizes: S/M - M/L
Fits head size: 54/56 - 56/58 cm 
Materials:
DROPS SNOW from Garnstudio (belongs to yarn group E)
100 g for both sizes in colour 53, light grey
50 g for both sizes in colour 46, medium grey

The piece can also be crocheted with yarn from:
"Alternative yarn (Yarn group E)" – see link below.

DROPS CROCHET HOOK SIZE 7 MM - or the size needed to get 10 treble crochets and 6 rows on 10 cm in width and 10 cm in height.
-----------------------------------------------------------

NECK WARMER:
Size: One size
Measurements: Circumference at bottom: 62 cm. Circumference at top: 58 cm.
Height: 26 cm.
Materials:
DROPS SNOW from Garnstudio (belongs to yarn group E)
150 g colour 46, medium grey 

The piece can also be crocheted with yarn from:
"Alternative yarn (Yarn group E)" – see link below.

DROPS CROCHET HOOK SIZE 8 MM - or the size needed to get 9 treble crochets and 5 rows on 10 cm in width and 10 cm in height.
-----------------------------------------------------------

MITTENS:
Sizes: S/M - M/L
Materials:
DROPS SNOW from Garnstudio (belongs to yarn group E)
150 g for both sizes in colour 53, light grey
50 g for both sizes in colour 46, medium grey

The piece can also be crocheted with yarn from:
"Alternative yarn (Yarn group E)" – see link below.

DROPS CROCHET HOOK SIZE 6 MM - or the size needed to get 12 double crochets and 12 rows on 10 cm in width and 10 cm in height.
----------------------------------------------------------

-------------------------------------------------------

Alternative Yarn – See how to change yarns here
Yarn Groups A to F – Use the same pattern and change the yarn here
Yarn usage using an alternative yarn – Use our yarn converter here

-------------------------------------------------------

DROPS Snow
DROPS Snow
100% Wool
from 2.00 £ /50g
Get the yarn to make this pattern from 18.00£.

The yarn cost is calculated from the pattern’s smallest size and the yarn’s cheapest product type. Looking for an even better price? You might find it on the DROPS Deals!

Pattern instructions

NOTE: This pattern is written in British English. All measurements in charts are in cm. For conversion from cm to inches - click here. There are different terms for crocheting in British and American English. If this pattern includes crochet, click for "crochet terms" here. For this pattern in American English, please click here.
INFORMATION FOR THE PATTERN

CROCHET INFO:
At the beginning of each round of double crochets, replace the first double crochet with1 chain stitch. Finish the round with 1 slip stitch in the first chain stitch at beginning of round.

At the beginning of each round of half treble crochets replace the first half treble crochet with 2 chain stitches. Finish the round with 1 slip stitch in the second chain stitch at beginning of round.

At the beginning of each round of treble crochets replace the first treble crochet with 3 chain stitches. Finish the round with 1 slip stitch in the third chain stitch at beginning of round.

PATTERN: 
ROUND 1: 1 half treble crochet in the back loop of each double crochet.
ROUND 2: 1 double crochet in the back loop of each half treble crochet.
ROUND 3: 1 treble crochet in the back loop of each double crochet.
ROUND 4: 1 double crochet in the back loop of each treble crochet.
Repeat rounds 1 - 4.

COLOUR CHANGE TIP (for hat):
To get a neat transition when changing colours, work the slip stitch at the end of the round before starting with the new colour as follows: Insert the hook into the chain stitch worked at the beginning of the round, pick up the new strand, make a yarn over with the new colour and pull it through the loop on the hook.

WORK 2 DOUBLE CROCHETS TOGETHER:
* Insert the hook into the next stitch, pick up the strand (= 2 loops on hook) *, work from *-* one more time, make a yarn over and pull it through all 3 loops on hook (= 1 double crochet decreased).

CROCHET TIP (for mittens):
When working double crochets in the back loop of the stitch, it is easy to tighten the stitch too much, the mitten will then lose its elasticity and be too tight.
Make sure the double crochets are loose enough, i.e. when making the yarn over when working double crochets, pull the yarn over all the way through the stitch (and even a little further). 

INCREASE TIP (for hat):
To work out how to increase evenly, count the total number of stitches on the round (e.g. 40 stitches) and divide by the number of increases to be made (e.g. 10) = 4. In this example, increase 1 stitch after every 4th stitch.
Increase 1 stitch by working 2 stitches in 1 stitch.

DECREASE TIP (for mittens):
To work out how to decrease evenly, count the total number of stitches on the round (e.g. 20 stitches) and divide by the number of decreases to be made (e.g. 4) = 5. In this example, work every 4th and 5th stitch together as described below.
Decrease 1 double crochet by working 2 double crochets together as follows: * Insert the hook into the next stitch, pick up the strand *, work from *-* one more time, make a yarn over and pull it through all 3 stitches on the hook.
--------------------------------------------------------

HAT: 
The hat is worked in the round, top down.

Work a circle as follows:
Work 4 chain stitches with hook size 7 mm and light grey and form them into a ring with 1 slip stitch in the first chain stitch. Read CROCHET INFO!
ROUND 1: Work 12-12 half treble crochets around the ring. Now work each round in the back loop of each stitch.
ROUND 2: * Work 1 double crochet in the first half treble crochet, 2 double crochets in the next half treble crochet * work from *-* to end of round = 18-18 double crochets on round.
ROUND 3: * Work 1 treble crochet in the first double crochet, 2 treble crochets in the next double crochet * work from *-* to end of round = 27-27 treble crochets on round.
ROUND 4: * Work 1 double crochet in the first treble crochet, 2 double crochets in the next treble crochet * repeat from *-* to end of round = 40-40 double crochets on round.
REMEMBER THE CROCHET TENSION!
After the circle, continue working PATTERN - see description above. AT THE SAME TIME increase 10-13 half treble crochets evenly on first round – read INCREASE TIP = 50-53 stitches on the round. When piece measures approx. 19-20 cm change to medium grey – read COLOUR CHANGE TIP. Work 4 rounds of double crochets (work in the back loop). Cut and fasten the strand. The hat measures approx. 23-24 cm from the top down. Make a large pom pom of approx. 9 cm with both colours and fasten to top of hat.
--------------------------------------------------------

NECK WARMER:
Work 56 loose chain stitches with hook size 8 mm and medium grey and form them into a ring with 1 slip stitch in the first chain stitch. Read CROCHET INFO! Work 1 round with 1 half treble crochet in each chain stitch. Work PATTERN in the round starting from ROUND 2 in the pattern - see description above.  AT THE SAME TIME on round 6, decrease 4 double crochets evenly on round by working every 13th and 14th double crochet together – read WORK 2 DOUBLE CROCHETS TOGETHER = 52 double crochets. Continue the pattern in the round until piece measures approx. 26 cm in height – finish after a round of double crochets. Cut and fasten the strand.
--------------------------------------------------------

MITTENS:
The piece is worked in the round. You fist work a cuff with pattern, then the rest of the mitten with double crochets in the back loop.

CUFF:
Work 21-23 slightly loose chain stitches with hook size 6 mm and light grey and form them into a ring with 1 slip stitch in the first chain stitch. Read CROCHET INFO!
Work 1 round with 1 half treble crochet in each chain stitch. Work PATTERN in the round starting from ROUND 2 in the pattern – see description above. When the piece measures approx. 5 cm the cuff is finished – stop after a round of double crochets. Insert 1 marker thread – THE PIECE IS NOW MEASURED FROM HERE!

LEFT MITTEN:
Work in the round with 1 double crochet in each double crochet - read CROCHET TIP and work in the back loop of each stitch (do this for the rest of the mitten). REMEMBER THE CROCHET TENSION!
When you have worked 1 round of double crochets after the marker thread, increase 1 double crochet for the thumb on each side of the first stitch at the beginning of the round – increase 1 double crochet by working 2 double crochets in the same double crochet. Increase in this way on each side of this first stitch every 2nd round a total of 3-4 times = 27-31 double crochets on the round (7-9 of these stitches are thumb stitches). Cut the strand.
The next round is worked as follows: Skip the first 4-5 double crochets on the round, work 1 double crochet in each of the next 20-22 double crochets (work in the back loop) = 3-4 double crochets left on round. Now continue with the next round without working the last 3-4 double crochets on the round. NOTE: Mark the beginning of the round with a marker thread between the last stitch on the round and the first stitch on the next round, allow the marker thread to follow your work onwards.
Work 1 double crochet in each of the 20-22 double crochets (work in back loop) until piece measures 18-20 cm from the marker thread. Then decrease as follows:
ROUND 1: Work 1 double crochet in each double crochet (in back loop) and AT THE SAME TIME decrease 4-5 double crochets evenly on round - read DECREASE TIP = 16-17 double crochets on round.
ROUND 2: Work 1 double crochet in each double crochet and AT THE SAME TIME decrease 4-5 double crochets evenly on round = 12 double crochets.
ROUND 3: Work 2 and 2 double crochets together = 6 double crochets left on round. Cut the strand, tack it up and down through the remaining stitches, tighten and fasten well.

THUMB:
= 7-9 stitches. The first round is worked as follows: Work 1 double crochet in each double crochet (work in back loop), in addition work 2 double crochets precisely in the transition between thumb and mitten = 9-11 double crochets on the round. Work 4-5 rounds with 1 double crochet in each double crochet. On the next round work 2 and 2 double crochets together until there is 1 double crochet left on the round, work the last double crochet = 5-6 double crochets left. Cut the strand, tack it up and down through the remaining stitches, tighten and fasten well.

CORDS:
Cut 2 strands of medium grey, each 120 cm long. Twist them together until they begin to resist, fold the cord double and it will continue to twist. Tie a knot in each end.
Make 2 small pom poms of approx. 2-3 cm in diameter. Sew 1 pom pom to the one end of the cord. Thread the cord up and down through the stitches in the transition between cuff and mitten (the cord should start and finish on the outside of the mitten so that the pom pom is not in the palm). Sew the other pom pom to the other end of the cord.

RIGHT MITTEN:
Work cuff and mitten in the same way as the left mitten, but when increasing to thumb increase on each side of the last stitch on the round (instead of on each side of the first stitch). The rest of the mitten and thumb are worked in the same way as the left mitten.
Make cords with pom poms in the same way as for the left mitten.
Do you have a question? See a list of frequently asked questions (FAQ)

Knitting tension is what determines the final measurements of your work, and is usually measured per 10 x 10 cm. It is provided like so: number of stitches in width x number of rows in height - eg: 19 stitches x 26 rows = 10 x 10 cm.

The knitting tension is very individual; some people knit/crochet loosely while others work tightly. You adjust the knitting tension with the needle size, which is why the suggested needle size is only meant as a guide! You need to adjust this (up or down) to ensure that YOUR knitting tension matches the knitting tension provided in the pattern. If you work with a different knitting tension than provided you will have a different yarn consumption, and your work will have different measurements than what the pattern suggests.

The knitting tension also determines which yarns can replace each other. As long as you achieve the same knitting tension you can replace one yarn with another.

See DROPS lesson: How to measure your tension/gauge

See DROPS video: How to make a gauge tension swatch

The required amount of yarn is provided in grams, eg: 450 g. To calculate how many balls you’ll need you first need to know how many grams are in 1 ball (25g, 50g or 100g). This information is available if you click on the individual yarn quality on our pages. Divide the amount required with the amount of each ball. For example, if each ball is 50g (the most common amount), the calculation will be as follows: 450 / 50 = 9 balls.

The important thing when changing from one yarn to another is that the knitting/crochet tension remains the same. This is so that the measurements of the finished piece will be the same as on the sketch provided. It is easier to achieve the same knitting tension using yarns from the same yarn group. It is also possible to work with multiple strands of a thinner yarn to achieve the knitting tension of a thicker one. Please try our yarn converter. We recommend you to always work a test swatch.

Please NOTE: when changing yarn the garment might have a different look and feel to the garment in the photo, due to individual properties and qualities of each yarn.

See DROPS lesson: Can I use a different yarn than the one mentioned in the pattern?

All our yarns are categorised into yarn groups (from A to F) according to thickness and knitting tension – group A contains the thinnest yarns and group F the thickest. This makes it easier for you to find alternative yarns to our patterns, should you wish to switch yarn. All yarns within the same group have a similar knitting tension and can easily replace each other. However, different yarn qualities have different structures and properties which will give the finished work a unique look and feel.

Click here for an overview of the yarns in each yarn group

At the top of all our patterns you’ll find a link to our yarn calculator, which is a helpful tool should you wish to use a different yarn than suggested. By filling in the yarn quality you wish to replace, the amount (in your size) and number of strands, the calculator will present good alternative yarns with the same knitting tension. Additionally it will tell you how much you’ll require in the new qualities and whether you’ll need to work with multiple strands. Most skeins are 50g (some are 25g or 100g).

If the pattern is worked with multiple colours, every colour will have to be calculated separately. Similarly, if the pattern is worked with several strands of different yarns (for example 1 strand Alpaca and 1 strand Kid-Silk) you will have to find alternatives for each, individually.

Click here to see our yarn calculator

Since different yarns have different qualities and textures we have chosen to keep the original yarn in our patterns. However, you can easily find options among our available qualities by using our yarn calculator, or simply pick a yarn from the same yarn group.

It is possible that some retailers still have discontinued yarns in stock, or that someone has a few skeins at home that they would like to find patterns for.

The yarn calculator will provide both alternative yarn as well as required amount in the new quality.

If you think it's hard to decide what size to make, it can be a good idea to measure a garment you own already and like the size of. Then you can pick the size by comparing those measures with the ones available in the pattern's size chart.

You'll find the size chart at the bottom of the pattern.

See DROPS lesson: How to read size chart

The needle size provided in the pattern serves only as a guide, the important thing is to follow the knitting tension. And since knitting tension is very individual, you will have to adjust the needle size to ensure that YOUR tension is the same as in the pattern – maybe you’ll have to adjust 1, or even 2 needle sizes, up or down to achieve the correct tension. For this, we recommend that you work test swatches.

Should you work with a different knitting tension than the one provided, the measurements of the finished garment might deviate from the measurement sketch.

See DROPS lesson: How to measure your tension/gauge

See DROPS video: How to make a tension/gauge swatch

Working a garment top-down provides more flexibility and room for personal adjustment. For example it is easier to try the garment on while working, as well as making adjustments to length of yoke and shoulder caps.

The instructions are carefully explaining every step, in the correct order. Diagrams are adjusted to the knitting direction and are worked as usual.

The diagram depicts all rows/rounds, and every stitch seen from the right side. It is read from bottom to top, from right to left. 1 square = 1 stitch.

When working back and forth, every other row is worked from the right side and every other row is worked from the wrong side. When working from the wrong side, the diagram will have to be worked reversed: from left to right, knit stitches are purled, purl stitches are knit etc.

When working in the round every round is worked from the right side and the diagram are worked from right to left on all rounds.

See DROPS lesson: How to read knitting diagrams

The diagram depicts all rows/rounds, and every stitch seen from the right side. It is worked from bottom to top, from right to left.

When working back and forth every other row is worked from the right side: from right to left and every other row is worked from the wrong side: from left to right.

When working in the round, every row in the diagram are worked from the right side, from right to left.

When working a circular diagram you start in the middle and work your way outwards, counter clockwise, row by row.

The rows usually start with a given number of chain stitches (equivalent to the height of the following stitch), this will either be depicted in the diagram or explained in the pattern.

See DROPS lesson: How to read crochet diagrams

Instructions for working several diagrams after each other on the same row/round, will often be written like so: “work A.1, A.2, A.3 a total of 0-0-2-3-4 times". This means you work A.1 once, then A.2 is worked once, and A.3 is repeated (in width) the number of times provided for your size – in this case like so: S = 0 times, M = 0 times, L=2 times, XL= 3 times and XXL = 4 times.

The diagrams are worked as usual: begin with the first row in A.1, then work the first row in A.2 etc.

See DROPS lesson: How to read knitting diagrams

See DROPS lesson: How to read crochet diagrams

The total width of the garment (from wrist-to-wrist) will be larger in the larger sizes, despite the actual sleeves being shorter. The larger sizes have longer sleeve caps and wider shoulders, so there will be a good fit in all sizes.

The measurement sketch/schematic drawing provides information regarding the full length of the garment. If it’s a jumper or a jacket the length is measured from the highest point on the shoulder closest to the neckline, and straight down to the bottom of the garment. It is NOT measured from the tip of shoulder. Similarly, the length of yoke is measured from the highest point on the shoulder and down to where yoke is split into body and sleeves.

On a jacket measures are never taken along bands, unless specifically stated. Always measure inside band stitches when measuring the length.

See DROPS lesson: How to read a schematic drawing

Diagrams are often repeated on the round or in height. 1 repeat is the diagram the way it appears in the pattern. If it says to work 5 repeats of A.1 in the round, then you work A.1 a total of 5 times after/next to each other in the round. If it says to work 2 repeats of A.1 vertically/in height you work the entire diagram once, then begin again at the start and work the entire diagram one more time.

Chain stitches are slightly narrower than other stitches and to avoid working the cast-on edge too tight, we simply chain more stitches to begin with. The stitch count will be adjusted on the following row to fit the pattern and measurement sketch.

The rib edge is more elastic and will contract slightly compared to, for example, stocking stitch. By increasing before the rib edge, you avoid a visible difference in width between the rib edge and the rest of the body.

It’s very easy to cast off too tightly, and by making yarn overs while casting off (and simultaneously casting these off) you avoid a too tight cast off edge.

See DROPS video: How to bind off with yarn overs (yo)

To achieve an even increase (or decrease) you can increase on, for example: every 3rd and 4th row alternately, like so: work 2 rows and increase on the 3rd row, work 3 rows and increase on the 4th. Repeat this until the increase is complete.

See DROPS lesson: Increase or decrease 1 st on every 3rd and 4th row alternately

Should you prefer to work in the round instead of back and forth, you may of course adjust the pattern. You’ll need to add steeks mid-front (usually 5 stitches), and follow the instructions. When you would normally turn and work from the wrong side, simply work across the steek and continue in the round. At the end you’ll cut the piece open, pick up stitches to work bands, and cover the cut edges.

See DROPS video: How to knit steeks and cut open

Should you prefer to work back and forth instead of in the round, you may of course adjust the pattern so you work the pieces separately and then assemble them at the end. Divide the stitches for the body in 2, add 1 edge stitch in each side (for sewing) and work the front and back pieces separately.

See DROPS lesson: Can I adapt a pattern for circular needles into straight needles?

Pattern repeats can vary slightly in the different sizes, in order to get the correct proportions. If you’re not working the exact same size as the garment in the photo, yours might deviate slightly. This has been carefully developed and adjusted so that the complete impression of the garment is the same in all sizes.

Make sure to follow instructions and diagrams for your size!

If you have found a pattern you like which is available in women’s size it’s not very difficult to convert it to men’s size. The biggest difference will be the length of sleeves and body. Start working on the women size that you think would fit across the chest. The additional length will be worked right before you cast off for the armhole/sleeve cap. If the pattern is worked top-down you can add the length right after the armhole or before the first decrease on sleeve.

Regarding additional yarn amount, this will depend on how much length you add, but it is better with a skein too many than too few.

All yarns will have excess fibres (from production) that might come off as lint or shedding. Brushed yarns (ie hairier yarns) have more of these loose, excess fibres, causing more shedding.

Shedding also depends on what is worn under or over the garment, and whether this pulls at the yarn fibres. It’s therefore not possible to guarantee that there will be no shedding

Below are some tips on how to get the best result when working with hairier yarns:

1. When the garment is finished (before you wash it) shake it vigorously so the looser hairs come off. NOTE: do NOT use a lint roller, brush or any method that pulls at the yarn.

2. Place the garment in a plastic bag and put it in your freezer - the temperature will cause the fibres to become less attached to each other, and excess fibres will come off easier.

3. Leave in the freezer for a few hours before taking it out and shaking it again.

4. Wash the garment according to the instructions on the yarn label.

Pilling is a natural process that happens to even the most exclusive of fibers. It's a natural sign of wear and tear that is hard to avoid, and that is most visible in high friction areas of your garment like a sweater's arms and cuffs.

You can make your garment look as new by removing the pilling, using a fabric comb or a pill/lint remover.

Still can't find the answer you need? Then scroll down and leave your question so one of our experts can try to help you. This will be done normally within 5 to 10 working days.
In the meantime, you can read the questions and answers that others have left to this pattern or join the DROPS Workshop on Facebook to get help from fellow knitters/crocheters!

You might also like...

Post a comment to pattern DROPS 182-33

We would love to hear what you have to say about this pattern!

If you want to leave a question, please make sure you select the correct category in the form below, to speed up the answering process. Required fields are marked *.

Comments / Questions (4)

country flag Agnethe Markussen wrote:

Hei, hvordan skal jeg klare å få det til å se ut som en vitt, sto veldig vanskelig i oppskriften, er på den omg hvor man skal hoppe over masker (til tommel’n). Og ikke hekle de siste 4 maskene, men hvordan skal jeg klare å få den overgangen som skiller tommel til hånda?

08.11.2021 - 10:36

DROPS Design answered:

Hei Agnethe. Når du har økt alle maskene til tommelen og har 27 eller 31 fastmasker (avhengig av hvilken str. du hekler), skal du klippe tråden. Hopp over de første 4 eller 5 fastmaskene på omgangen (merketråden sitter i 1. maske). start med ny tråd. Hekle 1 fastmaske i hver av de neste 20-22 fastmaskene = 3 eller 4 fastmasker tilbake på omgangen. Nå hekler du i den første masken du startet i, på denne omgangen, altså det er 7 eller 9 masker det ikke hekles over. mvh DROPS Design

15.11.2021 - 08:37

country flag Tania wrote:

El patrón dice vuelta 1 punto medio, vuelta 2 punto bajo y vuelta 3 punto alto, y repetir las vueltas 1-4. pero el patrón sólo habla de 3 vueltas. me puedes explicar?

27.10.2020 - 18:55

DROPS Design answered:

Hola Tania. Tienes razón. Ha sidp una errata al publicar el patrón. VUELTA 4: Trabajar 1 punto bajo en el bucle posterior de cada punto alto.

01.11.2020 - 13:03

country flag Francesca wrote:

Grazie molto chiara mi ero persa in un bicchiere d'acqua ora mi sento più sicura...

06.01.2019 - 16:52

country flag Francesca wrote:

Ho comprato la lana e vorrei iniziare il berretto ma non ho capito al primo giro cosa significa 12/12 mezze maglie? Poi dice 18/18 maglie basse al secondo giro? Potete darmi dei chiarimenti vi ringrazio

06.01.2019 - 16:39

DROPS Design answered:

Buongiorno Francesca. I numeri fanno riferimento alle maglie da lavorare a seconda della taglia. Per la taglia S/M deve considerare il primo numero , per la M/L il secondo numero. Quindi se la sua taglia è la S/M, al primo giro lavora 12 mezze maglie alte e alla fine del secondo giro deve avere 18 maglie basse. Buon lavoro!

06.01.2019 - 16:49