DROPS Cotton Light
DROPS Cotton Light
50% Cotton, 50% Polyester
from 1.80 $ /50g
Get the yarn to make this pattern from 18.00$.

The yarn cost is calculated from the pattern’s smallest size and the yarn’s cheapest product type. Looking for an even better price? You might find it on the DROPS Deals!

DROPS SS24

Miles Away

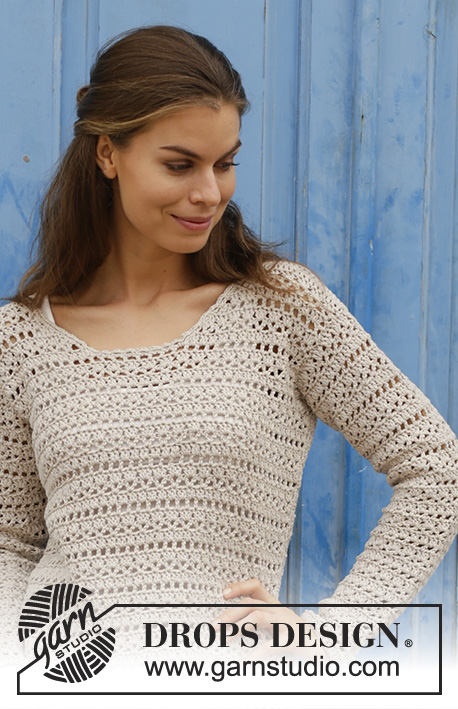
Crocheted sweater with lace pattern. Sizes S - XXXL. The piece is worked in DROPS Cotton Light.

DROPS 187-2
DROPS Design: Pattern no cl-084
Yarn group B
-----------------------------------------------------------
Sizes: S - M - L - XL - XXL - XXXL
Materials:
DROPS COTTON LIGHT from Garnstudio (belongs to yarn group B)
500-550-600-650-750-800 g color 21, light beige

The piece can also be crocheted with yarn from:
"Alternative yarn (Yarn group B)" – see link below.

DROPS CROCHET HOOK SIZE 4.5 MM/US 7 – or the size needed to get 16 double crochets and 8 rows on 10 cm / 4" in width and 10 cm / 4" in height.

-------------------------------------------------------

Alternative Yarn – See how to change yarns here
Yarn Groups A to F – Use the same pattern and change the yarn here
Yarn usage using an alternative yarn – Use our yarn converter here

-------------------------------------------------------

DROPS Cotton Light
DROPS Cotton Light
50% Cotton, 50% Polyester
from 1.80 $ /50g
Get the yarn to make this pattern from 18.00$.

The yarn cost is calculated from the pattern’s smallest size and the yarn’s cheapest product type. Looking for an even better price? You might find it on the DROPS Deals!

Pattern instructions

NOTE: This pattern is written in American English. All measurements in charts are in cm. For conversion from inches to cm - click here. There are different terms for crocheting in American and British English. If this pattern includes crochet, click for "crochet terms" here. For this pattern in British English, please click here.
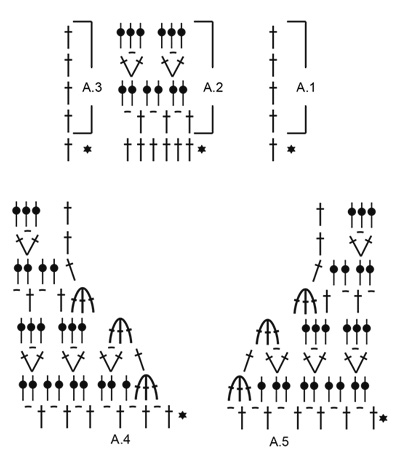
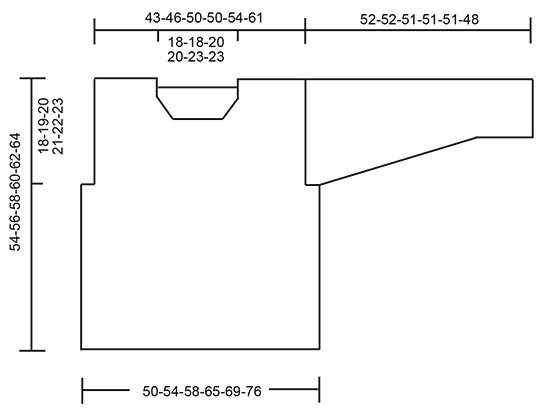
INFORMATION FOR THE PATTERN:

PATTERN:
See diagrams A.1 to A.5.

CROCHET INFO:
At the beginning of each row of double crochets, replace the first double crochet with 3 chain stitches.
----------------------------------------------------------

SWEATER:
The piece is worked back and forth. First work the back and front pieces separately and then work the sleeves. All pieces are sewn together at the end. To finish, crochet an edge around the neck.

BACK PIECE:
Work 94-101-108-122-129-143 chain stitches with hook size 4.5 mm/US 7 and Cotton Light. Work 1 double crochet in the 4th chain stitch from the hook (= 2 double crochets), 1 double crochet in each of the next 5 chain stitches, * 1 double crochet in each of the next 6 chain stitches, skip 1 chain stitch *, work from *-* until there is 1 chain stitch left, 1 double crochet in the last chain stitch = 80-86-92-104-110-122 double crochets. Then work as follows from the right side: Work A.1 – read CROCHET INFO, A.2 (= 6 stitches) a total of 13-14-15-17-18-20 times in width and finish with A.3 over the last double crochet. Continue this pattern upwards. REMEMBER THE CROCHET GAUGE! A.1 to A.3 are repeated in height.
When the piece measures 36-37-38-39-40-41 cm / 14¼"-14½"-15"-14¼"-15¾"-16⅛", work the armholes as follows: Cut the strand, skip 6-6-6-12-12-12 stitches (= armhole), work 1 slip stitch in the next stitch, 3 chain stitches, A.2 over the next 66-72-78-78-84-96 stitches and finish with A.3 over the next stitch (there are now 6-6-6-12-12-12 stitches left for the other armhole = a total of 68-74-80-80-86-98 stitches on the row. On the next row work A.1 in the last double crochet. Continue the pattern like this.
When the piece measures 52-54-56-58-60-62 cm / 20½"-21¼"-22"-22¾"-23⅝"-24⅜", adjust so that the last row was worked from the wrong side, finish each shoulder separately. Work 1 double crochet in each of the first 20-23-24-24-25-31 double crochets (= shoulder). Work 2 rows with 1 double crochet in each. Cut and fasten strand. The piece measures a total of 54-56-58-60-62-64 cm / 21¼"-22"-22¾"-23⅝"-24⅜"-25¼". Skip 28-28-32-32-36-36 stitches for neck, work 1 slip stitch in the next stitch and 3 chain stitches (= 1 double crochet), work 1 double crochet in each of the last 19-22-23-23-24-30 stitches. Finish the shoulder in the same way as the other shoulder.

FRONT PIECE:
Work as for back piece until piece measures 42-44-44-46-46-48 cm / 16½"-17¼"-17¼"-18"-18"-19", adjust so that the last row worked is the first row of A.2 (the last row is worked from the right side).
Now divide the piece and each shoulder is finished separately as follows:

RIGHT SHOULDER (when the garment is worn):
The first row is worked from the wrong side. Work A.3 over the first 1-1-2-2-3-3 stitches (work around chain stitches and in double crochets), work A.2 over the next 15-18-18-18-18-24 stitches, work A.4 over the next 12 stitches, turn the piece. Continue the pattern and decreases to neck according to diagram A.4. When A.4 has been worked 1 time in height, there are 20-23-24-24-25-31 double crochets on the last row. Work pattern until the piece measures 52-54-56-58-62 cm / 20½"-21¼"-22"-22¾"-24½", adjust so that you finish with 1 row of double crochets from the wrong side. Work 1 double crochet in each double crochet until the piece measures 54-56-58-60-62-64 cm / 21¼"-22"-22¾"-23⅝"-24⅜"-25¼". Cut and fasten the strand.

LEFT SHOULDER (when the garment is worn):
Now work the left shoulder as follows (first row = wrong side):
Skip 12-12-16-16-20-20 double crochets from where A.4 was worked (= for neck), work 1 slip stitch in the next stitch, then work A.5 over the same stitch and the next 11 stitches (= a total of 12 stitches), work A.2 over the next 15-18-18-18-18-24 stitches and finish with A.1 over the last 1-1-2-2-3-3 stitches (work around chain stitches and in double crochets). Continue the pattern and decrease according to diagram A.5. When A.5 has been worked 1 time in height, there are 20-23-24-24-25-31 double crochets on the last row. Work pattern until the piece measures 52-54-56-58-62 cm / ½"-21¼"-22"-22¾"-24½", adjust to match the right shoulder. Work 1 double crochet in each double crochet until the piece measures 54-56-58-60-62-64 cm / 21¼"-22"-22¾"-23⅝"-24⅜"-25¼". Cut and fasten the strand.

SLEEVE:
The piece is worked back and forth. Work 45-45-49-49-52-52 chain stitches with hook size 4.5 mm/US 7 and Cotton Light. Work 1 double crochet in the 4th chain stitch from the hook (= 2 double crochets), 1 double crochet in each of the next 5-5-7-7-5-5 chain stitches, * 1 double crochet in each of the next 6 chain stitches, skip 1 chain stitch *, work from *-* until there are 1-1-3-3-1-1 chain stitches left, 1 double crochet in each of the last 1-1-3-3-1-1 chain stitches = 38-38-42-42-44-44 double crochets.
Work A.1 over the first 1-1-3-3-1-1 double crochets, A.2 until there are 1-1-3-3-1-1 double crochets left (= 6-6-6-6-7-7 times in width), A.3 over the last 1-1-3-3-1-1 double crochets. Work A.1 to A.3 in height to finished length. When the piece measures 10 cm / 4" increase 1 double crochet in each side of the piece by working 2 double crochets in the first and last double crochet on the row (= 2 double crochets increased). Increase like this every 4-3½-3½-2½-2½-2 cm / 1½"-1¼"-1¼"-⅞"-⅞"-¾" a total of 10-11-11-13-13-15 times = 58-60-64-68-70-74 stitches. The increased stitches are worked into A.2 as you go. NOTE: There is always 1 double crochet (or 3 chain stitches = 1 double crochet) in each side of the piece. When the piece measures 48-48-47-44-44-41 cm / 19"-19"-18½"-17¼"-17¼"-16", insert 1 marker at the beginning of the row; the sleeve seams will later be sewn as far as the marker and the remaining rows sewn together with the 6-6-6-12-12-12 double crochets on the back/front piece which were skipped to make the armhole in each side of the piece (= mid under sleeve). Continue back and forth until the piece measures 52-52-51-51-51-48 cm / 20½"-20½"-20"-20"-20"-19" (shorter measurements in larger sizes due to wider shoulders). Cut and fasten strand. Work 1 more sleeve in the same way.

ASSEMBLY:
Sew shoulder seams in the outermost loop of the outermost stitch. Sew in the sleeves, the marker on the sleeve marks the side seam on the front and back pieces and the rows worked after the marker are sewn to the 6-6-6-12-12-12 stitches skipped for armholes on front and back pieces. Start at bottom of sleeve and sew sleeve seam in the outermost loop of the outermost stitch, continue with side seam on front and back pieces. Cut and fasten all strands.

NECK:
Crochet an edge around the neck as follows from mid top of shoulder: Work 1 single crochet, * 3 chain stitches, skip approx. 1 cm / ⅜", 1 single crochet *, work from *-* around the whole neck and finish with 3 chain stitches and 1 slip stitch in the first single crochet at the beginning of the round, make sure the edge is not tight. Cut and fasten the strand.

Diagram

All measurements in charts are in cm.

symbols = 1 chain stitch
symbols = 1 double crochet in double crochet
symbols = 1 double crochet around chain stitch
symbols = this row has already been worked; it shows how the next row is worked in/around the stitches
symbols = work 1 double crochet in each of the next 2 stitches, but wait with the last yarn over and pull through, work 1 more double crochet in the next stitch and pull the last yarn over through all 4 loops on the hook (when the row starts like this, replace the first double crochet with 3 chain stitches)
diagram
diagram
Do you have a question? See a list of frequently asked questions (FAQ)

Knitting tension is what determines the final measurements of your work, and is usually measured per 10 x 10 cm. It is provided like so: number of stitches in width x number of rows in height - eg: 19 stitches x 26 rows = 10 x 10 cm.

The knitting tension is very individual; some people knit/crochet loosely while others work tightly. You adjust the knitting tension with the needle size, which is why the suggested needle size only serve as a guide! You need to adjust this (up or down) to ensure that YOUR knitting tension matches the knitting tension provided in the pattern. If you work with a different knitting tension than provided you will have a different yarn consumption, and your work will have different measurements than what the pattern suggests.

The knitting tension also determines which yarns can replace each other. As long as you achieve the same knitting tension you can replace one yarn with another.

See DROPS lesson: How to measure your tension/gauge

See DROPS video: How to make a gauge tension swatch

The required amount of yarn is provided in grams, eg: 450 g. To calculate how many balls you’ll need you first need to know how many grams are in 1 ball (25g, 50g or 100g). This information is available if you click on the individual yarn quality on our pages. Divide the amount required with the amount of each ball. For example, if each ball is 50g (the most common amount), the calculation will be as follows: 450 / 50 = 9 balls.

The important thing when changing from one yarn to another is that the knitting/crochet tension remains the same. This is so that the measurements of the finished piece will be the same as on the sketch provided. It is easier to achieve the same knitting tension using yarns from the same yarn group. It is also possible to work with multiple strands of a thinner yarn to achieve the knitting tension of a thicker one. Please try our yarn converter. We recommend you to always work a test swatch.

Please NOTE: when changing yarn the garment might have a different look and feel to the garment in the photo, due to individual properties and qualities of each yarn.

See DROPS lesson: Can I use a different yarn than the one mentioned in the pattern?

All our yarns are categorised into yarn groups (from A to F) according to thickness and knitting tension – group A contains the thinnest yarns and group F the thickest. This makes it easier for you to find alternative yarns to our patterns, should you wish to switch yarn. All yarns within the same group have a similar knitting tension and can easily replace each other. However, different yarn qualities have different structures and properties which will give the finished work a unique look and feel.

Click here for an overview of the yarns in each yarn group

At the top of all our patterns you’ll find a link to our yarn converter, which is a helpful tool should you wish to use a different yarn than suggested. By filling in the yarn quality you wish to replace, the amount (in your size) and number of strands, the converter will present good alternative yarns with the same knitting tension. Additionally it will tell you how much you’ll require in the new qualities and whether you’ll need to work with multiple strands. Most skeins are 50g (some are 25g or 100g).

If the pattern is worked with multiple colours, every colour will have to be converted separately. Similarly, if the pattern is worked with several strands of different yarns (for example 1 strand Alpaca and 1 strand Kid-Silk) you will have to find alternatives for each, individually.

Click here to see our yarn converter

Since different yarns have different qualities and textures we have chosen to keep the original yarn in our patterns. However, you can easily find options among our available qualities by using our yarn converter, or simply pick a yarn from the same yarn group.

It is possible that some retailers still have discontinued yarns in stock, or that someone has a few skeins at home that they would like to find patterns for.

The yarn converter will provide both alternative yarn as well as required amount in the new quality.

If you think it's hard to decide what size to make, it can be a good idea to measure a garment you own already and like the size of. Then you can pick the size by comparing those measures with the ones available in the pattern's size chart.

You'll find the size chart at the bottom of the pattern.

See DROPS lesson: How to read size chart

The needle size provided in the pattern serves only as a guide, the important thing is to follow the knitting tension. And since knitting tension is very individual, you will have to adjust the needle size to ensure that YOUR tension is the same as in the pattern – maybe you’ll have to adjust 1, or even 2 needle sizes, up or down to achieve the correct tension. For this, we recommend that you work test swatches.

Should you work with a different knitting tension than the one provided, the measurements of the finished garment might deviate from the measurement sketch.

See DROPS lesson: How to measure your tension/gauge

See DROPS video: How to make a gauge tension swatch

Working a garment top-down provides more flexibility and room for personal adjustment. For example it is easier to try the garment on while working, as well as making adjustments to length of yoke and shoulder caps.

The instructions are carefully explaining every step, in the correct order. Diagrams are adjusted to the knitting direction and are worked as usual.

The diagram depicts all rows/rounds, and every stitch seen from the right side. It is read from bottom to top, from right to left. 1 square = 1 stitch.

When working back and forth, every other row is worked from the right side and every other row is worked from the wrong side. When working from the wrong side, the diagram will have to be worked reversed: from left to right, knit stitches are purled, purl stitches are knit etc.

When working in the round every round is worked from the right side and the diagram are worked from right to left on all rounds.

See DROPS lesson: How to read knitting diagrams

The diagram depicts all rows/rounds, and every stitch seen from the right side. It is worked from bottom to top, from right to left.

When working back and forth every other row is worked from the right side: from right to left and every other row is worked from the wrong side: from left to right.

When working in the round, every row in the diagram are worked from the right side, from right to left.

When working a circular diagram you start in the middle and work your way outwards, counter clockwise, row by row.

The rows usually start with a given number of chain stitches (equivalent to the height of the following stitch), this will either be depicted in the diagram or explained in the pattern.

See DROPS lesson: How to read crochet diagrams

Instructions for working several diagrams after each other on the same row/round, will often be written like so: “work A.1, A.2, A.3 a total of 0-0-2-3-4 times". This means you work A.1 once, then A.2 is worked once, and A.3 is repeated (in width) the number of times provided for your size – in this case like so: S = 0 times, M = 0 times, L=2 times, XL= 3 times and XXL = 4 times.

The diagrams are worked as usual: begin with the first row in A.1, then work the first row in A.2 etc.

See DROPS lesson: How to read knitting diagrams

See DROPS lesson: How to read crochet diagrams

The total width of the garment (from wrist-to-wrist) will be larger in the larger sizes, despite the actual sleeves being shorter. The larger sizes have longer sleeve caps and wider shoulders, so there will be a good fit in all sizes.

The measurement sketch/schematic drawing provides information regarding the full length of the garment. If it’s a jumper or a jacket the length is measured from the highest point on the shoulder (usually closest to the neckline), and straight down to the bottom of the garment. It is NOT measured from the tip of shoulder. Similarly, the length of yoke is measured from the highest point on the shoulder and down to where yoke is split into body and sleeves.

See DROPS lesson: How to read a schematic drawing

Diagrams are often repeated on the round or in height. 1 repeat is the diagram the way it appears in the pattern. If it says to work 5 repeats of A.1 in the round, then you work A.1 a total of 5 times after/next to each other in the round. If it says to work 2 repeats of A.1 vertically/in height you work the entire diagram once, then begin again at the start and work the entire diagram one more time.

Chain stitches are slightly narrower than other stitches and to avoid working the cast-on edge too tight, we simply chain more stitches to begin with. The stitch count will be adjusted on the following row to fit the pattern and measurement sketch.

The rib edge is more elastic and will contract slightly compared to, for example, stocking stitch. By increasing before the rib edge, you avoid a visible difference in width between the rib edge and the rest of the body.

It’s very easy to cast off too tightly, and by making yarn overs while casting off (and simultaneously casting these off) you avoid a too tight cast off edge.

See DROPS video: How to bind off with yarn overs (yo)

To achieve an even increase (or decrease) you can increase on, for example: every 3rd and 4th row alternately, like so: work 2 rows and increase on the 3rd row, work 3 rows and increase on the 4th. Repeat this until the increase is complete.

See DROPS lesson: Increase or decrease 1 st on every 3rd and 4th row alternately

Should you prefer to work in the round instead of back and forth, you may of course adjust the pattern. You’ll need to add steeks mid-front (usually 5 stitches), and follow the instructions. When you would normally turn and work from the wrong side, simply work across the steek and continue in the round. At the end you’ll cut the piece open, pick up stitches to work bands, and cover the cut edges.

See DROPS video: How to knit steeks and cut open

Should you prefer to work back and forth instead of in the round, you may of course adjust the pattern so you work the pieces separately and then assemble them at the end. Divide the stitches for the body in 2, add 1 edge stitch in each side (for sewing) and work the front and back pieces separately.

See DROPS lesson: Can I adapt a pattern for circular needles into straight needles?

Pattern repeats can vary slightly in the different sizes, in order to get the correct proportions. If you’re not working the exact same size as the garment in the photo, yours might deviate slightly. This has been carefully developed and adjusted so that the complete impression of the garment is the same in all sizes.

Make sure to follow instructions and diagrams for your size!

If you have found a pattern you like which is available in women’s size it’s not very difficult to convert it to men’s size. The biggest difference will be the length of sleeves and body. Start working on the women size that you think would fit across the chest. The additional length will be worked right before you cast off for the armhole/sleeve cap. If the pattern is worked top-down you can add the length right after the armhole or before the first decrease on sleeve.

Regarding additional yarn amount, this will depend on how much length you add, but it is better with a skein too many than too few.

All yarns will have excess fibres (from production) that might come off as lint or shedding. Brushed yarns (ie hairier yarns) have more of these loose, excess fibres, causing more shedding.

Shedding also depends on what is worn under or over the garment, and whether this pulls at the yarn fibres. It’s therefore not possible to guarantee that there will be no shedding

Below are some tips on how to get the best result when working with hairier yarns:

1. When the garment is finished (before you wash it) shake it vigorously so the looser hairs come off. NOTE: do NOT use a lint roller, brush or any method that pulls at the yarn.

2. Place the garment in a plastic bag and put it in your freezer - the temperature will cause the fibres to become less attached to each other, and excess fibres will come off easier.

3. Leave in the freezer for a few hours before taking it out and shaking it again.

4. Wash the garment according to the instructions on the yarn label.

Pilling is a natural process that happens to even the most exclusive of fibers. It's a natural sign of wear and tear that is hard to avoid, and that is most visible in high friction areas of your garment like a sweater's arms and cuffs.

You can make your garment look as new by removing the pilling, using a fabric comb or a pill/lint remover.

Still can't find the answer you need? Then scroll down and leave your question so one of our experts can try to help you. This will be done normally within 5 to 10 working days.
In the meantime, you can read the questions and answers that others have left to this pattern or join the DROPS Workshop on Facebook to get help from fellow knitters/crocheters!

You might also like...

Miles Away

Georgia, Canada

Miles Away

Purebeck, Germany

Miles Away

Diane, United Kingdom

Miles Away

JMFS, United States

187-2 Miles Away

Nathalie, France

Post a comment to pattern DROPS 187-2

We would love to hear what you have to say about this pattern!

If you want to leave a question, please make sure you select the correct category in the form below, to speed up the answering process. Required fields are marked *.

Comments / Questions (90)

country flag Annika Kläckta wrote:

Vielleicht habe ich auch falsch gehäkelt?Nach 54 cm Länge (inkl Armausschnitt) habe ich Rechts und links jeweils 2 Reihen reine Stäbchen gehäkelt a 22/23 Stäbchen. Dazwischen ist der Halsausschnitt mit 28 M unbehäkelt. Wenn ich nun beginne die Schultern separat über diese 22/23 Stäbchen zu häkeln habe ich nur 22 bzw. 23 Maschen. Es sollen aber separat jeweils 18M A2+12 A4/A5 über diese Stäbchen gehäkelt werden (30M). Das geht nicht auf. Da habe ich einen Knoten oder Denkfehler...

27.02.2024 - 16:11

DROPS Design answered:

Liebe Annika, am Vorderteil arbeiten Sie den Halsausschnitt NICHT zuerst wie am Rückenteil. Der Halsausschnitt beginnt beim Vorderteil früher als beim Rückenteil, Sie häkeln das Vorderteil nur bis zu einer Länge von 44 cm so wie das Rückenteil, der Halsausschnitt des Rückenteils wird aber erst bei einer Länge von 54 cm gehäkelt. D.h. Sie haben noch die ganze Reihe zur Verfügung (74 Maschen) und beginnen das Teilen des Vorderteils für den Halsausschnitt damit, dass Sie A.3, A.2 und A.4 wie beschrieben über die ersten 31 Maschen der Rück-Reihe häkeln. Sie sind also gar nicht auf die 23 Stäbchen angewiesen, weil Sie noch gar keinen Halsausschnitt haben. Gutes Gelingen weiterhin!

27.02.2024 - 20:59

country flag Annika Kläckta wrote:

Lieben Dank für die Antwort. Ich verstehe es leider immer noch nicht. Ggf habe ich vorher auch falsch gehäkelt?! Aktuell habe ich jeweils rechts und links des Halsausschnittes 2 Reihen reine Stäbchen a 22/23 (kein Muster). Ich beginne dann zum Halsausschnitt A2 zu häkeln (18 Maschen), dann habe ich noch 4 übrig bis zum Halsausschnitt. Das heißt A4 häkel ich in/über den Halsausschnitt? Liebe Grüße, Annika Kläckta

27.02.2024 - 10:48

DROPS Design answered:

Liebe Frau Kläckta, beide Schulter werden separat gehäkelt, dh zuerst häkelt man die rechte Schulter mit der 1. Reihe = Rückreihe die mit A.4 für den Hals endet; Hinreihen häkeln Sie mit A.4, dann wierdeholen Sie A.2 und enden Sie mit A.3, wenn A.4 fertig ist, sind est nur noch 4 Stäbchen in A.4, diese häkeln Sie wie ein halbes A.2 + A.1 (=Anfang/Ende der Reihen). Wenn die Schulter fertig ist häkeln Sie die linke Schulter und nehmen Sie für den Halsausschnitt mit A.5 dieses Mal. Die mittleren Maschen werden dann ungehäkelt für den Hals - oder misverstehe ich Ihre Frage?

27.02.2024 - 13:27

country flag Annika Kläckta wrote:

Liebes Design Team, Ich hänge bei folgendem Schritt: Schultern häkeln: Wo beginne ich?Ich habe nun jeweils 22/23 Maschen neben dem Halsausschnitt. Lt. Anleitung soll ich 18 Maschen A2 + 12 Maschen A4 häkeln. Ich habe habe aber doch nur 22 Maschen. Bzw. Wo beginnt die erste Reihe für die Schulter? Danke und liebe Grüße, Annika

20.02.2024 - 16:11

DROPS Design answered:

Liebe Annika, die 1. Reihe bei der rechten Schulter ist eine Rückreihe (ab Armausschnitt bis Halsausschnitt), so häkeln Sie: A.3 (wie zuvor), 6 Mal A.2 (= 18 M), und A.4 über die nächsten 12 Stäbchen (lesen Sie die 1. Reihe A.4 links nach rechts, dh mit der Abnahmen enden). So haben Sie insgesamt die ersten 31 in M / 32 M in L gehäkelt; es waren 74-80 M, es sind 31-32 M für jede Schulter gehäkelt und dazwischen 12 M nicht bearbeitet. Viel Spaß beim häkeln!

21.02.2024 - 08:08

country flag Esther Van Der Sluis wrote:

Ik lees bij de beschrijving alleen minderingen voor de hals en niets voor de armsgaten. Klopt het dat het voorpand op de hoogte van de armsgaten recht loopt en geen inspringen zoals bij het achterpand?

19.02.2024 - 08:11

DROPS Design answered:

Dag Esther,

Nee, je haakt het voorpand ook met een inspring voor de armsgaten, net als voor het achterpand. Je haakt het voorpand namelijk net zoals het achterpand, dat betekent dus ook met de minderingen voor de armsgaten

21.02.2024 - 21:16

country flag Thilde wrote:

Hej! Vad innebär ”avsluta med A.3 över sista stolpen”? Thilde

15.09.2023 - 06:53

DROPS Design answered:

Hei Thilde Du har 1 maske igjen, dette er en stolpemaske. I denne stolpemasken hekler du etter diagram A.3 (diagram A.3 består kun av en maske, en stolpemaske). mvh DROPS Design

18.09.2023 - 13:38

country flag Vijola wrote:

Graag zou ik willen weten of u voor me een schema van deze patroon hebt. Dan je wel!

07.08.2023 - 20:28

country flag Daniella wrote:

Hej! Jag blir tokig, jag får det inte att gå ihop med ökningarna på ärmarna! Jag har testat om och om igen på flera olika sätt men på varvet där man virkar 1 stolpe, i luftmaska och 1 stolpe i samma maska så blir det fel! Det går inte jämnt ut och det blir antingen för många eller för få maskor! Är ändå en erfaren virkare men får inte ihop det. Är det något som inte stämmer i mönstret?

20.04.2023 - 16:36

DROPS Design answered:

Hei Daniella Vi skal hjelpe deg så godt vi kan. Hvilken størrelse hekler du, slik at vi vet maskeantallet? Og er det økningen når arbeidet måler 10 cm og det skal økes med 1 stav i hver side? mvh DROPS Design

24.04.2023 - 12:45

country flag Susanna wrote:

Buongiorno, sono in difficoltà con le maniche del modello 187-2 in taglia L. Ho avviati 49 catenelle e lavorato la 1a riga come descritto. ottenendo 42 maglie alte. Sulla 2a riga ho lavorato il diagramma A.1 sulle prime 3 maglie alte, diagramma A.2 finché non rimangono 3 maglie alte, sulle quali ho lavorato il diagramma A3. Come proseguo sulla 3a riga? Devo lavorare lavorare A1 solo sulla 1a maglia alta, oppure lo lavoro 3 volte? E alla fine della riga? Grazie mille per l'aiuto !

22.03.2023 - 19:07

country flag Kuilman wrote:

Ik ben een ervaren haakster, maar dit patroon klopt van geen kant !!

31.01.2023 - 10:31

country flag Françoise wrote:

Ik heb reeds verschillende truien gehaakt met jullie patronen maar deze lukt echt niet. Ik ben al 5 keer herbegonnen. Telkens wordt de trui smaller

26.12.2022 - 05:37