
Popular categories
Looking for a yarn?


|
|||||||||||||||||||||||||
Silver Steps |
|||||||||||||||||||||||||
|
|
|||||||||||||||||||||||||
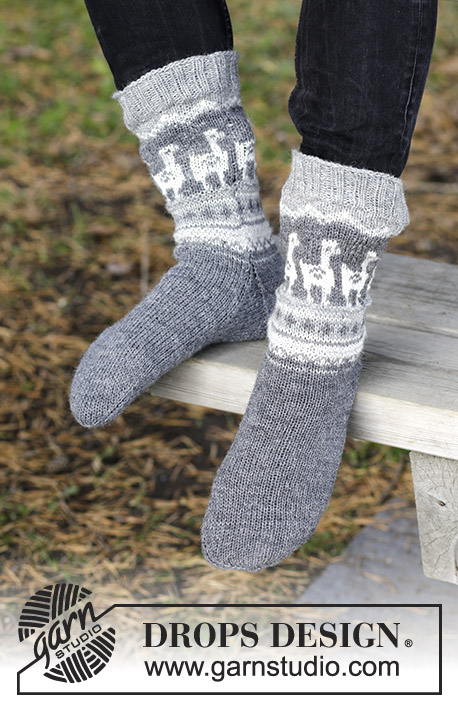
Men’s knitted socks with cables. The piece is worked in DROPS Fabel.
DROPS 185-20 |
|||||||||||||||||||||||||
|
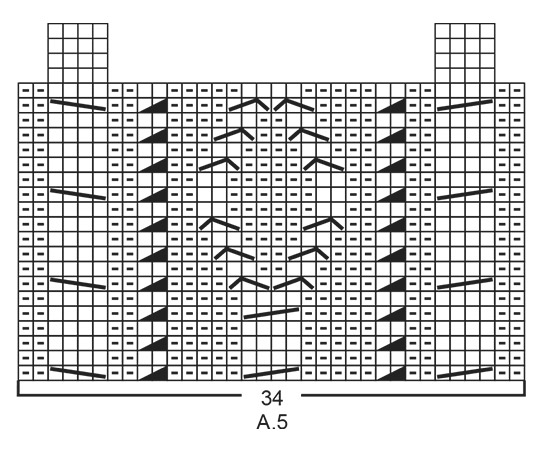
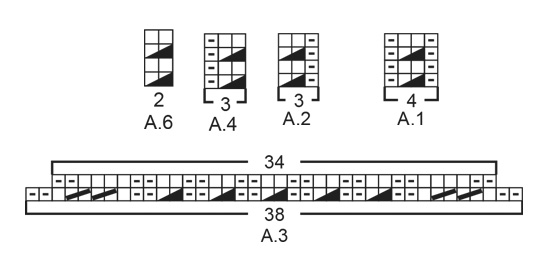
INFORMATION FOR THE PATTERN: PATTERN: See diagrams A.1 to A.6. The diagrams show all the rows in the pattern seen from the right side. HEEL DECREASE: ROW 1 (= right side): Knit until there are 7-8-8-10 stitches left, slip the next stitch as if to knit, knit 1, pass the slipped stitch over the knitted stitch, turn the piece. ROW 2 (= wrong side): Purl until there are 7-8-8-10 stitches left, slip the next stitch as if to purl, purl 1, pass the slipped stitch over the purled stitch, turn the piece. ROW 3 (= right side): Knit until there are 6-7-7-9 stitches left, slip the next stitch as if to knit, knit 1, pass the slipped stitch over the knitted stitch, turn the piece. ROW 4 (= wrong side): Purl until there are 6-7-7-9 stitches left, slip the next stitch as if to purl, purl 1, pass the slipped stitch over the purled stitch, turn the piece. Continue decreasing in the same way, with 1 less stitch before slipping 1 stitch, until there are 14-16-16-20 stitches left on the needle. DECREASE TIP (for toe): Start 2 stitches before the marker, knit 2 together, marker, slip 1 stitch as if to knit, knit 1, pass the slipped stitch over the knitted stitch (= 2 stitches decreased). ---------------------------------------------------------- SOCK: The piece is worked in the round with double pointed needles. Cast on 68-76-76-84 stitches with double pointed needles size 2.5 mm / US 1.5 and Fabel. Knit 1 round. Insert 1 marker thread at the beginning of the round = mid back. Work A.1 in the round (= 17-19-19-21 repeats of 4 stitches). When the piece measures 4 cm / 1½" work the next round as follows: Continue A.1 over the first 12-16-16-20 stitches (= 3-4-4-5 repeats of 4 stitches), work A.2 (= 3 stitches), A.3 (= 38 stitches which are decreased to 34 stitches), A.4 (= 3 stitches) and A.1 over the last 12-16-16-20 stitches (= 3-4-4-5 repeats of 4 stitches) = 64-72-72-80 stitches on the needle. Continue as follows: Continue A.1 over the first 12-16-16-20 stitches, A.2 (= 3 stitches), work A.5 (= 34 stitches), continue A.4 (= 3 stitches) and continue A.1 over the last 12-16-16-20 stitches. REMEMBER THE GAUGE! When the piece measures 12-14-16-18 cm / 4¾"-5½"-6¼"-7" keep the first 13-15-15-19 stitches and the last 13-15-15-19 stitches on the needle for heel, the middle 38-42-42-42 stitches are placed on a thread (= mid top of foot). Continue A.1 back and forth over the heel stitches and at the same time cast on 1 edge stitch in each side on the first row = 28-32-32-40 stitches. When the heel measures 5-5½-6-6½ cm / 2"-2¼"-2¼"-2½" bind off 1 edge stitch in each side = 26-30-30-38 stitches. Insert 1 marker in the middle of the row. Now work HEEL DECREASE – see description above! After the heel decrease, knit up 13-14-16-17 stitches on each side of the heel (knit up stitches inside the 1 edge stitch in each side of the heel) and the 38-42-42-42 stitches from the thread are placed back on the needles = 78-86-90-96 stitches. Insert 1 marker on each side of the middle 38 stitches on top of foot (for all sizes). Continue in the round with A.5 as before over the middle 34 stitches on top of foot and A.6 (= 2 stitches) on each side of A.5, the remaining stitches are worked in stockinette stitch. AT THE SAME TIME decrease in each side as follows: Knit together the last 2 stitches before the first marker on top of foot and knit twisted together the first 2 stitches after the second marker on top of foot. Decrease in this way every 2nd round a total of 8-10-10-11 times = 62-66-70-74 stitches. Continue working until the piece measures 18-19-21-23 cm / 7"-7½"-8¼"-9" from the marker on heel (= 4-5-6-7 cm / 1½"-2"-2¼"-2¾" left to finished length). Knit 1 round where you decrease 10 stitches evenly over A.5 and A.6 = 52-56-60-64 stitches. Insert 1 marker in each side so that there are 26-28-30-32 stitches both on top and underneath the foot. Work stockinette stitch in the round - AT THE SAME TIME decrease to toe on each side of both markers – READ DECREASE TIP (= 4 stitches decreased). Decrease in this way every 2nd round a total of 4-7-9-11 times and then every round a total of 6-3-2-0 times = 12-16-16-20 stitches. On the next round knit all stitches together 2 and 2 = 6-8-8-10 stitches. Cut the strand, pull it through the remaining stitches, tighten and fasten well. Work another sock in the same way. |
|||||||||||||||||||||||||
Diagram explanations |
|||||||||||||||||||||||||
|
|||||||||||||||||||||||||
|
|||||||||||||||||||||||||
|
|||||||||||||||||||||||||
|
Have you made this or any other of our designs? Tag your pictures in social media with #dropsdesign so we can see them! Do you need help with this pattern?You'll find tutorial videos, a Comments/Questions area and more by visiting the pattern on garnstudio.com. © 1982-2024 DROPS Design A/S. We reserve all rights. This document, including all its sub-sections, has copyrights. Read more about what you can do with our patterns at the bottom of each pattern on our site. |
|||||||||||||||||||||||||


With over 40 years in knitting and crochet design, DROPS Design offers one of the most extensive collections of free patterns on the internet - translated to 17 languages. As of today we count 304 catalogs and 11422 patterns - 11417 of which are translated into English (US/in).
We work hard to bring you the best knitting and crochet have to offer, inspiration and advice as well as great quality yarns at incredible prices! Would you like to use our patterns for other than personal use? You can read what you are allowed to do in the Copyright text at the bottom of all our patterns. Happy crafting!
Comments / Questions (9)
Hej! Tycker det här var väldigt roligt att sticka, jag bytte till drops alpacka för att jag ville ha ullgarn, men behöll stickorna 2,5. När vi använder strumporna blir de slappa och tappar spänsten, drar inte ihop sig igen. Vad har jag gjort fel?
23.03.2022 - 13:27DROPS Design answered:
Hei Sandra. Usikker på hvorfor de ikke holder formen hos deg. Har du overholdt strikkefastheten. Prøv å vaske sokkene (etter vaskeanvisningen) og se om det hjelper. mvh DROPS Design
28.03.2022 - 11:22Hola! Cuando decís que hay que montar y rematar un punto de orillo al principio y al final del talón, os referís a añadir un punto a cada lado primero, luego tejer todo el borde en punto de orillo y al final disminuir ese punto o simplemente a aumentar y disminuir un punto a cada lado al principio y al final? No he hecho nunca puntos de orillo y estoy un poco confusa. Tenéis algún vídeo tutorial de cómo hacer esto? Gracias!
21.12.2020 - 13:02DROPS Design answered:
Hola Marta! Cómo hacer disminuciones estándar del talón para una calceta esta aqui. Buen trabajo!
21.12.2020 - 13:53Hej - jeg forstår ikke, hvordan diagram A5 skal gentages? Har læst den tyske kommentar om det samme, men svaret gav ikke særlig god mening for mig - for hvordan skal de øverste fire rækker (der kun vises med retmasker over de to andre snoninger) egentlig strikkes, før man starter fra række 1 igen?
20.06.2020 - 17:49DROPS Design answered:
Hei Lise. Når du har strikket A.5 1 gang i høyden fortsetter du på rad 1 igjen, men flettene ytterst i diagrammet skal ha 5 omganger med glattstrikk mellom hver flette, så da må de 4 øverst rekkene strikkes samtidig som du begynner på 1. omgang. Slik at 1. rad strikkes slik: 2 vrang, 4 rett, 2 vrang, sett 1 maske på flettepinne bak arbeidet, strikk 1 rett, strikk masken på flettepinnen rett, 5 vrang, sett 2 masker på flettepinne bak arbeidet, strikk 2 rett, strikk de 2 maskene fra flettepinnen rett , 5 vrang, sett 1 maske på flettepinne bak arbeidet, strikk 1 rett, strikk masken på flettepinnen rett, 2 vrang, 4 rett og 2 vrang. mvh DROPS design
22.06.2020 - 13:36Ja, A3 passar över A1, men A5 passar inte över A3. Det är andra varvet i A3 jag avser.
21.02.2019 - 09:38DROPS Design answered:
Hei Anita. Det har du rett i, A.5 passer ikke like godt over A.3. Jeg så på A.1, beklager det. Det blir riktig som du sier: å strikke 4 rettmasker innenfor de ytterste vrangmaskene i hver side, og videre annenhver 2 vrang og 2 rett. Vi skal få oppdatert diagrammet snarest. God fornøyelse
11.03.2019 - 09:01När man kommer till hälen är det onödigt komplicerat om man ska ha varvbyte mitt bak. Man får då göra överföringen av maskan på avigsidan på halva varvet. Vore enklare att ha varvbyte precis före eller efter hälmaskorna. Detta kan ni väl enkelt rätta till? Mycket snygga sockar annars.
19.02.2019 - 12:26DROPS Design answered:
Hei Anita. Omgangen starter midt bak da vi vil den skal starte midt under foten senere. Du kan enten klippe tråden og starte i den ene siden av hælmaskene når du begynner på hælen, eller du kan helt enkelt strikke 1 omgang mer over halve hælen. Det kommer ikke til å vises om du gjøre det slik, men du må selvfølgelig gjerne klippe tråden slik at alle masker strikkes like mange ganger. God fornøyelse
11.03.2019 - 09:05Det måste vara fel i diagram A3. Borde vara 2 aviga och sen 4 räta.
17.02.2019 - 11:35DROPS Design answered:
hei Anita. A.3 er korrekt, flettene og vrangmaskene passer fint over flettene og vrangmaskene i A.1. Videre skal det strikkes A.5 over A.3. God fornøyelse
21.02.2019 - 08:25Bonjour je tricote ce modèle.Quand l'ouvrage mesure 16cm on commence le talon. On prend les 15 premières et les 15 dernières mailles Comment tricoter A1 en aller retour alors que le début du rang est au milieu de ces 30 mailles?
15.01.2018 - 14:39DROPS Design answered:
Bonjour Mme Broux, vous pouvez couper le fil et continuer le rang suivant soit sur l'endroit soit sur l'envers (ajustez en fonction de A.1 pour que les torsades soient sur l'endroit). Bon tricot!
15.01.2018 - 15:50Hallo, ich habe den Mustersatz A.5 jetzt einmal gestrickt aber wie geht es weiter? Ich kann nicht einfach unten anfangen, da sonst der Zopf an der Seite nicht stimmt.
28.11.2017 - 16:56DROPS Design answered:
Liebe Frau Weißenbach, nach 20. Reihen in A.5 ist das mittlere Muster fertig, von Reihe 1 wiederholen, bei den 2 Zöpfen sollen Sie noch 4 Reihen stricken, dann von Reihe 1 wiederholen. Viel Spaß beim stricken!
29.11.2017 - 08:23Wo finde ich die Diagramme A1 bis A4 und A6 ?
09.10.2017 - 21:24DROPS Design answered:
Liebe Miriam, Diagramme sind jetzt online, danke für Ihre Rückmeldung. Viel Spaß beim stricken!
13.10.2017 - 15:06