DROPS Merino Extra Fine
100% Wool
from 3.50 £ /50g
Get the yarn to make this pattern from 59.50£.

The yarn cost is calculated from the pattern’s smallest size and the yarn’s cheapest product type. Looking for an even better price? You might find it on the DROPS Deals!

DROPS SS24

Telegram

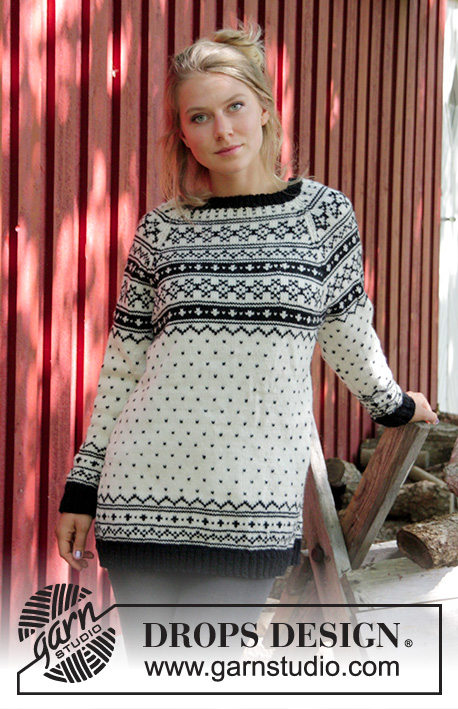
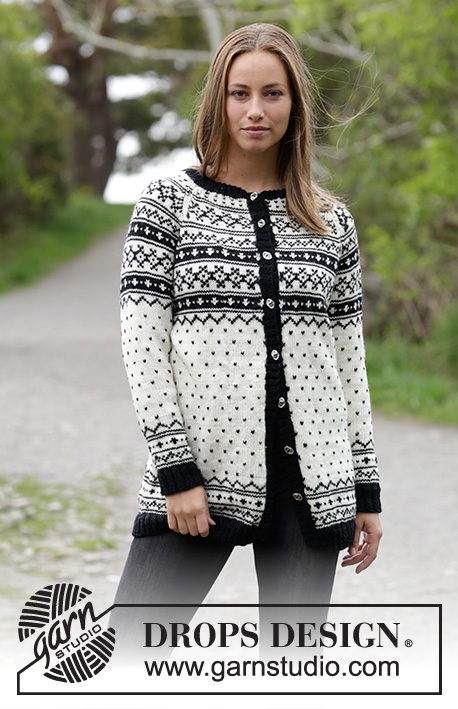
Knitted jumper with multi-coloured pattern and raglan for men. Size: S - XXXL Piece is knitted in DROPS Merino Extra Fine.

DROPS 185-11
DROPS design: Pattern me-118
Yarn group B
----------------------------------------------------------
Size: S - M - L - XL - XXL - XXXL
Materials:
DROPS MERINO EXTRA FINE from Garnstudio (belongs to yarn group B)
600-700-750-800-900-1000 g colour 01, off white
250-300-350-350-400-450 g colour 02, black

Piece can also be knitted with yarn from:
“Alternative yarn (yarn group B)” - see link below.

DROPS DOUBLE POINTED NEEDLES AND CIRCULAR NEEDLE (40 and 60 or 80 cm) SIZE 4 mm – or size needed to get 21 stitches and 28 rows in stocking stitch = width 10 cm and 10 cm vertically.

DROPS DOUBLE POINTED NEEDLES AND CIRCULAR NEEDLE (60 or 80 cm) SIZE 3 mm for rib – or size needed to get 23 stitches and 32 rows in stocking stitch = width 10 cm and 10 cm vertically.
----------------------------------------------------------

-------------------------------------------------------

Alternative Yarn – See how to change yarns here
Yarn Groups A to F – Use the same pattern and change the yarn here
Yarn usage using an alternative yarn – Use our yarn converter here

-------------------------------------------------------

DROPS Merino Extra Fine
100% Wool
from 3.50 £ /50g
Get the yarn to make this pattern from 59.50£.

The yarn cost is calculated from the pattern’s smallest size and the yarn’s cheapest product type. Looking for an even better price? You might find it on the DROPS Deals!

Pattern instructions

NOTE: This pattern is written in British English. All measurements in charts are in cm. For conversion from cm to inches - click here. There are different terms for crocheting in British and American English. If this pattern includes crochet, click for "crochet terms" here. For this pattern in American English, please click here.
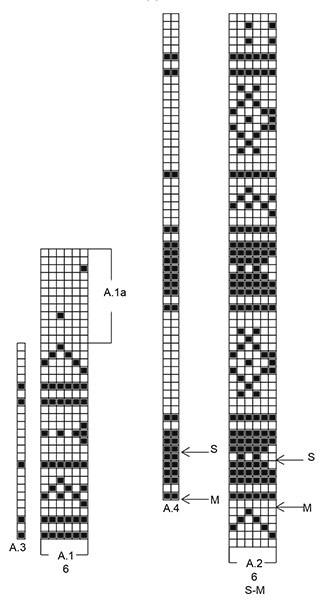
INFORMATION FOR PATTERN:

PATTERN:
See diagrams A.1 to A.4. Work the entire pattern in stocking stitch. Choose diagram for your size.

KNITTING TIP:
To avoid the knitting tension to tighten when working pattern, it is important not to tighten the strands on back side of piece. Switch to a higher needle number when working pattern if the pattern is somewhat tight.

DECREASE TIP:
To calculate how to decrease evenly, use the total number of stitches on row (e.g. 272 stitches) and divide stitches by number of decreases to be done (e.g. 44) = 6.1. In this example knit approx. every 5th and 6th stitch together.

INCREASE TIP:
Work until 2 stitches remain before marker thread, make 1 yarn over (= 1 stitch increased), knit 4 (marker thread is in the middle of these stitches), make 1 yarn over (= 1 stitch increased). Knit yarn over twisted on next round to avoid hole.

RAGLAN:
Decrease for raglan on each side of every A.4 as follows:
Decrease 1 stitch after A.4 as follows: Slip last stitch in A.4, knit 1, pass slipped stitch over (= 1 stitch decreased).
Decrease 1 stitch before A.4 as follows: Work until 1 stitch remains before A.4, knit the next 2 stitches together (= 1 stitch decreased). I.e. decrease 2 stitches at every A.4 and 8 stitches in total on round.
----------------------------------------------------------

JUMPER:
Worked in the round on circular needles. Sleeves are worked in the round on double pointed needles, switch to a short circular needle when needed. Slip the parts together and work yoke in the round.

BODY:
Cast on 248-272-288-300-332-372 stitches on circular needle size 3 mm with Black. Work rib (= knit 2/purl 2). When piece measures 5 cm, switch to circular needle size 4 mm and work 1 round in stocking stitch while decreasing 44-44-48-48-56-60 stitches evenly - read DECREASE TIP = 204-228-240-252-276-312 stitches. Work 1 round as follows: Insert 1 marker in first stitch, knit 101-113-119-125-137-155 stitches, insert 1 marker in next stitch, knit the rest of round.
Markers shows sides of garment. Then work A.1 (= 6 stitches) over all stitches (= 34-38-40-42-46-52 repetitions in width) - read KNITTING TIP. REMEMBER THE KNITTING TENSION! When A.1 has been worked 1 time vertically, repeat A.1a vertically. When piece measures 39-41-41-43-41-43 cm, work A.2 over A.1. When you have worked up to arrow in A.2, work next round as follows: Cast off 4 stitches, work the next 95-107-113-119-131-149 stitches as before, cast off the next 7 stitches, work the next 95-107-113-119-131-149 stitches as before and cast off the last 3 stitches. Piece measures approx. 43-43-43-44-44-44 cm. Put piece aside and work the sleeves.

SLEEVES:
Work in the round on double pointed needles, switch to a short circular needle when needed. Cast on 48-52-56-60-64-64 stitches on double pointed needles size 3 mm. Work rib (= knit 2/purl 2). When piece measures 5 cm, switch to double pointed needles size 4 mm and work 1 round in stocking stitch while decreasing 6-8-8-10-12-10 stitches evenly = 42-44-48-50-52-54 stitches. Insert 1 marker thread at beginning of round (= mid under sleeve). Work 1 round with black, then work next round as follows: Work 0-1-0-1-2-0 stitches A.3, work A.1 over the next 42-42-48-48-48-54 stitches (= 7-7-8-8-8-9 repetitions), finish with 0-1-0-1-2-0 stitches A.3. When A.1 has been worked 1 time vertically, repeat A.1a. When piece measures 8-10-10-10-8-6 cm, increase 1 stitch on each side of marker thread (= 2 stitches increased) - READ INCREASE TIP! Increase like this every 2½-2-1½-1½-1½-1½ cm 15-17-21-23-22-24 times in total = 72-78-90-96-96-102 stitches. Work stitches in A.3 and the increased stitches into pattern A.1.
When piece measures 44-45-43-44-40-41 cm, work A.2 over A.1. When all stitches under sleeve have been increased, work A.2 12-13-15-16-16-17 times in total in width. When you have worked up to arrow in A.2, work next round as follows: Cast off 4 stitches, work the next 65-71-83-89-89-95 stitches as before, cast off the last 3 stitches. Sleeve measures approx. 48-47-45-45-43-43 cm. Knit another sleeve the same way.

YOKE:
Slip sleeves on to same circular needle as body where armholes were cast off = 320-356-392-416-440-488 stitches. Begin round in transition between right sleeve and back piece. Work as follows: Work A.4 (= 2 stitches, begin at arrow marking your size), continue pattern as before over the next 91-103-109-115-127-145 stitches, A.4 (= back piece), work pattern as before over the next 65-71-83-89-89-95 stitches (= sleeve), A.4, continue pattern as before over the next 91-103-109-115-127-145 stitches, A.4 (= front piece), work pattern as before over the next 65-71-83-89-89-95 stitches (= sleeve). Work 6-4-5-4-10-3 rounds with pattern, then decrease for RAGLAN – see explanation above, every other round 25-29-31-33-33-39 times in total = 120-124-144-152-176-176 stitches. When A.2 has been worked 1 time vertically, switch to black. Work 1 round in black. Yoke measures approx. 20-22-24-25-27-29 cm. An elevation in the back of neck can be worked to get a better fit so that yoke is somewhat higher in the neck. This elevation can be skipped, to make the neck the same at the front and back. Work elevation in the back of neck or start to work the neck edge if you don’t want an elevation.

ELEVATION IN BACK OF NECK:
Skip this paragraph if you do not want an elevation. Insert 1 marker thread at beginning of round (this marks the beginning of rounds after elevation has been worked).
Work until mid back, insert 1 marker. Begin from right side with black and knit as before until 30-30-34-34-40-40 stitches have been worked past marker, turn, tighten yarn and purl 60-60-68-68-80-80. Turn, tighten yarn and knit 54-54-61-61-72-72, turn, tighten yarn and purl 48-48-54-54-64-64. Turn, tighten yarn and knit 42-42-48-48-56-56, turn, tighten yarn and purl 36-36-42-42-48-48. Turn, tighten yarn and knit 30-30-35-35-40-40, turn, tighten yarn and purl 24-24-28-28-32-32, turn, tighten yarn and work mid back. Cut the yarn. Round now begins at the marker thread, i.e. in the transition between right sleeve and back piece.

NECK EDGE:
On next round decrease as follows: * Knit 40-42-52-56-68-68 and decrease 0-0-8-8-18-16 stitches evenly, work the next 20 stitches together 2 by 2 (= 10 stitches decreased) *, work from *-* 2 times in total = 100-104-108-116-120-124 stitches. Switch to double pointed needles size 3 mm. Work next round as follows: * Knit 2, purl 2, knit 1, make 1 yarn over (= 1 stitch increased), purl 2, knit 2, make 1 yarn over (= 1 stitch increased), purl 1 *, work from *-* until 0-4-8-16-0-4 stitches remain, work rib (= knit 2/purl 2) over the remaining stitches = 120-124-128-136-144-148 stitches. Work yarn overs twisted in rib (i.e. knit 2/purl 2) on next round to avoid holes. When rib measures 3 cm, cast off knit over knit and purl over purl.

ASSEMBLY:
Sew opening under each sleeve in front loop of outermost stiches.

Diagram

symbols = black
symbols = off white
diagram
diagram
diagram

Each of our patterns has specific tutorial videos to help you.

Do you have a question? See a list of frequently asked questions (FAQ)

Knitting tension is what determines the final measurements of your work, and is usually measured per 10 x 10 cm. It is provided like so: number of stitches in width x number of rows in height - eg: 19 stitches x 26 rows = 10 x 10 cm.

The knitting tension is very individual; some people knit/crochet loosely while others work tightly. You adjust the knitting tension with the needle size, which is why the suggested needle size is only meant as a guide! You need to adjust this (up or down) to ensure that YOUR knitting tension matches the knitting tension provided in the pattern. If you work with a different knitting tension than provided you will have a different yarn consumption, and your work will have different measurements than what the pattern suggests.

The knitting tension also determines which yarns can replace each other. As long as you achieve the same knitting tension you can replace one yarn with another.

See DROPS lesson: How to measure your tension/gauge

See DROPS video: How to make a gauge tension swatch

The required amount of yarn is provided in grams, eg: 450 g. To calculate how many balls you’ll need you first need to know how many grams are in 1 ball (25g, 50g or 100g). This information is available if you click on the individual yarn quality on our pages. Divide the amount required with the amount of each ball. For example, if each ball is 50g (the most common amount), the calculation will be as follows: 450 / 50 = 9 balls.

The important thing when changing from one yarn to another is that the knitting/crochet tension remains the same. This is so that the measurements of the finished piece will be the same as on the sketch provided. It is easier to achieve the same knitting tension using yarns from the same yarn group. It is also possible to work with multiple strands of a thinner yarn to achieve the knitting tension of a thicker one. Please try our yarn converter. We recommend you to always work a test swatch.

Please NOTE: when changing yarn the garment might have a different look and feel to the garment in the photo, due to individual properties and qualities of each yarn.

See DROPS lesson: Can I use a different yarn than the one mentioned in the pattern?

All our yarns are categorised into yarn groups (from A to F) according to thickness and knitting tension – group A contains the thinnest yarns and group F the thickest. This makes it easier for you to find alternative yarns to our patterns, should you wish to switch yarn. All yarns within the same group have a similar knitting tension and can easily replace each other. However, different yarn qualities have different structures and properties which will give the finished work a unique look and feel.

Click here for an overview of the yarns in each yarn group

At the top of all our patterns you’ll find a link to our yarn calculator, which is a helpful tool should you wish to use a different yarn than suggested. By filling in the yarn quality you wish to replace, the amount (in your size) and number of strands, the calculator will present good alternative yarns with the same knitting tension. Additionally it will tell you how much you’ll require in the new qualities and whether you’ll need to work with multiple strands. Most skeins are 50g (some are 25g or 100g).

If the pattern is worked with multiple colours, every colour will have to be calculated separately. Similarly, if the pattern is worked with several strands of different yarns (for example 1 strand Alpaca and 1 strand Kid-Silk) you will have to find alternatives for each, individually.

Click here to see our yarn calculator

Since different yarns have different qualities and textures we have chosen to keep the original yarn in our patterns. However, you can easily find options among our available qualities by using our yarn calculator, or simply pick a yarn from the same yarn group.

It is possible that some retailers still have discontinued yarns in stock, or that someone has a few skeins at home that they would like to find patterns for.

The yarn calculator will provide both alternative yarn as well as required amount in the new quality.

If you think it's hard to decide what size to make, it can be a good idea to measure a garment you own already and like the size of. Then you can pick the size by comparing those measures with the ones available in the pattern's size chart.

You'll find the size chart at the bottom of the pattern.

See DROPS lesson: How to read size chart

The needle size provided in the pattern serves only as a guide, the important thing is to follow the knitting tension. And since knitting tension is very individual, you will have to adjust the needle size to ensure that YOUR tension is the same as in the pattern – maybe you’ll have to adjust 1, or even 2 needle sizes, up or down to achieve the correct tension. For this, we recommend that you work test swatches.

Should you work with a different knitting tension than the one provided, the measurements of the finished garment might deviate from the measurement sketch.

See DROPS lesson: How to measure your tension/gauge

See DROPS video: How to make a tension/gauge swatch

Working a garment top-down provides more flexibility and room for personal adjustment. For example it is easier to try the garment on while working, as well as making adjustments to length of yoke and shoulder caps.

The instructions are carefully explaining every step, in the correct order. Diagrams are adjusted to the knitting direction and are worked as usual.

The diagram depicts all rows/rounds, and every stitch seen from the right side. It is read from bottom to top, from right to left. 1 square = 1 stitch.

When working back and forth, every other row is worked from the right side and every other row is worked from the wrong side. When working from the wrong side, the diagram will have to be worked reversed: from left to right, knit stitches are purled, purl stitches are knit etc.

When working in the round every round is worked from the right side and the diagram are worked from right to left on all rounds.

See DROPS lesson: How to read knitting diagrams

The diagram depicts all rows/rounds, and every stitch seen from the right side. It is worked from bottom to top, from right to left.

When working back and forth every other row is worked from the right side: from right to left and every other row is worked from the wrong side: from left to right.

When working in the round, every row in the diagram are worked from the right side, from right to left.

When working a circular diagram you start in the middle and work your way outwards, counter clockwise, row by row.

The rows usually start with a given number of chain stitches (equivalent to the height of the following stitch), this will either be depicted in the diagram or explained in the pattern.

See DROPS lesson: How to read crochet diagrams

Instructions for working several diagrams after each other on the same row/round, will often be written like so: “work A.1, A.2, A.3 a total of 0-0-2-3-4 times". This means you work A.1 once, then A.2 is worked once, and A.3 is repeated (in width) the number of times provided for your size – in this case like so: S = 0 times, M = 0 times, L=2 times, XL= 3 times and XXL = 4 times.

The diagrams are worked as usual: begin with the first row in A.1, then work the first row in A.2 etc.

See DROPS lesson: How to read knitting diagrams

See DROPS lesson: How to read crochet diagrams

The total width of the garment (from wrist-to-wrist) will be larger in the larger sizes, despite the actual sleeves being shorter. The larger sizes have longer sleeve caps and wider shoulders, so there will be a good fit in all sizes.

The measurement sketch/schematic drawing provides information regarding the full length of the garment. If it’s a jumper or a jacket the length is measured from the highest point on the shoulder closest to the neckline, and straight down to the bottom of the garment. It is NOT measured from the tip of shoulder. Similarly, the length of yoke is measured from the highest point on the shoulder and down to where yoke is split into body and sleeves.

On a jacket measures are never taken along bands, unless specifically stated. Always measure inside band stitches when measuring the length.

See DROPS lesson: How to read a schematic drawing

Diagrams are often repeated on the round or in height. 1 repeat is the diagram the way it appears in the pattern. If it says to work 5 repeats of A.1 in the round, then you work A.1 a total of 5 times after/next to each other in the round. If it says to work 2 repeats of A.1 vertically/in height you work the entire diagram once, then begin again at the start and work the entire diagram one more time.

Chain stitches are slightly narrower than other stitches and to avoid working the cast-on edge too tight, we simply chain more stitches to begin with. The stitch count will be adjusted on the following row to fit the pattern and measurement sketch.

The rib edge is more elastic and will contract slightly compared to, for example, stocking stitch. By increasing before the rib edge, you avoid a visible difference in width between the rib edge and the rest of the body.

It’s very easy to cast off too tightly, and by making yarn overs while casting off (and simultaneously casting these off) you avoid a too tight cast off edge.

See DROPS video: How to bind off with yarn overs (yo)

To achieve an even increase (or decrease) you can increase on, for example: every 3rd and 4th row alternately, like so: work 2 rows and increase on the 3rd row, work 3 rows and increase on the 4th. Repeat this until the increase is complete.

See DROPS lesson: Increase or decrease 1 st on every 3rd and 4th row alternately

Should you prefer to work in the round instead of back and forth, you may of course adjust the pattern. You’ll need to add steeks mid-front (usually 5 stitches), and follow the instructions. When you would normally turn and work from the wrong side, simply work across the steek and continue in the round. At the end you’ll cut the piece open, pick up stitches to work bands, and cover the cut edges.

See DROPS video: How to knit steeks and cut open

Should you prefer to work back and forth instead of in the round, you may of course adjust the pattern so you work the pieces separately and then assemble them at the end. Divide the stitches for the body in 2, add 1 edge stitch in each side (for sewing) and work the front and back pieces separately.

See DROPS lesson: Can I adapt a pattern for circular needles into straight needles?

Pattern repeats can vary slightly in the different sizes, in order to get the correct proportions. If you’re not working the exact same size as the garment in the photo, yours might deviate slightly. This has been carefully developed and adjusted so that the complete impression of the garment is the same in all sizes.

Make sure to follow instructions and diagrams for your size!

If you have found a pattern you like which is available in women’s size it’s not very difficult to convert it to men’s size. The biggest difference will be the length of sleeves and body. Start working on the women size that you think would fit across the chest. The additional length will be worked right before you cast off for the armhole/sleeve cap. If the pattern is worked top-down you can add the length right after the armhole or before the first decrease on sleeve.

Regarding additional yarn amount, this will depend on how much length you add, but it is better with a skein too many than too few.

All yarns will have excess fibres (from production) that might come off as lint or shedding. Brushed yarns (ie hairier yarns) have more of these loose, excess fibres, causing more shedding.

Shedding also depends on what is worn under or over the garment, and whether this pulls at the yarn fibres. It’s therefore not possible to guarantee that there will be no shedding

Below are some tips on how to get the best result when working with hairier yarns:

1. When the garment is finished (before you wash it) shake it vigorously so the looser hairs come off. NOTE: do NOT use a lint roller, brush or any method that pulls at the yarn.

2. Place the garment in a plastic bag and put it in your freezer - the temperature will cause the fibres to become less attached to each other, and excess fibres will come off easier.

3. Leave in the freezer for a few hours before taking it out and shaking it again.

4. Wash the garment according to the instructions on the yarn label.

Pilling is a natural process that happens to even the most exclusive of fibers. It's a natural sign of wear and tear that is hard to avoid, and that is most visible in high friction areas of your garment like a sweater's arms and cuffs.

You can make your garment look as new by removing the pilling, using a fabric comb or a pill/lint remover.

Still can't find the answer you need? Then scroll down and leave your question so one of our experts can try to help you. This will be done normally within 5 to 10 working days.
In the meantime, you can read the questions and answers that others have left to this pattern or join the DROPS Workshop on Facebook to get help from fellow knitters/crocheters!

You might also like...

Telegram

Ionamar, United Kingdom

185-11 Telegram

Ionamar, United Kingdom

Post a comment to pattern DROPS 185-11

We would love to hear what you have to say about this pattern!

If you want to leave a question, please make sure you select the correct category in the form below, to speed up the answering process. Required fields are marked *.

Comments / Questions (31)

country flag Massimo wrote:

Scusate ho visto male

15.11.2022 - 15:58

country flag Massimo wrote:

Nella versione in italiano si dice di seguire i diagrammi A1 e A1a per il davanti e il dietro e A3 per le manche ma non ci sono questi diagrammi

15.11.2022 - 15:57

country flag Léger Catherine wrote:

Bonjour J'ai tricoté ce modèle en xl. Il est indiqué 800g en couleur ecru. La pelote faisant 50g j'en ai commandé 16. Il m'en reste 5 ! Et je tricote lâche. .. soit je n'ai pas compris comment calculer soit il y a un problème dans l'énoncé. Pouvez-vous m'aider car je dois faire un autre modèle et je n'ai pas envie d'avoir le même problème. Merci de votre aide.

02.05.2022 - 13:17

DROPS Design answered:

Bonjour Mme Léger, merci pour votre retour, cette information a été transmise à nos stylistes. Pensez toujours à bien vérifier votre échantillon et à bien conserver la même tension tout du long. Bon tricot!

16.05.2022 - 10:51

country flag Andreas wrote:

Hello. I am making an L size. I made the body and the 2 sleeves. I slip the sleeves on to the needle with the body. The beginning of the round will be the first A4 (2 stitches) between the transition of the right sleeve and the back piece. Now I don't understand. Why the first A4 (2 stitches) color arrow is one color higher than the main pattern? All the A4 (around 4 times) will be different or only the first A4 stitches of every round? Thank you~

06.02.2022 - 09:10

DROPS Design answered:

Dear Andreas, on body and sleeves you worked to the round with the arrow and inclusive that round (= row 7 (= with off white) in A.2 should be worked) and then on the yoke you will start with the row with the arrow in A.4 = 4th row (= row with black) so that it's all the same everywhere. If you haven't worked that row in A.2, just start A.4 with one row below the arrow so that the pattern will match everywhere in the round. Happy knitting!

07.02.2022 - 10:05

country flag Birthe Fischer wrote:

Hej med jer , jeg kan se at i har taget opskriften af er der noget galt med opskriften ? Jeg er ved at strikke den

28.09.2021 - 13:47

DROPS Design answered:

Hei Birthe. Litt usikker på hva du mener. Oppskriften ligger ute den. Dårlig internett forbinnelse tidligere idag kanskje? Gi oss beskjed om du ikke får lastet den opp. mvh DROPS Design

28.09.2021 - 15:35

country flag Birthe Fischer wrote:

Når man har strikke til arbejdet måler 41cm det er en str l står der at man skal strikke A 2 over A 1. Når der er stikket til pilen i A 2 skal der lukkes af til ærmegab men spørgsmået er at det jo ikke kan passe at når man har strikket A 2 at så måler arbejdet kun 43 cm. ps jeg kan også se på trøjen at øverste del af trøjen mønster starter som den nederste slutter og det fremgår ikke i opskriften

10.09.2021 - 16:25

DROPS Design answered:

Hei Birthe. Når du har strikket til arb måler 41 cm, skal du strikke til pilen i A.2 (7 omganger). Nå måler arbeidet 43 cm. Nå skal det felles til ermhull på begge sider, legg arbeidet vekk og strikk begge erme. Sett ermene på samme pinne som bolen = BÆRESTYKKET og nå skal det strikkes videre på A.2 (rad 8 i diagrammet), SAMTIDIG som det strikkes etter A.4. mvh DROPS design

15.09.2021 - 15:05

country flag Evie wrote:

Klopt het dat bij het meerderen in de mouw patroon A1 niet doorloopt? Moeten de tips voor het meerderen (meerderen als er nog twee steken voor de markeerdraad zijn) hier worden toegepast? In maat M (2x 1 steek A3) moet dan gemeerderd worden in A1 twee steken na de markeerdraad, dus: na de markeerdraad 1 steek A3, 1 steek A1 en dan meerderen in A1 etc. De middenachternaad van de mouw kent dan dus twee steken die afwijken van A1 en patroon A1 loopt niet door. Klopt dat?

23.08.2021 - 20:14

DROPS Design answered:

Dag Evie,

Bij het meerderen voor de mouw zal het patroon (A.1a) inderdaad niet altijd doorlopen, dat is niet anders. De tip voor het meerderen kun je inderdaad hier toepassen, zoals ook staat aangegeven bij de beschrijving van de mouw. Je meerdert bij maat M pas na 10 cm, en als het goed is zit je dan al (bijna) bij het patroon met de stippen. Dan zal het niet zo opvallen als het patroon onder de mouw niet doorloopt. 03.09.2021 - 10:35

country flag Rut wrote:

Ved bærestykket, A4er strikket og det står fortsett med mønster som før( antar dette betyr A2) , si at har jeg strikket 3 masker i en rapport, skal jeg da, etter A4 er strikket, fullføre de tre siste maskene i rapporten, eller inngår A4 i rapporten fra A2?

13.04.2021 - 16:29

DROPS Design answered:

Hei Rut. Strikk mønster som før (A.2), slik at mønstret passer over hverandre, men om du ser på bildet vil det på et tidspunkt ikke stemme 100% når man strikker raglanlinjen (A.4). mvh DROPS design

26.04.2021 - 11:54

country flag Doris wrote:

Hallo Drops Team, habe diesen Pulover für meinen Neffen in grau blau mit Microfasergarn nachgesrickt und er ist wunderschön geworden! Mein Neffe hat sich sehr darüber gefreut. Vielen lieben Dank für Eure tollen Modelle! Mit freundlichen Grüßen Doris

16.02.2021 - 07:25

country flag Charlotte wrote:

Jeg synes det er svært at få mønsteret pænt ved start / slut på en omgang. Der bliver et hak i mønsteret ved start / slut når jeg strikker på rundpind. Findes der en teknik til dette? På forhånd tak for hjælpen.

04.09.2020 - 21:41

DROPS Design answered:

Hei Charlotte. Har du sett på videoen: Hvordan unngå hakk i starten når det strikkes rundt, som ligger under oppskriften? Ta en titt på den og se om den kan være til hjelp. God Fornøyelse!

07.09.2020 - 07:26