
Popular categories
Looking for a yarn?


|
|||||||||||||||||||
Visby Tunic |
|||||||||||||||||||
 |
 |
||||||||||||||||||
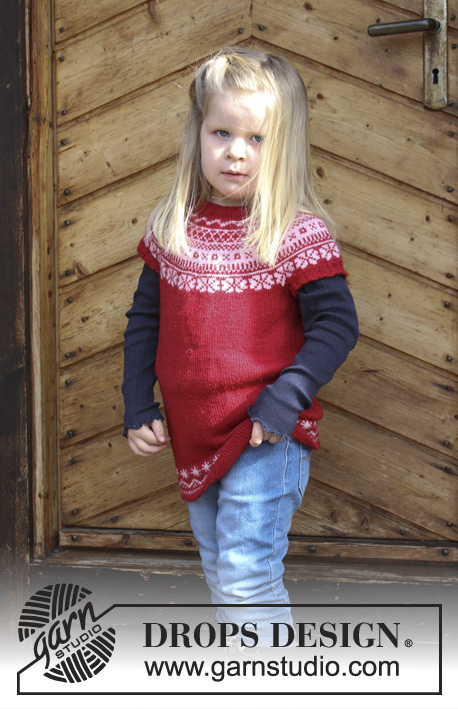
Set consists of: Tunic for kids with round yoke, multi-colored Norwegian pattern and A-shape, knitted top down. Head band with multi-colored Norwegian pattern. Size 2 - 12 years Set is knitted in DROPS Merino Extra Fine.
DROPS Children 30-11 |
|||||||||||||||||||
|
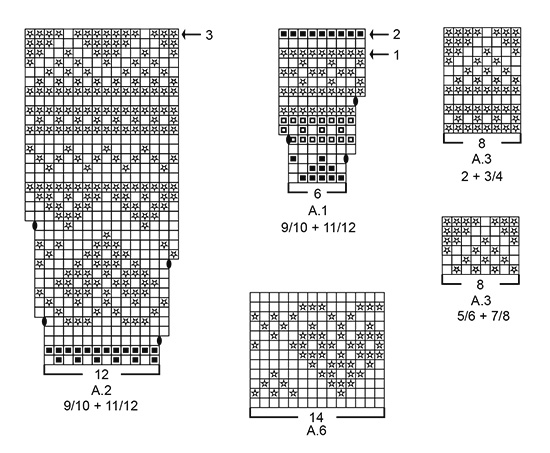
INFORMATION FOR PATTERN: GARTER STITCH (worked in the round): 1 ridge = 2 rounds. Knit 1 round and purl 1 round. PATTERN: Tunic: See diagrams A.1 to A.5. Choose diagram for your size. Head band: See diagram A.6. Work the entire pattern in stockinette stitch. INCREASE/DECREASE TIP: To calculate how to increase/decrease evenly, use the total number of stitches on round (e.g. 76 stitches) and divide stitches by number of increases/decreases to be done (e.g. 8) = 9.5. In this example increase after alternately approx. every 9th and 10th stitch by making 1 yarn over. On next round knit yarn overs twisted to avoid holes. If decreasing knit alternately approx. every 8th and 9th stitch and every 9th and 10th stitch together. ELEVATION: Insert 1 marker at beginning of round = mid back. Begin from right side with rose and knit as before until 6-6-7-7-8-8 stitches have been worked past marker, turn, tighten yarn and purl 12-12-14-14-16-16. Turn, tighten yarn and knit 18-18-21-21-24-24, turn, tighten yarn and purl 24-24-28-28-32-32. Turn, tighten yarn and knit 30-30-35-35-40-40, turn, tighten yarn and purl 36-36-42-42-48-48. Turn piece, tighten yarn and knit until mid back. KNITTING TIP-1: To avoid the knitting gauge to tighten when working pattern, it is important not to tighten the strands on back side of piece. Switch to a higher needle number when working pattern if the pattern is somewhat tight. KNITTING TIP-2 (applies to yoke on tunic): If knitting gauge is incorrect in height and there are more rows vertically on 10 cm / 4'' than stated in pattern the round yoke will be too short and the armholes too small. To avoid this work 1 extra round in stockinette stitch evenly in the unicolored sections on yoke. KNITTING TIP-3: Tunic can be worked to desired length. If you want it longer, continue increase in each side the same way as before until desired measurements. INCREASE TIP (applies to sides of body): Increase 1 stitch on each side of marker thread in each side as follows: Begin 10 stitches before marker thread, make 1 yarn over, knit 20 (marker thread is in the middle of these 20 stitches), make 1 yarn over (= 2 stitches increased). On next round knit yarn overs twisted to avoid holes. DECREASE TIP (applies to mid under sleeve): Begin 2 stitches before marker thread and knit 2 together, marker thread, slip 1 stitch knitwise, knit 1, pass slipped stitch over stitch worked (= 2 stitches decreased). ---------------------------------------------------------- TUNIC: Worked in the round on circular needle, top down. Work sleeves in the round on double pointed needles. Rounds begin mid back. NECK EDGE: Cast on 76-78-80-82-84-86 stitches on a short circular needle size 4 mm / US 6 with rose. Switch to circular needle size 3 mm / US 2.5 and work 2 ridges in GARTER STITCH - see explanation above. Then knit 2 round while AT THE SAME TIME increasing 8-6-10-8-12-10 stitches evenly - read INCREASE/DECREASE TIP = 84-84-90-90-96-96 stitches. Then work yoke as explained below. YOKE: Switch back to circular needle size 4 mm / US 6 and work ELEVATION at the back of neck - see explanation above. When elevation has been worked, finish by knitting 0-2-0-2-0-2 rounds with rose. Read KNITTING TIP-1 AND KNITTING TIP-2! Then work A.1 in the round (= 14-14-15-15-16-16 repetitions of 6 stitches). Continue pattern and increase as shown in diagram. REMEMBER THE GAUGE! On round marked with arrow-1 in A.1 there are 126-126-135-135-144-144 stitches on needle. Work round as shown in diagram and increase AT THE SAME TIME 10-16-18-18-20-26 stitches evenly on this round = 136-142-153-153-164-170 stitches. Continue A.1 and increase AT THE SAME TIME 8-14-15-15-16-22 stitches on round marked with arrow-2 in A.1 = 144-156-168-168-180-192 stitches. After A.1 work A.2 in the round (= 12-13-14-14-15-16 repetitions of 12 stitches). Continue pattern and increase as shown in diagram. On round marked with arrow-3 (last round in A.2) there are 192-208-224-224-240-256 stitches on needle. Work round as shown in diagram and increase AT THE SAME TIME 14-10-6-10-6-2 stitches evenly on this round (increasing base color in pattern stripe) = 206-218-230-234-246-258 stitches. Piece measures now approx. 16-17-18-19-20-21 cm / 6¼''-6¾''-7''-7½''-8''-8¼'' from cast-on edge mid front. On next round work as explained below: SIZE 2 and 3/4 YEARS: Work with off white as follows: 29-31 stitches in stockinette stitch (= ½ back piece), slip the next 45-47 stitches on 1 stitch holder for sleeve, cast on 6-6 new stitches on needle (= in the side under sleeve), work 58-62 stitches in stockinette stitch (= front piece), slip the next 45-47 stitches on 1 stitch holder for sleeve, cast on 6-6 new stitches on needle (= in the side under sleeve) and work the remaining 29-31 stitches in stockinette stitch (= ½ back piece). SIZE 5/6, 7/8, 9/10 and 11/12 YEARS: Work with dark rose as follows: 33-34-36-38 stitches in stockinette stitch (= ½ back piece), slip the next 49-49-51-53 stitches on 1 stitch holder for sleeve, cast on 6-8-8-8 new stitches on needle (= in the side under sleeve), work 66-68-72-76 stitches in stockinette stitch (= front piece), slip the next 49-49-51-53 stitches on 1 stitch holder for sleeve, cast on 6-8-8-8 new stitches on needle (= in the side under sleeve) and work the remaining 33-34-36-38 stitches in stockinette stitch (= ½ back piece). ALL SIZES: Cut the strand. Finish body and sleeves separately. NOW MEASURE PIECE FROM HERE! BODY: = 128-136-144-152-160-168 stitches. Insert 1 marker thread in the middle of the 6-6-6-8-8-8 stitches that were cast on under sleeve in each side. Begin round at one marker and read the rest of body before continuing! SIZE 2, 3/4, 5/6 and 7/8 years: Work A.3 in the round (= 16-17-18-19 repetitions of 8 stitches). When A.3 has been worked, work A.4 in the round. When A.4 has been worked, work in stockinette stitch with dark rose until finished measurements. SIZE 9/10 and 11/12 years: Work A.4 in the round (= 20-21 repetitions of 8 stitches). When A.4 has been worked, work in stockinette stitch with dark rose until finished measurements. ALL SIZES: AT THE SAME TIME when piece measures 4-4-4-4-3-3 cm / 1½"-1½"-1½"-1½"-1"-1", increase 2 stitches in each side - read INCREASE TIP (= 4 stitches increased). Increase like this every 8th-9th-8th-9th-8th-9th round (approx. every 3 cm / 1'') 8-8-10-10-12-12 times in total in each side = 160-168-184-192-208-216 stitches. NOTE! Work the increased stitches in dark rose, i.e. when increasing, there will be more stitches in dark rose between dots in A.4. When piece measures approx. 25-28-31-34-37-40 cm / 9 3/4"-11"-12 1/4"-13½"-14½"-15 3/4" from division - read KNITTING TIP-3, work 2 ridges. Then loosely bind off. Tunic measures approx. 42-46-50-54-58-62 cm / 16½"-18"-19 3/4"-21 1/4"-22 3/4"-24½" from shoulder and down. SLEEVE: Slip the 45-47-49-49-51-53 stitches from stitch holder in one side of piece on double pointed needles size 4 mm / US 6 and pick in addition up 1 new stitch in each of the 6-6-6-8-8-8 stitches cast on under sleeve = 51-53-55-57-59-61 stitches on needle. Insert a marker thread in the middle of the 6-6-6-8-8-8 stitches under sleeve and 1 marker thread in the middle stitch on round (= mid on top of sleeve. Read the rest of sleeve before continuing! SIZE 2, 3/4, 5/6 and 7/8 years: Begin at marker thread mid under sleeve and work A.3 in the round but note that the pattern will not fit an entire repetition mid under sleeve. Begin with 3rd-2nd-1st-8th stitch in A.3 and repeat A.3 in the round as long as you can. Pattern will be symmetrical mid under sleeve and stitch with marker thread mid on top of sleeve should now fit 4th stitch in A.3. After A.3 work in stockinette stitch with dark rose. SIZE 9/10 and 11/12 years: Begin at marker thread mid under sleeve and work in stockinette stitch with dark rose. ALL SIZES: AT THE SAME TIME when piece measures 3-3-2-2-2-2 cm / 1"-1"-3/4"-3/4"-3/4"-3/4'' from division, decrease 2 stitches mid under sleeve - read DECREASE TIP. Decrease like this every 2-2-2½-3½-3½-3½ cm / 3/4"-3/4"-7/8"-1 1/4"-1 1/4"-1 1/4"' 7-8-9-8-9-10 times in total = 37-37-37-41-41-41 stitches. When piece measures 16-19-23-27-31-34 cm / 6 1/4"-7½"-9"-10½"-12 1/4"-13½" from division (decreases should be done), knit 1 round while decreasing 1 stitch in all sizes = 36-36-36-40-40-40 stitches. Work A.5 in the round (= 9-9-9-10-10-10 repetitions of 4 stitches). After A.5 switch to double pointed needles size 3 mm / US 2.5. Work 2 ridges in the round with dark rose, switch back to double pointed needles size 4 mm / US 6 and bind off. Sleeve measures approx. 21-24-28-32-36-39 cm / 8 1/4"-9½"-11"-12½"-14 1/4"-15 1/4" from division. Work the other sleeve the same way. ---------------------------------------------------------- HEAD BAND: Worked in the round on circular needle. Cast on 108-124 stitches on circular needle size 2.5 mm / US 1.5 with dark rose. Knit 1 round. Then work rib in the round (= knit 2/purl 2) for 2 cm / 3/4''. Switch to circular needle size 3 mm / US 2.5 and off white. Knit 1 round while at the same time decrease 10-12 stitches evenly - read INCREASE/DECREASE TIP = 98-112 stitches. Work A.6 in the round (= 7-8 repetitions of 14 stitches). REMEMBER THE GAUGE! When A.6 has been worked, continue with dark rose. Knit 1 round while increasing 10-12 stitches evenly = 108-124 stitches. Switch to circular needle size 2.5 mm / US 1.5 and work rib in the round = knit 2/purl 2 for 2 cm / 3/4''. Switch back to circular needle size 3 mm / US 2.5 and bind off with knit over knit and purl over purl. |
|||||||||||||||||||
Diagram explanations |
|||||||||||||||||||
|
|||||||||||||||||||

|
|||||||||||||||||||
|
|||||||||||||||||||

|
|||||||||||||||||||
|
Have you made this or any other of our designs? Tag your pictures in social media with #dropsdesign so we can see them! Do you need help with this pattern?You'll find tutorial videos, a Comments/Questions area and more by visiting the pattern on garnstudio.com. © 1982-2024 DROPS Design A/S. We reserve all rights. This document, including all its sub-sections, has copyrights. Read more about what you can do with our patterns at the bottom of each pattern on our site. |
|||||||||||||||||||


With over 40 years in knitting and crochet design, DROPS Design offers one of the most extensive collections of free patterns on the internet - translated to 17 languages. As of today we count 304 catalogs and 11422 patterns - 11417 of which are translated into English (US/in).
We work hard to bring you the best knitting and crochet have to offer, inspiration and advice as well as great quality yarns at incredible prices! Would you like to use our patterns for other than personal use? You can read what you are allowed to do in the Copyright text at the bottom of all our patterns. Happy crafting!
Comments / Questions (20)
Merci beaucoup pour votre soutien! Il est très apprécié!
29.02.2024 - 12:43Dans le diagramme A.2 , à la fin de la 5e ligne, il y a une augmentation. Je veux savoir de quelle couleur je la fais. Je doute: naturel ou rose foncé.
28.02.2024 - 23:10DROPS Design answered:
Bonjour Hélène, faites les jetés dans la couleur principale du tour tricoté, autrement dit, au 5ème tour, faites le jeté en naturel (tout comme les 2 jetés suivants qui devront aussi être faits en naturel). Bon tricot!
29.02.2024 - 08:26Is het mogelijk om na de pas het lijf vanaf middenachter te breien?
30.09.2023 - 15:01Buenas tardes, Estoy haciendo la túnica para una niña de 2 años. Tengo una duda. Después de finalizar la elevación comienzo con el A1 teniendo 84 puntos. En el diagrama A1 sólo veo que aparezcan 3 aumentos. Cuando sigo leyendo el patrón, me dice que donde marca la flecha 1 tengo que tener 126 puntos. Es imposible !!. Si en el diagrama A1 sólo dice aumentar 3 Veces!!!! Ayuda pls Thks coop Isabel Castro
22.10.2021 - 13:17DROPS Design answered:
Hola Maria Isabel, A.1 tiene 3 aumentos, pero tienes que repetir A.1 14 veces en la vuelta(como pone en el paréntesis). Por lo tanto, en total se aumentan 14x3 = 42 puntos, que sumados a 84 puntos son 126 puntos.
24.10.2021 - 12:16Hi there! I'm knitting size 11/12. In diagram A.2, there is an arrow- 3, for which the instructions say : " Work round as shown in diagram and increase AT THE SAME TIME 14-10-6-10-6-2 stitches evenly on this round (increasing base color in pattern stripe)". I'm having some difficulty understanding how to increase without spoiling the pattern . Maybe you can explain a bit more what is meant by "increasing base color in pattern stripe"? Thank you!
23.02.2021 - 11:16DROPS Design answered:
Dear Guinevere, you will increase evenly with dark rose and make sure that there is 1 stitch worked with offwhite over the 3 stitches off-white from previous round. Happy knitting!
23.02.2021 - 12:36Merci pour votre explication . Une autre question si vous permettez : comment éviter que le point mousse ne roule lors de la bordure de la tunique ? Merci
01.12.2020 - 16:29DROPS Design answered:
Bonjour Mme Marimar, le meilleur moyen est de bloquer la robe quand elle est terminée: lavez-la (en suivant bien les instructions de l'étiquette + quelques généralités ici) et faites la sécher bien à plat, avec des épingles si besoin. Bonne continuation!
01.12.2020 - 17:20Bonjour, Je suis arrivée aux manches en taille 2 ans de ce modèle. Or je ne comprend pas par où je dois commencer en haut ou en bas de la Manche ? Je ne comprend pas la partie que vous détaillez pour les tailles 2,3/4, 5/6, et 7/8 ans " En commençant au fil marqueur. .........et la maille avec le fil marqueur au milieu du dessus de la Manche doit être la 4eme maille de A3." Merci de bien vouloir m'eclairer.
01.12.2020 - 00:32DROPS Design answered:
Bonjour Mme Marimar, la manche se tricote de haut en bas, à partir des mailles mises en attente que l'on reprend + on va relever 1 m dans chacune des 6 mailles montées lors de la division = 51 m en taille 2 ans. Mettez un marqueur au milieu des 6 nouvelle mailles = c'est maintenant le début des tours, vous tricotez en commençant par la maille juste après le marqueur (= 3 des nouvelles mailles) et tricotez A.3 en commençant par la 3ème m du diagramme (= 6 m) et répétez ensuite A.3 (5 x 8 m) + les 5 premières m du diagramme. Bon tricot!
01.12.2020 - 09:30Bonjour, Je tricote cette tunique en taille 2 ans. Je suis arrivée au niveau de l'empiècement où je dois augmenter 14 m au dernier rang de la grille A2. Je ne comprends pas comment je dois augmenter en respectant le motif de la grille . Merci de m'éclairer. .
25.11.2020 - 00:41DROPS Design answered:
Bonjour Mme Marimar, cette leçon explique comment augmenter à intervalles réguliers - ajustez pour que vos jetés soient faits dans les sections 3 mailles de la couleur du fond pour que le triangle soit bien terminé à chaque fois, autrement dit, vous devez avoir parfois 4 mailles avec la couleur du fond au lieu de 3 mailles et ceci 14 fois au total. Bon tricot!
25.11.2020 - 08:08Non ho capito come fate gli ai.enti della tunica dopo lo sprone. Vanno fatti sotto i buchi per le maniche e solo ai lati? Grazie mille per la risposta
23.11.2020 - 06:48DROPS Design answered:
Buonasera Cesarina, se fa riferimento agli aumenti sul davanti/dietro si aumenta ai lati a livello dei segnapunti. Buon lavoro!
23.11.2020 - 21:56In welcher Farbe wird die Erhöhung gestrickt? In der deutschen Anleitung steht dunkelrosa. In der Englischen nur rosa. Was ist mit "Faden anziehen" gemeint? Sollen verkürzte Reihen gestrickt werden? Danke!
30.05.2019 - 22:59DROPS Design answered:
Liebe Johanna, die Erhöhung wird mit rosa gestrickt - deutsche Anleitung wird angepasst - dieses Video zeigt wie man eine Erhöhung strickt, und wie man den Faden etwas anziehen wird. Viel Spaß beim stricken!
31.05.2019 - 09:50