DROPS Flora
DROPS Flora
65% Wool, 35% Alpaca
from 3.30 $ /50g
Get the yarn to make this pattern from 6.60$.

The yarn cost is calculated from the pattern’s smallest size and the yarn’s cheapest product type. Looking for an even better price? You might find it on the DROPS Deals!

DROPS SS24

Annely

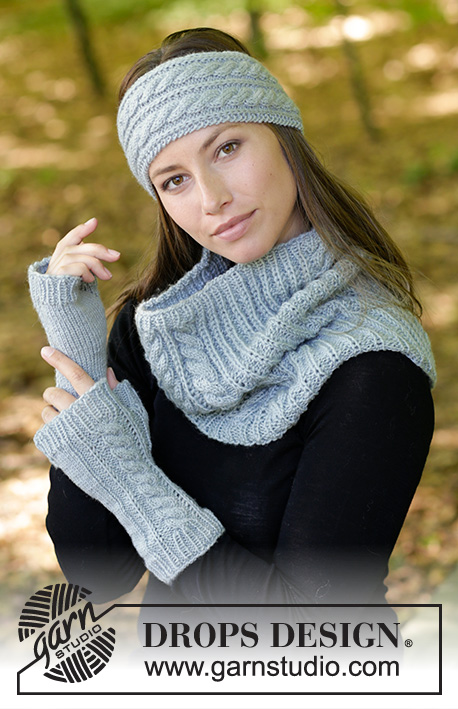
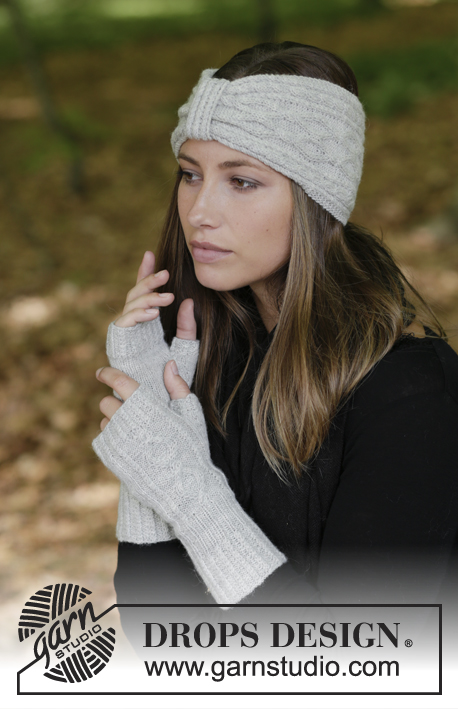
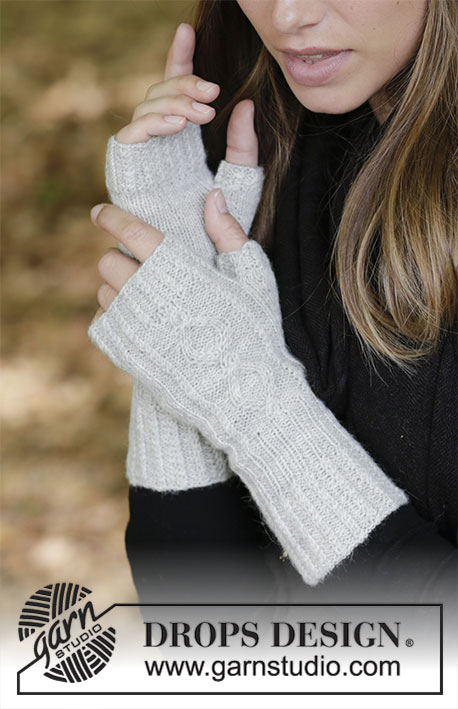
The set consists of: Knitted head band and wrist warmers with cables. The piece is worked in DROPS Flora.

DROPS 182-12
DROPS Design: Pattern no fl-015
Yarn group A
-----------------------------------------------------------

HEAD BAND:
Sizes: S/M - L/XL
Fits head size: approx. 54/56 - 58/60 cm / 21"/22" - 22½"/23½"
Materials:
DROPS FLORA from Garnstudio (belongs to Yarn Group A)
50 g for both sizes in color 03, light gray

The piece can also be knitted with yarn from:
"Alternative yarn (Yarn Group A)" – see the link below.

DROPS NEEDLE SIZE 2.5 MM / US 1.5 – or the size needed to get 26 stitches and 34 rows stockinette stitch on 10 cm / 4" in width and 10 cm / 4" in height.

DROPS CABLE NEEDLE – for cables.
-----------------------------------------------------------

WRIST WARMERS:
Sizes: S/M - L/XL
Complete length: approx. 25 - 26 cm / 9¾"-10¼"
Materials:
DROPS FLORA from Garnstudio (belongs to Yarn Group A)
50 g for both sizes in color 03, light gray

DROPS DOUBLE POINTED NEEDLES SIZE 2.5 MM / US 1.5 – or the size needed to get 26 stitches and 34 rows stockinette stitch on 10 cm / 4" in width and 10 cm / 4" in height.

DROPS CABLE NEEDLE – for cables.

-------------------------------------------------------

Alternative Yarn – See how to change yarns here
Yarn Groups A to F – Use the same pattern and change the yarn here
Yarn usage using an alternative yarn – Use our yarn converter here

-------------------------------------------------------

DROPS Flora
DROPS Flora
65% Wool, 35% Alpaca
from 3.30 $ /50g
Get the yarn to make this pattern from 6.60$.

The yarn cost is calculated from the pattern’s smallest size and the yarn’s cheapest product type. Looking for an even better price? You might find it on the DROPS Deals!

Pattern instructions

NOTE: This pattern is written in American English. All measurements in charts are in cm. For conversion from inches to cm - click here. There are different terms for crocheting in American and British English. If this pattern includes crochet, click for "crochet terms" here. For this pattern in British English, please click here.
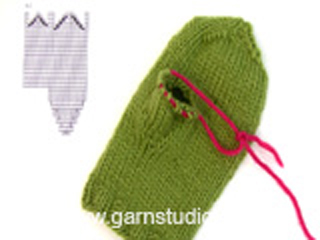
INFORMATION FOR THE PATTERN:

RIDGE/GARTER STITCH (worked back and forth):
1 ridge = Knit 2 rows.

PATTERN:
Head band: See diagrams A.1 and A.2.
Wrist warmers: See diagrams A.2 to A.4.
The diagrams show all the rows in the pattern seen from the right side.

DECREASE TIP (for head band):
To work out how to decrease evenly, count the total number of stitches on the needle (e.g. 54 stitches), minus the edge stitches (e.g. 6 stitches) and divide by the number of decreases to be made (e.g. 12) = 4. In this example, you knit every 3rd and 4th stitch together, but do not decrease over the edge stitches.

INCREASE TIP-1 (for the thumb gusset on the wrist warmers):
Make 1 yarn over, knit 1, make 1 yarn over (= 2 stitches increased). On the next round knit the yarn overs twisted to prevent holes.
Continue to increase on each side of the increased stitches so that you get a gusset.

INCREASE TIP-2 (for wrist warmers):
To work out how to increase evenly, count the total number of stitches on the needle (e.g. 50 stitches), minus the stitches you are not going to increase over (e.g. 22 stitches) and divide the remaining stitches with the number of increases to be made (e.g. 14) = 2. In this example, you increase after every 2nd stitch by making 1 yarn over, on the next round work the yarn overs twisted to prevent holes.
----------------------------------------------------------

HEAD BAND:
The piece is worked back and forth on the needle.
Cast on 42 stitches with needle size 2.5 mm / US 1.5 and Flora. Work 2 RIDGES – see description above. The next row is worked as follows from the right side: Knit 3 edge stitches, * Knit 3, 1 yarn over *, repeat from *-* until there are 3 stitches left on the needle and finish with knit 3 edge stitches = 54 stitches. Purl 1 row from the wrong side with knit 3 edge stitches in each side (the yarn overs are purled twisted to prevent holes). Continue by working A.1 (= 54 stitches) until the piece measures approx. 48-54 cm / 19"-21¼" – finish with the 6th row in A.1 so that the pattern starts and finishes in the same way. Knit 1 row from the right side and decrease AT THE SAME TIME 12 stitches evenly on row – read DECREASE TIP = 42 stitches. Knit 5 rows and then loosely bind off with knit from the right side.

BAND:
The piece is worked back and forth on the needle.
Cast on 14 stitches with needle size 2.5 mm / US 1.5. Work 1 ridge. The next row is worked as follows from the right side: 1 edge stitch in garter stitch, work A.2 over the next 12 stitches (= 3 repeats of 4 stitches), finish with 1 edge stitch in garter stitch. Continue the pattern in this way until the piece measures 10 cm / 4". Work 1 ridge and then loosely bind off with knit from the right side.
Cut the strand, form the band into a ring and sew the bind-off edge to the cast-on edge with 1 stitch in each stitch.

Pull the head band through the ring. Sew the head band together mid front – sew the bind-off edge to the cast-on edge with 1 stitch in each stitch. Place the band mid front so that it hides the seam.
----------------------------------------------------------

LEFT WRIST WARMER:
The piece is worked in the round with double pointed needles.
Cast on 64-72 stitches with double pointed needles size 2.5 mm / US 1.5 and Flora. Knit 1 round. Then work A.2 in the round (= 16-18 repeats of 4 stitches). When the piece measures 5-6 cm / 2"-2⅜" knit the stitches in each cable together 2 and 2 the complete round (the other stitches are purled) = 48-54 stitches. Continue working with knit over knit and purl over purl until the piece measures 10-11 cm / 4"-4½". REMEMBER THE GAUGE!
The next round is worked as follows:
S/M: Knit 2, purl 9, knit 1 in the front and back of each of the next 2 stitches (= 2 stitches increased), purl 9 and knit 26 = 50 stitches.
L/XL: Knit 3, purl 9, knit 1 in the front and back of each of the next 2 stitches (= 2 stitches increased), purl 9, knit 31 and decrease at the same time 2 stitches evenly over these 31 stitches = 54 stitches.
The next round is worked as follows in both sizes: 2-3 stitches stockinette stitch, work A.3 (= 22 stitches) and work 26-29 stitches stockinette stitch. Continue the pattern in this way.
When the piece measures 14-15 cm / 5½"-6" start the increases for the thumb gusset. Increase 1 stitch on each side of the next to last stitch on the round (i.e. on the inside of the hand) – read INCREASE TIP-1. Increase in this way on each side of the increased stitches every 3rd round a total of 6-7 times = 13-15 thumb-gusset stitches and a total of 62-68 stitches on the needle.
When the piece measures 19-21 cm / 7½"-8¼" place the 13-15 thumb-gusset stitches + 1 stitch on each side of these on a thread (= 15-17 stitches on the thread). On the next round, cast on 3 new stitches on the needle over the stitches on the thread = 50-54 stitches.
Continue with stockinette stitch and A.3 as before until the piece measures 21-22 cm / 8¼"-8¾". Knit 1 round and increase at the same time 14 stitches evenly in both sizes – read INCREASE TIP-2 (do not increase over the 22 stitches in A.3) = 64-68 stitches. Continue working A.2 in the round – NOTE: A.4 shows how A.2 fits over A.3, there should be purl 2 / 2 cable stitches the complete round.
When you have worked 10 rounds with A.2 the whole wrist warmer measures approx. 24-25 cm / 9½"-9¾". Bind off with knit over knit and purl over purl.

THUMB:
Place the 15-17 stitches from the thread back on double pointed needles size 2.5 mm / US 1.5 and in addition knit up 9-7 stitches on the edge of the back of the thumb-gusset stitches (i.e. knit up 1 stitch in each of the 3 stitches which were cast on + 3-2 stitches on each side of these 3 stitches) = 24-24 stitches. Work 3-5 rounds stockinette stitch in the round. Then work 6 rounds of A.2 before binding off with knit over knit and purl over purl.

RIGHT WRIST WARMER:
Cast on 64-72 stitches with double pointed needles size 2.5 mm / US 1.5. Knit 1 round. Then work A.2 in the round (= 16-18 repeats of 4 stitches). When the piece measures 5-6 cm / 2"-2⅜" knit the stitches in each cable together 2 and 2 the complete round (the other stitches are purled) = 48-54 stitches. Continue working with knit over knit and purl over purl until the piece measures 10-11 cm / 4"-4½".
The next round is worked as follows:
S/M: Knit 26, purl 9, knit 1 in the front and back of each of the next 2 stitches (= 2 stitches increased), purl 9 and knit 2 = 50 stitches.
L/XL: Knit 31 and decrease at the same time 2 stitches evenly over these 31 stitches, purl 9, knit 1 in the front and back of each of the next 2 stitches (= 2 stitches increased), purl 9 and knit 3 = 54 stitches.
The next round is worked as follows in both sizes: 26-29 stitches stockinette stitch, work A.3 (= 22 stitches) and finish with 2-3 stitches stockinette stitch. Continue the pattern in this way.
When the piece measures 14-15 cm / 5½"-6" start the increases for the thumb gusset. Increase 1 stitch on each side of the second stitch on the round (i.e. on the inside of the hand) – read INCREASE TIP-1. Increase in this way on each side of the increased stitches every 3rd round a total of 6-7 times = 13-15 thumb-gusset stitches and a total of 62-68 stitches on the needle.
When the piece measures 19-21 cm / 7½"-8¼" place the 13-15 thumb-gusset stitches + 1 stitch on each side of these on a thread (= 15-17 stitches on the thread). On the next round cast on 3 new stitches on the needle over the stitches on the thread = 50-54 stitches.
Continue with stockinette stitch and A.3 as before until the piece measures 21-22 cm / 8¼"-8¾". Knit 1 round and at the same time increase 14 stitches evenly in both sizes – read INCREASE TIP-2 (do not increase over the 22 stitches in A.3) = 64-68 stitches. Continue to work A.2 in the round – NOTE: A.4 shows how A.2 fits over A.3, there should be purl 2 / 2 cable stitches the complete round.
When you have worked 10 rounds of A.2 the whole wrist warmer measures approx. 24-25 cm / 9½"-9¾". Bind off with knit over knit and purl over purl.
Work thumb in the same way as for the left wrist warmer.

Diagram

All measurements in charts are in cm.

symbols = knit from right side, purl from wrong side
symbols = purl from right side, knit from wrong side
symbols = knit 2 together
symbols = place 1 stitch on the cable needle behind the piece, knit 1, knit the stitch from the cable needle
symbols = place 1 stitch on the cable needle behind the piece, knit 2, purl the stitch from the cable needle
symbols = place 2 stitches on the cable needle in front of piece, purl 1, knit the 2 stitches from the cable needle
symbols = place 2 stitches on the cable needle behind the piece, knit 2, knit the 2 stitches from the cable needle
symbols = place 2 stitches on the cable needle in front of piece, knit 2, knit the 2 stitches from the cable needle
diagram

Each of our patterns has specific tutorial videos to help you.

Do you have a question? See a list of frequently asked questions (FAQ)

Knitting tension is what determines the final measurements of your work, and is usually measured per 10 x 10 cm. It is provided like so: number of stitches in width x number of rows in height - eg: 19 stitches x 26 rows = 10 x 10 cm.

The knitting tension is very individual; some people knit/crochet loosely while others work tightly. You adjust the knitting tension with the needle size, which is why the suggested needle size only serve as a guide! You need to adjust this (up or down) to ensure that YOUR knitting tension matches the knitting tension provided in the pattern. If you work with a different knitting tension than provided you will have a different yarn consumption, and your work will have different measurements than what the pattern suggests.

The knitting tension also determines which yarns can replace each other. As long as you achieve the same knitting tension you can replace one yarn with another.

See DROPS lesson: How to measure your tension/gauge

See DROPS video: How to make a gauge tension swatch

The required amount of yarn is provided in grams, eg: 450 g. To calculate how many balls you’ll need you first need to know how many grams are in 1 ball (25g, 50g or 100g). This information is available if you click on the individual yarn quality on our pages. Divide the amount required with the amount of each ball. For example, if each ball is 50g (the most common amount), the calculation will be as follows: 450 / 50 = 9 balls.

The important thing when changing from one yarn to another is that the knitting/crochet tension remains the same. This is so that the measurements of the finished piece will be the same as on the sketch provided. It is easier to achieve the same knitting tension using yarns from the same yarn group. It is also possible to work with multiple strands of a thinner yarn to achieve the knitting tension of a thicker one. Please try our yarn converter. We recommend you to always work a test swatch.

Please NOTE: when changing yarn the garment might have a different look and feel to the garment in the photo, due to individual properties and qualities of each yarn.

See DROPS lesson: Can I use a different yarn than the one mentioned in the pattern?

All our yarns are categorised into yarn groups (from A to F) according to thickness and knitting tension – group A contains the thinnest yarns and group F the thickest. This makes it easier for you to find alternative yarns to our patterns, should you wish to switch yarn. All yarns within the same group have a similar knitting tension and can easily replace each other. However, different yarn qualities have different structures and properties which will give the finished work a unique look and feel.

Click here for an overview of the yarns in each yarn group

At the top of all our patterns you’ll find a link to our yarn converter, which is a helpful tool should you wish to use a different yarn than suggested. By filling in the yarn quality you wish to replace, the amount (in your size) and number of strands, the converter will present good alternative yarns with the same knitting tension. Additionally it will tell you how much you’ll require in the new qualities and whether you’ll need to work with multiple strands. Most skeins are 50g (some are 25g or 100g).

If the pattern is worked with multiple colours, every colour will have to be converted separately. Similarly, if the pattern is worked with several strands of different yarns (for example 1 strand Alpaca and 1 strand Kid-Silk) you will have to find alternatives for each, individually.

Click here to see our yarn converter

Since different yarns have different qualities and textures we have chosen to keep the original yarn in our patterns. However, you can easily find options among our available qualities by using our yarn converter, or simply pick a yarn from the same yarn group.

It is possible that some retailers still have discontinued yarns in stock, or that someone has a few skeins at home that they would like to find patterns for.

The yarn converter will provide both alternative yarn as well as required amount in the new quality.

If you think it's hard to decide what size to make, it can be a good idea to measure a garment you own already and like the size of. Then you can pick the size by comparing those measures with the ones available in the pattern's size chart.

You'll find the size chart at the bottom of the pattern.

See DROPS lesson: How to read size chart

The needle size provided in the pattern serves only as a guide, the important thing is to follow the knitting tension. And since knitting tension is very individual, you will have to adjust the needle size to ensure that YOUR tension is the same as in the pattern – maybe you’ll have to adjust 1, or even 2 needle sizes, up or down to achieve the correct tension. For this, we recommend that you work test swatches.

Should you work with a different knitting tension than the one provided, the measurements of the finished garment might deviate from the measurement sketch.

See DROPS lesson: How to measure your tension/gauge

See DROPS video: How to make a gauge tension swatch

Working a garment top-down provides more flexibility and room for personal adjustment. For example it is easier to try the garment on while working, as well as making adjustments to length of yoke and shoulder caps.

The instructions are carefully explaining every step, in the correct order. Diagrams are adjusted to the knitting direction and are worked as usual.

The diagram depicts all rows/rounds, and every stitch seen from the right side. It is read from bottom to top, from right to left. 1 square = 1 stitch.

When working back and forth, every other row is worked from the right side and every other row is worked from the wrong side. When working from the wrong side, the diagram will have to be worked reversed: from left to right, knit stitches are purled, purl stitches are knit etc.

When working in the round every round is worked from the right side and the diagram are worked from right to left on all rounds.

See DROPS lesson: How to read knitting diagrams

The diagram depicts all rows/rounds, and every stitch seen from the right side. It is worked from bottom to top, from right to left.

When working back and forth every other row is worked from the right side: from right to left and every other row is worked from the wrong side: from left to right.

When working in the round, every row in the diagram are worked from the right side, from right to left.

When working a circular diagram you start in the middle and work your way outwards, counter clockwise, row by row.

The rows usually start with a given number of chain stitches (equivalent to the height of the following stitch), this will either be depicted in the diagram or explained in the pattern.

See DROPS lesson: How to read crochet diagrams

Instructions for working several diagrams after each other on the same row/round, will often be written like so: “work A.1, A.2, A.3 a total of 0-0-2-3-4 times". This means you work A.1 once, then A.2 is worked once, and A.3 is repeated (in width) the number of times provided for your size – in this case like so: S = 0 times, M = 0 times, L=2 times, XL= 3 times and XXL = 4 times.

The diagrams are worked as usual: begin with the first row in A.1, then work the first row in A.2 etc.

See DROPS lesson: How to read knitting diagrams

See DROPS lesson: How to read crochet diagrams

The total width of the garment (from wrist-to-wrist) will be larger in the larger sizes, despite the actual sleeves being shorter. The larger sizes have longer sleeve caps and wider shoulders, so there will be a good fit in all sizes.

The measurement sketch/schematic drawing provides information regarding the full length of the garment. If it’s a jumper or a jacket the length is measured from the highest point on the shoulder (usually closest to the neckline), and straight down to the bottom of the garment. It is NOT measured from the tip of shoulder. Similarly, the length of yoke is measured from the highest point on the shoulder and down to where yoke is split into body and sleeves.

See DROPS lesson: How to read a schematic drawing

Diagrams are often repeated on the round or in height. 1 repeat is the diagram the way it appears in the pattern. If it says to work 5 repeats of A.1 in the round, then you work A.1 a total of 5 times after/next to each other in the round. If it says to work 2 repeats of A.1 vertically/in height you work the entire diagram once, then begin again at the start and work the entire diagram one more time.

Chain stitches are slightly narrower than other stitches and to avoid working the cast-on edge too tight, we simply chain more stitches to begin with. The stitch count will be adjusted on the following row to fit the pattern and measurement sketch.

The rib edge is more elastic and will contract slightly compared to, for example, stocking stitch. By increasing before the rib edge, you avoid a visible difference in width between the rib edge and the rest of the body.

It’s very easy to cast off too tightly, and by making yarn overs while casting off (and simultaneously casting these off) you avoid a too tight cast off edge.

See DROPS video: How to bind off with yarn overs (yo)

To achieve an even increase (or decrease) you can increase on, for example: every 3rd and 4th row alternately, like so: work 2 rows and increase on the 3rd row, work 3 rows and increase on the 4th. Repeat this until the increase is complete.

See DROPS lesson: Increase or decrease 1 st on every 3rd and 4th row alternately

Should you prefer to work in the round instead of back and forth, you may of course adjust the pattern. You’ll need to add steeks mid-front (usually 5 stitches), and follow the instructions. When you would normally turn and work from the wrong side, simply work across the steek and continue in the round. At the end you’ll cut the piece open, pick up stitches to work bands, and cover the cut edges.

See DROPS video: How to knit steeks and cut open

Should you prefer to work back and forth instead of in the round, you may of course adjust the pattern so you work the pieces separately and then assemble them at the end. Divide the stitches for the body in 2, add 1 edge stitch in each side (for sewing) and work the front and back pieces separately.

See DROPS lesson: Can I adapt a pattern for circular needles into straight needles?

Pattern repeats can vary slightly in the different sizes, in order to get the correct proportions. If you’re not working the exact same size as the garment in the photo, yours might deviate slightly. This has been carefully developed and adjusted so that the complete impression of the garment is the same in all sizes.

Make sure to follow instructions and diagrams for your size!

If you have found a pattern you like which is available in women’s size it’s not very difficult to convert it to men’s size. The biggest difference will be the length of sleeves and body. Start working on the women size that you think would fit across the chest. The additional length will be worked right before you cast off for the armhole/sleeve cap. If the pattern is worked top-down you can add the length right after the armhole or before the first decrease on sleeve.

Regarding additional yarn amount, this will depend on how much length you add, but it is better with a skein too many than too few.

All yarns will have excess fibres (from production) that might come off as lint or shedding. Brushed yarns (ie hairier yarns) have more of these loose, excess fibres, causing more shedding.

Shedding also depends on what is worn under or over the garment, and whether this pulls at the yarn fibres. It’s therefore not possible to guarantee that there will be no shedding

Below are some tips on how to get the best result when working with hairier yarns:

1. When the garment is finished (before you wash it) shake it vigorously so the looser hairs come off. NOTE: do NOT use a lint roller, brush or any method that pulls at the yarn.

2. Place the garment in a plastic bag and put it in your freezer - the temperature will cause the fibres to become less attached to each other, and excess fibres will come off easier.

3. Leave in the freezer for a few hours before taking it out and shaking it again.

4. Wash the garment according to the instructions on the yarn label.

Pilling is a natural process that happens to even the most exclusive of fibers. It's a natural sign of wear and tear that is hard to avoid, and that is most visible in high friction areas of your garment like a sweater's arms and cuffs.

You can make your garment look as new by removing the pilling, using a fabric comb or a pill/lint remover.

Still can't find the answer you need? Then scroll down and leave your question so one of our experts can try to help you. This will be done normally within 5 to 10 working days.
In the meantime, you can read the questions and answers that others have left to this pattern or join the DROPS Workshop on Facebook to get help from fellow knitters/crocheters!

You might also like...

Grey Head Band

jupis, Finland

Post a comment to pattern DROPS 182-12

We would love to hear what you have to say about this pattern!

If you want to leave a question, please make sure you select the correct category in the form below, to speed up the answering process. Required fields are marked *.

Comments / Questions (17)

country flag Marca wrote:

Kan ik het patroon vd polswarmers ook met rondbreinaalden breien ipv naalden zonder knop? En zo ja, kan ik het patroon dan gewoon letterlijk volgen?? En hoe lang moet mijn kabel dan zijn (ik heb 40, 60 en 80)?

28.11.2023 - 18:20

DROPS Design answered:

Dag Marca,

Jazeker dat kan. Kijk even welke lengte voor jou het handigst werkt. Zelf werk ik liever met een wat langere draad in combinatie met de magic loop techiek.

29.11.2023 - 09:31

country flag Amouret wrote:

Ok mais les 14 augmentation vu que c'est écrit ne pas les faire au dessus des 22 mailles du motif je les fait de quelle coté ? coté motif ou coté jersey?

24.04.2023 - 10:16

DROPS Design answered:

Bonjour Mme Amouret, oups je n'en étais pas au bon niveau... vous devez augmenter ces 14 mailles au-dessus des 40 mailles jersey, pour ne pas toucher aux 22 mailles de A.3. Bon tricot!

24.04.2023 - 10:40

country flag Angélique Amouret wrote:

Bonjour je suis arriver au niv des 14 augmentation , quand vous dite ne pas augmenter au dessus des 22 mailles du motif , et ce que ca veut dire que j'augmente sur le jersey ou j'augmente coté motif, et en regardant la photo du modèle j'ai l'impression que si je continue en motif A2 ca ne continuera pas la suite du motif de A3 car la sur ma mitaine j'ai que 1 cercle de dessiner sur le milieu de la mitaine et pas 2 comme sur le dessin en photo

23.04.2023 - 10:45

DROPS Design answered:

Bonjour Mme Amouret, tout dépend de votre tensionen hauteur; on va mettre les mailles du pouce en attente 10 cm (2ème taille) après avoir commencé A.3, autrement dit après 34 rangs de A.3 (soit 19 rangs de A.3 + les 15 premiers rangs), terminez votre motif A.3 si souhaité avant les côtes de la main - et ajustez en conséquence la hauteur des côtés de A.2. Bon tricot!

24.04.2023 - 10:10

country flag Amouret wrote:

Ok donc j'augmente sur mes 2 mailles du début et je continue le motif comme avant c ca? mais comment si retrouver pour retomber dans le bon sens du motif

21.04.2023 - 13:35

DROPS Design answered:

Bonjour Mme Amouret, pour la 1ère augmentation du pouce, augmenter 1 m avant + 1 maille après la maille avec le marqueur, la 2ème fois, augmentez avant puis après ces 3 mailles, la 3ème fois, augmentez avant puis après ces 5 mailles etc. J'ai peur de ne pas bien comprendre pas votre question , je suis désolée, le motif A.3 ne sera pas décalé, on rajoute juste des mailles de chaque côté de la maille avec un marqueur, les autres mailles se tricotent comme avant: en jersey endroit et diagramme A.3 sur le dessus de la main (lisez le diagramme de droite à gauche tous les tours car on tricote en rond). Bon tricot!

21.04.2023 - 14:11

country flag Amouret wrote:

Vu que je fait mes mitaine sur des aiguille circulaire , du coup et ce que je doit faire une augmentation au début et a la fin du travail pour former mon pouce vers la droite ?

19.04.2023 - 14:15

DROPS Design answered:

Bonjour Mme Amouret, l'avant-dernière maille reste la même maille dans tous les cas, vous devez juste augmenter 2 m à chaque fois: 1 m avant cette maille + 1 maille après cette maille (puis 1 m avant ces mailles et 1 m après ces mailles). Pour la mitaine droite, vous augmenterez de part et d'autre de la 2ème maille du tour. Bon tricot!

19.04.2023 - 15:16

country flag Angélique Amouret wrote:

Bonjour je suis au niveau de l'augmentation pour le gousser du pouce mais j'ai du mal a comprendre comment proceder exactement et surtout a quel moment j'augmente car je vois pas comment faire de chaque coté sur le coté paume et savoir du coup si on continue tjr sur le motif A3 car c pas indiquer cordialement,

19.04.2023 - 11:27

DROPS Design answered:

Bonjour Mme Amouret, vous augmentez d'abord de chaque côté de l'avant-dernière maille du tour (mitaine gauche), autrement dit, avant + après cette maille (= 2 mailles à chaque fois), la fois suivante, vous augmentez avant + après ces 3 mailles et ainsi de suite - cf AUGMENTATIONS-1 (gousset du pouce, mitaines):. Les autres mailles se tricotent exactement comme avant. Bon tricot!

19.04.2023 - 13:10

country flag Amouret wrote:

Bonjour je suis perdu je suis au niv ou je dois commencer le diagramme A3 mais je comprends pas pour les 2 mailles jersey c pas écrit comment les tricoter et vous mettez A3 = 22 maille et 26 maille en Jersey mais ça fait pas 50 mailles du coup comment on tricoté les 2 dernières mailles

09.04.2023 - 09:25

DROPS Design answered:

Bonjour Mme Amouret, en taille S/.M, si vous avez bien 50 mailles sur vos aiguilles, tricotez-les ainsi: 2 m jersey (en rond, on tricote ces mailles toujours à l'endroit), puis tricotez les 22 mailles de A.3 et terminez par 26 mailles jersey, soit: 2+22+26=50. Bon tricot!

11.04.2023 - 12:29

country flag Johanna Andersson wrote:

Hej! Jag förstår inte hur jag ska sticka varv 21-24 i diagram A1. Arbetet har 54 maskor men där finns bara beskrivna totalt sett 8 maskor. Hur kommer jag vidare? Jag stickar pannbandet. Tack!

11.03.2021 - 20:14

DROPS Design answered:

Hei Johanna. Når du er ferdig med rad 20 i A.1, begynner du på 1. rad igjen. De 8 maskene du ser på slutten av diagrammet er samme maske som er på 1.- 4. rad i diagrammet. mvh DROPS design

15.03.2021 - 13:02

country flag Sylvie wrote:

Bonjour, Le modèle « Annely » le diagramme A.1 , après les 20 rangs entre les 2 colonnes (marquer en jaune) je fais quoi ??? J’attends impatiemment votre réponse pour faire ce modèle Merci Sylvie

21.02.2021 - 23:17

DROPS Design answered:

Bonjour Sylvie, les différents motifs de A.1 se répètent sur un nombre différents de rangs, autrement dit, quand les 20 rangs du diagramme sont terminés, reprenez-le au début sur toutes les mailles sauf sur les 2 torsades de 4 mailles - ces torsades doivent être croisées tous les 6 rangs. Bon tricot!

22.02.2021 - 09:35

country flag Kari Bjerknes wrote:

Prøver å skrive ut mønsteret/oppskriften på pulsvanter. Det står at det er gratismønster og jeg kan ikke ha på mobilen hele tiden....... Kan dere hjelpe meg🥰

28.12.2019 - 15:40

DROPS Design answered:

Hei Kari. Da er det bare å klikke på skriver ikonet, nedenfor bildet eller til høyre. Får du ikke skrevet ut, sjekk dine skriver innstillinger på din printer/telefon/PC. God Fornøyelse!

20.01.2020 - 11:06