DROPS Fabel
DROPS Fabel
75% Wool, 25% Polyamide
from 3.00 $ /50g
Get the yarn to make this pattern from 12.00$.

The yarn cost is calculated from the pattern’s smallest size and the yarn’s cheapest product type. Looking for an even better price? You might find it on the DROPS Deals!

DROPS SS24

Sea Spray

Set consists of: Knitted mittens, hat and neck warmer with cables and wave pattern in DROPS Fabel. Size S - L

DROPS Extra 0-1369
DROPS design: Pattern no fa-358
Yarn group A
----------------------------------------------------------
MITTENS:
Size: S/M - L
Materials:
DROPS FABEL from Garnstudio
50-50 g color no 602, silver fox

DROPS DOUBLE POINTED NEEDLES size 2.5 mm / US 1.5 - or size needed to get 26 sts x 34 rows in stockinette st = 4" x 4" (10 x 10 cm).
DROPS CABLE NEEDLE - for cables.

HAT:
Size: S/M – L
Head circumference: 52/54 cm / 20½"/21¼" - 58/60 cm / 22¾"/23½"
Materials:
DROPS FABEL from Garnstudio
50-50 g color no 602, silver fox

DROPS DOUBLE POINTED NEEDLES size 3 mm / US 2.5 - or size needed to get 24 sts x 32 rows in stockinette st = 4" x 4" (10 x 10 cm).
DROPS DOUBLE POINTED NEEDLES size 2.5 mm / US 1.5 for rib - or size needed to get 26 sts x 34 rows in stockinette st = 4" x 4" (10 x 10 cm).
DROPS CABLE NEEDLE - for cables.

NECK WARMER:
Size: One-size
Circumference: 70 cm / 27½"
Height: 20 cm / 8"
Materials:
DROPS FABEL from Garnstudio
100 g color no 602, silver fox

DROPS CIRCULAR NEEDLE (60 cm / 24") SIZE 3 mm/US 2.5 - or size needed to get 24 sts x 32 rows in stockinette st = 4" x 4" (10 x 10 cm).

-------------------------------------------------------

Alternative Yarn – See how to change yarns here
Yarn Groups A to F – Use the same pattern and change the yarn here
Yarn usage using an alternative yarn – Use our yarn converter here

-------------------------------------------------------

DROPS Fabel
DROPS Fabel
75% Wool, 25% Polyamide
from 3.00 $ /50g
Get the yarn to make this pattern from 12.00$.

The yarn cost is calculated from the pattern’s smallest size and the yarn’s cheapest product type. Looking for an even better price? You might find it on the DROPS Deals!

Pattern instructions

NOTE: This pattern is written in American English. All measurements in charts are in cm. For conversion from inches to cm - click here. There are different terms for crocheting in American and British English. If this pattern includes crochet, click for "crochet terms" here. For this pattern in British English, please click here.
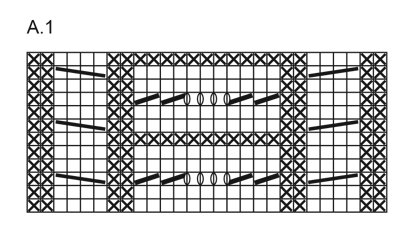
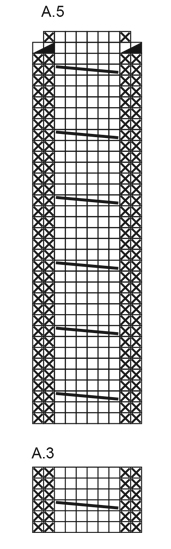
PATTERN:
See diagram A.1. The diagram show all rows in pattern seen from RS.

GARTER STITCH (worked in the round):
1 ridge = 2 rounds. * Knit 1 round and purl 1 round *, repeat from *-*.
----------------------------------------------------------

RIGHT MITTEN:
Worked in the round on double pointed needles. Cast on 60-64 sts on double pointed needles size 2.5 mm / US 1.5 with Fabel. Knit 1 round. Then work rib = knit 2/purl 2. Continue like this until rib measures 6 cm / 2⅜". Knit 1 round AT THE SAME TIME decrease 9-6 sts evenly = 51-58 sts. Work 1 ridge in GARTER ST - see explanation above. Then work as follows: 0-2 sts in stockinette st, A.1 (= 27 sts) and 24-29 sts in stockinette st. Repeat A.1 vertically. REMEMBER THE KNITTING GAUGE When piece measures 7 cm / 2¾", begin to increase for thumb, increase 1 st on each side of the last st on round. Increase with a yarn over, to avoid holes knit yarn overs twisted on next round. Increase outside the increased sts every other round 5-6 times in total = 11-13 thumb sts (61-70 sts in total). When piece measures 12-13 cm / 4¾"-5", slip the 11-13 thumb sts on 1 stitch holder. On next round, cast on 1 new st behind thumb sts = 51-58 sts. Continue in the round in stockinette st and A.1 until piece measures 22-23 cm / 8¾"-9" (3½-4 cm / 1¼"-1½" remain until full length). Now insert 1 marker thread at beginning of round and 1 marker thread after 27-29 sts. Then work in the round with pattern and stockinette st as before, AT THE SAME TIME decrease 1 st on each side of every marker thread (= 4 decreases). Decrease as follows 2 sts before marker thread: Slip 1 st knitwise, knit 1, pass slipped stitch over. Decrease as follows after marker thread: Knit 2 together, work sts that do not fit the pattern in stockinette st. Repeat decreases every other round 7-8 times in total = 23-26 sts remain on needle. On next round knit all sts together 2 by 2 = 12-13 sts. Cut the yarn and pull it through the remaining sts, tighten together and fasten.

THUMB:
Slip the 11-13 sts from stitch holder on double pointed needles size 2.5 mm / US 1.5 and pick in addition up 3 sts behind these sts = 14-16 sts. Work in stockinette st in the round for 5½-6 cm / 2¼"-2½". On next round knit all sts together 2 by 2 = 7-8 sts. Cut the yarn and pull it through the remaining sts, tighten together and fasten.

LEFT MITTEN:
Work as right but reversed. Increase for thumb on each side of the 28th-32nd st on round.

----------------------------------------------------------
HAT:

PATTERN:
See diagrams A.2 to A.5.
----------------------------------------------------------
Cast on 136-164 sts on double pointed needles size 2.5 mm / US 1.5 with Fabel. Knit 1 round, then work rib = knit 2/purl 2. When piece measures 4 cm / 1½", switch to double pointed needles size 3 mm / US 2.5. Knit 1 round while decreasing 1-2 sts evenly = 135-162 sts. Then work as follows: * A.2 (= 17 sts), A.3 (= 10 sts) *, repeat from *-* 5-6 times in total. REMEMBER THE KNITTING GAUGE Repeat A.2 and A.3 vertically. When piece measures approx. 13-15 cm / 5"-6" - adjust after one whole repetition of A.2/A.3 vertically, continue as follows: * A.4, A.5 *, work from *-* 5-6 times in total. When A4/A.5 have been worked 1 time vertically, there are 65-78 sts on round. Knit all sts together 2 by 2 = 33-39 sts. Knit all sts together 2 by 2, 2 more times = 9-10 sts. Pull yarn through the remaining sts, tighten and fasten. Piece measures approx. 23-25 cm / 9"-9¾".

----------------------------------------------------------
NECK WARMER:

GARTER STITCH (worked in the round):
1 ridge = 2 rounds. * Knit 1 round and purl 1 round *, repeat from *-*.
----------------------------------------------------------

NECK WARMER:
Cast on 168 sts on circular needle size 3 mm / US 2.5 with Fabel. Work in GARTER ST - see explanation above. Bind off when piece measures 20 cm / 8".

This pattern has been corrected.

Updated online: 04.11.2020
Correction: HAT: ... Cast on 136-164 sts on double pointed needles size 2.5 mm = US 1,5 with Fabel. Knit 1 round, then work rib = knit 2/purl 2. When piece measures 4 cm = 1 1/2", switch to double pointed needles size 3 mm = US 2,5. Knit 1 round while decreasing 1-2 sts evenly = 135-162 sts...

Diagram

All measurements in charts are in cm.

symbols = knit
symbols = purl
symbols = knit 2 stitches together
symbols = between 2 stitches make 1 yarn over, on the next round purl yarn over to make a hole
symbols = slip 2 stitches on cable needle behind piece, knit 2 stitches, knit 2 stitches from cable needle
symbols = slip 2 stitches on cable needle in front of piece, knit 2 stitches, knit 2 stitches from cable needle
symbols = purl 2 stitches together
symbols = slip 3 stitches on cable needle in front of piece, knit 3 stitches, knit 3 stitches from cable needle
diagram
diagram
diagram

Each of our patterns has specific tutorial videos to help you.

Do you have a question? See a list of frequently asked questions (FAQ)

Knitting tension is what determines the final measurements of your work, and is usually measured per 10 x 10 cm. It is provided like so: number of stitches in width x number of rows in height - eg: 19 stitches x 26 rows = 10 x 10 cm.

The knitting tension is very individual; some people knit/crochet loosely while others work tightly. You adjust the knitting tension with the needle size, which is why the suggested needle size only serve as a guide! You need to adjust this (up or down) to ensure that YOUR knitting tension matches the knitting tension provided in the pattern. If you work with a different knitting tension than provided you will have a different yarn consumption, and your work will have different measurements than what the pattern suggests.

The knitting tension also determines which yarns can replace each other. As long as you achieve the same knitting tension you can replace one yarn with another.

See DROPS lesson: How to measure your tension/gauge

See DROPS video: How to make a gauge tension swatch

The required amount of yarn is provided in grams, eg: 450 g. To calculate how many balls you’ll need you first need to know how many grams are in 1 ball (25g, 50g or 100g). This information is available if you click on the individual yarn quality on our pages. Divide the amount required with the amount of each ball. For example, if each ball is 50g (the most common amount), the calculation will be as follows: 450 / 50 = 9 balls.

The important thing when changing from one yarn to another is that the knitting/crochet tension remains the same. This is so that the measurements of the finished piece will be the same as on the sketch provided. It is easier to achieve the same knitting tension using yarns from the same yarn group. It is also possible to work with multiple strands of a thinner yarn to achieve the knitting tension of a thicker one. Please try our yarn converter. We recommend you to always work a test swatch.

Please NOTE: when changing yarn the garment might have a different look and feel to the garment in the photo, due to individual properties and qualities of each yarn.

See DROPS lesson: Can I use a different yarn than the one mentioned in the pattern?

All our yarns are categorised into yarn groups (from A to F) according to thickness and knitting tension – group A contains the thinnest yarns and group F the thickest. This makes it easier for you to find alternative yarns to our patterns, should you wish to switch yarn. All yarns within the same group have a similar knitting tension and can easily replace each other. However, different yarn qualities have different structures and properties which will give the finished work a unique look and feel.

Click here for an overview of the yarns in each yarn group

At the top of all our patterns you’ll find a link to our yarn converter, which is a helpful tool should you wish to use a different yarn than suggested. By filling in the yarn quality you wish to replace, the amount (in your size) and number of strands, the converter will present good alternative yarns with the same knitting tension. Additionally it will tell you how much you’ll require in the new qualities and whether you’ll need to work with multiple strands. Most skeins are 50g (some are 25g or 100g).

If the pattern is worked with multiple colours, every colour will have to be converted separately. Similarly, if the pattern is worked with several strands of different yarns (for example 1 strand Alpaca and 1 strand Kid-Silk) you will have to find alternatives for each, individually.

Click here to see our yarn converter

Since different yarns have different qualities and textures we have chosen to keep the original yarn in our patterns. However, you can easily find options among our available qualities by using our yarn converter, or simply pick a yarn from the same yarn group.

It is possible that some retailers still have discontinued yarns in stock, or that someone has a few skeins at home that they would like to find patterns for.

The yarn converter will provide both alternative yarn as well as required amount in the new quality.

If you think it's hard to decide what size to make, it can be a good idea to measure a garment you own already and like the size of. Then you can pick the size by comparing those measures with the ones available in the pattern's size chart.

You'll find the size chart at the bottom of the pattern.

See DROPS lesson: How to read size chart

The needle size provided in the pattern serves only as a guide, the important thing is to follow the knitting tension. And since knitting tension is very individual, you will have to adjust the needle size to ensure that YOUR tension is the same as in the pattern – maybe you’ll have to adjust 1, or even 2 needle sizes, up or down to achieve the correct tension. For this, we recommend that you work test swatches.

Should you work with a different knitting tension than the one provided, the measurements of the finished garment might deviate from the measurement sketch.

See DROPS lesson: How to measure your tension/gauge

See DROPS video: How to make a gauge tension swatch

Working a garment top-down provides more flexibility and room for personal adjustment. For example it is easier to try the garment on while working, as well as making adjustments to length of yoke and shoulder caps.

The instructions are carefully explaining every step, in the correct order. Diagrams are adjusted to the knitting direction and are worked as usual.

The diagram depicts all rows/rounds, and every stitch seen from the right side. It is read from bottom to top, from right to left. 1 square = 1 stitch.

When working back and forth, every other row is worked from the right side and every other row is worked from the wrong side. When working from the wrong side, the diagram will have to be worked reversed: from left to right, knit stitches are purled, purl stitches are knit etc.

When working in the round every round is worked from the right side and the diagram are worked from right to left on all rounds.

See DROPS lesson: How to read knitting diagrams

The diagram depicts all rows/rounds, and every stitch seen from the right side. It is worked from bottom to top, from right to left.

When working back and forth every other row is worked from the right side: from right to left and every other row is worked from the wrong side: from left to right.

When working in the round, every row in the diagram are worked from the right side, from right to left.

When working a circular diagram you start in the middle and work your way outwards, counter clockwise, row by row.

The rows usually start with a given number of chain stitches (equivalent to the height of the following stitch), this will either be depicted in the diagram or explained in the pattern.

See DROPS lesson: How to read crochet diagrams

Instructions for working several diagrams after each other on the same row/round, will often be written like so: “work A.1, A.2, A.3 a total of 0-0-2-3-4 times". This means you work A.1 once, then A.2 is worked once, and A.3 is repeated (in width) the number of times provided for your size – in this case like so: S = 0 times, M = 0 times, L=2 times, XL= 3 times and XXL = 4 times.

The diagrams are worked as usual: begin with the first row in A.1, then work the first row in A.2 etc.

See DROPS lesson: How to read knitting diagrams

See DROPS lesson: How to read crochet diagrams

The total width of the garment (from wrist-to-wrist) will be larger in the larger sizes, despite the actual sleeves being shorter. The larger sizes have longer sleeve caps and wider shoulders, so there will be a good fit in all sizes.

The measurement sketch/schematic drawing provides information regarding the full length of the garment. If it’s a jumper or a jacket the length is measured from the highest point on the shoulder (usually closest to the neckline), and straight down to the bottom of the garment. It is NOT measured from the tip of shoulder. Similarly, the length of yoke is measured from the highest point on the shoulder and down to where yoke is split into body and sleeves.

See DROPS lesson: How to read a schematic drawing

Diagrams are often repeated on the round or in height. 1 repeat is the diagram the way it appears in the pattern. If it says to work 5 repeats of A.1 in the round, then you work A.1 a total of 5 times after/next to each other in the round. If it says to work 2 repeats of A.1 vertically/in height you work the entire diagram once, then begin again at the start and work the entire diagram one more time.

Chain stitches are slightly narrower than other stitches and to avoid working the cast-on edge too tight, we simply chain more stitches to begin with. The stitch count will be adjusted on the following row to fit the pattern and measurement sketch.

The rib edge is more elastic and will contract slightly compared to, for example, stocking stitch. By increasing before the rib edge, you avoid a visible difference in width between the rib edge and the rest of the body.

It’s very easy to cast off too tightly, and by making yarn overs while casting off (and simultaneously casting these off) you avoid a too tight cast off edge.

See DROPS video: How to bind off with yarn overs (yo)

To achieve an even increase (or decrease) you can increase on, for example: every 3rd and 4th row alternately, like so: work 2 rows and increase on the 3rd row, work 3 rows and increase on the 4th. Repeat this until the increase is complete.

See DROPS lesson: Increase or decrease 1 st on every 3rd and 4th row alternately

Should you prefer to work in the round instead of back and forth, you may of course adjust the pattern. You’ll need to add steeks mid-front (usually 5 stitches), and follow the instructions. When you would normally turn and work from the wrong side, simply work across the steek and continue in the round. At the end you’ll cut the piece open, pick up stitches to work bands, and cover the cut edges.

See DROPS video: How to knit steeks and cut open

Should you prefer to work back and forth instead of in the round, you may of course adjust the pattern so you work the pieces separately and then assemble them at the end. Divide the stitches for the body in 2, add 1 edge stitch in each side (for sewing) and work the front and back pieces separately.

See DROPS lesson: Can I adapt a pattern for circular needles into straight needles?

Pattern repeats can vary slightly in the different sizes, in order to get the correct proportions. If you’re not working the exact same size as the garment in the photo, yours might deviate slightly. This has been carefully developed and adjusted so that the complete impression of the garment is the same in all sizes.

Make sure to follow instructions and diagrams for your size!

If you have found a pattern you like which is available in women’s size it’s not very difficult to convert it to men’s size. The biggest difference will be the length of sleeves and body. Start working on the women size that you think would fit across the chest. The additional length will be worked right before you cast off for the armhole/sleeve cap. If the pattern is worked top-down you can add the length right after the armhole or before the first decrease on sleeve.

Regarding additional yarn amount, this will depend on how much length you add, but it is better with a skein too many than too few.

All yarns will have excess fibres (from production) that might come off as lint or shedding. Brushed yarns (ie hairier yarns) have more of these loose, excess fibres, causing more shedding.

Shedding also depends on what is worn under or over the garment, and whether this pulls at the yarn fibres. It’s therefore not possible to guarantee that there will be no shedding

Below are some tips on how to get the best result when working with hairier yarns:

1. When the garment is finished (before you wash it) shake it vigorously so the looser hairs come off. NOTE: do NOT use a lint roller, brush or any method that pulls at the yarn.

2. Place the garment in a plastic bag and put it in your freezer - the temperature will cause the fibres to become less attached to each other, and excess fibres will come off easier.

3. Leave in the freezer for a few hours before taking it out and shaking it again.

4. Wash the garment according to the instructions on the yarn label.

Pilling is a natural process that happens to even the most exclusive of fibers. It's a natural sign of wear and tear that is hard to avoid, and that is most visible in high friction areas of your garment like a sweater's arms and cuffs.

You can make your garment look as new by removing the pilling, using a fabric comb or a pill/lint remover.

Still can't find the answer you need? Then scroll down and leave your question so one of our experts can try to help you. This will be done normally within 5 to 10 working days.
In the meantime, you can read the questions and answers that others have left to this pattern or join the DROPS Workshop on Facebook to get help from fellow knitters/crocheters!

Post a comment to pattern DROPS Extra 0-1369

We would love to hear what you have to say about this pattern!

If you want to leave a question, please make sure you select the correct category in the form below, to speed up the answering process. Required fields are marked *.

Comments / Questions (9)

country flag Del Faye wrote:

Can this pattern be used with DK wool? if so, how would decreases be made?

23.09.2023 - 15:02

DROPS Design answered:

Dear Del Faye, yes, you could use a DK yarn, but you would need to work a gauge and calculate the pattern according to the gauge. See here how to calculate a pattern: https://www.garnstudio.com/lesson.php?id=25&cid=19. Happy knitting!

24.09.2023 - 23:11

country flag Sabine wrote:

Hallo, wenn ich die Handschuhe nach Anleitung stricke, erhalte ich den linken Handschuh. Das ist oben vertauscht!

18.03.2022 - 14:43

country flag REINE MARIE wrote:

Bonsoir je commence avec plaisir ce beau bonnet mais voilà ,je suis les explications c'est à dire par 17mailles ensuite je fais les 10mailles ;tout le long mais cela ne tombe pas juste alors comment je dois commencer ?Merci de votre rèponse

12.01.2021 - 21:47

DROPS Design answered:

Bonjour Reine Marie, pour tricoter le bonnet, vous devez répéter alternativement A.2 et A.3 ainsi: *tricotez les 17 m de A.2, tricotez les 10 mailles de A.3*, répétez ces 27 mailles encore 5 ou 6 fois = 135-162 mailles. Bon tricot

13.01.2021 - 07:03

country flag Merja wrote:

Miksi nuo kaavapiirrokset eivät näy vieläkään?? Piirroksien puuttumisesta kirjoitettu teille jo vuosisitten!Tämä ainoa 28silmukkaa/10cm myssy, joka langallani neulottavissa. Piirokset voi lähettää vaikka sähköpostiosoitteeseen.

29.11.2020 - 19:32

DROPS Design answered:

Hei, nyt piirrokset avautuvat.

30.11.2020 - 14:16

country flag Mariona wrote:

Hola! Para el gorro, talla L, se dice de montar 162p, para hacer el elástico 2/2. 162 encaja muy bien con las repeticiones de 27p, pero no para el canalé. No deberían ser 164 o 160, y luego ajustar a 162? Gracias

11.09.2020 - 23:30

DROPS Design answered:

Hola Mariona. Hemos enviado tu pregunta al departamento de diseño. Publicaremos una corrección los más pronto posible.

27.09.2020 - 20:50

country flag Sonja wrote:

Jostain syystä tässä suomenkielisessä ohjeessa ei näy piirrokset. Ei näy koneella eikä puhelimella.

03.10.2019 - 19:29

country flag Carina Rosshed Renkert wrote:

Jag stickar mössan. I diagramförklaring ska man sticka 2 maskor på flätsticka framför arbetet, sticka 2 maskor, sticka maskorna från flätstickan. Men i själva diagramet så är det ju 6 maskor som ska stickas fläta över. Likadant i A.3 och A.5. Hur går det till?

06.12.2018 - 20:30

DROPS Design answered:

Hei Carina. Det har du helt rett i, her mangler det et symbol i symbolforklaringen. Du skal strikke slik: sett 3 masker på flettepinne foran arbeidet, strikk masker rett, strikk 3 masker rett fra flettepinnen. Vi skal få lagt til dette symbolet snarest. Takk for beskjed og god fornøyelse.

07.12.2018 - 08:23

country flag Christiane wrote:

Bonjour, je viens de terminer le bonnet avec la laine Fabel "brume de rose" et je suis enchantée. J'ai adoré le tricoter. Merci pour le modèle, pour les explications claires et pour cette laine. Cela me permet d'avoir un bonnet fantaisie qui demande juste un peu d'attention dans les diagrammes avec un très joli rendu.

03.03.2018 - 11:06

country flag Ingrid wrote:

"Lägg upp 136-162 maskor på strumpstickor 2,5 med Fabel. Sticka 1 varv rätt, sedan stickas det resår 2 rätmaskor, 2 avigmaskor. När arbetet mäter 4 cm byts det till strumpstickor 3. Sticka 1 varv rätt där det minskas 1-0 maskor jämnt fördelat = 135-162 maskor." ska vara "lägg upp 136-160" ... "där det minskas 1m respektive ökas 2m" alternativt "Lägg upp 136-164" .... " där det minskas 1-2 maskor jämnt fördelat", 162 är inte och blir aldrig jämnt delbart med fyra.

24.03.2017 - 12:26