DROPS Paris
DROPS Paris
100% Cotton
from 0.75 £ /50g
Get the yarn to make this pattern from 3.00£.

The yarn cost is calculated from the pattern’s smallest size and the yarn’s cheapest product type. Looking for an even better price? You might find it on the DROPS Deals!

DROPS Super Sale
DROPS 177-13
DROPS Design: Pattern no w-657
Yarn group C or A + A
----------------------------------------------------------
Measurements: Diameter: approx. 22 cm.
Materials:
DROPS PARIS from Garnstudio (belongs to yarn group C)
50 g colour 16, white
50 g colour 100, light wash
50 g colour 30, grey blue
50 g colour 48, petrol
The yarn amounts are enough for 2 potholders.

DROPS CROCHET HOOK SIZE 4 MM – or the size needed to get 17 double crochet/treble crochet on 10 cm in width.
----------------------------------------------------------

-------------------------------------------------------

Alternative Yarn – See how to change yarns here
Yarn Groups A to F – Use the same pattern and change the yarn here
Yarn usage using an alternative yarn – Use our yarn converter here

-------------------------------------------------------

DROPS Paris
DROPS Paris
100% Cotton
from 0.75 £ /50g
Get the yarn to make this pattern from 3.00£.

The yarn cost is calculated from the pattern’s smallest size and the yarn’s cheapest product type. Looking for an even better price? You might find it on the DROPS Deals!

DROPS Super Sale

SAVE 30% on 6 cotton favourites!
Valid until 12.04.2024

Pattern instructions

NOTE: This pattern is written in British English. All measurements in charts are in cm. For conversion from cm to inches - click here. There are different terms for crocheting in British and American English. If this pattern includes crochet, click for "crochet terms" here. For this pattern in American English, please click here.
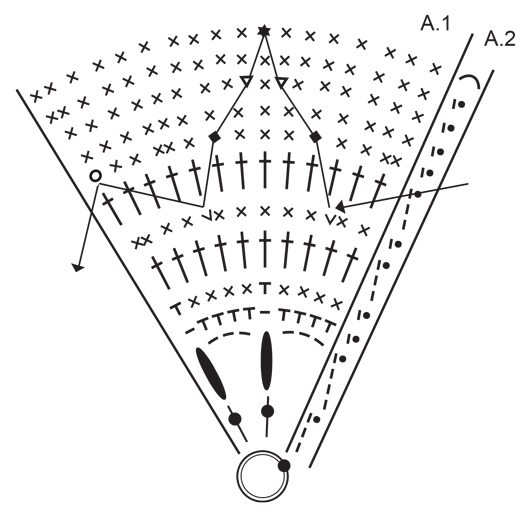
PATTERN:
See diagrams A.1 and A.2. Diagram A.1 is worked a total of 6 times in the round. A.2 shows how the rounds start and finish.

COLOUR STRIPES:
CAST ON + ROUND 1: grey blue
ROUND 2: white
ROUND 3: grey blue.
ROUND 4: petrol
ROUND 5: light wash
ROUND 6: grey blue
ROUND 7: light wash
ROUND 8: white
ROUND 9: light wash
ROUND 10: grey blue
ROUNDS 11 and 12: petrol

COLOUR CHANGE:
To get the neatest transition when changing colours, work the last slip stitch on the round with the new colour as follows: Insert the hook into the last chain stitch from the beginning of the round, pick up the new strand, make a yarn over with the new colour and pull it through the stitch on the hook.

QUADRUPLE TREBLE CROCHET:
Make 4 yarn overs, insert the hook in the bottom of the stitch to be worked around, pull through the first stitch, make another yarn over and pull through the first 2 stitches, * make another yarn over and pull through the next 2 stitches *, repeat from *-* 3 more times.
----------------------------------------------------------

POTHOLDER:
First work 2 flowers (= rounds 1 and 2), then work these together on round 3 so there is a double layer.

FLOWER:
Work 6 chain stitches with hook size 4 mm and grey blue and form them to a ring with 1 slip stitch in the first chain stitch. Then work the pattern as follows: READ COLOUR STRIPES and COLOUR CHANGE. Work rounds 1 and 2 in A.1 (a total of 6 repeats) - A.2 shows how the rounds start and finish. REMEMBER THE CROCHET TENSION! Now the piece measures approx. 9 cm in diameter. Work 1 more flower in the same way. Lay the 2 flowers together, wrong side to wrong side. Work the round 3 in A.1/A.2 through both layers.

Continue with the pattern as before until A.1/A.2 are complete in height. Cut and fasten the strand. Work another potholder in the same way.

Diagram

symbols = chain stitch
symbols = slip stitch
symbols = double crochet in stitch
symbols = double crochet in stitch. Insert a marker in these double crochets so that it is easier to find them when you work around them in round 8
symbols = double crochet around chain stitch/chain-space
symbols = treble crochet in stitch
symbols = treble crochet around chain stitch ring
symbols = work 2 double treble crochet in the next stitch, but wait with the last yarn over and pull through on both of these double treble crochets, work 1 double treble crochet in the same stitch and pull the last yarn over through all 4 loops on the hook
symbols = work 1 triple treble crochet around the double crochet (= v) the line leads to
symbols = work 1 triple treble crochet around the triple treble crochet the line leads to
symbols = work 1 double treble crochet around the first triple treble crochet the line leads to, but wait with the last yarn over and pull through, work 1 double treble crochet around the next triple treble crochet and pull the last yarn over through all 3 loops on the hook
symbols = work 2 quadruple treble crochets together: (make 4 yarn overs on hook, insert the hook around the stitch that the line leads to, make a yarn over on hook and pull the yarn trough (around the stitch), * make a yarn over on hook and pull through 2 loops on hook *, repeat from *-* 3 times more), repeat from (-) around next stitch the line leads too, work 1 double crochet in the treble crochet from previous round and pull through all loops on hook.
symbols = shows where the line continues
symbols = work 20 chain stitches for the loop. Finish the round with 20 double crochet around the loop and 1 slip stitch in the first double crochet
symbols = 6 chain stitches, form them to a ring with 1 slip stitch in the first chain stitch – see the point on the circle, the round starts and finishes here
diagram
Do you have a question? See a list of frequently asked questions (FAQ)

Knitting tension is what determines the final measurements of your work, and is usually measured per 10 x 10 cm. It is provided like so: number of stitches in width x number of rows in height - eg: 19 stitches x 26 rows = 10 x 10 cm.

The knitting tension is very individual; some people knit/crochet loosely while others work tightly. You adjust the knitting tension with the needle size, which is why the suggested needle size is only meant as a guide! You need to adjust this (up or down) to ensure that YOUR knitting tension matches the knitting tension provided in the pattern. If you work with a different knitting tension than provided you will have a different yarn consumption, and your work will have different measurements than what the pattern suggests.

The knitting tension also determines which yarns can replace each other. As long as you achieve the same knitting tension you can replace one yarn with another.

See DROPS lesson: How to measure your tension/gauge

See DROPS video: How to make a gauge tension swatch

The required amount of yarn is provided in grams, eg: 450 g. To calculate how many balls you’ll need you first need to know how many grams are in 1 ball (25g, 50g or 100g). This information is available if you click on the individual yarn quality on our pages. Divide the amount required with the amount of each ball. For example, if each ball is 50g (the most common amount), the calculation will be as follows: 450 / 50 = 9 balls.

The important thing when changing from one yarn to another is that the knitting/crochet tension remains the same. This is so that the measurements of the finished piece will be the same as on the sketch provided. It is easier to achieve the same knitting tension using yarns from the same yarn group. It is also possible to work with multiple strands of a thinner yarn to achieve the knitting tension of a thicker one. Please try our yarn converter. We recommend you to always work a test swatch.

Please NOTE: when changing yarn the garment might have a different look and feel to the garment in the photo, due to individual properties and qualities of each yarn.

See DROPS lesson: Can I use a different yarn than the one mentioned in the pattern?

All our yarns are categorised into yarn groups (from A to F) according to thickness and knitting tension – group A contains the thinnest yarns and group F the thickest. This makes it easier for you to find alternative yarns to our patterns, should you wish to switch yarn. All yarns within the same group have a similar knitting tension and can easily replace each other. However, different yarn qualities have different structures and properties which will give the finished work a unique look and feel.

Click here for an overview of the yarns in each yarn group

At the top of all our patterns you’ll find a link to our yarn calculator, which is a helpful tool should you wish to use a different yarn than suggested. By filling in the yarn quality you wish to replace, the amount (in your size) and number of strands, the calculator will present good alternative yarns with the same knitting tension. Additionally it will tell you how much you’ll require in the new qualities and whether you’ll need to work with multiple strands. Most skeins are 50g (some are 25g or 100g).

If the pattern is worked with multiple colours, every colour will have to be calculated separately. Similarly, if the pattern is worked with several strands of different yarns (for example 1 strand Alpaca and 1 strand Kid-Silk) you will have to find alternatives for each, individually.

Click here to see our yarn calculator

Since different yarns have different qualities and textures we have chosen to keep the original yarn in our patterns. However, you can easily find options among our available qualities by using our yarn calculator, or simply pick a yarn from the same yarn group.

It is possible that some retailers still have discontinued yarns in stock, or that someone has a few skeins at home that they would like to find patterns for.

The yarn calculator will provide both alternative yarn as well as required amount in the new quality.

If you think it's hard to decide what size to make, it can be a good idea to measure a garment you own already and like the size of. Then you can pick the size by comparing those measures with the ones available in the pattern's size chart.

You'll find the size chart at the bottom of the pattern.

See DROPS lesson: How to read size chart

The needle size provided in the pattern serves only as a guide, the important thing is to follow the knitting tension. And since knitting tension is very individual, you will have to adjust the needle size to ensure that YOUR tension is the same as in the pattern – maybe you’ll have to adjust 1, or even 2 needle sizes, up or down to achieve the correct tension. For this, we recommend that you work test swatches.

Should you work with a different knitting tension than the one provided, the measurements of the finished garment might deviate from the measurement sketch.

See DROPS lesson: How to measure your tension/gauge

See DROPS video: How to make a tension/gauge swatch

Working a garment top-down provides more flexibility and room for personal adjustment. For example it is easier to try the garment on while working, as well as making adjustments to length of yoke and shoulder caps.

The instructions are carefully explaining every step, in the correct order. Diagrams are adjusted to the knitting direction and are worked as usual.

The diagram depicts all rows/rounds, and every stitch seen from the right side. It is read from bottom to top, from right to left. 1 square = 1 stitch.

When working back and forth, every other row is worked from the right side and every other row is worked from the wrong side. When working from the wrong side, the diagram will have to be worked reversed: from left to right, knit stitches are purled, purl stitches are knit etc.

When working in the round every round is worked from the right side and the diagram are worked from right to left on all rounds.

See DROPS lesson: How to read knitting diagrams

The diagram depicts all rows/rounds, and every stitch seen from the right side. It is worked from bottom to top, from right to left.

When working back and forth every other row is worked from the right side: from right to left and every other row is worked from the wrong side: from left to right.

When working in the round, every row in the diagram are worked from the right side, from right to left.

When working a circular diagram you start in the middle and work your way outwards, counter clockwise, row by row.

The rows usually start with a given number of chain stitches (equivalent to the height of the following stitch), this will either be depicted in the diagram or explained in the pattern.

See DROPS lesson: How to read crochet diagrams

Instructions for working several diagrams after each other on the same row/round, will often be written like so: “work A.1, A.2, A.3 a total of 0-0-2-3-4 times". This means you work A.1 once, then A.2 is worked once, and A.3 is repeated (in width) the number of times provided for your size – in this case like so: S = 0 times, M = 0 times, L=2 times, XL= 3 times and XXL = 4 times.

The diagrams are worked as usual: begin with the first row in A.1, then work the first row in A.2 etc.

See DROPS lesson: How to read knitting diagrams

See DROPS lesson: How to read crochet diagrams

The total width of the garment (from wrist-to-wrist) will be larger in the larger sizes, despite the actual sleeves being shorter. The larger sizes have longer sleeve caps and wider shoulders, so there will be a good fit in all sizes.

The measurement sketch/schematic drawing provides information regarding the full length of the garment. If it’s a jumper or a jacket the length is measured from the highest point on the shoulder closest to the neckline, and straight down to the bottom of the garment. It is NOT measured from the tip of shoulder. Similarly, the length of yoke is measured from the highest point on the shoulder and down to where yoke is split into body and sleeves.

On a jacket measures are never taken along bands, unless specifically stated. Always measure inside band stitches when measuring the length.

See DROPS lesson: How to read a schematic drawing

Diagrams are often repeated on the round or in height. 1 repeat is the diagram the way it appears in the pattern. If it says to work 5 repeats of A.1 in the round, then you work A.1 a total of 5 times after/next to each other in the round. If it says to work 2 repeats of A.1 vertically/in height you work the entire diagram once, then begin again at the start and work the entire diagram one more time.

Chain stitches are slightly narrower than other stitches and to avoid working the cast-on edge too tight, we simply chain more stitches to begin with. The stitch count will be adjusted on the following row to fit the pattern and measurement sketch.

The rib edge is more elastic and will contract slightly compared to, for example, stocking stitch. By increasing before the rib edge, you avoid a visible difference in width between the rib edge and the rest of the body.

It’s very easy to cast off too tightly, and by making yarn overs while casting off (and simultaneously casting these off) you avoid a too tight cast off edge.

See DROPS video: How to bind off with yarn overs (yo)

To achieve an even increase (or decrease) you can increase on, for example: every 3rd and 4th row alternately, like so: work 2 rows and increase on the 3rd row, work 3 rows and increase on the 4th. Repeat this until the increase is complete.

See DROPS lesson: Increase or decrease 1 st on every 3rd and 4th row alternately

Should you prefer to work in the round instead of back and forth, you may of course adjust the pattern. You’ll need to add steeks mid-front (usually 5 stitches), and follow the instructions. When you would normally turn and work from the wrong side, simply work across the steek and continue in the round. At the end you’ll cut the piece open, pick up stitches to work bands, and cover the cut edges.

See DROPS video: How to knit steeks and cut open

Should you prefer to work back and forth instead of in the round, you may of course adjust the pattern so you work the pieces separately and then assemble them at the end. Divide the stitches for the body in 2, add 1 edge stitch in each side (for sewing) and work the front and back pieces separately.

See DROPS lesson: Can I adapt a pattern for circular needles into straight needles?

Pattern repeats can vary slightly in the different sizes, in order to get the correct proportions. If you’re not working the exact same size as the garment in the photo, yours might deviate slightly. This has been carefully developed and adjusted so that the complete impression of the garment is the same in all sizes.

Make sure to follow instructions and diagrams for your size!

If you have found a pattern you like which is available in women’s size it’s not very difficult to convert it to men’s size. The biggest difference will be the length of sleeves and body. Start working on the women size that you think would fit across the chest. The additional length will be worked right before you cast off for the armhole/sleeve cap. If the pattern is worked top-down you can add the length right after the armhole or before the first decrease on sleeve.

Regarding additional yarn amount, this will depend on how much length you add, but it is better with a skein too many than too few.

All yarns will have excess fibres (from production) that might come off as lint or shedding. Brushed yarns (ie hairier yarns) have more of these loose, excess fibres, causing more shedding.

Shedding also depends on what is worn under or over the garment, and whether this pulls at the yarn fibres. It’s therefore not possible to guarantee that there will be no shedding

Below are some tips on how to get the best result when working with hairier yarns:

1. When the garment is finished (before you wash it) shake it vigorously so the looser hairs come off. NOTE: do NOT use a lint roller, brush or any method that pulls at the yarn.

2. Place the garment in a plastic bag and put it in your freezer - the temperature will cause the fibres to become less attached to each other, and excess fibres will come off easier.

3. Leave in the freezer for a few hours before taking it out and shaking it again.

4. Wash the garment according to the instructions on the yarn label.

Pilling is a natural process that happens to even the most exclusive of fibers. It's a natural sign of wear and tear that is hard to avoid, and that is most visible in high friction areas of your garment like a sweater's arms and cuffs.

You can make your garment look as new by removing the pilling, using a fabric comb or a pill/lint remover.

Still can't find the answer you need? Then scroll down and leave your question so one of our experts can try to help you. This will be done normally within 5 to 10 working days.
In the meantime, you can read the questions and answers that others have left to this pattern or join the DROPS Workshop on Facebook to get help from fellow knitters/crocheters!

You might also like...

Post a comment to pattern DROPS 177-13

We would love to hear what you have to say about this pattern!

If you want to leave a question, please make sure you select the correct category in the form below, to speed up the answering process. Required fields are marked *.

Comments / Questions (13)

country flag Alexanquaph wrote:

Hello.

06.06.2023 - 09:54

country flag Ivaninquaph wrote:

Hello.

26.05.2023 - 10:49

country flag Alexeyquaph wrote:

Hello.

23.05.2023 - 22:16

country flag Vasiliyquaph wrote:

Hello.

19.05.2023 - 23:49

country flag Anne wrote:

Jeg har kommet til rad åtte, men forstår overhode ikke hva jeg skal gjøre. Det burde vært en forklarende video på hvordan man lager disse sikksakk-linjene.

08.08.2022 - 00:17

DROPS Design answered:

Hei Anne. Takk for ditt innspill, vi setter opp ditt video ønske på vår liste. I mellomtiden kan du se på en videoen som ligner litt på den teknikken du skal bruke. Selv om videoen viser en 4-dobbeltstav rundt en dobbeltstav er teknikken den sammen, se i tidsrommet ca 0:53 - 2:44. Du hekler en trippelstav rundt en fastmaske 2 rader under / den tynne streken viser til hvilken fastmaske du skal hekle rundt. Hvordan hekle fletter med relieffmasker etter diagram Håper dette kan hjelpe deg litt på veien. mvh DROPS Design

15.08.2022 - 08:57

country flag Anne Dupont wrote:

En français, j\'ai voulu faire ce modèle ! Impossible ! Le diagramme n\'est pas correcte. J\'ai acheté le coton et j\'aimerais pouvoir faire cette manique. Envoyez-moi le bon diagramme svp. Merci.

12.11.2021 - 19:08

DROPS Design answered:

Bonjour Mme Dupont, le diagramme est juste, à quel niveau rencontrez-vous des difficultés?

15.11.2021 - 08:59

country flag Kelly Gee wrote:

I have crocheted for years but always from written patterns. I am very new to using diagrams. The stitches over the top shown by the lines with the arrow, that begin on row 7, is that done at the end as it's own row over top of the flat work? I apologize if my question is confusing, I am just unsure about this one thing.

15.09.2021 - 04:38

DROPS Design answered:

Dear Mrs Gee, correct, the first arrow at the beg of A.1 shows the stitch where you will crochet around at the end of the 9th round = the arrow at the end of A.1 (the same that will be worked at the end of each repeat, worked around the stitch shown at the beg of the repeat). Happy crocheting!

15.09.2021 - 07:15

country flag Gabriella wrote:

Ma come faccio a lavorare in doppio dal 4 al 12 giro se solo i 2 fiori si mettono insieme al 3 giro???? Vorrei sapere solo questo Grazie

31.12.2020 - 10:59

DROPS Design answered:

Buongiorno Gabriella, si continua a lavorare come per il 3° giro. Buon lavoro!

31.12.2020 - 11:21

country flag Gabriella Malara wrote:

Grazie per la risposta. Vorrei capire adesso : dal 4 al 12 giro si lavora sul dritto del lavoro ma poi si devono lavorare gli stessi giri anche sul rovescio per avere la presina doppia come il fiore???

30.12.2020 - 19:50

DROPS Design answered:

Buongiorno Gabriella, no, deve lavorare 2 fiori e metterli uno contro l'altro e poi lavorare i giri successivi attraverso entrambi gli strati del lavoro. Buon lavoro!

31.12.2020 - 09:32

country flag Gabriella wrote:

Questa presina si lavora doppia come il fiore? Una volta accoppiati i 2 fiori si continua singolarmente prima da una parte e poi dall'altra? Rimango in attesa per continuare il mio lavoro GRAZIE

28.12.2020 - 16:37

DROPS Design answered:

Buonasera Gabriella, prima si lavorano i 2 fiori seguendo il giro 1 e 2 poi durante la lavorazione del giro 3 si uniscono, per cui il giro 3 va lavorato attraverso entrambi gli strati. Buon lavoro!

28.12.2020 - 22:11