
Popular categories
Looking for a yarn?


|
|||||||||||||||||||
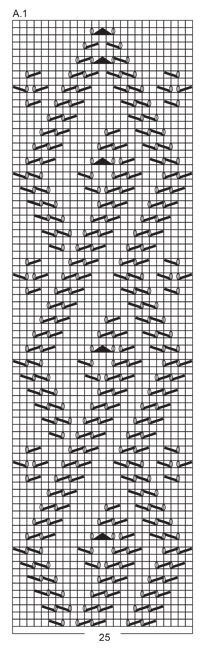
Celtic Knot |
|||||||||||||||||||
 |
 |
||||||||||||||||||
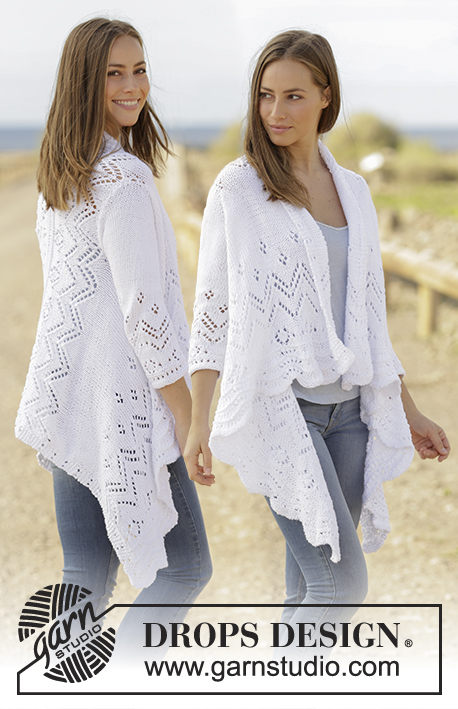
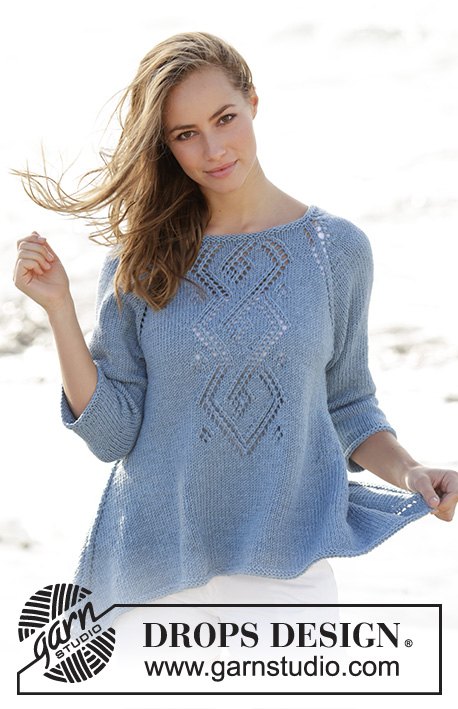
Jumper knitted top down with lace pattern, raglan and A-shape in DROPS Big Merino. Size: S - XXXL
DROPS 177-5 |
|||||||||||||||||||
|
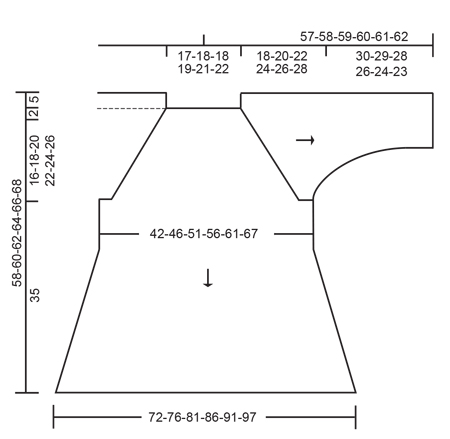
GARTER STITCH (worked in the round): 1 ridge = 2 rounds. Knit 1 round and purl 1 round. INCREASE TIP-1: To calculate how to increase evenly, use the total number of stitches on row (e.g. 78 stitches) and divide stitches by number of increases to be done (e.g. 8) = 9.75. In this example increase after approx. every 10th stitch. Increase 1 stitch by making 1 yarn over, on next round knit yarn over twisted to avoid holes. RAGLAN: Increase for raglan on each side of the four marker threads on every other round - NOTE: Increase different number of stitches on front and back piece and on sleeves as explained in pattern. INCREASE LIKE THIS ON FRONT AND BACK PIECE WHEN INCREASING 4 STITCHES (i.e. increase 2 stitches in each side): After marker thread: Knit 1, make 1 yarn over, knit 1, make 1 yarn over (= 2 stitches increased). Before marker thread: Begin 2 stitches before marker thread, make 1 yarn over, knit 1, make 1 yarn over, knit 1 (= 2 stitches increased). On next round knit the yarn overs closest to the marker thread (= hole) and knit the other yarn overs twisted (= not hole). INCREASE LIKE THIS ON FRONT AND BACK PIECE WHEN INCREASING 2 STITCHES (i.e. increase 1 stitch in each side): After marker thread: Knit 1, make 1 yarn over (= 1 stitch increased). Before marker: Begin 1 stitch before marker thread, make 1 yarn over, knit 1 (= 1 stitch increased). On next round knit yarn overs (= holes). INCREASE LIKE THIS ON SLEEVES (i.e. increase 1 stitch in each side): After marker thread: Knit 1, make 1 yarn over (= 1 stitch increased). Before marker thread: Begin 1 stitch before marker thread, make 1 yarn over, knit 1 (= 1 stitch increased). On next round knit the yarn overs to make holes. INCREASE TIP-2 (applies to sides of body): Work until 1 stitch remain before marker thread, make 1 yarn over, knit 2 (marker thread is in the middle of these 2 stitches), make 1 yarn over (= 2 stitches increased). On next round knit yarn overs (= holes). DECREASE TIP (applies to mid under sleeve): Begin 3 stitches before marker thread and knit 2 together, knit 2 (marker thread is between these 2 stitches), slip 1 stitch knitwise, knit 1, pass slipped stitch over stitch worked (= 2 stitches decreased). ---------------------------------------------------------- JUMPER: Worked in the round on circular needle, top down. Work sleeves in the round on a short circular needle/double pointed needles. YOKE: Cast on 78-82-82-86-90-94 stitches on a short circular needle size 4.5 mm with Big Merino. Work 2 ridges in GARTER STITCH - see explanation above. Knit 1 round while increasing 8 stitches evenly - READ INCREASE TIP-1 = 86-90-90-94-98-102 stitches. Beginning of round = raglan line in the right hand side of back piece when the garment is worn. Switch to a short circular needle size 5.5 mm and knit 1 round - AT THE SAME TIME insert 4 marker threads in the piece as follows: Insert the first marker thread at beginning of round, insert the second marker thread after the next 16 stitches (= sleeve), insert the third marker thread after the next 27-29-29-31-33-35 stitches (= front piece), and insert the fourth marker thread after the next 16 stitches (= sleeve). 27-29-29-31-33-35 stitches remain on round after last marker thread (= back piece). Knit the rest of round. REMEMBER KNITTING TENSION AND READ ALL OF THE FOLLOWING SECTION BEFORE CONTINUING: On next round start increase for RAGLAN – see explanation above! Increase on each side of the 4 marker threads but increase differently on front/back piece and sleeves as follows: SLEEVES: Increase 1 stitch after and 1 stitch before marker thread every other round 16-18-20-22-24-26 times in total. FRONT AND BACK PIECE: Increase 2 stitches after and 2 stitches before marker thread every other round 1-1-2-3-3-4 times in total, then increase 1 stitch after and 1 stitch before marker thread every other round 15-17-18-19-21-22 times in total. PATTERN: AT THE SAME TIME on first round with increase for raglan begin lace pattern and work A.1 over the middle 25 stitches front and back. When A.1 has been worked 1 time vertically, continue with stocking stitch over all stitches until finished measurements. AT THE SAME TIME after all increases there are 218-238-258-282-302-326 stitches on row and piece measures approx. 18-20-22-24-26-28 cm from cast-on edge measured mid front. Remove the marker threads from the raglan lines. Work next round as follows: Slip the first 48-52-56-60-64-68 stitches on 1 stitch holder (= right sleeve), cast on 6-6-8-8-10-12 new stitches on needle (= in the side under sleeve - insert 1 marker thread in the middle of these new stitches), work the next 61-67-73-81-87-95 stitches (= front piece), slip the next 48-52-56-60-64-68 stitches on 1 stitch holder (= left sleeve), cast on 6-6-8-8-10-12 new stitches on needle (= in the side under sleeve - insert 1 marker thread in the middle of these new stitches) and work the remaining 61-67-73-81-87-95 stitches on needle (= back piece). NOW MEASURE PIECE FROM HERE! BODY: = 134-146-162-178-194-214 stitches. Continue in the round in stocking stitch and A.1 front and back as before. When piece measures 9 cm in all sizes from division under sleeves, increase 1 stitch on each side of both marker threads - READ INCREASE TIP-2 (= 4 stitches increased). Increase like this every other round 24 times in total in each side (or until piece measures 33 cm from division) = approx. 230-242-258-274-290-310 stitches on needle. Switch to circular needle size 4.5 mm. Work 2 ridges. Switch back to circular needle size 5.5 mm and cast off by knitting (make sure to avoid a tight cast-off edge). Jumper measures approx. 35 cm from division under sleeves and 58-60-62-64-66-68 cm from shoulder and down. SLEEVE: Slip stitches from stitch holder in one side of piece on a short circular needle size 5.5 mm. Pick in addition up 1 stitch in each of the 6-6-8-8-10-12 stitches cast on under sleeve = 54-58-64-68-74-80 stitches on needle. Insert 1 marker thread in the middle of the new stitches (= mid under sleeve). Work in stocking stitch in the round. When piece measures 3 cm, decrease 2 stitches mid under sleeve - READ DECREASE TIP. Decrease like this every 3-2½-2-1½-1-1 cm 8-9-11-13-15-17 times in total = 38-40-42-42-44-46 stitches. When sleeve measures 28-27-26-24-22-21 cm (shorter measurements in the larger sizes because of longer yoke), switch to double pointed needles size 4.5 mm. Work 2 ridges in garter stitch, switch back to double pointed needles size 5.5 mm and cast off by knitting. Sleeve measures approx. 30-29-28-26-24-23 cm from division. Work the other sleeve the same way. |
|||||||||||||||||||
Diagram explanations |
|||||||||||||||||||
|
|||||||||||||||||||
|
|||||||||||||||||||
|
|||||||||||||||||||
|
Have you made this or any other of our designs? Tag your pictures in social media with #dropsdesign so we can see them! Do you need help with this pattern?You'll find tutorial videos, a Comments/Questions area and more by visiting the pattern on garnstudio.com. © 1982-2024 DROPS Design A/S. We reserve all rights. This document, including all its sub-sections, has copyrights. Read more about what you can do with our patterns at the bottom of each pattern on our site. |
|||||||||||||||||||


With over 40 years in knitting and crochet design, DROPS Design offers one of the most extensive collections of free patterns on the internet - translated to 17 languages. As of today we count 304 catalogues and 11422 patterns - 11422 of which are translated into English (UK/cm).
We work hard to bring you the best knitting and crochet have to offer, inspiration and advice as well as great quality yarns at incredible prices! Would you like to use our patterns for other than personal use? You can read what you are allowed to do in the Copyright text at the bottom of all our patterns. Happy crafting!
Comments / Questions (17)
Cosa devo fare per allungare la manica fino al polso?
17.11.2021 - 18:36DROPS Design answered:
Buonasera Sara, può semplicemente proseguire nella lavorazione, misurando sempre la larghezza mano a mano che prosegue il lavoro e nel caso lavorando delle diminuzioni per stringere il diametro. Buon lavoro!
17.11.2021 - 18:57This is a beautiful pattern. How can I translate it to \r\nEnglish?\r\nThank you,\r\nWendy
01.07.2020 - 19:46DROPS Design answered:
Dear Wendy. Here you have the link to the English pattern: https://www.garnstudio.com/pattern.php?id=7906&cid=19 Happy knitting!
01.07.2020 - 20:34Hullo..I would like to ask if there is a pattern for a sweater tht is wider at the bottom..unfortunately i dont know how to work in circle.I like to work the front and the bavk separately thankyou for your help
06.02.2019 - 21:27DROPS Design answered:
Dear Mrs Ivaldi, you will find here all our sweater patterns, just check the one worked bottom up - you'll find also more informations about adapting a pattern into straight needles here. Happy knitting!
07.02.2019 - 09:58I want to knit this garment to a UK size 12/14. Should I use the M or L sizing?
01.09.2017 - 13:01DROPS Design answered:
Dear Mrs Davies, you will find all measurements for each size in the chart at the very bottom of the pattern. Compare these measurements to a similar garment you have and like the shape to find out the matching size. Read more about sizing here. Happy knitting!
01.09.2017 - 15:24Can I use drops safran. I would like to have some help
12.07.2017 - 01:29DROPS Design answered:
Hi Espe, The problem with using another yarn is the knitting tension, which means you have to find out how many stitches and rows you get on 10 x 10 cm square and adjust the pattern accordingly. A bit of a job, but it can be done. Kind regards, Deirdre.
12.07.2017 - 06:21Ich habe den Pullover in Drops loves you 8 gestrickt. Ich hatte dabei die Befürchtung, daß die Trapezform des Schnittes für Baumwolle nicht taugt, da Baumwolle starrer ist als Wolle. Dies hat sich zum Glück nicht bewahrheitet. Der Pulli ist wunderschön geworden und sieht aus wie auf der Abbildung. Nur das Garn pillt ziemlich (ich hätte besser die Drops Paris genommen).
28.06.2017 - 10:06Bij dit patroon staat garengroep C vermeld maar ook A en A. Dus ik kan ook garengroep A gebruiken maar dan met dubbele draad breien? Alvast bedankt voor het antwoord.
25.03.2017 - 12:11DROPS Design answered:
Hallo Dilianne, Ja, dat klopt; je kunt garens uit groep C vervangen door 2 draden van garens uit groep A. Brei altijd wel even een proeflapje voor de juiste stekenverhouding.
27.03.2017 - 12:26Ich möchte den Pullover gerne mit dem Garn Paris stricken. Wirkt er dann nicht zu wuchtig und schwer? Fällt er genauso wie abgebildet oder trägt er durch die Weite und dem festeren Baumwollgarn eher auf? Würden Sie eher die Big Merino empfehlen? LG Doris
14.02.2017 - 08:08DROPS Design answered:
Liebe Doris, Paris können Sie hier anstatt Big Merino benutzen (gleiche Garngruppe), vergessen Sie aber nicht Garne mit unterschiedlichen Strukturen auch unterschiedlich aussehen. Mehr können Sie hier lesen, Ihr Laden wird Ihnen gerne dabei beraten. Viel Spaß beim stricken!
14.02.2017 - 09:36I would love to knit this in brushed alpaca silk. Will the pattern work in a softer yarn?
13.02.2017 - 21:25DROPS Design answered:
Dear Julie, Brushed Alpaca Silk belong to same yarn group Big Merino does (= yarn group C), so that you could use it, remember different yarn will give different results, read more here. Happy knitting!
14.02.2017 - 09:18Danke, aber wird es, auch wenn die Maschenprobe genau stimmt, nicht gehen, und warum nicht? LG Margit
13.02.2017 - 11:01