DROPS Lima
DROPS Lima
65% Wool, 35% Alpaca
from 4.60 CAD /50g
Get the yarn to make this pattern from 50.60CAD.

The yarn cost is calculated from the pattern’s smallest size and the yarn’s cheapest product type. Looking for an even better price? You might find it on the DROPS Deals!

DROPS SS24

Prairie Fairy

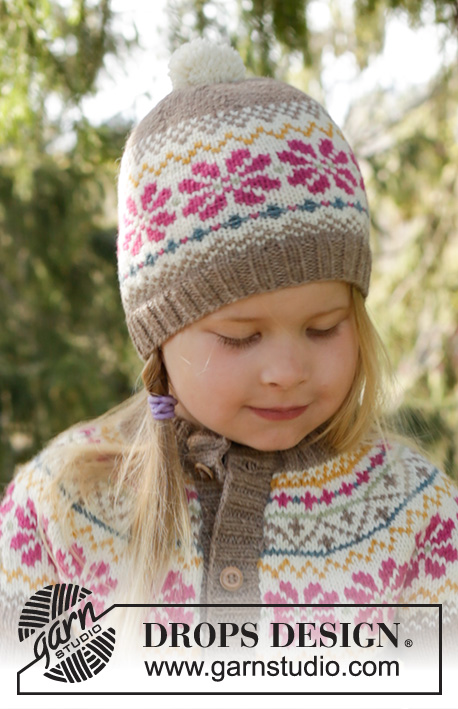
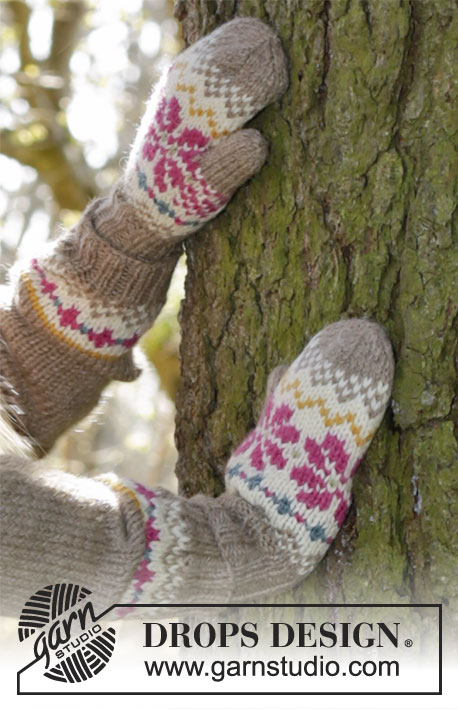
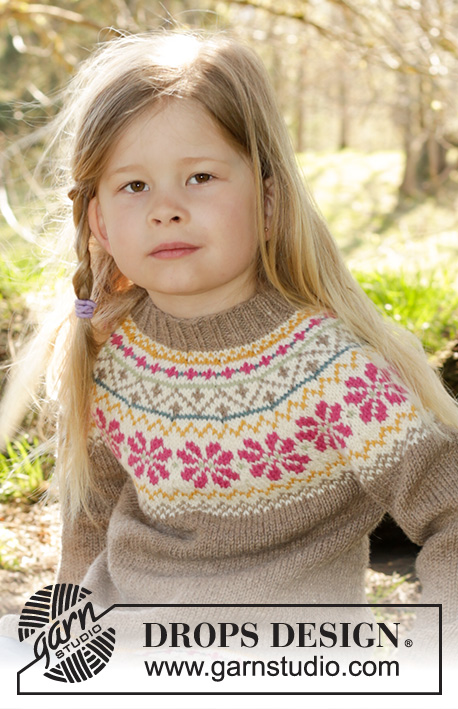
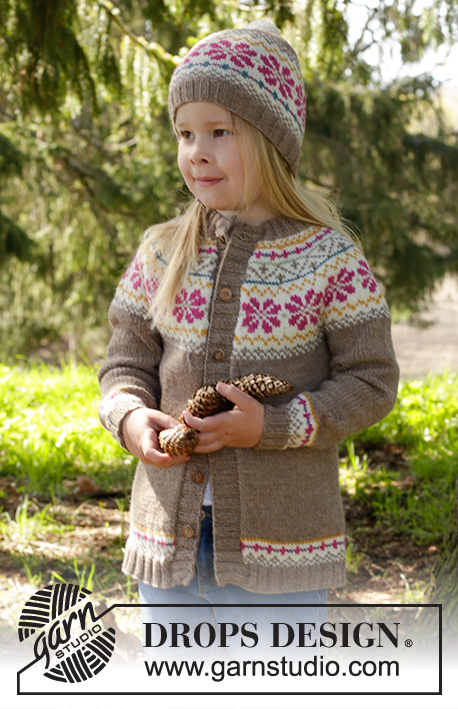
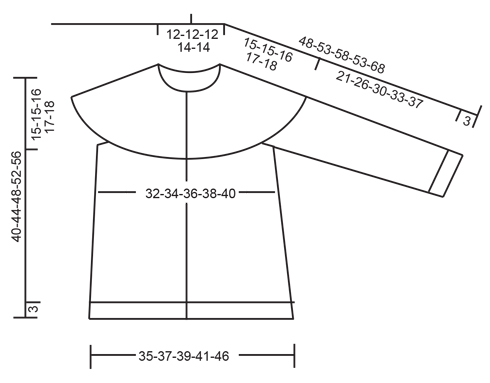
Knitted jacket with round yoke and Nordic pattern in DROPS Lima. Size children 3-12 years.

DROPS Children 27-5
DROPS design: Pattern no li-009-bn
Yarn group B
----------------------------------------------------------
Size: 3/4 - 5/6 - 7/8 - 9/10 - 11/12 years
Materials:
DROPS LIMA from Garnstudio
250-250-300-350-400 color no 0619, beige.
100-100-100-100-150 g color no 0100, off white
50-50-50-50-50 color no 6273, cerise
50-50-50-50-50 g, color no 2923, goldenrod
50-50-50-50-50 g, color no 9018, sea green
50-50-50-50-50 color no 7219, pistachio

DROPS DOUBLE POINTED NEEDLES AND CIRCULAR NEEDLE (60 and 80 cm / 24'' and 32'') SIZE 4 mm/US 6 - or size needed to get 21 sts x 28 rows in stockinette st = 4'' x 4'' (10 x 10 cm). NOTE: It is important that the knitting gauge is correct vertically to get the right shape on the round yoke.
DROPS DOUBLE POINTED NEEDLES AND CIRCULAR NEEDLE (60 and 80 cm / 24'' and 32'') SIZE 3 mm/US 2.5 for rib - or size needed to get 23 sts x 32 rows in stockinette st = 4'' x 4'' (10 x 10 cm).
DROPS CEDAR BUTTON NO 511: 6-6-7-7-7 pieces

-------------------------------------------------------

Alternative Yarn – See how to change yarns here
Yarn Groups A to F – Use the same pattern and change the yarn here
Yarn usage using an alternative yarn – Use our yarn converter here

-------------------------------------------------------

DROPS Lima
DROPS Lima
65% Wool, 35% Alpaca
from 4.60 CAD /50g
Get the yarn to make this pattern from 50.60CAD.

The yarn cost is calculated from the pattern’s smallest size and the yarn’s cheapest product type. Looking for an even better price? You might find it on the DROPS Deals!

Pattern instructions

NOTE: This pattern is written in American English. All measurements in charts are in cm. For conversion from inches to cm - click here. There are different terms for crocheting in American and British English. If this pattern includes crochet, click for "crochet terms" here. For this pattern in British English, please click here.
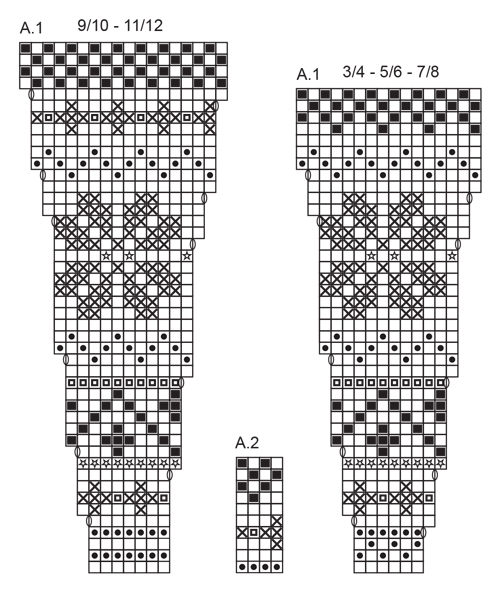
GARTER ST (back and forth):
K all rows. 1 ridge = K2 rows.

PATTERN:
See diagrams A.1 and A.2. The diagrams are worked in stockinette st. See diagram for correct size.

KNITTING TIP:
To avoid the knitting gauge to tighten when working pattern, it is important not to tighten the strands on back side of piece. Switch to a higher needle no when working pattern if the pattern is somewhat tight.
--------------------------------------------------------

JACKET:
Worked back and forth on circular needle from the top and down.

YOKE:
Cast on 84-88-92-96-100 sts on a short circular needle size 3 mm / US 2.5 with beige. 1 sts in GARTER ST - see explanation above, K 2, * P 2, K 2 *, repeat from *-* and finish with 1 sts in garter st. Work rib for 3-3-4-4-5 cm / 1"-1"-1½''-1½''-2'' (= neck edge). Switch to a short circular needle size 4 mm / US 6. K 1 row while at the same time adjusting no of sts to 81-87-93-101-108. Insert 1 marker after 40-43-46-50-54 sts = mid back. Then work an elevation at the back in stockinette st as follows: K 8 sts past marker, turn, tighten yarn and P 16 sts on return, turn, tighten yarn and K 24 sts, turn, continue by working 8 sts more on every turn until 24-24-32-32-40 sts have been worked on each side of marker mid back, turn and K the rest of row, P 1 row. Then work as follows: 1 edge st in garter st, A.1 (= 13-14-15-14-15 repetitions in width) finish with first st in diagram and 1 edge st in garter st -see diagram for correct size. READ KNITTING TIP! REMEMBER THE KNITTING GAUGE Switch to a longer circular needle when needed. When A.1 has been worked, there are 211-227-243-255-273 sts on needle. Work 0-1-2-0-1 cm / 0"-½"-3/4"-0"-½" with beige. Piece now measures approx. 15-16-17-17-18 cm / 6 3/4-7'' mid front (measured without rib in the neck). Continue piece with beige and in stockinette st. First work 1 row while AT THE SAME TIME inc 3-3-3-11-9 sts evenly = 214-230-246-266-282 sts. Work next row as follows: Work 32-34-36-38-40 sts (= front piece), slip the next 44-48-52-58-62 sts on 1 stitch holder for sleeve (without working them first), cast on 6 new sts, work 62-66-70-74-78 sts (= back piece), slip the next 44-48-52-58-62 sts on a stitch holder for sleeve (without working them first), cast on 6 new sts, work 32-34-36-38-40 sts (= front piece).

BODY:
= 138-146-154-162-170 sts. NOW MEASURE PIECE FROM HERE! Insert 1 marker in each side, in the middle of the 6 new sts that were cast on. Continue in stockinette st with 1 st in garter st in each side. When piece measures 3 cm / 1'', inc 1 st on each side of markers (= 4 sts inc). Inc every 7-9-10-12-13 cm / 2 3/4"-3½"-4"-4 3/4"-5" 3 times in total = 150-158-166-174-182 sts. Continue to work until piece measures 19-23-26-29-32 cm / 7½"-9"-10 1/4"-11½"-12½". Work A.2 with one edge st in each side. Switch to circular needle size 3 mm / US 2.5. K 1 row from RS while AT THE SAME TIME inc 14 sts evenly = 164-172-180-188-196 sts. Work 1 row from WS. Then work as follows: 1 st in garter st, K 2, * P 2, K 2 *, repeat from *-* and finish with 1 st in garter st. Work rib for 3 cm / 1''. Then bind off sts with K over K and P over P.

SLEEVE:
Slip sts from one stitch holder on double pointed needles size 4 mm / US 6, cast in addition on 6 sts mid under sleeve (insert 1 marker in the middle of these sts) = 50-54-58-64-68 sts. NOW MEASURE PIECE FROM HERE! Work in stockinette st in the round with beige. When sleeve measures 2 cm / 3/4'', dec 1 st on each side of marker. Repeat dec every 4½-3½-4-3-3½ cm / 1 3/4"-1 1/4"-1½"-1"-1 1/4" 5-7-7-10-10 times in total = 40-40-44-44-48 sts. When sleeve measures 18-23-27-30-34 cm / 7"-9"-10½"-11 3/4"-13½", work diagram A.2, then switch to double pointed needles size 3 mm / US 2.5. Work rib = K 2/P 2 for 3 cm / 1'', then bind off with K over K and P over P.
Work the same way over the sts on the other stitch holder.

BAND:
Pick up from RS approx. 84 to 118 sts along right front piece inside 1 edge st on circular needle size 3 mm / US 2.5 with beige. P 1 row from WS while AT THE SAME TIME inc evenly to 102-110-118-130-142 sts. Work next row as follows from RS: 2 edge sts in garter st, * K 2, P 2 *, repeat from *-* until 4 sts remain and finish with K 2 and 2 edge st in garter st. Continue rib like this. AT THE SAME TIME after 1 cm / 3/8'', bind off for 6-6-7-7-7 button holes evenly. 1 button hole = work 2 sts tog and make 1 YO (binding off P 2 seen from RS will look more pretty). Upper button hole should be approx. 1 cm / 3/8'' from neck edge and bottom hole approx. 8-8-10-10-10 cm / 3"-3"-4"-4"-4'' from bottom edge. When band measures 3 cm / 1'', bind off K over K and P over P. Repeat along left front piece but do not bind off for button holes on left band.

ASSEMBLY:
Sew the openings under the sleeves. Sew the buttons on to the left band.

Diagram

symbols = off white
symbols = beige
symbols = cerise
symbols = sea green
symbols = goldenrod
symbols = pistachio
symbols = 1 YO between 2 sts, work YO twisted on next row to avoid holes
diagram
diagram

Each of our patterns has specific tutorial videos to help you.

Do you have a question? See a list of frequently asked questions (FAQ)

Knitting tension is what determines the final measurements of your work, and is usually measured per 10 x 10 cm. It is provided like so: number of stitches in width x number of rows in height - eg: 19 stitches x 26 rows = 10 x 10 cm.

The knitting tension is very individual; some people knit/crochet loosely while others work tightly. You adjust the knitting tension with the needle size, which is why the suggested needle size only serve as a guide! You need to adjust this (up or down) to ensure that YOUR knitting tension matches the knitting tension provided in the pattern. If you work with a different knitting tension than provided you will have a different yarn consumption, and your work will have different measurements than what the pattern suggests.

The knitting tension also determines which yarns can replace each other. As long as you achieve the same knitting tension you can replace one yarn with another.

See DROPS lesson: How to measure your tension/gauge

See DROPS video: How to make a gauge tension swatch

The required amount of yarn is provided in grams, eg: 450 g. To calculate how many balls you’ll need you first need to know how many grams are in 1 ball (25g, 50g or 100g). This information is available if you click on the individual yarn quality on our pages. Divide the amount required with the amount of each ball. For example, if each ball is 50g (the most common amount), the calculation will be as follows: 450 / 50 = 9 balls.

The important thing when changing from one yarn to another is that the knitting/crochet tension remains the same. This is so that the measurements of the finished piece will be the same as on the sketch provided. It is easier to achieve the same knitting tension using yarns from the same yarn group. It is also possible to work with multiple strands of a thinner yarn to achieve the knitting tension of a thicker one. Please try our yarn converter. We recommend you to always work a test swatch.

Please NOTE: when changing yarn the garment might have a different look and feel to the garment in the photo, due to individual properties and qualities of each yarn.

See DROPS lesson: Can I use a different yarn than the one mentioned in the pattern?

All our yarns are categorised into yarn groups (from A to F) according to thickness and knitting tension – group A contains the thinnest yarns and group F the thickest. This makes it easier for you to find alternative yarns to our patterns, should you wish to switch yarn. All yarns within the same group have a similar knitting tension and can easily replace each other. However, different yarn qualities have different structures and properties which will give the finished work a unique look and feel.

Click here for an overview of the yarns in each yarn group

At the top of all our patterns you’ll find a link to our yarn converter, which is a helpful tool should you wish to use a different yarn than suggested. By filling in the yarn quality you wish to replace, the amount (in your size) and number of strands, the converter will present good alternative yarns with the same knitting tension. Additionally it will tell you how much you’ll require in the new qualities and whether you’ll need to work with multiple strands. Most skeins are 50g (some are 25g or 100g).

If the pattern is worked with multiple colours, every colour will have to be converted separately. Similarly, if the pattern is worked with several strands of different yarns (for example 1 strand Alpaca and 1 strand Kid-Silk) you will have to find alternatives for each, individually.

Click here to see our yarn converter

Since different yarns have different qualities and textures we have chosen to keep the original yarn in our patterns. However, you can easily find options among our available qualities by using our yarn converter, or simply pick a yarn from the same yarn group.

It is possible that some retailers still have discontinued yarns in stock, or that someone has a few skeins at home that they would like to find patterns for.

The yarn converter will provide both alternative yarn as well as required amount in the new quality.

If you think it's hard to decide what size to make, it can be a good idea to measure a garment you own already and like the size of. Then you can pick the size by comparing those measures with the ones available in the pattern's size chart.

You'll find the size chart at the bottom of the pattern.

See DROPS lesson: How to read size chart

The needle size provided in the pattern serves only as a guide, the important thing is to follow the knitting tension. And since knitting tension is very individual, you will have to adjust the needle size to ensure that YOUR tension is the same as in the pattern – maybe you’ll have to adjust 1, or even 2 needle sizes, up or down to achieve the correct tension. For this, we recommend that you work test swatches.

Should you work with a different knitting tension than the one provided, the measurements of the finished garment might deviate from the measurement sketch.

See DROPS lesson: How to measure your tension/gauge

See DROPS video: How to make a gauge tension swatch

Working a garment top-down provides more flexibility and room for personal adjustment. For example it is easier to try the garment on while working, as well as making adjustments to length of yoke and shoulder caps.

The instructions are carefully explaining every step, in the correct order. Diagrams are adjusted to the knitting direction and are worked as usual.

The diagram depicts all rows/rounds, and every stitch seen from the right side. It is read from bottom to top, from right to left. 1 square = 1 stitch.

When working back and forth, every other row is worked from the right side and every other row is worked from the wrong side. When working from the wrong side, the diagram will have to be worked reversed: from left to right, knit stitches are purled, purl stitches are knit etc.

When working in the round every round is worked from the right side and the diagram are worked from right to left on all rounds.

See DROPS lesson: How to read knitting diagrams

The diagram depicts all rows/rounds, and every stitch seen from the right side. It is worked from bottom to top, from right to left.

When working back and forth every other row is worked from the right side: from right to left and every other row is worked from the wrong side: from left to right.

When working in the round, every row in the diagram are worked from the right side, from right to left.

When working a circular diagram you start in the middle and work your way outwards, counter clockwise, row by row.

The rows usually start with a given number of chain stitches (equivalent to the height of the following stitch), this will either be depicted in the diagram or explained in the pattern.

See DROPS lesson: How to read crochet diagrams

Instructions for working several diagrams after each other on the same row/round, will often be written like so: “work A.1, A.2, A.3 a total of 0-0-2-3-4 times". This means you work A.1 once, then A.2 is worked once, and A.3 is repeated (in width) the number of times provided for your size – in this case like so: S = 0 times, M = 0 times, L=2 times, XL= 3 times and XXL = 4 times.

The diagrams are worked as usual: begin with the first row in A.1, then work the first row in A.2 etc.

See DROPS lesson: How to read knitting diagrams

See DROPS lesson: How to read crochet diagrams

The total width of the garment (from wrist-to-wrist) will be larger in the larger sizes, despite the actual sleeves being shorter. The larger sizes have longer sleeve caps and wider shoulders, so there will be a good fit in all sizes.

The measurement sketch/schematic drawing provides information regarding the full length of the garment. If it’s a jumper or a jacket the length is measured from the highest point on the shoulder (usually closest to the neckline), and straight down to the bottom of the garment. It is NOT measured from the tip of shoulder. Similarly, the length of yoke is measured from the highest point on the shoulder and down to where yoke is split into body and sleeves.

See DROPS lesson: How to read a schematic drawing

Diagrams are often repeated on the round or in height. 1 repeat is the diagram the way it appears in the pattern. If it says to work 5 repeats of A.1 in the round, then you work A.1 a total of 5 times after/next to each other in the round. If it says to work 2 repeats of A.1 vertically/in height you work the entire diagram once, then begin again at the start and work the entire diagram one more time.

Chain stitches are slightly narrower than other stitches and to avoid working the cast-on edge too tight, we simply chain more stitches to begin with. The stitch count will be adjusted on the following row to fit the pattern and measurement sketch.

The rib edge is more elastic and will contract slightly compared to, for example, stocking stitch. By increasing before the rib edge, you avoid a visible difference in width between the rib edge and the rest of the body.

It’s very easy to cast off too tightly, and by making yarn overs while casting off (and simultaneously casting these off) you avoid a too tight cast off edge.

See DROPS video: How to bind off with yarn overs (yo)

To achieve an even increase (or decrease) you can increase on, for example: every 3rd and 4th row alternately, like so: work 2 rows and increase on the 3rd row, work 3 rows and increase on the 4th. Repeat this until the increase is complete.

See DROPS lesson: Increase or decrease 1 st on every 3rd and 4th row alternately

Should you prefer to work in the round instead of back and forth, you may of course adjust the pattern. You’ll need to add steeks mid-front (usually 5 stitches), and follow the instructions. When you would normally turn and work from the wrong side, simply work across the steek and continue in the round. At the end you’ll cut the piece open, pick up stitches to work bands, and cover the cut edges.

See DROPS video: How to knit steeks and cut open

Should you prefer to work back and forth instead of in the round, you may of course adjust the pattern so you work the pieces separately and then assemble them at the end. Divide the stitches for the body in 2, add 1 edge stitch in each side (for sewing) and work the front and back pieces separately.

See DROPS lesson: Can I adapt a pattern for circular needles into straight needles?

Pattern repeats can vary slightly in the different sizes, in order to get the correct proportions. If you’re not working the exact same size as the garment in the photo, yours might deviate slightly. This has been carefully developed and adjusted so that the complete impression of the garment is the same in all sizes.

Make sure to follow instructions and diagrams for your size!

If you have found a pattern you like which is available in women’s size it’s not very difficult to convert it to men’s size. The biggest difference will be the length of sleeves and body. Start working on the women size that you think would fit across the chest. The additional length will be worked right before you cast off for the armhole/sleeve cap. If the pattern is worked top-down you can add the length right after the armhole or before the first decrease on sleeve.

Regarding additional yarn amount, this will depend on how much length you add, but it is better with a skein too many than too few.

All yarns will have excess fibres (from production) that might come off as lint or shedding. Brushed yarns (ie hairier yarns) have more of these loose, excess fibres, causing more shedding.

Shedding also depends on what is worn under or over the garment, and whether this pulls at the yarn fibres. It’s therefore not possible to guarantee that there will be no shedding

Below are some tips on how to get the best result when working with hairier yarns:

1. When the garment is finished (before you wash it) shake it vigorously so the looser hairs come off. NOTE: do NOT use a lint roller, brush or any method that pulls at the yarn.

2. Place the garment in a plastic bag and put it in your freezer - the temperature will cause the fibres to become less attached to each other, and excess fibres will come off easier.

3. Leave in the freezer for a few hours before taking it out and shaking it again.

4. Wash the garment according to the instructions on the yarn label.

Pilling is a natural process that happens to even the most exclusive of fibers. It's a natural sign of wear and tear that is hard to avoid, and that is most visible in high friction areas of your garment like a sweater's arms and cuffs.

You can make your garment look as new by removing the pilling, using a fabric comb or a pill/lint remover.

Still can't find the answer you need? Then scroll down and leave your question so one of our experts can try to help you. This will be done normally within 5 to 10 working days.
In the meantime, you can read the questions and answers that others have left to this pattern or join the DROPS Workshop on Facebook to get help from fellow knitters/crocheters!

You might also like...

Prairie Fairy

Terkel, Norway

Kaylee Prairie Fairy

Kate, Australia

S27-5 Prairie Fairy

perbath, France

Post a comment to pattern DROPS Children 27-5

We would love to hear what you have to say about this pattern!

If you want to leave a question, please make sure you select the correct category in the form below, to speed up the answering process. Required fields are marked *.

Comments / Questions (23)

country flag Ruth wrote:

Hallo, wenn ich den Rand kraus rechts stricke, rollt er sich ein. Was kann ich gegen das Einrollen tun? // Hi there, I am doing a garter stitch at the end of each row. The cardigan now rolls itself inwards at the end of each row. What can I do about it? Thanks, best, Ruth

09.12.2023 - 09:41

DROPS Design answered:

Liebe Ruth, danach werden Sie die Maschen für die Blende auffsassen, dann wird der Rand nicht mehr rollen. Viel Spaß beim stricken!

11.12.2023 - 10:02

country flag Jane Milton wrote:

I'm knitting thin in the smallest size. After the yoke A1 pattern, and I have begun the body, the instructions say to knit 3cm then do the increases. Then it says to increase every 7cm three times. in my counting, this means that there would be 3+21 cm, a total of 24 cms. However, the instructions say to continue after the last increase until piece measures 19cm. I'm confused as that is a 5cm difference! Can you please clarify the instructions for me?

17.02.2023 - 23:08

DROPS Design answered:

Dear Jane, you increase for the first time when the piece measures 3 cm and every 7 cm 2 more times (so you have increased 3 times in total; 138 + 12 (= 4 increases 3 times) = 150 sts. So, after the increases, the piece will measure 3+7+7= 17 cm. That is, you will have to work 2 cm more after the last increase. Happy knitting!

19.02.2023 - 22:22

country flag Poonam Kirpal wrote:

How much should be the length of the bodice after A1 pattern for adults say Height 5 ft 3 inches

06.06.2022 - 12:23

DROPS Design answered:

Dear Poonam, we don't make custom patterns. You can check a similar pattern for adults here: https://www.garnstudio.com/pattern.php?id=7107&cid=19. Happy knitting!

06.06.2022 - 13:33

country flag Marie wrote:

Placer 1 marqueur de chaque côté, au milieu des 6 nouvelles m montées. Continuer en jersey avec 1 m point mousse de chaque côté. À 3 cm, augmenter 1 m de chaque côté des marqueurs (= 4 augmentations). je ne comprends pas pour les marqueurs et augm, doit on poser un marq, 3mailles,un marqueur,3 mailles ,1marqueurs,les augmentations se font au mileu des 6 m? Merci pour votre aide

26.01.2022 - 17:07

DROPS Design answered:

Bonjour Marie, cette leçon montre comment tricoter un pull de haut en bas; et notamment à partir de la photo 17 comment reprendre les manches, monter les mailles sous la manche (18A) et diminuer (21, 22) au milieu sous la manche (cf cette vidéo). Bon tricot!

26.01.2022 - 17:19

country flag Marianne Plaskett wrote:

I can see the rows where I have to increase the number of stitches but there is no instruction on how many stitches need to be increased. I have read the pattern several times and cannot find the details about increasing.

19.02.2021 - 13:20

DROPS Design answered:

Dear Mrs Plasket, when working diagram A.1, the increases are drawn in the diagram (with the last symbole = a yarn over made either at the beg or at the end of a repeat). This means you just have to work the diagram appropriate to the size increasing as the diagram is showing. Hope this helps. Happy knitting!

19.02.2021 - 15:09

country flag Berit Forsberg Tripkou wrote:

I can not print the whole diagram for DROPS Children 27-5. It is just coming the first 11 rows, That is making the whole knitting a little bit complex. It is not easy to read the pattern if I take a photo from the picture at the computer,,, So can you tell me what is wrong. I have tried 2 times to print the whole diagram...

31.10.2020 - 20:05

DROPS Design answered:

Dear Mrs Forsberg Tripkou, we could print this pattern succesfully (in Swedisch and in English) - remember to check that some previous settings weren't savec and do not allow you to print all pages. Happy knitting!

02.11.2020 - 08:07

country flag Mary wrote:

I’m on row 12 in A1 size 7/8 the pattern does not work for me if I finish the previous row with the last two stitches being the first stitch in diagram and a garter stitch. Any tips as to what I’m doing wrong?

12.02.2020 - 12:54

DROPS Design answered:

Dear Mary, do you have 10 sts in each A.1 (= 1 edge st, 15 x 10 sts (A.1), 1st st in A.1, 1 edge st = 153 sts on needle)? 12th row should be a WS row, this means you work: 1 edge st, 1st st in A.1 (= P with off-white), then repeat A.1 (= P1 with beige, P2 with off white, P3 with beige, P2 with off white, P1 with beige, P1 with off white) , 1 edge st in garter st. Hope this can help you. Happy knitting!

12.02.2020 - 14:38

country flag Götze Sigrid wrote:

Könnte ich die Wolle bei Ihnen kaufen für diesen Pulli in Gr. 104. Gleiche Farbe wie angegeben.

13.11.2019 - 12:58

DROPS Design answered:

Liebe Frau Götze, hier finden Sie einen DROPS Laden in Deutschlang, wo Sie die Wolle finden können. Viel Spaß beim stricken!

13.11.2019 - 13:59

country flag Evelyn wrote:

I am trying to knit this pattern, however, I don’t understand the first parts of starting the chart. IE; knit 1 edge stitch, A1 chart.....(finish with a knit first stitch from chart and 1 edge stitch. I have tried and the second row doesn’t work.

06.04.2019 - 05:40

DROPS Design answered:

Dear Evelyn, for the jacket from RS work: 1 edge st in garter stitch, then repeat A.1 (reading diagram from the bottom corner on the right side towards the left) until 2 stitches remain, work now the first stich in A.1 (the stitch on the right side) and finish with 1 edge stitch. From WS work the first stitch in A.1 (the one on the right side), then repeat A.1 reading from the left towards the right. Learn more about reading diagrams here. Happy knitting!

08.04.2019 - 09:13

country flag Annie wrote:

Ce très beau modèle existe t il pour femme ? Merci

09.02.2019 - 18:30

DROPS Design answered:

Bonjour Annie, pas avec le même motif exactement, mais vous pourrez probablement vous inspirer d'un des modèles jacquards femme pour l'adapter. Bon tricot!

11.02.2019 - 08:56