
Popular categories
Looking for a yarn?


|
||||||||||||||||
Rock Them Socks |
||||||||||||||||
 |
 |
|||||||||||||||
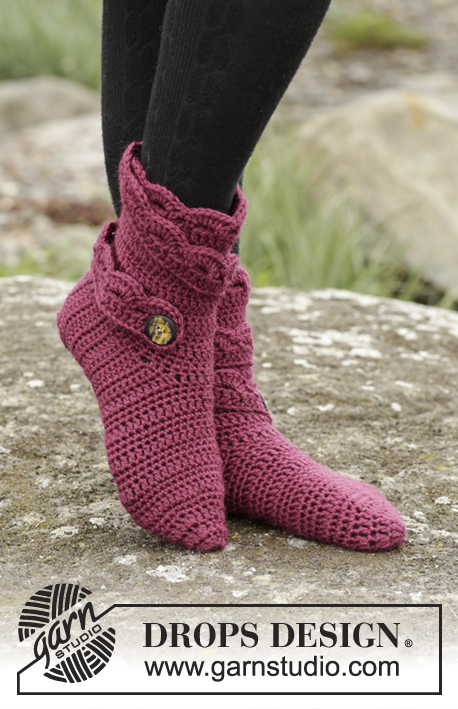
Crochet DROPS slippers with multi-coloured pattern in "Nepal". Size 35 - 43
DROPS 172-19 |
||||||||||||||||
|
CROCHET INFO: Replace first tr at beg of every tr round with 3 ch. Finish round with 1 sl st in 3rd ch at beg of round. Replace first dc at beg of every dc round with 1 ch. Finish round with 1 sl st in 1st ch at beg of round. Replace first tr at beg of every tr row with 3 ch. COLOUR PATTERN (worked in the round): When changing colour work as follows: Work last tr with first colour but wait with last pull through, switch to next colour and work last pull through, then work next tr. When working with two colour place strand for the colour not worked over sts from previous round, work around the strand so that it is hidden and follows in the round. Make sure not to tighten the yarns. Replace first tr with 3 ch, if last tr on previous round and first tr on next round are different colour work last tr as follows: Work last tr with first colour but wait with last pull through, switch to next colour and work last pull through, 1 sl st in 3rd ch at beg of round, then work 3 ch (= beg of round). DECREASE TIP: Dec 1 tr by working the next 2 tr tog as follows: Work 1 tr but wait with last pull through (= 2 sts on hook), then work next tr but on last pull through, pull yarn through all 3 sts on hook. DECREASE TIP-1 (evenly spaced): To calculate how often dec should be done, use the total no of tr on round (e.g. 56 tr) and divide by no of dec to be done (e.g. 5) = 11.2. I.e. in this example work approx. every 10th and 11th tog. PATTERN: See diagrams A.1 and A.2. Diagrams show colours on slippers. 1 square in diagram = 1 tr. ---------------------------------------------------------- LEG: Worked in the round, top down from mid back. Work 64 ch on hook size 4.5 mm with sea blue. Work 3 ch (= 1 tr) - READ CROCHET INFO, 1 tr in first ch from ch-ring, * skip 1 ch, 1 tr in each of the next 6 ch *, repeat from *-* = 56 tr. Work A.1 (= 8 sts) 7 times in total on round - READ COLOUR PATTERN. REMEMBER THE CROCHET TENSION! When A.1 has been worked 1 time vertically, piece measures approx. 16 cm. Work 1 round with 1 tr in every tr with raspberry rose AT THE SAME TIME dec 8 tr evenly = 48 tr. Insert 1 marker between 24th and 25th st (marks mid front). Fasten off. HEEL: Now work back and forth. Beg 5 tr from marker. Work with raspberry rose as follows: Work 1 tr in each of the 38 tr (= 10 tr remain mid front, these tr are no longer worked). Continue with 1 tr in every tr until piece measures 7-8-9 cm from marker (= 23-24-25 cm in total). Work next row as follows: Work 1 tr in each of the first 15 tr, work the next 2 tr tog – READ DECREASE TIP, * 1 tr in next tr, work the next 2 tr tog *, repeat from *-* 2 times in total, work 1 tr in each of the last 15 tr = 35 tr. Work 1 row with 1 tr in every tr. Work next row as follows: Work 1 tr in each of the first 15 tr, * work the next 2 tr tog *, repeat from *-* 3 times in total, work 1 tr in each of the last 14 tr = 32 tr. Piece measures approx. 26-27-28 cm in total. Cut the yarn and leave approx. 25 cm for assembly. ASSEMBLY: Sew tog mid under foot. Fasten the strand. FOOT: Insert 1 marker in the piece. NOW MEASURE PIECE FROM HERE! Work with raspberry rose. Beg mid under foot (i.e. where seam is). Work 14-16-18 tr evenly around tr row (i.e. before tr on leg) until 1 row remains, work 1 tr around last tr row but wait with last pull through, work 1 tr in first tr from leg but on last pull through, pull yarn through all sts on hook (= 1 tr dec), work 1 tr in each of the next 8 tr over leg, work 1 tr in last tr but wait with last pull through, work 1 tr around first tr row but on last pull through, pull yarn through all sts on hook (= 1 tr dec), work 14-16-18 tr evenly over the last tr rows = 38-42-46 tr. Work 2 rounds with 1 tr in every tr and dec 1-3-3 tr evenly on every round - READ DECREASE TIP-1 (= 2-6-6 tr dec in total) = 36-36-40 tr. Work 1 tr in every tr until piece measures approx. 6-8-10 cm from marker. Then work A.2 (= 4 tr) in total 9-9-10 times on round. When A.2 has been worked 1 time vertically, work until finished measurements with sea blue as follows: SIZE 41/43: Work 1 round with 1 tr in every tr and dec 4 tr evenly = 36 tr. ALL SIZES: ROUND 1: Work * 1 tr in each of the first/next 2 tr, work the next 2 tr tog *, repeat from *-* 9 times in total = 27 tr. ROUND 2: Work * 1 tr in first/next, work the next 2 tr tog *, repeat from *-* 9 times in total = 18 tr. ROUND 3: Work all 2 tr tog 2 by 2 = 9 tr. ALL SIZES: Cut the yarn, baste it up and down through sts at the tip of slipper, pull yarn to tighten and fasten tightly. EDGE: Work an edge around the leg in ch-row where first round was worked with sea blue as follows: Work 1 dc in every ch there was worked tr in on first round, i.e. Do not work in the ch skipped (= 56 dc). Work another slipper the same way. TWINED TIE: Cut 2 strands with sea blue of approx. 2 meters. Twine them together until they resist, fold them double and they will twine themselves together. Make a knot in each end. Thread the tie up and down on the shaft and fasten a small pompom made from all of the colors at each end. |
||||||||||||||||
Diagram explanations |
||||||||||||||||
|
||||||||||||||||

|
||||||||||||||||
|
Have you made this or any other of our designs? Tag your pictures in social media with #dropsdesign so we can see them! Do you need help with this pattern?You'll find tutorial videos, a Comments/Questions area and more by visiting the pattern on garnstudio.com. © 1982-2024 DROPS Design A/S. We reserve all rights. This document, including all its sub-sections, has copyrights. Read more about what you can do with our patterns at the bottom of each pattern on our site. |
||||||||||||||||


With over 40 years in knitting and crochet design, DROPS Design offers one of the most extensive collections of free patterns on the internet - translated to 17 languages. As of today we count 304 catalogues and 11422 patterns - 11422 of which are translated into English (UK/cm).
We work hard to bring you the best knitting and crochet have to offer, inspiration and advice as well as great quality yarns at incredible prices! Would you like to use our patterns for other than personal use? You can read what you are allowed to do in the Copyright text at the bottom of all our patterns. Happy crafting!
Comments / Questions (5)
Bij het begin van de pijp, na het haken van de 64 lossen, staat er haak 3 lossen. Moet je niet eerst na de 64 lossen de ring sluiten met een halve vaste? Het kost anders wel wat moeite om 3 lossen te halen en een stokje in de 1e l van de l-ring. Het heeft me heel wat hoofdbrekens gekost om te zien wat er miste in het patroon, omdat ik er eerst niet uitkwam.
18.04.2021 - 19:46DROPS Design answered:
Dag Jellie,
Ja volgens mij heb je gelijk; ik zal het doorgeven aan de ontwerpafdeling ter correctie.
19.04.2021 - 20:31Hallo liebes Team, folgendes Problem: An dem Punkt: "Fertigstellen" möchte ich wissen, wie genau ich vernähen soll. Wo fange ich an? Wo höre ich auf? Habe ich das richtig verstanden, dass ich mit dem 25cm langen Faden die komplette untere Naht schließe? Dann habe ich ja auch die Ferse zugenäht???? Dann der Fuss: Wo genau bringe ich den Markierer an? an der offenen Seite die dann spitz zuläuft? Vielen Dank für Ihre Mühe
06.01.2017 - 13:44DROPS Design answered:
Liebe Frau Schmidt, Sie müssen die letzte Reihe der Ferse doppeld falten, und die letzte Reihe von der Mitte an der Ferse bis untem am Fuß zusammennähen. Dann wird der Fuss um herum von dem Ferse-Teil gehäkelt. Der Markierer am Fuss soll vor der 1. Runde eingesetzt. Viel Spaß beim häkeln!
06.01.2017 - 14:49I love the socks! They are so cute, but I've run out of votes!
18.06.2016 - 16:08I love these socks, too! The pattern is beautiful but I've run out of votes!
18.06.2016 - 16:06Very cute! I would like to try these!
12.06.2016 - 01:35