DROPS Safran
DROPS Safran
100% Cotton
from 2.05 $ /50g
Get the yarn to make this pattern from 18.45$.

The yarn cost is calculated from the pattern’s smallest size and the yarn’s cheapest product type. Looking for an even better price? You might find it on the DROPS Deals!

DROPS SS24

Spring Lullaby

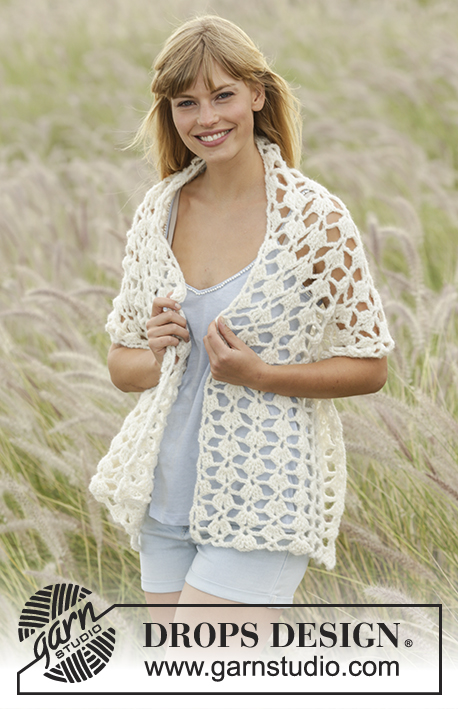
Crochet DROPS vest with lace pattern edge in stripes with ties in waist in ”Safran”. Size S-XXXL.

DROPS Extra 0-1296
DROPS design: Pattern no e-239
Yarn group A
----------------------------------------------------------
Size: S/M - L/XL - XXL/ XXXL
Materials:
DROPS SAFRAN from Garnstudio
250-250-300 g color no 18, off white
150-200-200 g color no 50, ice blue
100-100-100 g color no 05, light blue purple
50-50-50 g color no 04, green

NOTE: Vest worked with one color = 450-500-500 g Safran.

DROPS CROCHET HOOK size 3.5 mm/E/4 – or size needed to get 22 dc x 12 rows = 4'' x 4'' (10 x 10 cm).

-------------------------------------------------------

Alternative Yarn – See how to change yarns here
Yarn Groups A to F – Use the same pattern and change the yarn here
Yarn usage using an alternative yarn – Use our yarn converter here

-------------------------------------------------------

DROPS Safran
DROPS Safran
100% Cotton
from 2.05 $ /50g
Get the yarn to make this pattern from 18.45$.

The yarn cost is calculated from the pattern’s smallest size and the yarn’s cheapest product type. Looking for an even better price? You might find it on the DROPS Deals!

Pattern instructions

NOTE: This pattern is written in American English. All measurements in charts are in cm. For conversion from inches to cm - click here. There are different terms for crocheting in American and British English. If this pattern includes crochet, click for "crochet terms" here. For this pattern in British English, please click here.
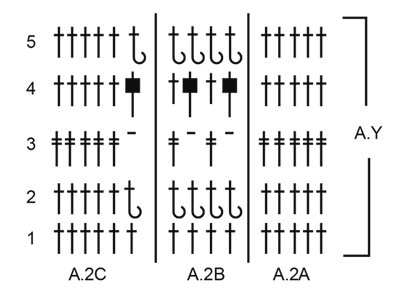
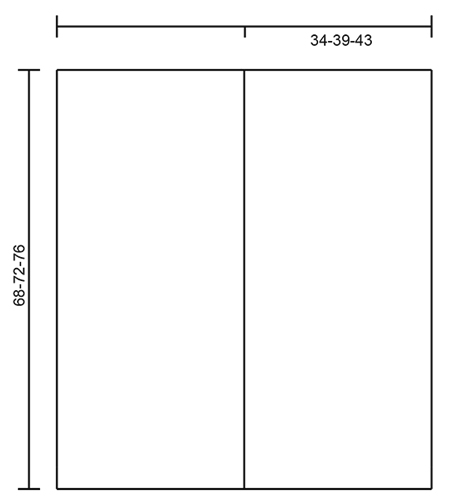
PATTERN:
See diagrams A.1 and A.2.

CROCHET INFO:
Replace first dc at beg of every dc row with 3 ch. Finish row with 1 dc in 3rd ch from beg of previous row (if previous row was a dc row) and with 1 dc in 4th ch from beg of previous row (if previous row was a tr row).
Replace first tr at beg of every tr row with 4 ch. Finish row with 1 tr in 3rd or 4th ch from beg of previous row as explained above.

LACE PATTERN (see diagram A.1):
ROW 1 (= RS): 3 ch (= 1 dc), 1 dc in each of the next 4 dc, ch 2, skip 2 dc, 1 dc in each of the next 3 dc, * ch 2, skip 3 dc, in next dc work 1 tr + 4 ch + 1 tr, ch 2, skip 3 dc, 1 dc in each of the next 3 dc *, repeat from *-* until 5 dc remain on row, work 2 ch and finish with 1 dc in each of the last 5 dc, turn piece.
ROW 2: 4 ch (= 1 tr), 1 tr in each of the next 4 sts, ch 2, * 1 tr in the middle of the 3 sts from previous row, ch 2, 7 tr around ch-space between tr, 2 ch *, repeat from *-* 6-7-8 times in total, work 1 tr in the middle of the next 3 sts, 2 ch and 1 tr in each of the last 5 sts on row, turn piece.
ROW 3: 4 ch (= 1 tr), 1 tr in each of the next 4 tr, in next tr work 1 tr + 4 ch + 1 tr, * ch 2, 1 tr in each of the middle 3 tr in group, ch 2, skip 2 tr, in next tr work 1 tr + 4 ch + 1 tr *, repeat from *-* 6-7-8 times in total and finish with 1 tr in each of the last 5 tr, turn piece.
ROW 4: 4 ch (= 1 tr), 1 tr in each of the next 4 tr, ch 2, * 7 tr around ch-space between tr, ch 2, 1 tr in the middle of the 3 tr in group, 2 ch *, repeat from *-* 6-7-8 times in total, 7 tr around ch-space between tr, 2 ch and 1 tr in each of the last 5 tr, turn piece.
ROW 5: 4 ch (= 1 tr), 1 tr in each of the next 4 tr, ch 2, 1 tr in each of the middle 3 tr in group, ch 2, skip 2 tr, * in next tr work 1 tr + 4 ch + 1 tr, ch 2, 1 tr in each of the middle 3 tr in group, ch 2, skip 2 tr *, repeat from *-* 6-7-8 times in total and finish with 1 tr in each of the last 5 tr, turn piece.
Repeat 2nd-5th row (= A.X).

STRIPE WITH EYELET ROW (see diagram A.2):
ROW 1: 3 ch (= 1 dc), 1 dc in each of the next 4 sts, then work 1 dc in every tr from previous row, 3 dc around every ch-space with 4 ch and 1 dc around every ch-space with ch 2, finish with 1 dc in each of the last 5 tr = 75-85-95 dc, turn piece.
ROW 2: 3 ch (= 1 dc), 1 dc in each of the next 4 sts, then work 1 dc in every dc until 5 dc remain on row, but work in back loop of st from RS and front loop of st from WS, finish with 1 dc in each of the last 5 sts (now work through both loops), turn piece.
ROW 3: 4 ch (= 1 tr), 1 tr in each of the next 4 sts, * ch 1, skip 1 st, 1 tr in next st *, repeat from *-* until 6 sts remain on row, ch 1, skip 1 st and finish with 1 tr in each of the last 5 sts on row, turn piece.
ROW 4: 3 ch (= 1 dc), 1 dc in each of the next 4 sts, then work 1 dc around every ch and 1 dc in every st the entire row, turn piece = 75-85-95 dc on row.
ROW 5: 3 ch (= 1 dc), 1 dc in each of the next 4 sts, then work 1 dc in every dc until 6 dc remain on row, but work in back loop of st from RS and front loop of st from WS, work 1 dc more in back/front loop and finish with 1 dc in each of the last 5 sts (now work through both loops), turn piece.
----------------------------------------------------------

VEST:
Work 4 equal parts and work from bottom up. Work 2 and 2 parts tog in the middle (short side against short side) to make 2 long scarves. Then work the 2 scarves tog alongside mid back.

PART 1:
Work 101-114-127 loose ch on hook size 3.5 mm/E/4 with ice blue. Work first row as follows from WS: 1 dc in 4th ch from hook, 1 dc in each of the next 1-2-3 ch, * skip ch 1, 1 dc in each of the next 3 ch *, repeat from *-* the entire row = 75-85-95 dc. READ CROCHET INFO! Then work LACE PATTERN - see explanation above, i.e. work pattern according to diagram A.1 as follows: Work A.1A (= 10 sts), repeat A.1B over the next 60-70-80 sts and finish with A.1C (= 5 sts). REMEMBER THE CROCHET GAUGE!
When A.X has been worked 1 time vertically, switch to light blue purple. Work STRIPES WITH EYELET ROW – see explanation above, i.e. work according to diagram A.2 as follows: Work A.2A (= 5 sts), work A.2B until 5 sts remain on row and finish with A.2C (= 5 sts) = 75-85-95 sts on row – NOTE: To get the correct number of sts work as follows on 1st row: Work 10 dc over A.1A, i.e. 1 dc in each of the 5 edge sts, 1 dc around ch-space, 1 dc in each of the middle 3 sts and 1 dc around ch-space. Then work 10 dc over every repetition in A.1B, i.e. 1 dc in first tr, 3 dc around ch-space, 1 dc in next tr, 1 dc around ch-space, 1 dc in each of the middle 3 dc in group and 1 dc around ch-space (= 60-70-80 dc in total over A.1B), then work 5 dc over A.1C, i.e. 1 dc in each of the 5 edge sts = 75-85-95 dc on row. Continue according to diagram A.2 until A.Y has been worked 1 time vertically. Switch to off white and work 1st-5th row in A.1 (1st row in A.1 work over A.2 as shown in diagram A.1), then repeat 2nd-5th row (= A.X) until lace pattern with off white measures approx. 25 cm / 9 3/4'' – finish after one whole or half repetition in A.X.
Switch to ice blue and work 1st row in A.2, switch to green and work 2nd-4th row in A.2, switch to ice blue and work 5th row in A.2, switch to off white and work 1st-5th row in A.2 (= A.Y). Switch to light blue purple and work 1st-5th row in A.1, switch to off white and work 1st-5th row in A.2 and switch to ice blue and work 1st-5th row in A.1, then repeat 2nd-5th row (= A.X) until piece measures approx. 67-71-75 cm / 26½"-28"-29½"– finish after one whole or half repetition in A.X. Work 1st row in A.2 with ice blue = 75-85-95 dc on row. Fasten off, piece now measures approx. 68-72-76 cm / 26 3/4"-28½"-30".

Work 3 more parts the same way. Work 2 and 2 parts tog in the middle with ice blue as follows: Place WS against WS (short side against short side) and work through both layers with 1 sc in every st (crochet tog = mid on top of shoulder). Fasten off. There are now 2 equally long scarves. Place the 2 scarves against each other, long side against long side. Beg in one end of the 2 scarves and sew them tog alongside (= mid back) – sew with neat little stitches until approx. 8-10-12 cm / 3"-4"-4 3/4" before shoulder. Fasten off. Vest is open from mid back of neck and the entire way down along mid front.

TWINED STRING:
Cut 3 lengths off white yarn of 5 metres/5.25 yds each. Twine the strands tog until they resist, fold the string double so that it twines again. Tie a knot in each end and shape the ends by cutting. Use tie as a belt.

Diagram

All measurements in charts are in cm.

symbols = ch
symbols = dc in dc/tr from previous row
symbols = dc around ch
symbols = dc worked in back loop from RS and front loop from WS
symbols = tr in dc/tr from previous row
symbols = tr in dc the middle of 3 dc/tr from previous row
symbols = 7 tr around ch-space between tr
symbols = ch 2, 1 tr in each of the middle 3 tr from previous row, 2 ch
symbols = 1 tr in dc/tr from previous row, ch 4, 1 tr in same dc/tr
symbols = this row is explained in pattern
diagram
diagram
diagram
Do you have a question? See a list of frequently asked questions (FAQ)

Knitting tension is what determines the final measurements of your work, and is usually measured per 10 x 10 cm. It is provided like so: number of stitches in width x number of rows in height - eg: 19 stitches x 26 rows = 10 x 10 cm.

The knitting tension is very individual; some people knit/crochet loosely while others work tightly. You adjust the knitting tension with the needle size, which is why the suggested needle size only serve as a guide! You need to adjust this (up or down) to ensure that YOUR knitting tension matches the knitting tension provided in the pattern. If you work with a different knitting tension than provided you will have a different yarn consumption, and your work will have different measurements than what the pattern suggests.

The knitting tension also determines which yarns can replace each other. As long as you achieve the same knitting tension you can replace one yarn with another.

See DROPS lesson: How to measure your tension/gauge

See DROPS video: How to make a gauge tension swatch

The required amount of yarn is provided in grams, eg: 450 g. To calculate how many balls you’ll need you first need to know how many grams are in 1 ball (25g, 50g or 100g). This information is available if you click on the individual yarn quality on our pages. Divide the amount required with the amount of each ball. For example, if each ball is 50g (the most common amount), the calculation will be as follows: 450 / 50 = 9 balls.

The important thing when changing from one yarn to another is that the knitting/crochet tension remains the same. This is so that the measurements of the finished piece will be the same as on the sketch provided. It is easier to achieve the same knitting tension using yarns from the same yarn group. It is also possible to work with multiple strands of a thinner yarn to achieve the knitting tension of a thicker one. Please try our yarn converter. We recommend you to always work a test swatch.

Please NOTE: when changing yarn the garment might have a different look and feel to the garment in the photo, due to individual properties and qualities of each yarn.

See DROPS lesson: Can I use a different yarn than the one mentioned in the pattern?

All our yarns are categorised into yarn groups (from A to F) according to thickness and knitting tension – group A contains the thinnest yarns and group F the thickest. This makes it easier for you to find alternative yarns to our patterns, should you wish to switch yarn. All yarns within the same group have a similar knitting tension and can easily replace each other. However, different yarn qualities have different structures and properties which will give the finished work a unique look and feel.

Click here for an overview of the yarns in each yarn group

At the top of all our patterns you’ll find a link to our yarn converter, which is a helpful tool should you wish to use a different yarn than suggested. By filling in the yarn quality you wish to replace, the amount (in your size) and number of strands, the converter will present good alternative yarns with the same knitting tension. Additionally it will tell you how much you’ll require in the new qualities and whether you’ll need to work with multiple strands. Most skeins are 50g (some are 25g or 100g).

If the pattern is worked with multiple colours, every colour will have to be converted separately. Similarly, if the pattern is worked with several strands of different yarns (for example 1 strand Alpaca and 1 strand Kid-Silk) you will have to find alternatives for each, individually.

Click here to see our yarn converter

Since different yarns have different qualities and textures we have chosen to keep the original yarn in our patterns. However, you can easily find options among our available qualities by using our yarn converter, or simply pick a yarn from the same yarn group.

It is possible that some retailers still have discontinued yarns in stock, or that someone has a few skeins at home that they would like to find patterns for.

The yarn converter will provide both alternative yarn as well as required amount in the new quality.

If you think it's hard to decide what size to make, it can be a good idea to measure a garment you own already and like the size of. Then you can pick the size by comparing those measures with the ones available in the pattern's size chart.

You'll find the size chart at the bottom of the pattern.

See DROPS lesson: How to read size chart

The needle size provided in the pattern serves only as a guide, the important thing is to follow the knitting tension. And since knitting tension is very individual, you will have to adjust the needle size to ensure that YOUR tension is the same as in the pattern – maybe you’ll have to adjust 1, or even 2 needle sizes, up or down to achieve the correct tension. For this, we recommend that you work test swatches.

Should you work with a different knitting tension than the one provided, the measurements of the finished garment might deviate from the measurement sketch.

See DROPS lesson: How to measure your tension/gauge

See DROPS video: How to make a gauge tension swatch

Working a garment top-down provides more flexibility and room for personal adjustment. For example it is easier to try the garment on while working, as well as making adjustments to length of yoke and shoulder caps.

The instructions are carefully explaining every step, in the correct order. Diagrams are adjusted to the knitting direction and are worked as usual.

The diagram depicts all rows/rounds, and every stitch seen from the right side. It is read from bottom to top, from right to left. 1 square = 1 stitch.

When working back and forth, every other row is worked from the right side and every other row is worked from the wrong side. When working from the wrong side, the diagram will have to be worked reversed: from left to right, knit stitches are purled, purl stitches are knit etc.

When working in the round every round is worked from the right side and the diagram are worked from right to left on all rounds.

See DROPS lesson: How to read knitting diagrams

The diagram depicts all rows/rounds, and every stitch seen from the right side. It is worked from bottom to top, from right to left.

When working back and forth every other row is worked from the right side: from right to left and every other row is worked from the wrong side: from left to right.

When working in the round, every row in the diagram are worked from the right side, from right to left.

When working a circular diagram you start in the middle and work your way outwards, counter clockwise, row by row.

The rows usually start with a given number of chain stitches (equivalent to the height of the following stitch), this will either be depicted in the diagram or explained in the pattern.

See DROPS lesson: How to read crochet diagrams

Instructions for working several diagrams after each other on the same row/round, will often be written like so: “work A.1, A.2, A.3 a total of 0-0-2-3-4 times". This means you work A.1 once, then A.2 is worked once, and A.3 is repeated (in width) the number of times provided for your size – in this case like so: S = 0 times, M = 0 times, L=2 times, XL= 3 times and XXL = 4 times.

The diagrams are worked as usual: begin with the first row in A.1, then work the first row in A.2 etc.

See DROPS lesson: How to read knitting diagrams

See DROPS lesson: How to read crochet diagrams

The total width of the garment (from wrist-to-wrist) will be larger in the larger sizes, despite the actual sleeves being shorter. The larger sizes have longer sleeve caps and wider shoulders, so there will be a good fit in all sizes.

The measurement sketch/schematic drawing provides information regarding the full length of the garment. If it’s a jumper or a jacket the length is measured from the highest point on the shoulder (usually closest to the neckline), and straight down to the bottom of the garment. It is NOT measured from the tip of shoulder. Similarly, the length of yoke is measured from the highest point on the shoulder and down to where yoke is split into body and sleeves.

See DROPS lesson: How to read a schematic drawing

Diagrams are often repeated on the round or in height. 1 repeat is the diagram the way it appears in the pattern. If it says to work 5 repeats of A.1 in the round, then you work A.1 a total of 5 times after/next to each other in the round. If it says to work 2 repeats of A.1 vertically/in height you work the entire diagram once, then begin again at the start and work the entire diagram one more time.

Chain stitches are slightly narrower than other stitches and to avoid working the cast-on edge too tight, we simply chain more stitches to begin with. The stitch count will be adjusted on the following row to fit the pattern and measurement sketch.

The rib edge is more elastic and will contract slightly compared to, for example, stocking stitch. By increasing before the rib edge, you avoid a visible difference in width between the rib edge and the rest of the body.

It’s very easy to cast off too tightly, and by making yarn overs while casting off (and simultaneously casting these off) you avoid a too tight cast off edge.

See DROPS video: How to bind off with yarn overs (yo)

To achieve an even increase (or decrease) you can increase on, for example: every 3rd and 4th row alternately, like so: work 2 rows and increase on the 3rd row, work 3 rows and increase on the 4th. Repeat this until the increase is complete.

See DROPS lesson: Increase or decrease 1 st on every 3rd and 4th row alternately

Should you prefer to work in the round instead of back and forth, you may of course adjust the pattern. You’ll need to add steeks mid-front (usually 5 stitches), and follow the instructions. When you would normally turn and work from the wrong side, simply work across the steek and continue in the round. At the end you’ll cut the piece open, pick up stitches to work bands, and cover the cut edges.

See DROPS video: How to knit steeks and cut open

Should you prefer to work back and forth instead of in the round, you may of course adjust the pattern so you work the pieces separately and then assemble them at the end. Divide the stitches for the body in 2, add 1 edge stitch in each side (for sewing) and work the front and back pieces separately.

See DROPS lesson: Can I adapt a pattern for circular needles into straight needles?

Pattern repeats can vary slightly in the different sizes, in order to get the correct proportions. If you’re not working the exact same size as the garment in the photo, yours might deviate slightly. This has been carefully developed and adjusted so that the complete impression of the garment is the same in all sizes.

Make sure to follow instructions and diagrams for your size!

If you have found a pattern you like which is available in women’s size it’s not very difficult to convert it to men’s size. The biggest difference will be the length of sleeves and body. Start working on the women size that you think would fit across the chest. The additional length will be worked right before you cast off for the armhole/sleeve cap. If the pattern is worked top-down you can add the length right after the armhole or before the first decrease on sleeve.

Regarding additional yarn amount, this will depend on how much length you add, but it is better with a skein too many than too few.

All yarns will have excess fibres (from production) that might come off as lint or shedding. Brushed yarns (ie hairier yarns) have more of these loose, excess fibres, causing more shedding.

Shedding also depends on what is worn under or over the garment, and whether this pulls at the yarn fibres. It’s therefore not possible to guarantee that there will be no shedding

Below are some tips on how to get the best result when working with hairier yarns:

1. When the garment is finished (before you wash it) shake it vigorously so the looser hairs come off. NOTE: do NOT use a lint roller, brush or any method that pulls at the yarn.

2. Place the garment in a plastic bag and put it in your freezer - the temperature will cause the fibres to become less attached to each other, and excess fibres will come off easier.

3. Leave in the freezer for a few hours before taking it out and shaking it again.

4. Wash the garment according to the instructions on the yarn label.

Pilling is a natural process that happens to even the most exclusive of fibers. It's a natural sign of wear and tear that is hard to avoid, and that is most visible in high friction areas of your garment like a sweater's arms and cuffs.

You can make your garment look as new by removing the pilling, using a fabric comb or a pill/lint remover.

Still can't find the answer you need? Then scroll down and leave your question so one of our experts can try to help you. This will be done normally within 5 to 10 working days.
In the meantime, you can read the questions and answers that others have left to this pattern or join the DROPS Workshop on Facebook to get help from fellow knitters/crocheters!

You might also like...

Post a comment to pattern DROPS Extra 0-1296

We would love to hear what you have to say about this pattern!

If you want to leave a question, please make sure you select the correct category in the form below, to speed up the answering process. Required fields are marked *.

Comments / Questions (9)

country flag Nathalie wrote:

Bjr tte débutante. il me semble que je dois crocheter le diagramme en commençant par A.1a, A1b,A1c puis remonter jusqu'au rang 5,et le recommencer jusqu'à la fin du rang. et je ne comprends pas, il me semble que les explications du point fantaisie sont différentes du diagramme. Dans l'attente de votre retour. belle journée nathalie

26.02.2024 - 10:56

DROPS Design answered:

Bonjour Nathalie, lorsque les 5 rangs (= A.X) ont été faits, vous changez de couleur et crochetez maintenant une rayure en bleu violet clair en suivant cette fois les diagrammes A.2A, A.2B et A.2C. Quand A.Y est terminé, crochetez les rangs 1-5 en naturel, puis répétez les rangs 2-5 jusqu'à ce que la rayure en naturel mesure 25 cm. Bon crochet!

26.02.2024 - 13:48

country flag Srijani Chakraborty wrote:

Hello, is this pattern has stitches along the sides. Otherwise how will this vest will be in place around the body?

13.07.2022 - 16:10

DROPS Design answered:

Dear Srijani, yes, this pattern has stitches along the sides. When working the right front, the side is included in A.1A; when working the left front, the other side is included in A.1C. Happy crocheting!

15.07.2022 - 12:51

country flag Srijani Chakraborty wrote:

Hello, I want to know is this pattern have stitches along the sides...otherwise how will this pattern be in place around the body?

13.07.2022 - 16:09

DROPS Design answered:

Dear Mrs Chakraborty, there is no seam along the sides, the jacket is closed with the string as a belt. Feel free to sew or crochet the sides together if you rather like it so. Happy crocheting!

02.08.2022 - 11:40

country flag Gea Stomphorst wrote:

Dank voor uw antwoord. Ik denk dat ik toch een andere oplossing kies. Ik haak een extra toer stokjes in naturel tussen de twee gaatjespatronen, dus direct na de toer in ijsblauw. Dat vind ik mooier dan de draad afknippen. Dan kom ik wel aan de goede kant uit met de volgende gaatjes en met het kantpatroon. Ik ben inmiddels met drie van de vier op de hoogte van 25 cm, dus kan nu mooi door.

03.03.2022 - 22:28

country flag Gea Stomphorst wrote:

Dank voor uw uitleg. Dit klopt voor het onderste deel. Maar in het bovenste deel kom ik er niet goed uit. Ik bedoel na 25 cm naturel. Dan haak je 10 toeren gaatjespatroon en kom je aan de andere kant uit en zitten de waaiers er boven verkeerd om. Ik heb nog gekeken op de foto of er een extra toer stokjes tussen de 2 gaatjespatronen zit, maar dat lijkt niet zo. Hoe kom ik dan toch aan de goede kant met de waaiers boven de 2 gaatjespatronen?

11.02.2022 - 22:41

DROPS Design answered:

Dag Gea,

Excuses voor het late antwoord. Volgens mij is het inderdaad wel zo dat je laatste keer dat je A.1 haakt, dus in ijsblauw, niet goed uit komt. Dit moet nog even nagekeken worden door de ontwerpafdeling. Je zou de draad af kunnen knippen en aan de goede kant kunnen beginnen. Hopelijk kun je zo eerst verder.

02.03.2022 - 13:47

country flag Gea Stomphorst wrote:

Ik kom er niet goed uit met de goede en verkeerde kant. Als ik in het onderste, ecru deel de waaiers van 7 dstk aan de goede kant maak, kom ik na de strepen er op uit dat de waaiers in paarsblauw aan de verkeerde kant zitten. Is dat de bedoeling? Of sla ik ergens per abuis een toer over? Of moet ik juist het onderste deel omdraaien, zodat die waaiers daar aan de verkeerde kant zitten en dan de paarsblauwe waaiers aan de goede kant?

08.02.2022 - 01:15

DROPS Design answered:

Dag Gea,

Als je (na de waaiers aan de goede kant) strepen begint te haken, haak je dus 5 toeren van strepen, waarbij de eerste en de laatste toer aan de verkeerde kant is. Hierdoor begin je weer met patroon A.1 aan de goede kant en zou je weer goed uit moeten komen. Let er op dat je dan de toer met de ster ervoor in A.1 niet haakt.

11.02.2022 - 15:33

country flag Bente Sørensen wrote:

Hej Drops ;) Tænker om 404 masker ikke er voldsomt meget, har haft den startet og den blev meget stor. Hilsen Bente

06.06.2020 - 09:53

country flag C.O. Hakkesteegt wrote:

Moeten er geen zijnaden gemaakt worden? Anders zijn het toch losse lappen en dat vind ik heel raar.

19.07.2018 - 18:22

country flag Sonia B. wrote:

Bonjour, j'aimerais faire la cordelette. Pouvez-vous me dire combien elle mesure une fois enroulée? Je voudrais ce genre de ceinture pour mettre autour d'un pull que j'ai tricoté. Merci.

22.05.2018 - 07:15

DROPS Design answered:

Bonjour Sonia, la longueur de la cordelière va dépendre de la façon dont vous avez serré le fil, et même le fil peut jouer. Vous pouvez vous baser sur un modèle similaire et faire éventuellement un échantillon-test de cordelière pour calculer la longueur dont vous avez besoin pour la ceinture. Bon tricot!

22.05.2018 - 12:51