
Popular categories
Looking for a yarn?


|
|||||||||||||||||||||||||
Winter Skies |
|||||||||||||||||||||||||
|
|
|||||||||||||||||||||||||
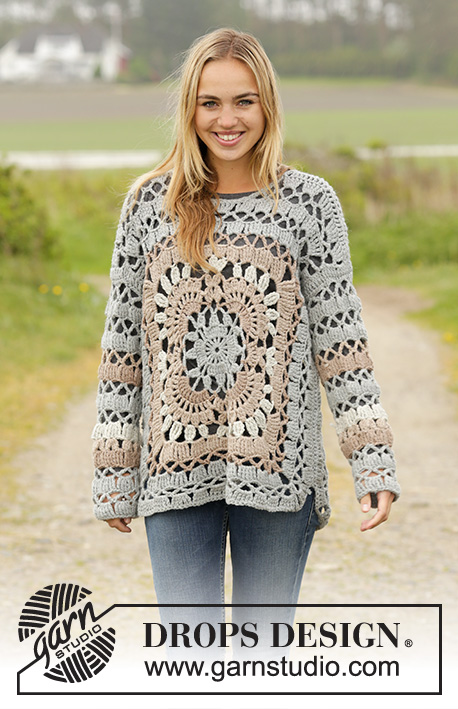
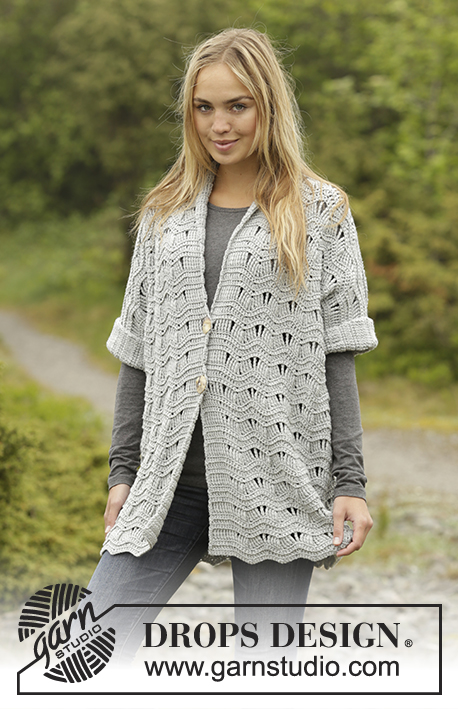
Crochet DROPS jacket with lace pattern, stripes and shawl collar, worked top down in 2 strands "Alpaca". Size S-XXXL.
DROPS 173-36 |
|||||||||||||||||||||||||
|
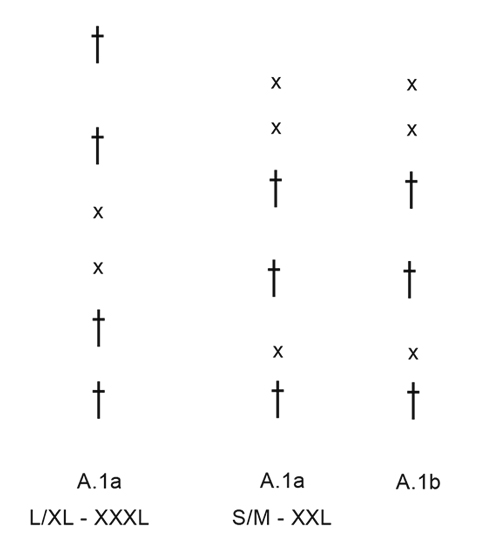
CROCHET INFO: Replace first tr at beg of every tr row with 3 ch. Replace first dc at beg of every dc row with 1 ch. PATTERN: See diagrams A.1 to A.5 – see diagram for correct size. STRIPES: Work all stripes with 2 strands. Work 3 repetitions (1 repetition vertically = the last 4 rows in diagram) vertically with 1st-5th stripe, then work 6th stripe until finished measurements. Stripe 1: 1 strand off white + 1 strand light pearl grey. Stripe 2: 2 strands light pearl grey. Stripe 3: 1 strand light pearl grey + 1 strand light grey. Stripe 4: 2 strands light grey. Stripe 5: 1 strand light grey + 1 strand medium grey. Stripe 6: 2 strands medium grey. BUTTONHOLES: Work buttonholes on right band on a row with tr. Beg from WS and work as follows: Work the first 5 tr on band, work 1 ch, skip 1 st and continue with tr the rest of band. Work for buttonholes when piece measures: SIZE S/M: 23 and 30 cm. SIZE L/XL: 24 and 31 cm. SIZE XXL: 25 and 32 cm. SIZE XXXL: 26 and 33 cm. ---------------------------------------------------------- JACKET: Worked top down in parts and sewn tog when finished. BACK PIECE: Right shoulder: Work 48-53-59-63 ch with 1 strand off white and 1 strand light pearl grey (= 2 strands) on hook size 6 mm. Cut the yarn and work left shoulder. Work 50-55-61-65 ch with 1 strand off white and 1 strand light pearl grey (= 2 strands) on hook size 6 mm. Turn and work 1 tr in 4th ch from hook (= 2 tr) - READ CROCHET INFO, 1 tr in each of the next 4-2-1-5 ch, * skip 1 ch, work 1 tr in each of the next 6 ch *, repeat from *-* 6-7-8-8 times in total = 42-46-51-55 tr. Continue with first row in A.5 (= 18 ch), work 1 tr 1st ch on ch-row (= right shoulder), work 1 tr in each of the next 5-3-2-6 ch, * skip 1 ch, work 1 tr in each of the next 6 ch *, repeat from *-* 6-7-8-8 times in total = 42-46-51-55 tr for each shoulder. Turn and work STRIPES - see explanation above, and PATTERN from RS as follows - beg on 2nd row in diagram: Work A.1a – see diagram for correct size (= 1 st), A.2 (= 5 tr) 1-0-1-0 times in width, A.3 (= 9 tr) over the next 36-45-45-54 tr, A.5 over the 18 ch for neck, A.3 over the next 36-45-45-54 tr, A.4 1-0-1-0 times, A.1a. Work 1 row in pattern (= 3rd row). Continue pattern like this but now work from 4th row in diagram A.3 over A.5 (i.e. work 10-12-12-14 repetitions of A.3 in total in width). REMEMBER THE CROCHET TENSION! When diagram A.1 to A.4 have been worked, repeat the last 4 rows in diagram vertically. When 2nd stripe has been worked vertically, piece measures approx. 28 cm. Cut the yarn. Now continue from 3rd stripe and skip repetitions in each side for sleeves in the different sizes as explained below - beg from WS: S/M - XXL: NOTE: Start working from 3rd row in diagram. Skip A.1a, A.4, 1 repetition A.3 and first ch-space in next repetition of A.3 for sleeve. Beg in next ch-space (= 3 ch) and work A.1a, work A.2, A.3 6-8 times in total in width, A.2, A.1a. NOTE: The same pattern now remain at the end of row that were skipped at beg of row. L/XL - XXXL: NOTE: Start working from 3rd row in diagram. Skip A.1a, 1 repetition of A.3 and skip the next 2 ch-spaces in next repetition of A.3. Beg in next ch-space (= last ch-space in A.3) and work A.1a, work A.3 8-10 times in total in width, work A.1a in next ch-space. NOTE: The same pattern now remain at the end of row that were skipped at beg of row. Continue like this until 5th stripe has been worked vertically. Work 6th stripe until piece measures 82-84-87-89 cm from shoulder. RIGHT FRONT PIECE/SLEEVE: Work collar as follows: Work 21 ch with 1 strand off white and 1 strand light pearl grey on hook size 6 mm. Turn and work as follows: 1 dc in 2nd ch from hook (= 2 dc), skip 1 ch, work 1 dc in each of the next 4 ch, * skip 1 ch, work 1 dc in each of the next 6 ch *, repeat from *-* 2 times in total = 18 dc. Turn piece and insert a marker at beg of row = RS. Now work short rows as follows: ROW 1 (= RS): Work 1 tr in every dc. ROW 2: Work 1 tr in each of the next 2 tr, 1 htr the next 2 tr, 1 dc in each of the next 2 tr, 1 sl st in the next 2 tr, turn piece. ROW 3: Work 1 sl st in the next 2 sts, 1 dc in each of the next 2 sts, 1 htr in each of the next 2 sts, 1 tr in each of the last 2 sts. Turn piece ROW 4: Work 1 tr in every st. Turn piece ROW 5: Work 1 tr in every tr. Continue like this and repeat 2nd-5th row until the shortest side on collar measures 8 cm, adjust so that last row is worked from WS. Cut the yarn. Now work shoulder as follows: Work 50-55-61-65 loose ch with 1 strand off white and 1 strand light pearl grey (= 2 strands) on hook size 6 mm. Turn and work 1 tr in 4th ch from hook (= 2 tr), 1 tr in each of the next 4-2-1-5 ch, * skip 1 ch, work 1 tr in each of the next 6 ch *, repeat from *-* 6-7-8-8 times in total = 42-46-51-55 tr. Turn piece and work pattern from RS - beg on 2nd row in diagram: NOTE: Work stripes as on back piece. Work A.1a, A.2 1-0-1-0 times in total, A.3 over the next 36-45-45-54 tr. Continue pattern over the 18 sts from collar as follows from RS: A.4, A.1b over the remaining 13 tr (= band). When diagram A.1 to A.4 have been worked, repeat the last 4 rows vertically. When 2nd stripe has been worked vertically, piece measures approx. 28 cm. Do not cut the yarn. REMEMBER BUTTONHOLES! Now continue from 3rd stripe and skip repetitions in the side for sleeve in the different sizes as explained below as follows - beg from WS: S/M - XXL: NOTE: Work from 3rd row in diagram. Work A.1b over band as before (= 13 sts), work A.4, A.3 2-3 times in total in width, A.2 and finish with A.1a in next ch-space (= 3 ch). Turn piece and continue piece back and forth like this. L/XL - XXXL: NOTE: Work from 3rd row in diagram. Work A.1b over band as before (= 13 sts), work A.4, A.3 3-4 times in total in width and finish with A.1a in next ch-space. Continue like this until 5th stripe has been worked vertically. Now continue with 6th stripe until piece measures 82-84-87-89 cm from shoulder, adjust according to back piece. LEFT FRONT PIECE/SLEEVE: Work shoulder as follows: Work 50-55-61-65 loose ch with 1 strand off white and 1 strand light pearl grey (= 2 strands) on hook size 6 mm. Turn and work as follows: Work 1 tr in 4th ch from hook (= 2 tr), 1 tr in each of the next 4-2-1-5 ch, * skip 1 ch, work 1 tr in each of the next 6 ch *, repeat from *-* 6-7-8-8 times in total = 42-46-51-55 tr. Cut the yarn and work collar as follows: Work 21 ch with 1 strand off white and 1 strand light pearl grey on hook size 6 mm. Turn and work as follows: 1 dc in 2nd ch from hook (= 2 dc), skip 1 ch, work 1 dc in each of the next 4 ch, * skip 1 ch, work 1 dc in each of the next 6 ch *, repeat from *-* 2 times in total = 18 dc. Insert a marker on last st worked = RS. Turn piece. Work short rows, beg from WS as follows: ROW 1 (= WS): Work 1 tr in every dc, turn piece. ROW 2: Work 1 tr in each of the next 2 tr, 1 htr in next tr, 1 dc in each of the next 2 tr, 1 sl st in next tr, turn piece. ROW 3: Work 1 sl st in first st, 1 dc in each of the next 2 sts, 1 htr in next st, 1 tr in each of the last 2 sts, turn piece. ROW 4: Work 1 tr in every st, turn piece. ROW 5: Work 1 tr in every tr, turn piece. Continue like this and repeat 2nd-5th row until the shortest side on collar measures 8 cm, adjust so that last row is worked from WS. Do not cut the yarn. Turn piece and work pattern from RS - beg on 2nd row in diagram: Work A.1b over the first 13 sts, A.2, work A.3 over the first 36-45-45-54 tr on left shoulder, A.4 1-0-1-0 times in total, A.1a. Continue like this back and forth. When diagram A.1 to A.4 have been worked, repeat the last 4 rows vertically. When 2nd stripe has been worked vertically, piece measures approx. 28 cm. Cut the yarn. Now continue from 3rd stripe and skip repetitions in the side for sleeve in the different sizes as explained below as follows - beg from WS: S/M - XXL: NOTE: Work from 3rd row in diagram. Skip A.1a, A.4, 1 repetition A.3 and first ch-space in next repetition of A.3 for sleeve. Beg in next ch-space (= 3 ch) and work A.1a, A.2, A.3 2-3 times in total in width, A.2, work A.1a in the remaining 13 sts. L/XL - XXXL: NOTE: Work from 3rd row in diagram. Skip A.1a, 1 repetition of A.3 and skip the next 2 ch-spaces in next repetition of A.3. Beg in next ch-space (= last ch-space in next repetition A.3) and work A.1a, continue with A.3 3-4 times in total in width, A.2, A.1b the remaining 13 sts. Continue like this until 5th stripe has been worked vertically. Now continue with 6th stripe until piece measures 82-84-87-89 cm from shoulder, adjust according to back piece. ASSEMBLY: Place shoulder on back piece and front piece towards each other and sew shoulder seams with 1 strand off white by sewing one and one st tog. Sew underarm seams and side seams in one with 1 strand light grey, sew outer loops of edge sts in one and one st until 26 cm remain for vents at the bottom in each side. Crochet an edge around the sleeves as follows: Beg mid under sleeve and work with 1 strand off white and 1 strand light pearl grey (= 2 strands) on hook size 6 mm as follows: * Work 1 dc, 3 ch, skip 1 cm *, repeat from *-* around the entire sleeve and finish with 1 sl st in first dc on round. Work the same way around the other sleeve. Sew collar tog mid back with off white, then sew collar to neck edge. Sew the buttons on to left band. |
|||||||||||||||||||||||||
Diagram explanations |
|||||||||||||||||||||||||
|
|||||||||||||||||||||||||
|
|||||||||||||||||||||||||

|
|||||||||||||||||||||||||

|
|||||||||||||||||||||||||
|
Have you made this or any other of our designs? Tag your pictures in social media with #dropsdesign so we can see them! Do you need help with this pattern?You'll find tutorial videos, a Comments/Questions area and more by visiting the pattern on garnstudio.com. © 1982-2024 DROPS Design A/S. We reserve all rights. This document, including all its sub-sections, has copyrights. Read more about what you can do with our patterns at the bottom of each pattern on our site. |
|||||||||||||||||||||||||


With over 40 years in knitting and crochet design, DROPS Design offers one of the most extensive collections of free patterns on the internet - translated to 17 languages. As of today we count 304 catalogues and 11422 patterns - 11422 of which are translated into English (UK/cm).
We work hard to bring you the best knitting and crochet have to offer, inspiration and advice as well as great quality yarns at incredible prices! Would you like to use our patterns for other than personal use? You can read what you are allowed to do in the Copyright text at the bottom of all our patterns. Happy crafting!
Comments / Questions (43)
Hej! Nu är jag nästan klar, men jag fick virka om flera gånger innan jag fick till kragen. Det blev inte bra förrän jag struntade i beskrivningen och gjorde så att formen stämde med videon på den stickade sjalkragen. Kan ni inte se över beskrivningen, jag tror inte att den stämmer? Till att börja med blir kragen olika bred på höger respektive vänster sida om man följer beskrivningen (2 resp 1 hst). .
26.03.2017 - 20:39Vorrei sostituire il filato consigliato Alpaca con il Big Delight Print, per ottenere lo stesso effetto senza dover cambiare i colori. La quantità/peso rimane la stessa che usando 2 capi del filato Alpaca? Grazie di cuore!
13.02.2017 - 19:27DROPS Design answered:
Buonasera Eugenia, per utilizzare Big Delight al posto di 2 capi di Alpaca, ad esempio per la taglia S servono 700 g di Alpaca, ma siccome è lavorata a 2 capi deve considerare 350 g: Alpaca rende circa 167 m ogni 50 g, per cui le serviranno circa 1170 m totali, Big Delight rende 190 m ogni 100g, quindi un pò più di 6 gomitoli di Big Delight. Tanga inoltre conto che la pesantezza del capo finito può essere diversa tra i 2 filati. Buon lavoro!
13.02.2017 - 20:37Hej! Skulle ni kunna visa en bild av hur det ska se ut när man virkat några varv av mönstret på höger framstycke? Jag är osäker på om jag gjort rätt med kragen. Det skulle även vara jättebra med en bild på hur kragen ska sys ihop. Det är svårt att se på bilden hur kragen ska vara eftersom modellens hår är i vägen.
28.01.2017 - 22:10DROPS Design answered:
Hej Erika. Jeg har desvaerre ikke noget billede til dig. Jeg har bedt om en video paa mönstret, men kan desvaerre ikke sige hvor lang tid det vil tage. Herunder en video af en strikket sjalskrage, selvom den er strikket, saa er konstruktionen det samme:
02.02.2017 - 14:18En el apartado de la espalda, una vez que se repiten las últimas 4 filas del diagrama, no me queda claro qué hacer. No entiendo muy bien las explicaciones, no sé a lo que se refiere con raya, fila, etc. Por favor que alguien me lo explique al ser posible de manera visual, porque me he quedado estancada y no hay manera de avanzar.
29.12.2016 - 23:22DROPS Design answered:
Hola Raquel. Ahora comenzamos con los colores de la 3ª raya; como trabajarlos te lo explican en los apartados superiores, ya que depende de las talla de la labor: S/M - XXL o L/XL - XXXL.
31.12.2016 - 20:00Goedenavond, ook ik snap de kraag niet en met de al bestaande antwoorden kom ik er ook niet uit. Hebben jullie misschien ook beeldmateriaal van de kraag en de start van het linkerpand? Groet Suzanne
02.12.2016 - 20:14DROPS Design answered:
Hoi Suzanne. Helaas hebben wij dat niet. Kan je misschien uitleggen waar met de kraag het precies misgaat? Dan kan ik proberen verder uit te leggen.
07.12.2016 - 16:24Heel erg bedankt voor je snelle reactie. Ik ga rekenen, bestellen en aan de slag! Hartelijke groet, Suzanne
06.11.2016 - 09:40Goedemorgen, ik wil dit vest graag voor mijn dochter haken, maar dan met lange mouwen. Is drops flora (met dubbele draad) een alternatief, haak ik met naald 6 en hoeveel bollen heb ik dan nodig? Ik hoop dat jullie me even op weg kunnen helpen. Met vriendelijke groet, Suzanne
04.11.2016 - 12:23DROPS Design answered:
Hoi Suzanna. Ja, je kan prima vervangen door 2 draden Flora. Je moet ervoor zorgen dat de stekenverhouding zoals aangegeven in het patroon klopt, dus haak een proeflapje - dan weet je ook welke nld je moet gebruiken. Lees hier hoe je berekent hoeveel garen je nodig hebt. Veel plezier.
04.11.2016 - 14:31Hej! kan man få lite utförligare beskrivning på kragen? Jag får verkligen inte ihop de :(
23.09.2016 - 22:18DROPS Design answered:
Hej Linda. Hvad er det precies du ikke forstaar med kraven.
06.10.2016 - 16:07Hallo, Danke für die mega schnelle Antwort! Den beschriebenen Kragenteil häkel ich also nur einmal und zwar wenn ich die linke Schulter mache? Woran soll ich dann die Blende häkeln? Wahrscheinlich mache ich einen riesen Denkfehler... Gibt es vllt einen Beitrag im Forum, bei dem evtl. auch Bilder dabei sind? Vielen Dank für Ihre Geduld
22.09.2016 - 10:57DROPS Design answered:
Liebe Frau Flocke, es wird insgesamt 2 Teile für Kragen geben, der 1. Teil häkeln Sie vor dem rechten Vorderteil/Ärmel, dann wenn Sie die 8 cm des Kragens haben, Faden abschneiden. Dann Schulter häkeln: 50 Lm anschlagen, dann die 1. Reihe = 42 Stb häkeln, dann die nächste Reihe über die Maschen von der Schulter + von dem Kragen häkeln. So haben sie Schulter und Kragen zsgehäkelt. Bei dem linken Vorderteil fangen Sie dieses Mal mit Schulter, dann Faden abschneiden und Kragen beginnen, dann, wenn Kragen fertig ist, beide Teile zshäkeln (= bei der 2. Reihe A.1-A.4 häkeln).
22.09.2016 - 11:52Liebes Drops-Team, Ich habe bereits das komplette Rückenteil fertig gehäkelt, ginge ohne Probleme innerhalb weniger Tage. Leider gestaltet sich der Vorderteil deutlich schwieriger und ich habe eine regelrechte Blockade und weiß nicht wie weiter... Den Kragen habe ich fertiggestellt, ebenso den zweiten Teil bis hin zu den 4 Wiederholungen A3 über 36Stb. Mir ist es jetzt ein absolutes Rätsel wie ich den Kragen daran basteln soll...Wie gehts weiter? Vielen Dank im Voraus! Diana
21.09.2016 - 21:49DROPS Design answered:
Liebe Diana, den Kragen häkeln Sie, wenn Sie die 2. der Schulter häklen, dh, nach der 1. R. haben Sie 42 Stb (1. Grösse), dann häkeln Sie die 2. R des Diagramms: A.1a 1x, A.2 1x, A.3 über die nächsten 36 Stb und dann häkeln Sie die 18 Kragen-M: A.4 1x, A.1b über die letzten 13 Stb (= Blende). Beide Teile (Kragen und Schulter) sind jetzt zusammen gehäkelt.
22.09.2016 - 09:01