DROPS Cotton Merino
DROPS Cotton Merino
50% Wool, 50% Cotton
from 3.55 £ /50g
Get the yarn to make this pattern from 39.05£.

The yarn cost is calculated from the pattern’s smallest size and the yarn’s cheapest product type. Looking for an even better price? You might find it on the DROPS Deals!

DROPS SS24

Lucky Charm

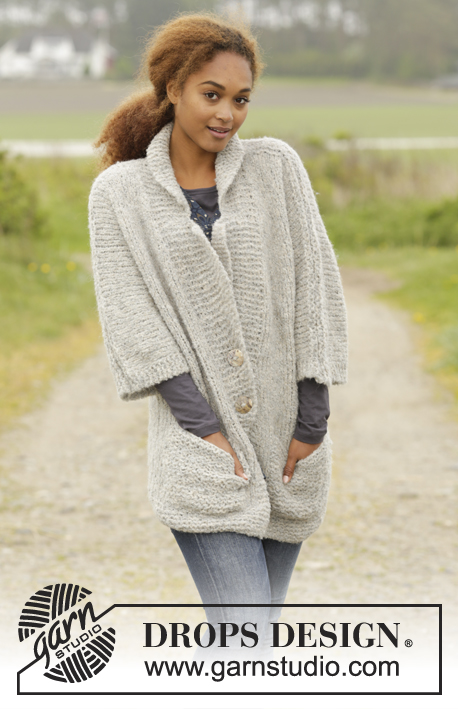
Knitted DROPS jumper with leaf pattern, lace pattern and ridges, worked from the middle and outwards in a square in ”Cotton Merino”. Size: S - XXXL.

DROPS 172-3
DROPS design: Pattern no cm-052
Yarn group B
----------------------------------------------------------
Size: S - M - L - XL - XXL - XXXL
Materials:
DROPS COTTON MERINO from Garnstudio
550-550-650-700-750-850 g colour no 29, sea green

DROPS DOUBLE POINTED NEEDLES AND CIRCULAR NEEDLE (60 or 80 cm) SIZE 4 mm - or size needed to get 21 sts x 28 rows in stocking st = 10 x 10 cm. Knitting tension when working pattern A.1 to A.6 = 21 sts x 36 rows on 10 x 10 cm.

-------------------------------------------------------

Alternative Yarn – See how to change yarns here
Yarn Groups A to F – Use the same pattern and change the yarn here
Yarn usage using an alternative yarn – Use our yarn converter here

-------------------------------------------------------

DROPS Cotton Merino
DROPS Cotton Merino
50% Wool, 50% Cotton
from 3.55 £ /50g
Get the yarn to make this pattern from 39.05£.

The yarn cost is calculated from the pattern’s smallest size and the yarn’s cheapest product type. Looking for an even better price? You might find it on the DROPS Deals!

Pattern instructions

NOTE: This pattern is written in British English. All measurements in charts are in cm. For conversion from cm to inches - click here. There are different terms for crocheting in British and American English. If this pattern includes crochet, click for "crochet terms" here. For this pattern in American English, please click here.
PATTERN:
See diagrams A.1 to A.6. The diagrams show all rows in pattern seen from RS.

GARTER ST (worked in the round):
1 ridge = 2 rounds. * K 1 round and P 1 round *, repeat from *-*.
----------------------------------------------------------

BACK PIECE:
Cast on 8 sts with Cotton Merino and divide them on 4 double pointed needles size 4 mm (= 2 sts on every needle). Work according to A.1 (= 4 repetitions on round). Work A.1 1 time vertically = 184 sts on round, then work as follows: *A.2 A (= 11 sts), A.2 B (= 24 sts), A.2 C (= 11 sts) *, repeat from *-* 3 more times. When A.2 has been worked 1 time vertically (= 344 sts on round), work the last 8 rounds in A.2 A-C 0-1-2-3-4-6 more times (40 sts inc for every time the last 8 rounds are worked) = 344-384-424-464-504-584 sts. Then work as follows: Keep the first 86-96-106-116-126-146 sts, on needle, cast off the next 86-96-106-116-126-146 sts, slip the next 86-96-106-116-126-146 sts on a stitch holder and cast off the last 86-96-106-116-126-146 sts on round. NOTE! The yarn must be cut several times in piece.

TOP PART:
Continue back and forth over the first 86-96-106-116-126-146 sts. Work first row in A.3 AT THE SAME TIME adjust no of sts to 89-97-105-113-129-145. Then work as follows: A.3 over 88-96-104-112-128-144 sts (= 11-12-13-14-16-18 repetitions), finish with 1 st which is worked as first st in A.3 (K when working K and P when working P). On row with arrow -1 cast off the middle 31-31-33-33-35-35 sts for neck and finish each shoulder separately. On next row dec 1 st towards the neck = 28-32-35-39-46-54 sts remain on each shoulder. Finish A.3, then cast off.

BOTTOM PART:
Slip 86-96-106-116-126-146 sts from stitch holder back on circular needle, work first row in A.4, AT THE SAME TIME adjust no of sts to 89-97-105-113-129-145. Then work back and forth as follows: A.4 over 88-96-104-112-128-144 sts (= 11-12-13-14-16-18 repetitions), finish with 1 st which is worked as first st in A.4 (K when working K and P when working P). Cast off when A.4 has been worked vertically.

FRONT PIECE:
Cast on and work as on back piece until A.2 has been worked = 344-384-424-464-504-584 sts.

TOP PART:
Continue back and forth over the first 86-96-106-116-126-146 sts. Work first row in A.3, AT THE SAME TIME adjust no of sts to 89-97-105-113-129-145. Then work back and forth as follows: A.3 over the next 88-96-104-112-128-144 sts (= 11-12-13-14-16-18 repetitions), finish with 1 st which is worked as first st in A.3 (K when working K and P when working P). On row with arrow- 2, slip the middle 25-25-27-27-29-29 sts on a stitch holder for neck and finish each shoulder separately. Cast off for neck on every row towards mid front: 2 sts 1 time and 1 st 2 times = 28-32-35-39-46-54 sts remain on each shoulder. Continue until A.3 has been worked vertically, cast off.

BOTTOM PART:
Work as bottom part on back piece.

SLEEVES:
Worked top down in the round on double pointed needles. Cast on 77-79-85-89-93-97 sts on double pointed needles size 4 mm. Work as follows: 31-32-35-37-39-41 sts in stocking st, A.5 A (= 15 sts), 31-32-35-37-39-41 sts in stocking st. Insert 1 marker at beg of round = mid under sleeve. When piece measures 4 cm dec 1 st on each side of marker, dec every 2-2-2-1½-1½-1½ cm 17-17-19-20-21-22 times = 43-45-47-49-51-53 sts. AT THE SAME TIME when A.5 A has been worked one time vertically continue with A.5 B over A.5 A. When piece measures 43-42-41-40-38-36 cm, adjust no of sts to 40-40-48-48-48-56. Then work according to A.6 (= 5-5-6-6-6-7 repetitions in width). When A.6 has been worked 1 time vertically, work 2 ridges in GARTER ST – see explanation above, then cast off, sleeve measures approx. 51-50-49-48-46-44 cm.

ASSEMBLY:
Sew the shoulder seams. Sew side seams, leave a gap of at the top of 18-19-20-21-22-23 cm = armholes. Sew in sleeves.

NECK EDGE:
Pick up approx. 80-96 sts (including sts on stitch holder) around the neck on a short circular needle size 4 mm. Work 2 ridges, then cast off.

This pattern has been corrected.

Updated online: 19.10.2016
Correction: text diagram-symbol no 6 & 7

Diagram

symbols = K from RS, P from WS


symbols = P from RS, K from WS
symbols = K 2 tog
symbols = slip 1 st as if to K, K 1, psso
symbols = slip 2 sts as if to K 2 tog, K 1, pass the 2 slipped sts over tog
symbols = 1 YO between 2 sts, on next round K/P YO to make holes
symbols = 1 YO between 2 sts, on next round K/P YO twisted to avoid holes
diagram
diagram
diagram
diagram
diagram

Each of our patterns has specific tutorial videos to help you.

Do you have a question? See a list of frequently asked questions (FAQ)

Knitting tension is what determines the final measurements of your work, and is usually measured per 10 x 10 cm. It is provided like so: number of stitches in width x number of rows in height - eg: 19 stitches x 26 rows = 10 x 10 cm.

The knitting tension is very individual; some people knit/crochet loosely while others work tightly. You adjust the knitting tension with the needle size, which is why the suggested needle size is only meant as a guide! You need to adjust this (up or down) to ensure that YOUR knitting tension matches the knitting tension provided in the pattern. If you work with a different knitting tension than provided you will have a different yarn consumption, and your work will have different measurements than what the pattern suggests.

The knitting tension also determines which yarns can replace each other. As long as you achieve the same knitting tension you can replace one yarn with another.

See DROPS lesson: How to measure your tension/gauge

See DROPS video: How to make a gauge tension swatch

The required amount of yarn is provided in grams, eg: 450 g. To calculate how many balls you’ll need you first need to know how many grams are in 1 ball (25g, 50g or 100g). This information is available if you click on the individual yarn quality on our pages. Divide the amount required with the amount of each ball. For example, if each ball is 50g (the most common amount), the calculation will be as follows: 450 / 50 = 9 balls.

The important thing when changing from one yarn to another is that the knitting/crochet tension remains the same. This is so that the measurements of the finished piece will be the same as on the sketch provided. It is easier to achieve the same knitting tension using yarns from the same yarn group. It is also possible to work with multiple strands of a thinner yarn to achieve the knitting tension of a thicker one. Please try our yarn converter. We recommend you to always work a test swatch.

Please NOTE: when changing yarn the garment might have a different look and feel to the garment in the photo, due to individual properties and qualities of each yarn.

See DROPS lesson: Can I use a different yarn than the one mentioned in the pattern?

All our yarns are categorised into yarn groups (from A to F) according to thickness and knitting tension – group A contains the thinnest yarns and group F the thickest. This makes it easier for you to find alternative yarns to our patterns, should you wish to switch yarn. All yarns within the same group have a similar knitting tension and can easily replace each other. However, different yarn qualities have different structures and properties which will give the finished work a unique look and feel.

Click here for an overview of the yarns in each yarn group

At the top of all our patterns you’ll find a link to our yarn calculator, which is a helpful tool should you wish to use a different yarn than suggested. By filling in the yarn quality you wish to replace, the amount (in your size) and number of strands, the calculator will present good alternative yarns with the same knitting tension. Additionally it will tell you how much you’ll require in the new qualities and whether you’ll need to work with multiple strands. Most skeins are 50g (some are 25g or 100g).

If the pattern is worked with multiple colours, every colour will have to be calculated separately. Similarly, if the pattern is worked with several strands of different yarns (for example 1 strand Alpaca and 1 strand Kid-Silk) you will have to find alternatives for each, individually.

Click here to see our yarn calculator

Since different yarns have different qualities and textures we have chosen to keep the original yarn in our patterns. However, you can easily find options among our available qualities by using our yarn calculator, or simply pick a yarn from the same yarn group.

It is possible that some retailers still have discontinued yarns in stock, or that someone has a few skeins at home that they would like to find patterns for.

The yarn calculator will provide both alternative yarn as well as required amount in the new quality.

If you think it's hard to decide what size to make, it can be a good idea to measure a garment you own already and like the size of. Then you can pick the size by comparing those measures with the ones available in the pattern's size chart.

You'll find the size chart at the bottom of the pattern.

See DROPS lesson: How to read size chart

The needle size provided in the pattern serves only as a guide, the important thing is to follow the knitting tension. And since knitting tension is very individual, you will have to adjust the needle size to ensure that YOUR tension is the same as in the pattern – maybe you’ll have to adjust 1, or even 2 needle sizes, up or down to achieve the correct tension. For this, we recommend that you work test swatches.

Should you work with a different knitting tension than the one provided, the measurements of the finished garment might deviate from the measurement sketch.

See DROPS lesson: How to measure your tension/gauge

See DROPS video: How to make a tension/gauge swatch

Working a garment top-down provides more flexibility and room for personal adjustment. For example it is easier to try the garment on while working, as well as making adjustments to length of yoke and shoulder caps.

The instructions are carefully explaining every step, in the correct order. Diagrams are adjusted to the knitting direction and are worked as usual.

The diagram depicts all rows/rounds, and every stitch seen from the right side. It is read from bottom to top, from right to left. 1 square = 1 stitch.

When working back and forth, every other row is worked from the right side and every other row is worked from the wrong side. When working from the wrong side, the diagram will have to be worked reversed: from left to right, knit stitches are purled, purl stitches are knit etc.

When working in the round every round is worked from the right side and the diagram are worked from right to left on all rounds.

See DROPS lesson: How to read knitting diagrams

The diagram depicts all rows/rounds, and every stitch seen from the right side. It is worked from bottom to top, from right to left.

When working back and forth every other row is worked from the right side: from right to left and every other row is worked from the wrong side: from left to right.

When working in the round, every row in the diagram are worked from the right side, from right to left.

When working a circular diagram you start in the middle and work your way outwards, counter clockwise, row by row.

The rows usually start with a given number of chain stitches (equivalent to the height of the following stitch), this will either be depicted in the diagram or explained in the pattern.

See DROPS lesson: How to read crochet diagrams

Instructions for working several diagrams after each other on the same row/round, will often be written like so: “work A.1, A.2, A.3 a total of 0-0-2-3-4 times". This means you work A.1 once, then A.2 is worked once, and A.3 is repeated (in width) the number of times provided for your size – in this case like so: S = 0 times, M = 0 times, L=2 times, XL= 3 times and XXL = 4 times.

The diagrams are worked as usual: begin with the first row in A.1, then work the first row in A.2 etc.

See DROPS lesson: How to read knitting diagrams

See DROPS lesson: How to read crochet diagrams

The total width of the garment (from wrist-to-wrist) will be larger in the larger sizes, despite the actual sleeves being shorter. The larger sizes have longer sleeve caps and wider shoulders, so there will be a good fit in all sizes.

The measurement sketch/schematic drawing provides information regarding the full length of the garment. If it’s a jumper or a jacket the length is measured from the highest point on the shoulder closest to the neckline, and straight down to the bottom of the garment. It is NOT measured from the tip of shoulder. Similarly, the length of yoke is measured from the highest point on the shoulder and down to where yoke is split into body and sleeves.

On a jacket measures are never taken along bands, unless specifically stated. Always measure inside band stitches when measuring the length.

See DROPS lesson: How to read a schematic drawing

Diagrams are often repeated on the round or in height. 1 repeat is the diagram the way it appears in the pattern. If it says to work 5 repeats of A.1 in the round, then you work A.1 a total of 5 times after/next to each other in the round. If it says to work 2 repeats of A.1 vertically/in height you work the entire diagram once, then begin again at the start and work the entire diagram one more time.

Chain stitches are slightly narrower than other stitches and to avoid working the cast-on edge too tight, we simply chain more stitches to begin with. The stitch count will be adjusted on the following row to fit the pattern and measurement sketch.

The rib edge is more elastic and will contract slightly compared to, for example, stocking stitch. By increasing before the rib edge, you avoid a visible difference in width between the rib edge and the rest of the body.

It’s very easy to cast off too tightly, and by making yarn overs while casting off (and simultaneously casting these off) you avoid a too tight cast off edge.

See DROPS video: How to bind off with yarn overs (yo)

To achieve an even increase (or decrease) you can increase on, for example: every 3rd and 4th row alternately, like so: work 2 rows and increase on the 3rd row, work 3 rows and increase on the 4th. Repeat this until the increase is complete.

See DROPS lesson: Increase or decrease 1 st on every 3rd and 4th row alternately

Should you prefer to work in the round instead of back and forth, you may of course adjust the pattern. You’ll need to add steeks mid-front (usually 5 stitches), and follow the instructions. When you would normally turn and work from the wrong side, simply work across the steek and continue in the round. At the end you’ll cut the piece open, pick up stitches to work bands, and cover the cut edges.

See DROPS video: How to knit steeks and cut open

Should you prefer to work back and forth instead of in the round, you may of course adjust the pattern so you work the pieces separately and then assemble them at the end. Divide the stitches for the body in 2, add 1 edge stitch in each side (for sewing) and work the front and back pieces separately.

See DROPS lesson: Can I adapt a pattern for circular needles into straight needles?

Pattern repeats can vary slightly in the different sizes, in order to get the correct proportions. If you’re not working the exact same size as the garment in the photo, yours might deviate slightly. This has been carefully developed and adjusted so that the complete impression of the garment is the same in all sizes.

Make sure to follow instructions and diagrams for your size!

If you have found a pattern you like which is available in women’s size it’s not very difficult to convert it to men’s size. The biggest difference will be the length of sleeves and body. Start working on the women size that you think would fit across the chest. The additional length will be worked right before you cast off for the armhole/sleeve cap. If the pattern is worked top-down you can add the length right after the armhole or before the first decrease on sleeve.

Regarding additional yarn amount, this will depend on how much length you add, but it is better with a skein too many than too few.

All yarns will have excess fibres (from production) that might come off as lint or shedding. Brushed yarns (ie hairier yarns) have more of these loose, excess fibres, causing more shedding.

Shedding also depends on what is worn under or over the garment, and whether this pulls at the yarn fibres. It’s therefore not possible to guarantee that there will be no shedding

Below are some tips on how to get the best result when working with hairier yarns:

1. When the garment is finished (before you wash it) shake it vigorously so the looser hairs come off. NOTE: do NOT use a lint roller, brush or any method that pulls at the yarn.

2. Place the garment in a plastic bag and put it in your freezer - the temperature will cause the fibres to become less attached to each other, and excess fibres will come off easier.

3. Leave in the freezer for a few hours before taking it out and shaking it again.

4. Wash the garment according to the instructions on the yarn label.

Pilling is a natural process that happens to even the most exclusive of fibers. It's a natural sign of wear and tear that is hard to avoid, and that is most visible in high friction areas of your garment like a sweater's arms and cuffs.

You can make your garment look as new by removing the pilling, using a fabric comb or a pill/lint remover.

Still can't find the answer you need? Then scroll down and leave your question so one of our experts can try to help you. This will be done normally within 5 to 10 working days.
In the meantime, you can read the questions and answers that others have left to this pattern or join the DROPS Workshop on Facebook to get help from fellow knitters/crocheters!

You might also like...

Post a comment to pattern DROPS 172-3

We would love to hear what you have to say about this pattern!

If you want to leave a question, please make sure you select the correct category in the form below, to speed up the answering process. Required fields are marked *.

Comments / Questions (28)

country flag Genevieve wrote:

Goedendag als je dit patroon op 4 naalden breid zonder knop moet je de rondte sluiten. Als je het sluit dan kan die toch niet plat worden.

08.02.2024 - 20:57

DROPS Design answered:

Dag Genevieve,

Je breit vanuit het midden naar buiten toe, dus je begint in het midden van de ster en je meerdert steeds steken, waardoor het plat wordt. Misschien ken je de gehaakte ronde tafelkleedjes wel, deze zijn ook vanuit het midden naar buiten toe gehaakt en in de rondte. Nu doe je dit met breien. Als je aan de slag gaat zul je vanzelf zien hoe het werkt.

28.02.2024 - 20:54

country flag Bianca wrote:

Ik zie dat er een correctie in het patroon wordt gemeld in telpatroon symbool 6 en 7, maar kunt u de correctie uitleggen? Ik hoor graag van u. M vr gr Bianca

26.05.2023 - 15:53

DROPS Design answered:

Dag Bianca,

De correctie is online al doorgevoerd, dus je kunt gewoon het patroon volgen. Mocht je het patroon afgedrukt hebben voor de correctiedatum, dan heb je een afdruk zonder de correctie erin verwerkt.

29.05.2023 - 15:29

country flag Gun Magnusson wrote:

I natt skrev jag förtvivlade frågor till Er om slutet på bakstycket. Jag har nu hittat orsaken till problemet och jag är glad igen. Kanske kan jag rekommendera att meningen inom parentes om ökning av de 40 maskorna i en beskrivning för svenska stickerskor formuleras så här:(För varje gång alla de sista 8 v stickats får man 40 m fler på varvet. Det är alltså ingen extra ökning på 40 m som jag trodde. Jag är klar nu och det blir ett väldigt vackert bakstycke. Fantastisk design.

27.01.2021 - 10:40

DROPS Design answered:

Hej Gun. Så bra att det löste sig, vi ska se över den formuleringen för att se om det går att göra det tydligare. Mvh DROPS Design

28.01.2021 - 10:06

country flag Gun Magnusson wrote:

Förtvivlad! Jag har stickat bakstycket tom A2A - C och har344 m på v. A2A 31m, A2B 24m,A2C31 m . Multiplicerat med 4 rapporter blir det 344 m. Jag ska nu sticka de sista 8 varven en gång till.Stl M Första varvet har A2A enl diagr 26m/rutor. Jag har 31 ,samma problem med A2C Vad ska jag göra? Alla 8 v har dessutom ökningar. + 40 m som ska ökas . Det blir tillsammans mycket mer än 384. Hur fördelas de 40 m över varvet? Sitter fast. Har st 6 av de 8 v och det blir inte rätt. Hjälp!

26.01.2021 - 23:42

country flag Diot wrote:

Bonjour je porte du 40 ou taille M combien de pelote de drops cotton merino dois-je commander pour réaliser ce pull modèle lucky charm n°cm-052 ? je n'ai pas trouvé ce renseignement sur les explications.

02.10.2019 - 17:55

DROPS Design answered:

Bonjour Mme Diot, Mesurez un pull similaire que vous avez et dont vous aimez la forme et comparez les mesures à celles du schéma, vous pourrez ainsi trouver votre taille. Vous trouverez ici plus d'infos sur les tailles. Bon tricot!

03.10.2019 - 08:51

country flag Laura Menegatti wrote:

Buonasera, Vi prego gentilmente di non tener conto delle mie due domande, poste qualche giorno fa. Va tuto bene nel diagramma, è stato un mio errore. Grazie

24.04.2019 - 21:36

DROPS Design answered:

Buongiorno Laura, abbiamo inoltrato la sua segnalazione alla casa madre e il diagramma verrà corretto. Continui a tenere monitorato il sito. Buon lavoro!

30.04.2019 - 14:37

country flag Laura Menegatti wrote:

Buongiorno. Gentilmente vorrei un aiuto/spiegazione: sullo schema A2A al giro 15° dovrebbero esserci 19 maglie, ma al giro 16° sono 20 . C'è un errore nello schema o sbaglio io? Grazie

22.04.2019 - 08:36

DROPS Design answered:

Buongiorno Laura, chiederemo una verifica alla casa madre: se ci dovessero essere delle correzioni le troverà direttamente indicate nel modello il prima possibile. Buon lavoro!

24.04.2019 - 09:00

country flag Laura Menegatti wrote:

Buongiorno. Diagramma A2C: al ferro 15 avrei 21 m., ma al ferro 16 sono 20 maglie. Come è possibile? Grazie per l'aiuto.

21.04.2019 - 09:26

DROPS Design answered:

Buongiorno Laura, chiederemo una verifica alla casa madre: se ci dovessero essere delle correzioni le troverà direttamente indicate nel modello il prima possibile. Buon lavoro!

24.04.2019 - 08:59

country flag Joan Hansen wrote:

Jeg kan ikke få række 2 til at passe i a1

31.03.2018 - 19:51

DROPS Design answered:

Hei Joan. Dette mønsteret strikkes i en sirkel fra midten av ryggen. De 8 maskene som legges opp på 4 settpinner tilsvarer 4 rapporter av A1. Første omgang på A1 har 2 kast før hver av maskene på pinnen (=4 masker pr pinne, og totalt 16 masker etter avsluttet omgang). Den andre omgangen strikkes annenhver vrang og rett før det er ny økning på tredje omgangen. God fornøyelse

04.04.2018 - 13:24

Annette Große wrote:

Gibt es die Anleitung auch auf Deutsch?

30.03.2018 - 19:35

DROPS Design answered:

Ja, Sie können die Sprache unter dem Bild auswählen oder Sie gehen auf die deutsche Hauptseite, dann erscheinen auch alle Anleitungen auf Deutsch. Viel Spaß beim Stricken!

31.03.2018 - 09:36