
Popular categories
Looking for a yarn?


|
|||||||||||||||||||||||||
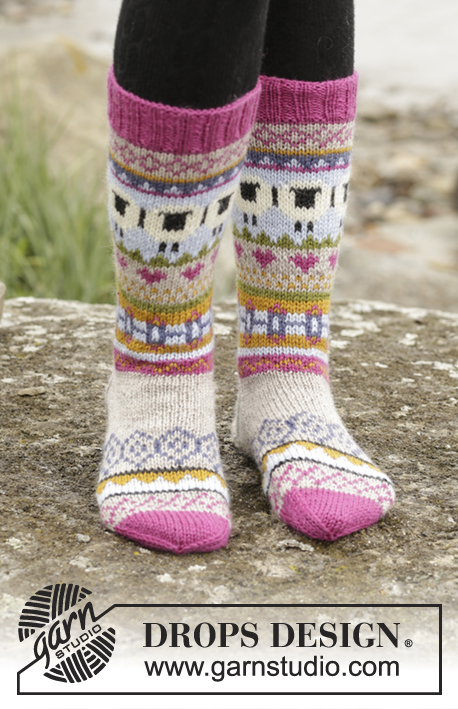
Sleepy Sheep |
|||||||||||||||||||||||||
 |
 |
||||||||||||||||||||||||
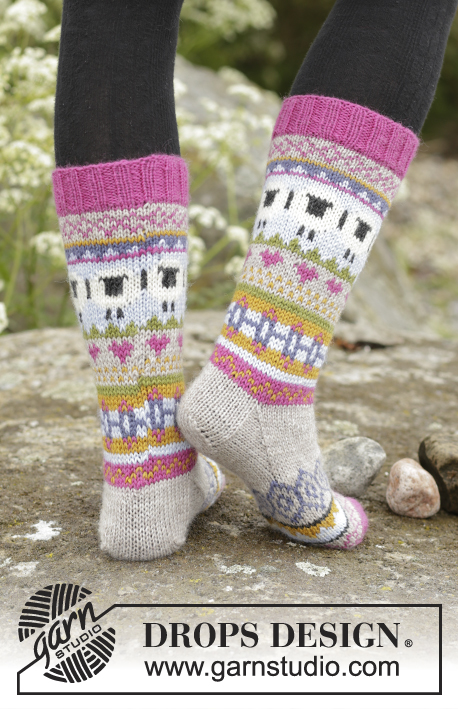
Knitted DROPS socks with sheeps in ”Karisma”. Size 35 - 46
DROPS 173-45 |
|||||||||||||||||||||||||
|
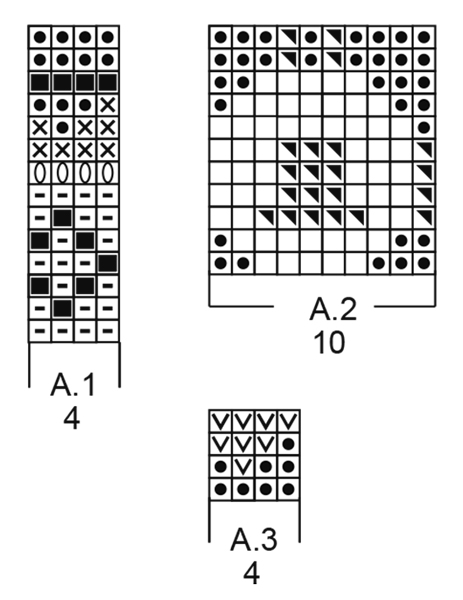
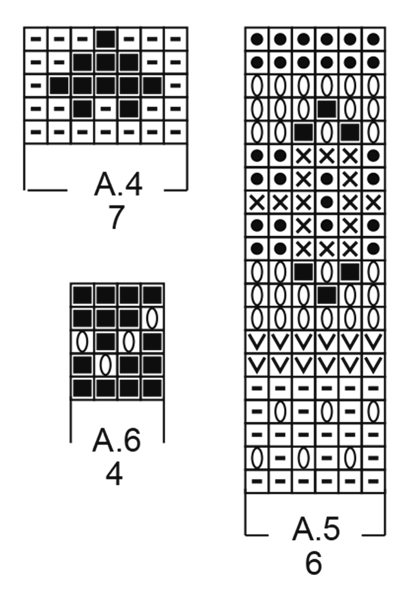
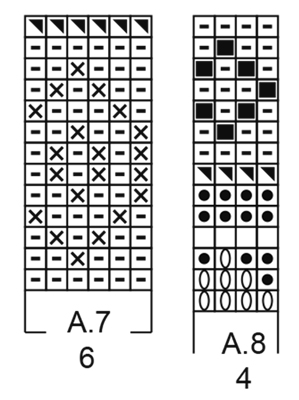
PATTERN: See diagrams A.1 to A.8. The diagrams are worked in stocking st. HEEL DECREASE: Row 1 (= RS): K until 7-7-8-8 sts remain, slip next st as if to K, K 1, psso, turn piece. Row 2 (= WS): P until 7-7-8-8 sts remain, slip next st as if to P, P 1, psso, turn piece. Row 3 (= RS): K until 6-6-7-7 sts remain, slip next st as if to K, K 1, psso, turn piece. Row 4 (= WS): P until 6-6-7-7 sts remain, slip next st as if to P, P 1, psso, turn piece. Continue dec like this with 1 less st before each dec until there are 12-14-14-14 sts on needle. DECREASE TIP (applies to toe): Dec on each side of markers as follows: Beg 3 sts before marker and K 2 tog, K 2 (marker is between these sts), slip 1 st as if to K, K 1, psso (= 2 sts dec). ---------------------------------------------------------- SOCK: Worked in the round on double pointed needles. Cast on 64-64-68-68 sts on double pointed needles size 3 mm with cerise. Work 1 round in stocking st. Work rib = K 2/P 2 for 4 cm. Switch to double pointed needles size 3.5 mm and K 1 round while at the same time dec 4 sts evenly = 60-60-64-64 sts. Work A.1 (= 4 sts) 15-15-16-16 times in width in total. On last round of A.1 dec 0-0-4-4 sts evenly = 60 sts. REMEMBER THE KNITTING TENSION K 0-0-1-3 round with light sky blue. Work A.2 (= 10 sts) 6 times in total in width, insert 1 marker after 25 sts (i.e. in the middle of 3rd repetition of A.2 = marks mid front). When A.2 has been worked 1 time vertically, K 0-0-2-3 rounds with light sky blue. Work A.3 (= 4 sts), on last round of A.3 dec 4 sts evenly = 56 sts. Work A.4 (= 7 sts) 8 times in width in total. When A.4 has been worked 1 time vertically, piece measures approx. 15-15-16-17 cm. Then work A.5 (= 6 sts) on first round dec 2 sts evenly = 54 sts. On 3rd round, dec 2-0-0-0 sts evenly = 52-54-54-54 sts. On 6th round, dec 4-0-0-0 sts evenly = 48-54-54-54 sts. Work diagram A.5 8-9-9-9 times in the round. Then work A.6 (= 4 sts), on first round dec 0-2-0-0 sts or inc 0-0-2-2 evenly = 48-52-56-56 sts. Work diagram A.6 12-13-14-14 times in the round. K 1 round with light oak. Piece now measures approx. 24-24-25-26 cm. Adjust round to beg 24-26-28-28 sts from marker mid front. Now keep the first 12-13-14-14 sts on needle for heel, slip the next 24-26-28-28 sts on 1 stitch holder (marker is in the middle of these sts = mid on top of foot) and keep the last 12-13-14-14 sts on needle for heel. Continue with light oak and stocking st back and forth over the 24-26-28-28 heel sts for 5-5½-6-6½ cm. Then work HEEL DECREASE - see explanation above. After heel dec, pick up 11-12-13-14 sts on each side of heel with light oak and slip the 24-26-28-28 sts from stitch holder back on needle = 58-64-68-70 sts. Insert 1 marker on each side of the 24-26-28-28 sts on top of foot. Insert 1 marker in piece, NOW MEASURE PIECE FROM HERE. Work in stocking st with light oak and dec on each side of the 24-26-28-28 sts on top of foot as follows: K the last 2 sts BEFORE first marker on top of foot tog and K the first 2 sts AFTER last marker on top of foot twisted tog. Repeat dec on every other round a total of 5-8-7-5 times = 48-48-54-60 sts. Continue to work with light oak until piece measures approx. 9-10-13-15 cm from marker on heel (approx. 13-14-14-15 cm remain). Work A.7 (= 6 sts) 8-8-9-10 times on round. On last round in A.7, dec 4-0-2-4 sts evenly = 44-48-52-56 sts. Then work pattern according to diagram A.8 (= 4 sts) 11-12-13-14 times in total on round. Insert 1 marker in each side so that there are 22-24-26-28 sts on top of foot and 22-24-26-28 sts under foot. Switch to cerise. Work 1 round in stocking st. Then dec for toes on each side of both markers – READ DECREASE TIP (= 4 sts dec). Repeat dec on every other round 4-4-5-5 times in total and then on every round 5-6-6-7 times in total = 8 sts remain on needle. Cut the yarn and pull it through the remaining sts, tighten tog and fasten. Work another sock but when inserting 1 marker in diagram A.2, insert it after 35 sts (i.e. in the middle of 4th repetition of A.2 = marks mid front). |
|||||||||||||||||||||||||
Diagram explanations |
|||||||||||||||||||||||||
|
|||||||||||||||||||||||||
|
|||||||||||||||||||||||||
|
|||||||||||||||||||||||||
|
|||||||||||||||||||||||||
|
Have you made this or any other of our designs? Tag your pictures in social media with #dropsdesign so we can see them! Do you need help with this pattern?You'll find tutorial videos, a Comments/Questions area and more by visiting the pattern on garnstudio.com. © 1982-2024 DROPS Design A/S. We reserve all rights. This document, including all its sub-sections, has copyrights. Read more about what you can do with our patterns at the bottom of each pattern on our site. |
|||||||||||||||||||||||||


With over 40 years in knitting and crochet design, DROPS Design offers one of the most extensive collections of free patterns on the internet - translated to 17 languages. As of today we count 304 catalogues and 11422 patterns - 11422 of which are translated into English (UK/cm).
We work hard to bring you the best knitting and crochet have to offer, inspiration and advice as well as great quality yarns at incredible prices! Would you like to use our patterns for other than personal use? You can read what you are allowed to do in the Copyright text at the bottom of all our patterns. Happy crafting!
Comments / Questions (29)
J’ai tout acheté ma laine pour faire ce modèle, mais j’ai du fil A, au lieu du fil B, une erreur. Après avoir presque terminé mon premier bas, j’ai vu que c’était trop petit. Je voudrais tellement réussir ce modèle, auriez vous une solution ´à mon problème? Pensez vous qu’en prenant la plus grande taille indiquée, ça donnerait la petite taille? Merci à l’avance !
24.02.2021 - 15:26DROPS Design answered:
Bonjour Mme Duchesne, vérifiez bien votre échantillon, vous devez avoir 22 m x 30 rangs jersey et jacquard pour 10 x 10 cm, adaptez la taille de vos aiguilles si besoin - pensez à bien tricoter le jacquard souplement, les fils derrière ne doivent pas être trop tirés pour conserver la souplesse. N'hésitez pas à montrer votre ouvrage à votre magasin (même par mail), on saura vous apporter des conseils plus personnalisés. Bon tricot!
25.02.2021 - 06:58Moet ik bij deze veelkleurige sok de draden steeds meenemen of bij wisseling doorknippen als er met twee nieuwe kleuren moet begonnen? Heel gedoe !! Bvd.
22.07.2020 - 09:40DROPS Design answered:
Dag Marjan,
Het kan beide en het hangt er een beetje vanaf wat je zelf prettig vindt. Als je van kleur moet wisselen en de kleur wordt lang niet gebruikt, kan je hem afknippen en afwerken. Als je de betreffende kleur binnenkort weer nodig hebt, kan je hem in de hoogte meenemen.
23.07.2020 - 12:12Ho appena finito di fare questo modello, purtroppo le misure dal tallone alla punta non mi sono risultate corrette, ho misurato 10 cm dal segnapunti sul tallone ma la misura risultante è di molto superiore alla taglia indicata. Non capisco dove ho sbagliato, sapete darmi qualche indicazione?
10.10.2019 - 22:28DROPS Design answered:
Buongiorno Veronica, il suo campione corrispondeva a quello indicato? Ha misurato 10 cm dal tallone e poi iniziato a lavorare A.7? Buon lavoro!
11.10.2019 - 09:16How do I avoid the jog in back of socks where contrast colours change?
17.09.2018 - 01:17I have almost knitted A1 chart, Tension is out 24 stitches on 3.50mm needles measured over 4" then on front half of sock on rnd 5 of A1. I am knitting them a bit bigger in calf I intend to sell the socks in my Etsy shop. What should I do. I'm a loose Knitter but new to Continental. I have been knitting English throwing yarn with rt finger but not yarn over finger. Please advise, shpuld I frog it all n start again? The knitted fabric feels just right am weaving in CC yarn.
09.09.2018 - 02:00Karisma is only 100 % wool. How good It is for socks, because it does not have any polyamide?
15.12.2017 - 23:19DROPS Design answered:
Dear Tarja, you can use Karisma for the socks. If you want a strong yarn you can choose a yarn with Polyamide such as Fabel (Superwash) or Nord (not Superwash) but will have then to adjust the pattern since it's not the same yarn group. Happy knitting!
18.12.2017 - 08:53Bonjour! Ce patron est vraiment très joli!
09.01.2017 - 19:32Je crains qu'il y ait une erreur de quantité pour ce joli modèle : vous indiquez en effet 100 g de chêne clair, or les motifs de cette couleur ne sont pas nombreux et semblent utiliser peu de laine. Par contre 50 g de naturel paraissent nettement insuffisants et le rose aussi, je pense... Etant tricoteuse, je vais corriger de moi-même mais ce serait bien de vérifier pour modifier les quantités sur le modèle. Merci et bonne journée.
03.12.2016 - 11:01Ik vroeg mij af waar je de markeerder voor de hiel plaatst. Meet je vanaf de hiel of vanaf de plaats waar je bent begonnen met licht eiken? Alvast bedankt!
11.11.2016 - 10:49DROPS Design answered:
Hoi Jenneke. Je plaatst de markeerder zoals er staat in het patroon: Plaats 1 markeerder aan elke kant van de 24-26-28-28 st op de bovenkant van de voet. Je doet dit nadat je de st hebt opgenomen in licht eiken. En dan MEET NU HET WERK VANAF HIER.
11.11.2016 - 15:12Ik heb dit patroon gebruikt om een muts en sjaal voor een klein meisje mee te breien. Ik heb Cotton Merino gebruikt ipv Karisma en het resultaat was zeer geslaagd. het was ontzettend leuk om te breien met al die vrolijke kleuren en leuke motieven, ik werd er helemaal happy van :-)
02.10.2016 - 09:29