DROPS Alpaca
DROPS Alpaca
100% Alpaca
from 4.85 $ /50g
Get the yarn to make this pattern from 48.50$.

The yarn cost is calculated from the pattern’s smallest size and the yarn’s cheapest product type. Looking for an even better price? You might find it on the DROPS Deals!

DROPS SS24

Shades of Eire

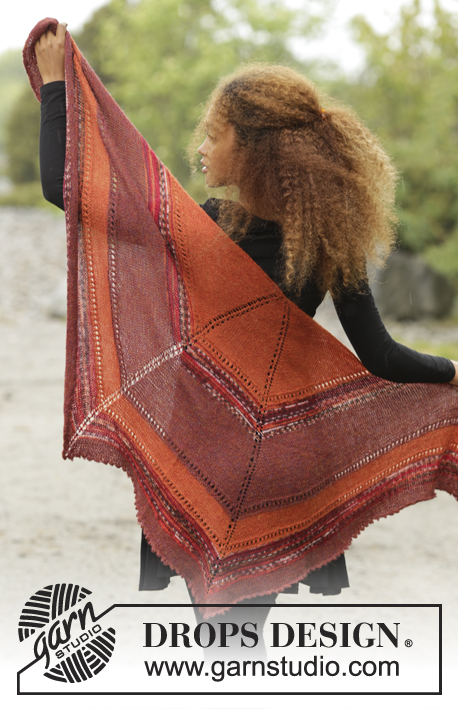
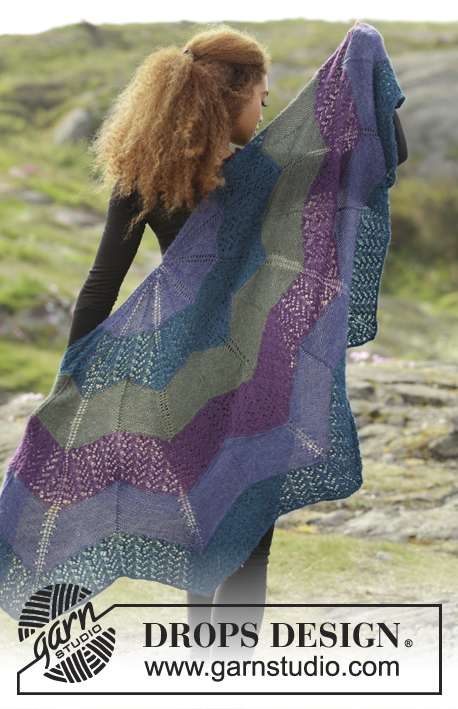
Knitted DROPS shawl with short rows, lace pattern and stripes, worked top down in 2 strands "Alpaca".

DROPS 171-8
DROPS design: Pattern no z-752
Yarn group A + A = C
----------------------------------------------------------
Measurements: approx. 60-65 cm / 23½"-25½" mid back and approx. 210 cm / 83'' along upper edge.
Materials:
DROPS ALPACA from Garnstudio
100 g color no 7233, olive
150 g color no 7238, dark olive
250 g color no 7815 green/turquoise

DROPS CIRCULAR NEEDLE (80 cm / 32'') SIZE 5 mm/US 8 - or size needed to get 17 sts x 22 rows in stockinette st with 2 strands = 4'' x 4'' (10 x 10 cm).

-------------------------------------------------------

Alternative Yarn – See how to change yarns here
Yarn Groups A to F – Use the same pattern and change the yarn here
Yarn usage using an alternative yarn – Use our yarn converter here

-------------------------------------------------------

DROPS Alpaca
DROPS Alpaca
100% Alpaca
from 4.85 $ /50g
Get the yarn to make this pattern from 48.50$.

The yarn cost is calculated from the pattern’s smallest size and the yarn’s cheapest product type. Looking for an even better price? You might find it on the DROPS Deals!

Pattern instructions

NOTE: This pattern is written in American English. All measurements in charts are in cm. For conversion from inches to cm - click here. There are different terms for crocheting in American and British English. If this pattern includes crochet, click for "crochet terms" here. For this pattern in British English, please click here.
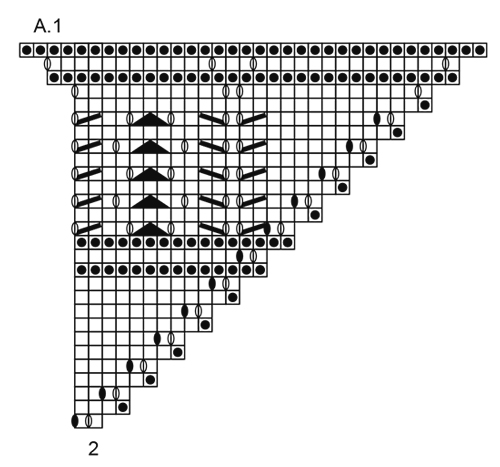
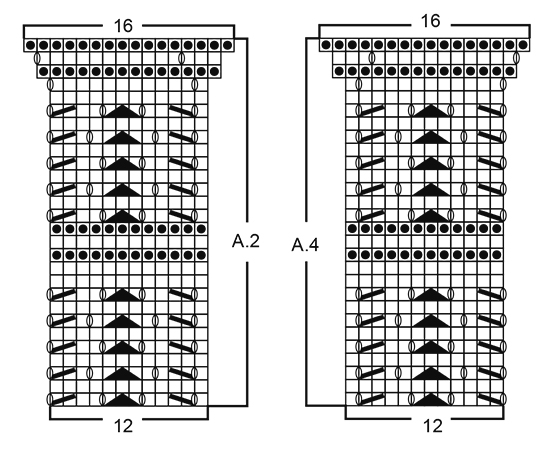
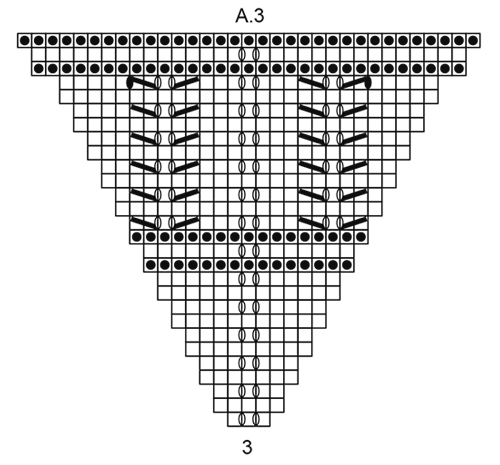
STRIPES:
Work stripes as follows:
Cast on with 2 strands olive and work 1st-12th row, then repeat 5th-12th ROW 7 more times = 105 sts.
Switch to 1 strand olive and 1 strand dark olive, repeat 5th-12th ROW 9 times in total = 213 sts.
Switch to 1 strand dark olive and 1 strand green/turquoise, repeat 5th-12th ROW 8 times in total = 309 sts.
Then work pattern A.1-A.5 with 2 strands green/turquoise.

GARTER ST (back and forth on circular needle):
K all rows.

PATTERN:
See diagrams A.1-A.5. The diagrams show all rows in pattern seen from RS.

----------------------------------------------------------

SHAWL:
Cast on 3 sts on circular needle size 5 mm / US 8 with 2 strands olive. Work STRIPES - see explanation above and work as follows:
ROW 1 (= RS): K all sts.
ROW 2 (= WS): K 1, 1 YO, P 1, 1 YO, K 1 = 5 sts.
ROW 3 (= RS): K 1, 1 YO, K 1, 1 YO, K 1, 1 YO, K 1, 1 YO, K 1 = 9 sts. Insert 1 marker in the middle st (= mid st).
ROW 4 (= WS): 1 edge sts in GARTER ST - see explanation above, work P until 1 st remains and finish with 1 edge st in garter st.
Continue to work and inc as follows with 1 edge st in garter st in each side:
ROW 5 (= RS): 1 edge st in garter st, 1 YO, K 1, 1 YO, K until mid st, 1 YO, K 1 (mid st), 1 YO, K until 2 sts remain on row, 1 YO, K 1, 1 YO and 1 edge st in garter st.
ROW 6 (= WS): 1 edge st in garter st, P 2, P next YO twisted to avoid hole, P until 4 sts remain on row, P first YO twisted, P 2 and finish with 1 edge st in garter st.
ROW 7 (= RS): 1 edge st in garter st, 1 YO, K 1, 1 YO, K until mid st, 1 YO, K 1 (= mid st), 1 YO, K until 2 sts remain on row, 1 YO, K 1, 1 YO and 1 edge st in garter st.
ROW 8 (= short row from WS): 1 edge st in garter st, K 2, K 1 twisted (to avoid hole), K 4, turn piece. NOTE: K this row from WS to make a ridge seen from RS.
ROW 9 (= RS): Slip 1st st as if to K, tighten yarn and K 7.
ROW 10 (= WS): 1 edge st in garter st, P until 4 sts remain on row, P first YO twisted (to avoid hole), P 2 and finish with 1 edge st in garter st.
ROW 11 (= short row from RS): 1 edge st in garter st, K 7, turn piece.
ROW 12 (= WS): Slip 1st st as if to K, tighten yarn and K 7. NOTE: K this row from WS to make a ridge seen from RS. REMEMBER THE KNITTING GAUGE

Repeat 5th-12th ROW back and forth BUT on every repetition work 2 sts more on short rows until short rows have been worked over 26 sts in total in each side. Then work short rows over only over 26 sts until finished measurements (work the other sts in stockinette st as before). After every repetition 12 new sts inc (inc 5th and 7th ROW).

After last stripe and repetition of 5th-12th ROW there are 309 sts on needle. Switch to 2 strands green/turquoise. K 1 row from RS while inc 10 sts as follows: Inc as before in each side and at mid st (= 6 sts) and inc in addition 4 sts evenly (i.e. 2 sts on each side of middle st, inc these sts with YOs that are worked twisted on next row) = 319 sts on needle. K 1 row from WS (work edge sts in garter st as before).

Then work according to diagram as follows: A.1 over 2 sts, repeat A.2 until 1 st before mid st, work A.3 over the next 3 sts (mid st is in the middle of A.3), repeat A.4 until 2 sts remain and work A.5 over these sts. Then work diagram 1 time in total vertically. Do not cut the yarn but bind off with picot - see explanation below.

BIND-OFF EDGE WITH PICOT:
Loosely bind off with K from RS as follows: K 1, ((** insert right needle in between the first 2 sts on left needle (i.e. between sts on needle, not through sts), make 1 YO on right needle, pull YO forwards between sts and slip YO on left needle **, repeat from **-** 2 more times (= 3 new sts on left needle). * K first st on left needle, pass first st on right needle over last st worked *)), repeat from *-* 6 times in total and repeat from ((-)) along the entire shawl until 1 st remains, cut the yarn and pull it through last st.

Diagram

All measurements in charts are in cm.

symbols = K from RS, P from WS
symbols = K from WS
symbols = 1 YO between 2 sts
symbols = 1 YO between 2 sts, on next row work YO twisted to avoid hole
symbols = K 2 tog
symbols = slip 1 st as if to K, K 1 and psso
symbols = slip 1 st as if to K, K 2 tog, psso
diagram
diagram
diagram
diagram
Do you have a question? See a list of frequently asked questions (FAQ)

Knitting tension is what determines the final measurements of your work, and is usually measured per 10 x 10 cm. It is provided like so: number of stitches in width x number of rows in height - eg: 19 stitches x 26 rows = 10 x 10 cm.

The knitting tension is very individual; some people knit/crochet loosely while others work tightly. You adjust the knitting tension with the needle size, which is why the suggested needle size only serve as a guide! You need to adjust this (up or down) to ensure that YOUR knitting tension matches the knitting tension provided in the pattern. If you work with a different knitting tension than provided you will have a different yarn consumption, and your work will have different measurements than what the pattern suggests.

The knitting tension also determines which yarns can replace each other. As long as you achieve the same knitting tension you can replace one yarn with another.

See DROPS lesson: How to measure your tension/gauge

See DROPS video: How to make a gauge tension swatch

The required amount of yarn is provided in grams, eg: 450 g. To calculate how many balls you’ll need you first need to know how many grams are in 1 ball (25g, 50g or 100g). This information is available if you click on the individual yarn quality on our pages. Divide the amount required with the amount of each ball. For example, if each ball is 50g (the most common amount), the calculation will be as follows: 450 / 50 = 9 balls.

The important thing when changing from one yarn to another is that the knitting/crochet tension remains the same. This is so that the measurements of the finished piece will be the same as on the sketch provided. It is easier to achieve the same knitting tension using yarns from the same yarn group. It is also possible to work with multiple strands of a thinner yarn to achieve the knitting tension of a thicker one. Please try our yarn converter. We recommend you to always work a test swatch.

Please NOTE: when changing yarn the garment might have a different look and feel to the garment in the photo, due to individual properties and qualities of each yarn.

See DROPS lesson: Can I use a different yarn than the one mentioned in the pattern?

All our yarns are categorised into yarn groups (from A to F) according to thickness and knitting tension – group A contains the thinnest yarns and group F the thickest. This makes it easier for you to find alternative yarns to our patterns, should you wish to switch yarn. All yarns within the same group have a similar knitting tension and can easily replace each other. However, different yarn qualities have different structures and properties which will give the finished work a unique look and feel.

Click here for an overview of the yarns in each yarn group

At the top of all our patterns you’ll find a link to our yarn converter, which is a helpful tool should you wish to use a different yarn than suggested. By filling in the yarn quality you wish to replace, the amount (in your size) and number of strands, the converter will present good alternative yarns with the same knitting tension. Additionally it will tell you how much you’ll require in the new qualities and whether you’ll need to work with multiple strands. Most skeins are 50g (some are 25g or 100g).

If the pattern is worked with multiple colours, every colour will have to be converted separately. Similarly, if the pattern is worked with several strands of different yarns (for example 1 strand Alpaca and 1 strand Kid-Silk) you will have to find alternatives for each, individually.

Click here to see our yarn converter

Since different yarns have different qualities and textures we have chosen to keep the original yarn in our patterns. However, you can easily find options among our available qualities by using our yarn converter, or simply pick a yarn from the same yarn group.

It is possible that some retailers still have discontinued yarns in stock, or that someone has a few skeins at home that they would like to find patterns for.

The yarn converter will provide both alternative yarn as well as required amount in the new quality.

If you think it's hard to decide what size to make, it can be a good idea to measure a garment you own already and like the size of. Then you can pick the size by comparing those measures with the ones available in the pattern's size chart.

You'll find the size chart at the bottom of the pattern.

See DROPS lesson: How to read size chart

The needle size provided in the pattern serves only as a guide, the important thing is to follow the knitting tension. And since knitting tension is very individual, you will have to adjust the needle size to ensure that YOUR tension is the same as in the pattern – maybe you’ll have to adjust 1, or even 2 needle sizes, up or down to achieve the correct tension. For this, we recommend that you work test swatches.

Should you work with a different knitting tension than the one provided, the measurements of the finished garment might deviate from the measurement sketch.

See DROPS lesson: How to measure your tension/gauge

See DROPS video: How to make a gauge tension swatch

Working a garment top-down provides more flexibility and room for personal adjustment. For example it is easier to try the garment on while working, as well as making adjustments to length of yoke and shoulder caps.

The instructions are carefully explaining every step, in the correct order. Diagrams are adjusted to the knitting direction and are worked as usual.

The diagram depicts all rows/rounds, and every stitch seen from the right side. It is read from bottom to top, from right to left. 1 square = 1 stitch.

When working back and forth, every other row is worked from the right side and every other row is worked from the wrong side. When working from the wrong side, the diagram will have to be worked reversed: from left to right, knit stitches are purled, purl stitches are knit etc.

When working in the round every round is worked from the right side and the diagram are worked from right to left on all rounds.

See DROPS lesson: How to read knitting diagrams

The diagram depicts all rows/rounds, and every stitch seen from the right side. It is worked from bottom to top, from right to left.

When working back and forth every other row is worked from the right side: from right to left and every other row is worked from the wrong side: from left to right.

When working in the round, every row in the diagram are worked from the right side, from right to left.

When working a circular diagram you start in the middle and work your way outwards, counter clockwise, row by row.

The rows usually start with a given number of chain stitches (equivalent to the height of the following stitch), this will either be depicted in the diagram or explained in the pattern.

See DROPS lesson: How to read crochet diagrams

Instructions for working several diagrams after each other on the same row/round, will often be written like so: “work A.1, A.2, A.3 a total of 0-0-2-3-4 times". This means you work A.1 once, then A.2 is worked once, and A.3 is repeated (in width) the number of times provided for your size – in this case like so: S = 0 times, M = 0 times, L=2 times, XL= 3 times and XXL = 4 times.

The diagrams are worked as usual: begin with the first row in A.1, then work the first row in A.2 etc.

See DROPS lesson: How to read knitting diagrams

See DROPS lesson: How to read crochet diagrams

The total width of the garment (from wrist-to-wrist) will be larger in the larger sizes, despite the actual sleeves being shorter. The larger sizes have longer sleeve caps and wider shoulders, so there will be a good fit in all sizes.

The measurement sketch/schematic drawing provides information regarding the full length of the garment. If it’s a jumper or a jacket the length is measured from the highest point on the shoulder (usually closest to the neckline), and straight down to the bottom of the garment. It is NOT measured from the tip of shoulder. Similarly, the length of yoke is measured from the highest point on the shoulder and down to where yoke is split into body and sleeves.

See DROPS lesson: How to read a schematic drawing

Diagrams are often repeated on the round or in height. 1 repeat is the diagram the way it appears in the pattern. If it says to work 5 repeats of A.1 in the round, then you work A.1 a total of 5 times after/next to each other in the round. If it says to work 2 repeats of A.1 vertically/in height you work the entire diagram once, then begin again at the start and work the entire diagram one more time.

Chain stitches are slightly narrower than other stitches and to avoid working the cast-on edge too tight, we simply chain more stitches to begin with. The stitch count will be adjusted on the following row to fit the pattern and measurement sketch.

The rib edge is more elastic and will contract slightly compared to, for example, stocking stitch. By increasing before the rib edge, you avoid a visible difference in width between the rib edge and the rest of the body.

It’s very easy to cast off too tightly, and by making yarn overs while casting off (and simultaneously casting these off) you avoid a too tight cast off edge.

See DROPS video: How to bind off with yarn overs (yo)

To achieve an even increase (or decrease) you can increase on, for example: every 3rd and 4th row alternately, like so: work 2 rows and increase on the 3rd row, work 3 rows and increase on the 4th. Repeat this until the increase is complete.

See DROPS lesson: Increase or decrease 1 st on every 3rd and 4th row alternately

Should you prefer to work in the round instead of back and forth, you may of course adjust the pattern. You’ll need to add steeks mid-front (usually 5 stitches), and follow the instructions. When you would normally turn and work from the wrong side, simply work across the steek and continue in the round. At the end you’ll cut the piece open, pick up stitches to work bands, and cover the cut edges.

See DROPS video: How to knit steeks and cut open

Should you prefer to work back and forth instead of in the round, you may of course adjust the pattern so you work the pieces separately and then assemble them at the end. Divide the stitches for the body in 2, add 1 edge stitch in each side (for sewing) and work the front and back pieces separately.

See DROPS lesson: Can I adapt a pattern for circular needles into straight needles?

Pattern repeats can vary slightly in the different sizes, in order to get the correct proportions. If you’re not working the exact same size as the garment in the photo, yours might deviate slightly. This has been carefully developed and adjusted so that the complete impression of the garment is the same in all sizes.

Make sure to follow instructions and diagrams for your size!

If you have found a pattern you like which is available in women’s size it’s not very difficult to convert it to men’s size. The biggest difference will be the length of sleeves and body. Start working on the women size that you think would fit across the chest. The additional length will be worked right before you cast off for the armhole/sleeve cap. If the pattern is worked top-down you can add the length right after the armhole or before the first decrease on sleeve.

Regarding additional yarn amount, this will depend on how much length you add, but it is better with a skein too many than too few.

All yarns will have excess fibres (from production) that might come off as lint or shedding. Brushed yarns (ie hairier yarns) have more of these loose, excess fibres, causing more shedding.

Shedding also depends on what is worn under or over the garment, and whether this pulls at the yarn fibres. It’s therefore not possible to guarantee that there will be no shedding

Below are some tips on how to get the best result when working with hairier yarns:

1. When the garment is finished (before you wash it) shake it vigorously so the looser hairs come off. NOTE: do NOT use a lint roller, brush or any method that pulls at the yarn.

2. Place the garment in a plastic bag and put it in your freezer - the temperature will cause the fibres to become less attached to each other, and excess fibres will come off easier.

3. Leave in the freezer for a few hours before taking it out and shaking it again.

4. Wash the garment according to the instructions on the yarn label.

Pilling is a natural process that happens to even the most exclusive of fibers. It's a natural sign of wear and tear that is hard to avoid, and that is most visible in high friction areas of your garment like a sweater's arms and cuffs.

You can make your garment look as new by removing the pilling, using a fabric comb or a pill/lint remover.

Still can't find the answer you need? Then scroll down and leave your question so one of our experts can try to help you. This will be done normally within 5 to 10 working days.
In the meantime, you can read the questions and answers that others have left to this pattern or join the DROPS Workshop on Facebook to get help from fellow knitters/crocheters!

You might also like...

Post a comment to pattern DROPS 171-8

We would love to hear what you have to say about this pattern!

If you want to leave a question, please make sure you select the correct category in the form below, to speed up the answering process. Required fields are marked *.

Comments / Questions (43)

country flag Liesbeth wrote:

Hoe haal je een ajoursteek op? Ik heb een stuk uit moeten halen en krijg die ajoursteken in het midden niet goed terug op de naald. De steken eronder zijn ook al losgegaan. Veel dank alvast!

28.12.2023 - 13:16

DROPS Design answered:

Dag Liesbeth,

Hoe ver het is los gegaan weet ik niet, maar ik probeer altijd de steken, tot waar ze los zijn geraakt (in de hoogte en de breedte) op aparte, korte naalden te zetten, zodat je dat stukje even apart kunt breien, tot je weer bij de rest bent.

30.12.2023 - 17:57

country flag Bente Sti Pedersen wrote:

I mønster 3 fra pind 15 til 25, tager jeg 2 m ud på hver side af midten. Så bliver der jo flere m fra midten og til mønstret. Forstår ikke hvordan mønstret kan blive ved at ligge oven over hinanden, det vil da blive forskudt - men det er det ikke på opskriften? Eller hvad gør jeg forkert?

05.01.2023 - 14:11

DROPS Design answered:

Hej Bente, du skal fortsætte så mønsteret kommer over hinanden, de nye masker er en fortsættelse af mønsteret :)

10.01.2023 - 10:50

country flag Anna Lis Haajse wrote:

Jeg har problemer med udtagningerne ved gentagelsen?

25.05.2020 - 13:42

DROPS Design answered:

Hej, du fortsætter udtagningerne på samme sted som tidligere. Hvis du strikker som 5.p tager du ud efter kantmasken og på hver side af midtmasken. osv . God fornøjelse!

27.05.2020 - 13:30

country flag Sofia Coelho wrote:

Onde está «Continuar com 1 fio verde turquesa + 1 fio verde azeitona escuro, repetir 9 vezes ao todo as carreiras 5-12 = 213 ms/pts.», não deve estar «Continuar com 1 fio verde azeitona + 1 fio verde azeitona escuro [...]»? Obrigada.

26.01.2020 - 20:28

DROPS Design answered:

Exactamente! Foi um lapso da nossa parte e já corrigimos, Obrigado pela sua ajuda. Bom Tricô!

27.01.2020 - 14:39

country flag Sofia Coelho wrote:

Onde está «Continuar com 1 fio verde turquesa + 1 fio verde azeitona escuro, repetir 9 vezes ao todo as carreiras 5-12 = 213 ms/pts.», não deve estar «Continuar com 1 fio verde azeitona + 1 fio verde azeitona escuro [...]»? Obrigada.

26.01.2020 - 20:28

DROPS Design answered:

Exactamente! Foi um lapso que já corrigimos, Obrigada pela ajuda. Bom Tricô!

27.01.2020 - 14:41

country flag Sandra wrote:

Hallo,\r\nIk heb de wol al een tijdje in huis, maar nog niet aangedurfd om te beginnen. Ik heb nog maar weinig ervaring met breien volgens een redelijk ingewikkeld patroon. \r\nNu vraag ik me af of ik het beschreven deel twee keer moet breien en dan aan elkaar naaien? Hoe krijg ik de middelste naad in de omslagdoek? \r\nGroetjes\r\nSandra

04.12.2018 - 16:58

country flag Manob wrote:

Mijn sjaal is prachtig geworden! zou hem nog graag met blauw maken en dan vooral de 6360 mix. zou de grijs blauw en de turkoois blauw of marine blauw daar mooi mee mixen? onze drops winkel in ede is helaas weg en geen stenen winkel meer om de kleuren te zien bij elkaar. . .

24.10.2018 - 21:45

DROPS Design answered:

Dag Manob,

Omdat kleuren zo persoonlijk zijn, is het lastig om zo van afstand daarin te adviseren. Het hangt er ook heel erg vanaf hoeveel contrast je mooi vindt en welke kleuren je mooi bij je vindt passen.

Het beste is om even contact op te nemen met je (online) winkel en vragen of ze bijv. extra bollen kunnen sturen, zodat je de kleuren kunt vergelijken.

28.10.2018 - 17:40

country flag Mari wrote:

Hei, etter første pinne på diagram A1-A5, hvor går veien videre? Skal nå strikke på vrangen tilbake. Forsetter jeg slik at A5 kommer over A5, A4 over A4 osv, eller begynner jeg på A1 igjen? I så fall har jeg da avsluttet retten med diagram A5 og begynner vrangen med A1. A2 kommer da over A4, A3 som før, A4 over A2 og A5 over A1. Hva er riktig? Takker for hjep. :)

03.08.2018 - 16:21

DROPS Design answered:

Hei Mari. Diagrammene viser alle pinnene sett fra rettsiden. Når du skal strikke vra vrangen må du derfor lese diagrammet «baklengs»: altså i motsatt rekkefølge og motsatt vei (dvs fra venstre mot høyre). Du vil på andre omgang begynne på venstre side av diagram A.5: strikke 1 masker rett (vrang fra retten) og videre strikke 3 masker vrang, så strikkes A.4 freme til midten hvor det strikkes A.3 osv. God fornøyelse

21.08.2018 - 11:45

country flag Virginie wrote:

When you say " 1 edge sts in garter st " do you mean a knit stitch ? Or an alternate knit right side/ purl wrong side ?

24.07.2018 - 16:35

DROPS Design answered:

Dear Virginie, when you work edge sts in garter st, you will K these sts both from RS and from WS - see video below. Happy knitting!

25.07.2018 - 08:40

country flag Alexandra Van Rosmalen wrote:

Deze omslagdoek ziet er prachtig uit en ik wil hem dus gaan breien, maar ik ben in verwarring want ik zie vier kleuren op het plaatje, maar ik zie maar drie kleuren genoemd bij de benodigdheden! Hoeveel gram van hoeveel kleuren wol heb ik nodig? Hartelijke groet, Alexandra

01.03.2018 - 13:33

DROPS Design answered:

Hoi Alexandra, Je hebt maar drie kleuren nodig omdat er steeds met twee draden gebreid wordt. Eerst brei je met 2 draden geel/groen, dan met 1 draad geel/groen en 1 draad donker olijfgroen, dan met 1 draad donker olijfgroen en 1 draad groen/turkoos en tot slot met 2 draden groen/turkoois. Dus door draden van verschillende kleuren te combineren creëer je extra kleuren.

04.03.2018 - 17:25