DROPS Alpaca
DROPS Alpaca
100% Alpaca
from 4.85 $ /50g
DROPS Kid-Silk
DROPS Kid-Silk
75% Mohair, 25% Silk
from 6.75 $ /25g
Get the yarn to make this pattern from 34.80$.

The yarn cost is calculated from the pattern’s smallest size and the yarn’s cheapest product type. Looking for an even better price? You might find it on the DROPS Deals!

DROPS SS24

Summer Twist

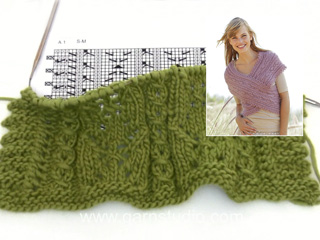
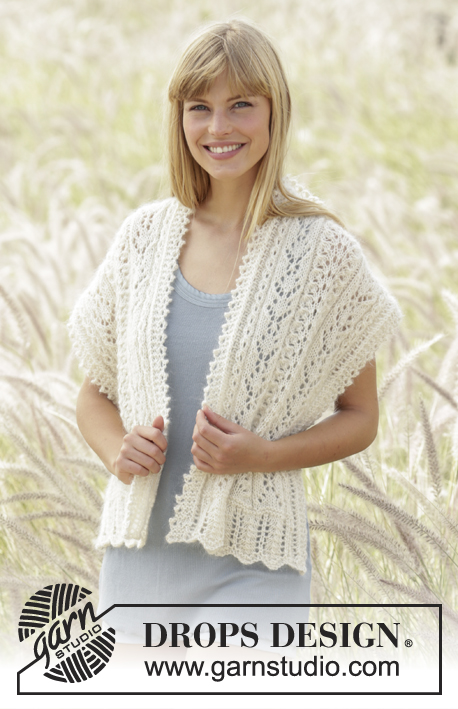
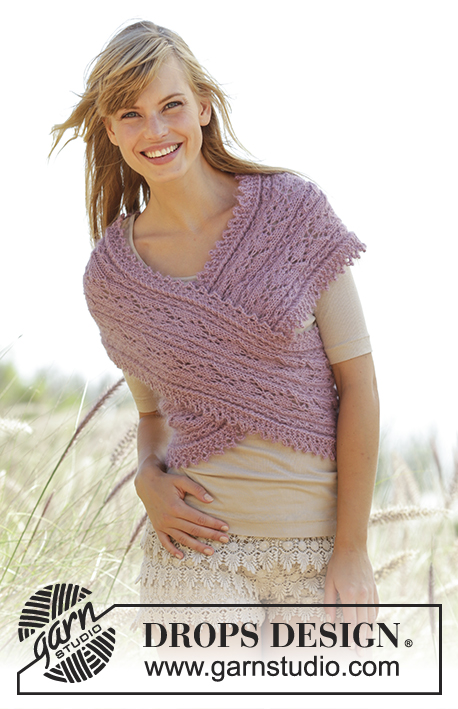
Knitted DROPS shoulder piece with cables, lace pattern and short rows in ”Alpaca” and ”Kid-Silk”. Size: S - XXXL.

DROPS 167-11
DROPS design: Pattern no z-732
Yarn group A + A or C
----------------------------------------------------------
Size: S - M - L - XL - XXL – XXXL
Chest measurements: approx. 88-96-104-114-126-138 cm / 34 5/8''-37¾''-41''-45''-49½''-54¼''

Materials: DROPS ALPACA from Garnstudio
150-150-200-200-200-250 g color no 3720, medium pink
And use: DROPS KID SILK from Garnstudio
75-75-75-75-100-100 g color no 04, medium pink

DROPS STRAIGHT NEEDLES size 5 mm / US 8 - or size needed to get 17 sts x 22 rows in stockinette st = 4'' x 4'' (10 x 10 cm).

-------------------------------------------------------

Alternative Yarn – See how to change yarns here
Yarn Groups A to F – Use the same pattern and change the yarn here
Yarn usage using an alternative yarn – Use our yarn converter here

-------------------------------------------------------

DROPS Alpaca
DROPS Alpaca
100% Alpaca
from 4.85 $ /50g
DROPS Kid-Silk
DROPS Kid-Silk
75% Mohair, 25% Silk
from 6.75 $ /25g
Get the yarn to make this pattern from 34.80$.

The yarn cost is calculated from the pattern’s smallest size and the yarn’s cheapest product type. Looking for an even better price? You might find it on the DROPS Deals!

Pattern instructions

NOTE: This pattern is written in American English. All measurements in charts are in cm. For conversion from inches to cm - click here. There are different terms for crocheting in American and British English. If this pattern includes crochet, click for "crochet terms" here. For this pattern in British English, please click here.
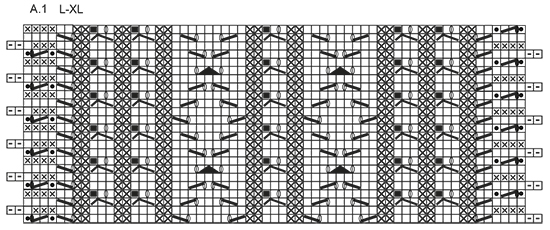
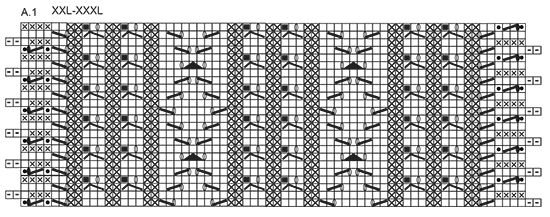
GARTER ST (back and forth):
K all rows. 1 ridge = K2 rows.

PATTERN:
See diagram A.1. The diagram shows all rows in pattern seen from RS. See diagram for size.
----------------------------------------------------------

SHOULDER PIECE:
Worked in two parts that are sewn tog mid back.
Worked back and forth on needle.

RIGHT SIDE: Work from mid back of neck, around the body and finish mid back on back.

Cast on 53-53-63-63-68-68 sts on needle size 5 mm / US 8 with 1 strand Alpaca and 1 strand Kid-Silk (= 2 strands). Work 2 ridges in GARTER ST - see explanation above. Then work according to A.1 - see diagram for size. REMEMBER THE KNITTING GAUGE When piece measures 22-24-26-29-32-35 cm / 8 3/4"-9½"-10 1/4"-11½"-12½"-13 3/4", work short rows as follows from RS - continue pattern as before:
SIZE S-M:
Work until 6 sts remain on row, turn and work back. Work until 8 sts remain on row, turn and work back. Work until 11 sts remain on row, turn and work back. Work until 13 sts remain on row, turn and work back. Work until 22 sts remain on row, turn and work back. Work until 24 sts remain on row, turn and work back. Work until 27 sts remain on row, turn and work back. Work until 29 sts remain on row, turn and work back. Work until 38 sts remain on row, turn and work back. Work until 40 sts remain on row, turn and work back. Work until 43 sts remain on row, turn and work back. Work until 45 sts remain on row, turn and work back. Insert a marker here.
Size L-XL:
Work until 6 sts remain on row, turn and work back. Work until 8 sts remain on row, turn and work back. Work until 11 sts remain on row, turn and work back. Work until 13 sts remain on row, turn and work back. Work until 16 sts remain on row, turn and work back. Work until 18 sts remain on row, turn and work back. Work until 27 sts remain on row, turn and work back. Work until 29 sts remain on row, turn and work back. Work until 32 sts remain on row, turn and work back. Work until 34 sts remain on row, turn and work back. Work until 43 sts remain on row, turn and work back. Work until 45 sts remain on row, turn and work back. Work until 48 sts remain on row, turn and work back. Work until 50 sts remain on row, turn and work back. Work until 53 sts remain on row, turn and work back. Work until 55 sts remain on row, turn and work back. Insert a marker here.
Size XXL-XXXL:
Work until 6 sts remain on row, turn and work back. Work until 8 sts remain on row, turn and work back. Work until 11 sts remain on row, turn and work back. Work until 13 sts remain on row, turn and work back. Work until 16 sts remain on row, turn and work back. Work until 18 sts remain on row, turn and work back. Work until 27 sts remain on row, turn and work back. Work until 29 sts remain on row, turn and work back. Work until 32 sts remain on row, turn and work back. Work until 34 sts remain on row, turn and work back. Work until 37 sts remain on row, turn and work back. Work until 39 sts remain on row, turn and work back. Work until 48 sts remain on row, turn and work back. Work until 50 sts remain on row, turn and work back. Work until 53 sts remain on row, turn and work back. Work until 55 sts remain on row, turn and work back. Work until 58 sts remain on row, turn and work back. Work until 60 sts remain on row, turn and work back. Insert a marker here.

Then work according to A.1 again - continue pattern where short rows ended. Work A.1 for 30-33-36-40-44-48 cm / 11 3/4"-13"-14 1/4"-15 3/4"-17 1/4"-19" from marker, then work short rows the same way as last time. Move marker here and work A.1 for 22-24-26-29-32-35 cm / 8 3/4"-9½"-10 1/4"-11½"-12½"-13 3/4", work 2 ridges and bind off.

LEFT SIDE:
Cast on and work as right side but when working short rows beg from WS.

ASSEMBLY:
Sew tog cast-on edge from right side towards cast-on edge on left side, cross the sides and sew tog bind-off edges. Sew tog shoulder piece mid back (sew approx. 10 cm / 4'') and sew a small stitch mid front.

This pattern has been corrected.

Updated online: 16.02.2016
Correction: Text for symbol 2 and 11 was mixed up.

Diagram

All measurements in charts are in cm.

symbols = K from RS, P from WS
symbols = P from RS, K from WS
symbols = K 2 tog
symbols = slip 1 st as if to K, K 1, psso
symbols = slip 1 st as if to K, K 2 tog, psso
symbols = work 2 sts in 1 st
symbols = 1 YO between 2 sts
symbols = 1 double YO between 2 sts, on next row drop the first YO down, K second YO twisted
symbols = this st has been bound off, skip square
symbols = slip 1 st as if to K, work 2 sts, psso
symbols = bind off 1 st
diagram
diagram
diagram
Do you have a question? See a list of frequently asked questions (FAQ)

Knitting tension is what determines the final measurements of your work, and is usually measured per 10 x 10 cm. It is provided like so: number of stitches in width x number of rows in height - eg: 19 stitches x 26 rows = 10 x 10 cm.

The knitting tension is very individual; some people knit/crochet loosely while others work tightly. You adjust the knitting tension with the needle size, which is why the suggested needle size only serve as a guide! You need to adjust this (up or down) to ensure that YOUR knitting tension matches the knitting tension provided in the pattern. If you work with a different knitting tension than provided you will have a different yarn consumption, and your work will have different measurements than what the pattern suggests.

The knitting tension also determines which yarns can replace each other. As long as you achieve the same knitting tension you can replace one yarn with another.

See DROPS lesson: How to measure your tension/gauge

See DROPS video: How to make a gauge tension swatch

The required amount of yarn is provided in grams, eg: 450 g. To calculate how many balls you’ll need you first need to know how many grams are in 1 ball (25g, 50g or 100g). This information is available if you click on the individual yarn quality on our pages. Divide the amount required with the amount of each ball. For example, if each ball is 50g (the most common amount), the calculation will be as follows: 450 / 50 = 9 balls.

The important thing when changing from one yarn to another is that the knitting/crochet tension remains the same. This is so that the measurements of the finished piece will be the same as on the sketch provided. It is easier to achieve the same knitting tension using yarns from the same yarn group. It is also possible to work with multiple strands of a thinner yarn to achieve the knitting tension of a thicker one. Please try our yarn converter. We recommend you to always work a test swatch.

Please NOTE: when changing yarn the garment might have a different look and feel to the garment in the photo, due to individual properties and qualities of each yarn.

See DROPS lesson: Can I use a different yarn than the one mentioned in the pattern?

All our yarns are categorised into yarn groups (from A to F) according to thickness and knitting tension – group A contains the thinnest yarns and group F the thickest. This makes it easier for you to find alternative yarns to our patterns, should you wish to switch yarn. All yarns within the same group have a similar knitting tension and can easily replace each other. However, different yarn qualities have different structures and properties which will give the finished work a unique look and feel.

Click here for an overview of the yarns in each yarn group

At the top of all our patterns you’ll find a link to our yarn converter, which is a helpful tool should you wish to use a different yarn than suggested. By filling in the yarn quality you wish to replace, the amount (in your size) and number of strands, the converter will present good alternative yarns with the same knitting tension. Additionally it will tell you how much you’ll require in the new qualities and whether you’ll need to work with multiple strands. Most skeins are 50g (some are 25g or 100g).

If the pattern is worked with multiple colours, every colour will have to be converted separately. Similarly, if the pattern is worked with several strands of different yarns (for example 1 strand Alpaca and 1 strand Kid-Silk) you will have to find alternatives for each, individually.

Click here to see our yarn converter

Since different yarns have different qualities and textures we have chosen to keep the original yarn in our patterns. However, you can easily find options among our available qualities by using our yarn converter, or simply pick a yarn from the same yarn group.

It is possible that some retailers still have discontinued yarns in stock, or that someone has a few skeins at home that they would like to find patterns for.

The yarn converter will provide both alternative yarn as well as required amount in the new quality.

If you think it's hard to decide what size to make, it can be a good idea to measure a garment you own already and like the size of. Then you can pick the size by comparing those measures with the ones available in the pattern's size chart.

You'll find the size chart at the bottom of the pattern.

See DROPS lesson: How to read size chart

The needle size provided in the pattern serves only as a guide, the important thing is to follow the knitting tension. And since knitting tension is very individual, you will have to adjust the needle size to ensure that YOUR tension is the same as in the pattern – maybe you’ll have to adjust 1, or even 2 needle sizes, up or down to achieve the correct tension. For this, we recommend that you work test swatches.

Should you work with a different knitting tension than the one provided, the measurements of the finished garment might deviate from the measurement sketch.

See DROPS lesson: How to measure your tension/gauge

See DROPS video: How to make a gauge tension swatch

Working a garment top-down provides more flexibility and room for personal adjustment. For example it is easier to try the garment on while working, as well as making adjustments to length of yoke and shoulder caps.

The instructions are carefully explaining every step, in the correct order. Diagrams are adjusted to the knitting direction and are worked as usual.

The diagram depicts all rows/rounds, and every stitch seen from the right side. It is read from bottom to top, from right to left. 1 square = 1 stitch.

When working back and forth, every other row is worked from the right side and every other row is worked from the wrong side. When working from the wrong side, the diagram will have to be worked reversed: from left to right, knit stitches are purled, purl stitches are knit etc.

When working in the round every round is worked from the right side and the diagram are worked from right to left on all rounds.

See DROPS lesson: How to read knitting diagrams

The diagram depicts all rows/rounds, and every stitch seen from the right side. It is worked from bottom to top, from right to left.

When working back and forth every other row is worked from the right side: from right to left and every other row is worked from the wrong side: from left to right.

When working in the round, every row in the diagram are worked from the right side, from right to left.

When working a circular diagram you start in the middle and work your way outwards, counter clockwise, row by row.

The rows usually start with a given number of chain stitches (equivalent to the height of the following stitch), this will either be depicted in the diagram or explained in the pattern.

See DROPS lesson: How to read crochet diagrams

Instructions for working several diagrams after each other on the same row/round, will often be written like so: “work A.1, A.2, A.3 a total of 0-0-2-3-4 times". This means you work A.1 once, then A.2 is worked once, and A.3 is repeated (in width) the number of times provided for your size – in this case like so: S = 0 times, M = 0 times, L=2 times, XL= 3 times and XXL = 4 times.

The diagrams are worked as usual: begin with the first row in A.1, then work the first row in A.2 etc.

See DROPS lesson: How to read knitting diagrams

See DROPS lesson: How to read crochet diagrams

The total width of the garment (from wrist-to-wrist) will be larger in the larger sizes, despite the actual sleeves being shorter. The larger sizes have longer sleeve caps and wider shoulders, so there will be a good fit in all sizes.

The measurement sketch/schematic drawing provides information regarding the full length of the garment. If it’s a jumper or a jacket the length is measured from the highest point on the shoulder (usually closest to the neckline), and straight down to the bottom of the garment. It is NOT measured from the tip of shoulder. Similarly, the length of yoke is measured from the highest point on the shoulder and down to where yoke is split into body and sleeves.

See DROPS lesson: How to read a schematic drawing

Diagrams are often repeated on the round or in height. 1 repeat is the diagram the way it appears in the pattern. If it says to work 5 repeats of A.1 in the round, then you work A.1 a total of 5 times after/next to each other in the round. If it says to work 2 repeats of A.1 vertically/in height you work the entire diagram once, then begin again at the start and work the entire diagram one more time.

Chain stitches are slightly narrower than other stitches and to avoid working the cast-on edge too tight, we simply chain more stitches to begin with. The stitch count will be adjusted on the following row to fit the pattern and measurement sketch.

The rib edge is more elastic and will contract slightly compared to, for example, stocking stitch. By increasing before the rib edge, you avoid a visible difference in width between the rib edge and the rest of the body.

It’s very easy to cast off too tightly, and by making yarn overs while casting off (and simultaneously casting these off) you avoid a too tight cast off edge.

See DROPS video: How to bind off with yarn overs (yo)

To achieve an even increase (or decrease) you can increase on, for example: every 3rd and 4th row alternately, like so: work 2 rows and increase on the 3rd row, work 3 rows and increase on the 4th. Repeat this until the increase is complete.

See DROPS lesson: Increase or decrease 1 st on every 3rd and 4th row alternately

Should you prefer to work in the round instead of back and forth, you may of course adjust the pattern. You’ll need to add steeks mid-front (usually 5 stitches), and follow the instructions. When you would normally turn and work from the wrong side, simply work across the steek and continue in the round. At the end you’ll cut the piece open, pick up stitches to work bands, and cover the cut edges.

See DROPS video: How to knit steeks and cut open

Should you prefer to work back and forth instead of in the round, you may of course adjust the pattern so you work the pieces separately and then assemble them at the end. Divide the stitches for the body in 2, add 1 edge stitch in each side (for sewing) and work the front and back pieces separately.

See DROPS lesson: Can I adapt a pattern for circular needles into straight needles?

Pattern repeats can vary slightly in the different sizes, in order to get the correct proportions. If you’re not working the exact same size as the garment in the photo, yours might deviate slightly. This has been carefully developed and adjusted so that the complete impression of the garment is the same in all sizes.

Make sure to follow instructions and diagrams for your size!

If you have found a pattern you like which is available in women’s size it’s not very difficult to convert it to men’s size. The biggest difference will be the length of sleeves and body. Start working on the women size that you think would fit across the chest. The additional length will be worked right before you cast off for the armhole/sleeve cap. If the pattern is worked top-down you can add the length right after the armhole or before the first decrease on sleeve.

Regarding additional yarn amount, this will depend on how much length you add, but it is better with a skein too many than too few.

All yarns will have excess fibres (from production) that might come off as lint or shedding. Brushed yarns (ie hairier yarns) have more of these loose, excess fibres, causing more shedding.

Shedding also depends on what is worn under or over the garment, and whether this pulls at the yarn fibres. It’s therefore not possible to guarantee that there will be no shedding

Below are some tips on how to get the best result when working with hairier yarns:

1. When the garment is finished (before you wash it) shake it vigorously so the looser hairs come off. NOTE: do NOT use a lint roller, brush or any method that pulls at the yarn.

2. Place the garment in a plastic bag and put it in your freezer - the temperature will cause the fibres to become less attached to each other, and excess fibres will come off easier.

3. Leave in the freezer for a few hours before taking it out and shaking it again.

4. Wash the garment according to the instructions on the yarn label.

Pilling is a natural process that happens to even the most exclusive of fibers. It's a natural sign of wear and tear that is hard to avoid, and that is most visible in high friction areas of your garment like a sweater's arms and cuffs.

You can make your garment look as new by removing the pilling, using a fabric comb or a pill/lint remover.

Still can't find the answer you need? Then scroll down and leave your question so one of our experts can try to help you. This will be done normally within 5 to 10 working days.
In the meantime, you can read the questions and answers that others have left to this pattern or join the DROPS Workshop on Facebook to get help from fellow knitters/crocheters!

You might also like...

Post a comment to pattern DROPS 167-11

We would love to hear what you have to say about this pattern!

If you want to leave a question, please make sure you select the correct category in the form below, to speed up the answering process. Required fields are marked *.

Comments / Questions (23)

country flag Sabine wrote:

Hallo, Ich verstehe das nicht mit den verkürzten Reihen. In der Anleitung steht bei Größe s-m nach den 30 cm nach den ersten verkürzten Reihen die verkürzten Reihen nochmal stricken. Nach meiner Logik müßte ich das doch in der umgekehrten Reihenfolge machen. Liege ich da richtig? Wenn ich es genauso mache wie beim ersten mal müßte da doch was anderes bei rauskommen oder läßt mich da mein Logik im Stich?

19.10.2022 - 02:19

DROPS Design answered:

Liebe Sabine, die verkürzten Reihen sollen genauso bei jedem Teil sein, bei der rechten Seite stricken Sie sie für den Schulter dann für die Taille, so werden sie beide gleich. Viel Spaß beim stricken!

21.10.2022 - 09:52

country flag Nina Hoffmann wrote:

Leider habe ich das noch nicht so ganz mit dem Garnaustausch verstanden. Benötige ich, wenn ich nicht A+A nehme also beide Garngewichte zusammen, also zum Beispiel für die größte Größe 350g?

18.10.2021 - 16:15

DROPS Design answered:

Liebe Frau Hoffmann, beim Garnalternativen soll man immer die Garnlänge kalkulieren, da Alpaca und Kid-Silk eine unterschiedliche Garnlänge haben, soll man jedes Garn individuel kalkulieren - am besten benutzen Sie unseren Garnumrechner, und hier lesen Sie mehr - Ihr DROPS Laden wird Ihnen auch gerne damit helfen, auch telefonisch oder per E-Mail. Viel Spaß beim stricken!

18.10.2021 - 16:33

country flag Dea wrote:

Buongiorno, la cucitura "Cucire il coprispalle al centro dietro (cucire circa 10 cm) e fare un piccolo punto al centro davanti." come deve essere fatta? Siccome ci sono le punte del bordo laterale, dovrò cucire punta con punta o diversamente? Inoltre per il punto al centro davanti come devo comportarmi? Grazie.

19.10.2020 - 11:04

DROPS Design answered:

Buongiorno Dea. Può cucire come meglio preferisce, in base al risulta che le piace di più. Ugualmente per il davanti, è sufficiente cucire qualche punto dove ritiene meglio, per tenere in posizione le parti che si incrociano. Buon lavoro!

19.10.2020 - 22:13

country flag Dea wrote:

Se facendo un ferro accorciato arrivo alla fine che dovrei fare un gettato e poi girare , questo gettato lo devo fare o evito di farlo? Questo è il dubbio? Non è possibile avere un video che spieghi questi passaggi? Grazie.

10.10.2020 - 15:56

DROPS Design answered:

Buongiorno Dea, inoltreremo la sua richiesta al settore design e video. Buon lavoro!

12.10.2020 - 10:19

country flag Dea wrote:

Quale metodo è meglio scegliere nel fare i ferri accorciati? Tenendo presente che nella lavorazione sono presenti anche delle gettate e potrebbero capitare nel punto in cui si gira il lavoro, come bisogna comportarsi? Grazie.

10.10.2020 - 15:48

DROPS Design answered:

Buongiorno Dea, solitamente nei nostri modelli non è indicato un metodo per la lavorazione dei ferri accorciati, semplicemente si gira il lavoro e si prosegue tornando indietro tirando leggermente il filo per non creare buchi. Buon lavoro!

12.10.2020 - 10:18

country flag Dea wrote:

Buonasera, la costruzione prevede diagramma A1 normale, poi ferri accorciati su A1, poi A1 normale , poi ferri accorciati su A1 e poi A1 normale? Grazie.

02.10.2020 - 22:10

DROPS Design answered:

Buonasera Dea. Sì, è corretto come ha indicato. Buon lavoro!

02.10.2020 - 23:03

country flag Adria Vitelli wrote:

Ma devo saltare le prime 4?.. Perché, ad esempio, continuando con il diagramma a1 su ferri accorciati, eseguendo il primo ferro( lasciate non lavorate 6 mg finali),quando poi vado ad eseguire il secondo ferro, si sfalza il motivo e non combaciano più le maglie ...

19.09.2019 - 15:24

DROPS Design answered:

Buongiorno Adria. Sul ferro di ritorno non deve iniziare il diagramma dal primo quadratino, ma dal quadratino che corrisponde all’ultima maglia lavorata sul ferro precedente, in modo che il motivo combaci. Buon lavoro!

19.09.2019 - 17:16

country flag Adria Vitelli wrote:

Buongiorno, ho lavorato il diagramma A1 per 22cm (tg S) ma ora non riesco a capire come devo proseguire. Dovrei continuare a lavorare A1 ma su ferri accorciati?...non riesco a capire come continuare con il motivo A1 e contemporaneamente lavorare a ferri accorciati. Ringrazio per qualsiasi aiuto.

19.09.2019 - 11:17

DROPS Design answered:

Buongiorno Adria. Quando lavora i ferri accorciati, sulle maglie che lavora prosegue con il diagramma in modo che il motivo continui correttamente . Gira il lavoro quando sui ferri rimane il numero di maglie che non deve lavorare (la prima volta 6 m, la seconda 8 maglie e così via). Buon lavoro!

19.09.2019 - 12:02

country flag Giulia Stevanato wrote:

Salve volevo sapere se si può acquistare la maglia già finita

20.05.2019 - 14:55

DROPS Design answered:

Buongiorno Giulia, purtroppo non vendiamo i capi finiti, ma può rivolgersi a un rivenditore DROPS, che sicuramente avrà delle magliaie disposte a confezionare il capo su commissione. Buon lavoro!

20.05.2019 - 15:48

country flag Bettina wrote:

Liebes DROPS-Team, gibt es eine Möglichkeit, das Diagramm für dieses wunderschöne Modell in höherer Auflösung zu downloaden bzw auszudrucken? Im Video ist es viel besser sichtbar als beim Ausdrucken der Anleitung... Vielen Dank!!!

31.07.2018 - 08:46

DROPS Design answered:

Liebe Bettina, es gibt nur dieses Diagram, aber gerne können Sie es beim drücken oder kopieren vergrößern. Viel Spaß beim stricken!

31.07.2018 - 10:02