
Popular categories
Looking for a yarn?


|
||||||||||
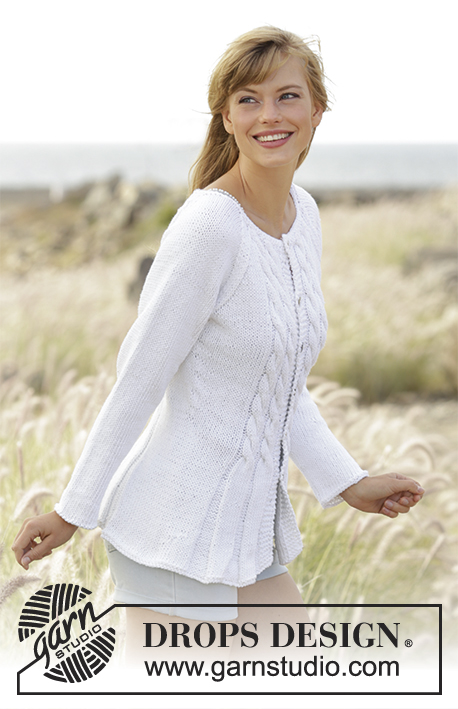
Romantic Twist |
||||||||||
 |
 |
|||||||||
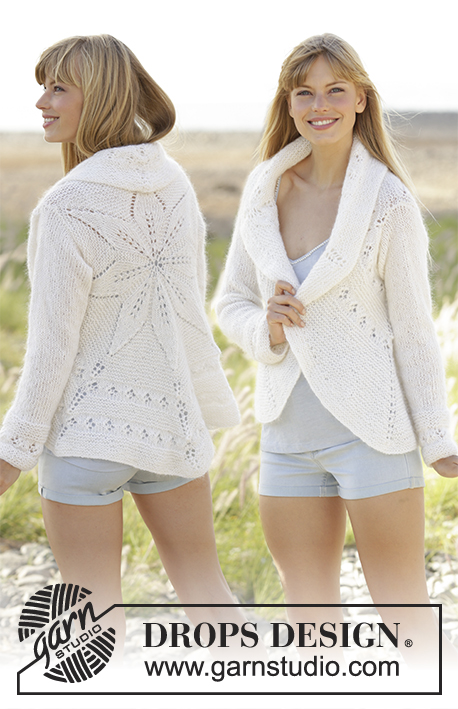
Knitted DROPS fitted jacket with cables and raglan in ”Paris”. Size: S - XXXL.
DROPS 169-1 |
||||||||||
|
GARTER ST (back and forth): K all rows. 1 ridge = K2 rows. GARTER ST (worked in the round): 1 ridge = 2 rounds. * K 1 round and P 1 round *, repeat from *-*. DECREASE TIP: Dec 1 st by P 2 tog. Dec alternately at beg and end of P section. PATTERN: See diagram A.1. The diagram show all rows in pattern seen from RS. RAGLAN: Dec 2 sts in every transition between body and sleeves. Dec as follows from RS: K 2 tog, K 2 (marker is between these sts), slip 1 st as if to K, K 1, psso. Dec as follows from WS: P 2 twisted tog, P 2 (marker is between these sts), P 2 tog. KNITTING TIP: If knitting gauge is incorrect in height and the knitting is too tight, the raglan dec will be too short and the armholes too small. This can be adjusted by working 1 extra row without dec evenly spaced between dec. BUTTONHOLES: Dec for buttonholes on right band. 1 buttonhole = K tog 2nd and 3rd st from mid front, then make 1 YO. Dec for buttonholes when piece measures: SIZE S: 19, 26, 33, 40, 47 and 54 cm / 7½", 10 1/4", 13, 15 3/4", 18 ½", 21 1/4" SIZE M: 19, 26, 33, 40, 48 and 56 cm / 7½", 10 1/4", 13, 15 3/4", 19", 22''. SIZE L: 19, 26, 34, 42, 50 and 58 cm / 7½", 10 1/4", 13½", 16½", 19 3/4", 22 3/4". SIZE XL: 19, 28, 36, 44, 52 and 60 cm / 7½", 11", 14 1/4", 17 1/4", 20½", 23½". SIZE XXL: 19, 26, 33, 40, 47, 54 and 62 cm / 7½", 10 1/4", 13, 15 3/4", 18 ½", 21 1/4", 24½" SIZE XXXL: 19, 26, 33, 40, 48, 56 and 64 cm / 7½", 10 1/4", 13, 15 3/4", 19", 22'', 25 1/4". ---------------------------------------------------------- BODY: Worked back and forth on circular needle from mid front. Cast on 216-228-240-266-286-306 sts (includes 5 band sts in each side towards mid front) on circular needle size 5 mm / US 8 with Paris. Work 1 ridge in GARTER ST - see explanation above, then work as follows - from RS: 5 sts in garter st, * P 8, K 8 *, repeat from *-* 2 times in total, P 8, 27-33-39-44-54-64 sts in stockinette st, * P 8, K 8 *, repeat from *-* 4-4-4-5-5-5 times in total, P 8, 27-33-39-44-54-64 sts in stockinette st, * P 8, K 8 *, repeat from *-* 2 times in total, P 8, 5 sts in garter st. Repeat this pattern upwards. REMEMBER THE KNITTING GAUGE When piece measures 5 cm / 2'', dec 1 sts in all P-sections (= 11-11-11-12-12-12 dec per dec round) - READ DECREASE TIP. Repeat dec every 3 cm / 1'' 5 more times = 150-162-174-194-214-234 sts. Dec for BUTTONHOLES on right band - see explanation above. When piece measures 21 cm / 8 1/4'', work as follows: 5 sts in garter st, A.1 2 times, P 2, stockinette st over the next 27-33-39-44-54-64 sts, A.1 4-4-4-5-5-5 times, P 2, stockinette st over the next 27-33-39-44-54-64 sts, A.1 2 times, P 2, 5 sts in garter st. Insert 2 markers in the piece; 40-43-46-51-56-61 sts in from each side (back piece = 70-76-82-92-102-112 sts). When piece measures 23 cm / 9'', inc 1 st on each side of each marker (= 4 sts inc), repeat inc every 2½-3-3-3½-3½-4 cm / 7/8"-1 1/8"-1 1/8"-1 1/4"-1 1/4"-1½" 5 more times = 174-186-198-218-238-258 sts. When piece measures 40-41-42-43-44-45 cm / 15¾''-16 1/8''-16½''-17''-17¼''-17¾'', work next row (from RS) as follows: Work 43-46-49-54-59-64 sts, bind off the next 6 sts, work 76-82-88-98-108-118 sts, bind off the next 6 sts and work the remaining 43-46-49-54-59-64 sts. Put piece aside and knit the sleeves. SLEEVE: Worked in the round on double pointed needles. Cast on 32-34-36-38-40-42 sts on double pointed needles size 5 mm / US 8 with Paris. Work 1 ridge, then work in stockinette st. Insert 1 marker at beg of round (= mid under sleeve). When piece measures 8 cm / 3 1/8'', inc 2 sts mid under sleeve. Inc every 3-2½-2½-2½-2-2 cm / 1 1/8"-7/8"-7/8"-7/8"-3/4"-3/4" 13-13-14-15-16-16 more times = 60-62-66-70-74-76 sts. When piece measures 49-48-48-47-46-46 cm / 19 1/4"-19"-19"-18½"-18"-18" (shorter measurements in the larger sizes because of longer sleeve cap), bind off 6 sts mid under sleeve = 54-56-60-64-68-70 sts. Put piece aside and make another sleeve. YOKE: Slip sleeves on to same circular needle as body where armholes were bound off = 270-286-306-334-362-386 sts. Insert a marker in all transitions between sleeves and body piece. Continue pattern as before AT THE SAME TIME dec for RAGLAN – see explanation above. Dec differently on body and sleeve. RAGLAN SLEEVE: Dec every other row 16-17-17-18-18-19 times, then every row 4-4-6-7-9-9 times (= 20-21-23-25-27-28 times in total). RAGLAN BODY: Dec every 4th row 4-2-0-0-0-0 times, every other row 11-16-19-21-19-16 times, then every row 0-0-2-0-7-15 times (= 15-18-21-21-26-31 times in total). After all dec are done, 130-130-130-150-150-150 sts remain on needle. On next row dec 2 sts over every cable in A.1 = 114-114-114-132-132-132 sts. Work 2 ridges over all sts, on first row dec 20-16-12-26-22-18 sts evenly = 94-98-102-106-110-114 sts. Bind off. ASSEMBLY: Sew the opening mid under the sleeves. Sew the buttons on to the left band. |
||||||||||
Diagram explanations |
||||||||||
|
||||||||||

|
||||||||||
|
Have you made this or any other of our designs? Tag your pictures in social media with #dropsdesign so we can see them! Do you need help with this pattern?You'll find tutorial videos, a Comments/Questions area and more by visiting the pattern on garnstudio.com. © 1982-2024 DROPS Design A/S. We reserve all rights. This document, including all its sub-sections, has copyrights. Read more about what you can do with our patterns at the bottom of each pattern on our site. |
||||||||||


With over 40 years in knitting and crochet design, DROPS Design offers one of the most extensive collections of free patterns on the internet - translated to 17 languages. As of today we count 304 catalogs and 11422 patterns - 11417 of which are translated into English (US/in).
We work hard to bring you the best knitting and crochet have to offer, inspiration and advice as well as great quality yarns at incredible prices! Would you like to use our patterns for other than personal use? You can read what you are allowed to do in the Copyright text at the bottom of all our patterns. Happy crafting!
Comments / Questions (155)
Re - Sleeve....when piece measures 48 cm ( size large) the pattern says... cast off 6 stitches mid under sleeve which leaves 60 stitches.. I have placed markers all the way up the sleeve, therefore should I decrease 3 stitches either side of the last marker? The video is not working. Thankyou
02.04.2024 - 00:10DROPS Design answered:
Hi Marilyn, Yes you cast off 3 stitches on each side of the marker. Happy knitting!
02.04.2024 - 06:38Can you please let me know how often the cable is done? i cannot see it in the pattern. I am making size L. I do however note that on 16/06/21 you answered Jenny's question - every 8th row. Have I interpreted that correctly? Looking at the picture of the cardigan it looks like in total there are 11 cables to the neckline. Please could you confirm. Sorry for the many questions. I love this pattern and really want to be able to complete it. Thanks in advance
23.01.2024 - 14:54DROPS Design answered:
Dear Mrs Growsn, cables are worked on every 8th row as follows in A.1: Row 1 with cable, Row 2 til 8 without cable, repeat these 8 rows. Happy knitting!
24.01.2024 - 08:14I posted 7/01/24 re the 11 decreases for size L. Decrease at the beginning of first Purl section and decrease at the end of the next purl section. Julia's question on 29/04/17 says in one row you do all decreases at the beginning of each P section and in the second decrease row you do them at the end of each P section. This contradicts what I have done and is concerning me that I have done this incorrectly. Please can you clarify. Thanks in advance
23.01.2024 - 14:35DROPS Design answered:
Dear Mrs Growns, you should decrease 11 stitches on every decrease row = 1 stitch in each of the P-sections and work these decreases a total of 5 times. the first time you will decrease at the beg of every P-section, the 2nd time at the end of every P-section and continue like this decreasing alternately one time at the beg of every P-section and next time at the end of every P-section. Happy knitting!
24.01.2024 - 08:10Thanks for answering my question. However, what I am confused with is 'When piece measures 5 cm, dec 1 sts in all P-sections (= 11-11-11-12-12-12 dec per dec round)' Read decrease tip which is ' Dec 1 st by P 2 tog. Dec alternately at beg and end of P section'. From 8 stitches it would mean each purl section decreases to 6 which would make the calculation wrong. What does it mean - alternately? I am just totally confused. :(
05.01.2024 - 22:50DROPS Design answered:
Dear Marilyn, you decrease by purling 2 together in each section once. However, in each purl section you will decrease either at the beginning or the end of the section (alternately means every other or on alternate sections). For example, in the first section you purl together the first 2 stitches, in the second section you purl together the last 2 stitches, in the third section you purl together the first 2 stitches, e.t.c. Happy knitting!
07.01.2024 - 23:34When the body measure 5cm, should the decrease start from the RS?
03.01.2024 - 22:39DROPS Design answered:
Hi Marilyn, Yes, the decreases are from the right side. Happy knitting!
04.01.2024 - 07:42Drops pattern 169-1 Can you explain please on the BODY when following instructions for the first row after 1 ridge of garter stitch....do I reverse all stitches when doing row 2 ( except the first 5 garter stitches which is the band)
27.12.2023 - 23:00DROPS Design answered:
Dear Marilyn, as explained in GARTER ST (back and forth): 1 ridge = 2 knit rows. So you knit from the right side and the wrong side. Then, start working as indicated on the next row from the right side. Happy knitting!
29.12.2023 - 00:15A woman is selling this pattern on Etsy. I can't send you the link but the seller's name is ThistleandTwigCrafts
23.03.2023 - 09:10Jak mám převést rukávy a trup na jednu kruhovou jehličí, aby se dalo dobře pokračovat. děkuji
25.07.2022 - 20:52DROPS Design answered:
Dobrý den, Věro, rukávy připletete k trupu v místech, kde jsou uzavřená oka pro průramky, takto: upletete přední díl, v místě průramku připletete na stejnou kruhovou jehlici jeden odložený rukáv, pak upleteze zadní díl, druhý rukáv a druhý přední díl. Podívejte se na tuto video-ukázku , kde je postup hezky vidět. Hodně zdaru! Hana
26.07.2022 - 05:26Hej Jeg er ved at lave str. M og er kommet til der hvor man laver raglan. Men forstår ikke helt hvordan det skal gøres, er med på det med hvornår, men bare ikke helt hvordan. På retsiden skal jeg så strikke raglan når jeg kommer til mærket ved ærmet eller er det først ved sidste mærke for ærmet? Tusind tak for hjælpen
08.05.2022 - 14:26DROPS Design answered:
Hei Maja. Fra retten strikk til det gjenstår 3 masker før 1. merke , strikk 2 masker rett sammen, strikk 2 masker rett (merketråden sitter mellom disse maskene), ta 1 maske løs av pinnen som om den skulle strikkes rett, 1 rett, løft den løse masken over. Du har nå felt 1 maske på hver side av 1. merketråd. Når du kommer til de andre merketrådene gjør du det samme. Når du skal felle fra vrangen strikker du til det gjenstår 3 masker før 4. merketråd, deretter strikkes det 2 masker vridd vrang sammen, 2 m vrang (merketråden sitter mellom disse maskene), 2 masker vrang sammen, Gjenta ved de 3 andre merketrådene. mvh DROPS Design
09.05.2022 - 13:06Opskrift 169-1. Han nu strikket 10 cm og omkreds er 150 cm!!!!! Jeg strikker i str. small, slog op til str large, den nåede rundt om mig to en halv gang. Jeg er på garnnøgle 2, har købt 15, men er bange for at jeg kommer til at drukne i den jakke Er I helt sikker på at opskriften er rigtig.
29.04.2022 - 15:36DROPS Design answered:
Hei Bente. Pga vrangmaskene foran og bak, bil plagget trekke seg sammen, Men det er viktig å overholde strikkefastheten som er oppgitt i oppskriften. Omkretsen nederst på jakken skal i str. S være 118 cm og i str. L 132 cm. mvh DROPS Design
02.05.2022 - 11:45