
Popular categories
Looking for a yarn?


|
||||||||||||||||||||||
Mer Bleue |
||||||||||||||||||||||
|
|
||||||||||||||||||||||
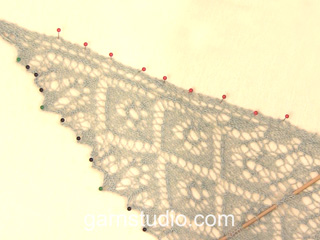
Knitted DROPS shawl with stripes and wave pattern in ”Fabel”.
DROPS 168-5 |
||||||||||||||||||||||
|
GARTER ST (back and forth): K all rows. 1 ridge = K2 rows. PATTERN: See diagrams A.1 to A.4. The diagrams show all rows in pattern seen from RS. MID ST: Work mid st in stockinette st on all rows with stockinette st in diagram, but on rows in diagram that are worked K from WS work mid st also like this. STRIPES: * 4 rows shoreline, 2 rows off white, 10 rows shoreline, 2 rows off white *, repeat from *-*. TIP FOR CHANGING YARN: When 1 ridge off white has been worked, cut and fasten the yarn. The strand in shoreline can follows upwards but make sure to avoid a tight strand. The fastening of the strand must not be tight either. ---------------------------------------------------------- SHAWL: The shawl is worked back and forth on circular needle to make room for all the sts. Worked from neckline mid back and down. Cast on 7 sts on circular needle size 4 mm / US 6 with shoreline. Insert 1 marker in the 4th st (= mid st) and move it upwards when working. Work diagram A.1 as follows: Work 2 edge sts in GARTER ST - see explanation above, A.1 over 1 st, 1 st in stockinette st (= mid st), A.1 over 1 st and 2 edge sts in garter st = 11 sts. Continue with A.1 on each side of mid st (work mid st in stockinette st in entire A.1), when diagram has been worked, 1 time vertically, there are 43 sts on row (i.e. 21 sts on each side of mid st). REMEMBER THE KNITTING GAUGE Then work STRIPES – see explanation above and pattern as follows: NOTE: READ TIP FOR CHANGING YARN! Work according to diagram A.2-A.4 as follows: 2 edge sts in garter st, A.2 over 1 st, A.3 over 17 sts, A.4 over 1 st, K 1 (= MID ST - see explanation above), A.2 over 1 st, A.3 over 17 sts, A.4 over 1 st and 2 edge sts in garter st. When diagrams have been worked 1 time vertically, there are 111 sts on needle (i.e. there are 55 sts on each side of mid st) and there is now room for 1 more repetition of A.3 on each side of A.3 on each side of shawl. Continue to work according to A.2-A.4 until diagrams have been worked 6 times in total vertically = 451 sts. Then work the first 6 rows in A.2-A.4. The stripes are now done, and continue in off white until finished measurements. Continue with the remaining 12 rows in diagram. Then work A.2-A.4 1 more time vertically. There are now 587 sts on needle (i.e. 293 sts on each side of mid st). Loosely bind off as follows with off white: * bind off 3 sts, 1 YO, bind off YO *, repeat from *-* the rest of row. SHAPING: Place the piece in lukewarm water until it is soaking wet. Carefully squeeze out the water - do not twist. Then roll the piece in a towel and squeeze to remove more water - the piece will now only be moist. Place the piece on a carpet or mattress - carefully stretch it out to measurements found at the top of pattern. Leave to dry. Repeat the process when the garment has been washed. |
||||||||||||||||||||||
Diagram explanations |
||||||||||||||||||||||
|
||||||||||||||||||||||

|
||||||||||||||||||||||
|
Have you made this or any other of our designs? Tag your pictures in social media with #dropsdesign so we can see them! Do you need help with this pattern?You'll find tutorial videos, a Comments/Questions area and more by visiting the pattern on garnstudio.com. © 1982-2024 DROPS Design A/S. We reserve all rights. This document, including all its sub-sections, has copyrights. Read more about what you can do with our patterns at the bottom of each pattern on our site. |
||||||||||||||||||||||


With over 40 years in knitting and crochet design, DROPS Design offers one of the most extensive collections of free patterns on the internet - translated to 17 languages. As of today we count 304 catalogs and 11422 patterns - 11417 of which are translated into English (US/in).
We work hard to bring you the best knitting and crochet have to offer, inspiration and advice as well as great quality yarns at incredible prices! Would you like to use our patterns for other than personal use? You can read what you are allowed to do in the Copyright text at the bottom of all our patterns. Happy crafting!
Comments / Questions (19)
Buongiorno, Vorrei un chiarimento sullo schema A2, A3, A4. Dopo la prima ripetizione c'è sufficiente numero di maglie per ripetere 2 volte A3 la seconda volta, 3 volte la terza volta, ecc... ma il numero dei gettati di A2 e A4 rimane invariato: in questo modo però, visto che invece il numero delle diminuzioni raddoppia, triplica, ecc... il modello non si restringe invece di allargarsi? Per il resto è spiegato perfettamente, grazie!
16.07.2023 - 04:20DROPS Design answered:
Buonasera Luciana, A.3 è un diagramma che inizia e finisce con lo stesso numero di maglie, anche se durante la ripetizione il numero delle maglie varia, per cui gli aumenti sono solo su A.2 e A.4. Buon lavoro!
20.07.2023 - 21:04Concernant les jetés doubles, ne faut-il pas inverser pour une parfaite symétrie ? Je lâche le 1er et je tricote le 2nd -Maille Centrale- je tricote le 1er et je lâche le second
16.06.2023 - 20:44DROPS Design answered:
Bonjour Mme Aquilina, vous pouvez si vous le souhaitez, mais le résultat est censé être exatement le même: on fait 2 jetés pour avoir un plus grand trou, que l'on tricote le 1er ou le 2ème en lâchant le 2ème ou le 1er, vous aurez simplement un plus grand trou. Bon tricot!
19.06.2023 - 09:57Bonjour, j'ai acheté la quantité de laine demandé dans l'explication. DROP FABEL de Granstudio 150 g coloris n° 914 littoral 100 g coloris n° 100 naturel NOTE: pour un chale uni 185 g Fabel Déjà il y a une différence entre le chale rayé 250 g et uni 185 g. Je viens de finir les raynures et il me reste une pelote de littoral. Merci
27.02.2021 - 18:36Hallo ich verstehe nicht, wie man nach A.1 auf 43M kommt. .lt Foto sind recht schnell und links der MM auch Umschläge, die ich aber in der Anleitung nicht finde. Auch verstehe ich nicht, wie der breite Rand entsteht. Für eine Antwort wäre ich sehr dankbar.... Vielen Dank für Eure Hilfe.
29.01.2020 - 10:59DROPS Design answered:
Liebe Damaris, wenn A.1 fertig ist sind es 19 Maschen, dh die Maschen liegen so auf der Nadel: 2 M kraus re, 19 M von A.1, 1 Masche glatt recht, 19 M von A.1, 1 Masche glatt recht, 2 Maschen Kraus re = 2+19+1+19+2= 43 M. Viel Spaß beim stricken!
29.01.2020 - 13:51Hei. Skjønner ikke helt hvordan jeg skal felle av dette sjalet. Felle 3 masker er greit, men kast også felle kastet. Hvordan gjør jeg det?
28.05.2019 - 19:39DROPS Design answered:
Hei Tove. Du lager et kast hver 3. maske, og feller dette av på akkurat samme måte som en vanlig maske. Her er en video av hvordan dette gjøres: god fornøyelse
29.05.2019 - 14:34Hallo, wo muss ich jeweils einen Farbwechsel einarbeiten?
27.04.2019 - 10:17DROPS Design answered:
Liebe Renate, Farbwechsel entsteht am Anfang einer Hinreihen. Sie können auch die Farbe nach den 2 ersten Maschen kraus rechts - siehe Video. Viel Spaß beim stricken!
29.04.2019 - 08:44Bonjour bonne année merci pour ce merveilleux modele 168 5 pourquoi ne puis je imprimer merci. Fa
04.01.2019 - 16:46DROPS Design answered:
Bonjour Mme Martinelli, nous avons réussi un test d'impression de ce modèle, vérifiez bien les paramètres de votre imprimante - si ça ne fonctionne toujours pas, nettoyez le cache de votre navigateur et essayez à nouveau. Bon tricot!
07.01.2019 - 08:17Buongiorno! Mi spiegate cosa significa una gettata doppia tra due maglie? Guardando ii diagramma vedo il simbolo della gettata doppia,quindi un diritto e di nuovo una gettata doppia.... Grazie Loredana
11.05.2017 - 09:49DROPS Design answered:
Buongiorno Loredana. Nel video sotto trova spiegato come lavorare una maglia gettata doppia. Buon lavoro!
11.05.2017 - 10:12Un grand Merci pour l'explication je comprends mieux le diagramme . A très bientôt.
04.09.2016 - 15:24Bonjour, Je ne comprend pas la deuxieme partie du diagrame avec les 55m de chaque coté de l'ouvrage jai bien le nombre de maille 55m . Pourriez vous l'expliquer en video ?
02.09.2016 - 15:11DROPS Design answered:
Bonjour Mme Rous, quand vous avez tricoté 1 fois les diagrammes en hauteur, vous avez suffisamment de mailles pour tricoter 1 fois de plus le diagramme A.3 de chaque côté des diagrammes A.3 précédents, c'est-à-dire répétez les diagrammes en hauteur la 2ème fois ainsi: 2 m point mousse, A.2, 3 x A.3, A.4, 1 m end, A.2, 3xA.3, A.4 et 2 m point mousse (=111 m au 1er rang). La 3ème fois, tricotez 5 fois A.3 et ainsi de suite. Bon tricot!
02.09.2016 - 15:49