DROPS Karisma
DROPS Karisma
100% Wool
from 2.30 £ /50g
Get the yarn to make this pattern from 29.90£.

The yarn cost is calculated from the pattern’s smallest size and the yarn’s cheapest product type. Looking for an even better price? You might find it on the DROPS Deals!

DROPS Super Sale

Ólafur

Men's knitted jumper in DROPS Karisma or DROPS Merino Extra Fine, with raglan and Norwegian pattern. Worked top down. Size: S - XXXL.

DROPS Extra 0-1146
DROPS design: Pattern no u-756
Yarn group B
----------------------------------------------------------
Size: S - M - L - XL - XXL - XXXL
Materials:
DROPS KARISMA from Garnstudio
350-400-450-500-550-600 g colour no 37, dark grey blue
150-150-200-200-200-250 g colour no 01, off white
100-100-100-100-100-150 g colour no 70, light blue grey
50-50-50-50-50-50 g colour no 48, wine red

Or use:
DROPS MERINO EXTRA FINE from Garnstudio
350-400-450-500-550-600 g colour no 20, dark blue
150-150-200-200-200-250 g colour no 01, off white
100-100-100-100-100-150 g colour no 15, light greyish green
50-50-50-50-50-50 g colour no 11, red

DROPS DOUBLE POINTED NEEDLES AND CIRCULAR NEEDLE (40 and 80 cm) SIZE 4 mm - or size needed to get 21 sts x 28 rows in stocking st = 10 x 10 cm.
DROPS DOUBLE POINTED NEEDLES and CIRCULAR NEEDLE (40 and 80 cm) SIZE 3 mm - for rib.

-------------------------------------------------------

Alternative Yarn – See how to change yarns here
Yarn Groups A to F – Use the same pattern and change the yarn here
Yarn usage using an alternative yarn – Use our yarn converter here

-------------------------------------------------------

DROPS Karisma
DROPS Karisma
100% Wool
from 2.30 £ /50g
Get the yarn to make this pattern from 29.90£.

The yarn cost is calculated from the pattern’s smallest size and the yarn’s cheapest product type. Looking for an even better price? You might find it on the DROPS Deals!

DROPS Super Sale

SAVE 30% on 6 cotton favourites!
Valid until 12.04.2024

Pattern instructions

NOTE: This pattern is written in British English. All measurements in charts are in cm. For conversion from cm to inches - click here. There are different terms for crocheting in British and American English. If this pattern includes crochet, click for "crochet terms" here. For this pattern in American English, please click here.
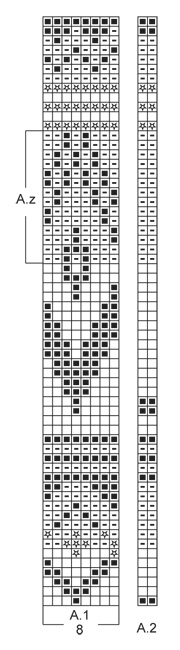
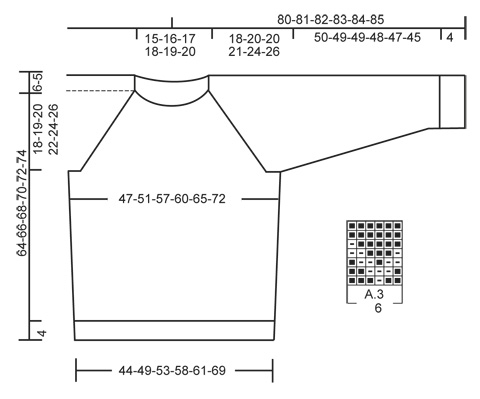
See diagrams A.1 to A.3. The diagrams are worked in stocking st.

INCREASE TIP:
Increase with YO, knit YO twisted over on next round to avoid holes.

DECREASE TIP:
Dec 1 st before marker as follows: Work until 2 sts remain before marker, slip 1 st as if to K, K 1, psso.
Dec 1 st after marker as follows: K 2 tog.
----------------------------------------------------------

JUMPER:
Worked in the round on circular needle, top down. Cast on 86-90-94-100-104-108 sts on circular needle size 3 mm with off white. K 1 round. Switch to dark grey blue Karisma / dark blue Merino Extra Fine. Then work in stocking st. Switch to off white and circular needle size 4 mm when piece measures 6 cm. Work 1 round in stocking st.

On next round, inc 26-30-34-34-44-52 sts evenly = 112-120-128-134-148-160 sts. On next round work as follows from mid back: K 16-18-18-19-24-27, insert 1st marker, K 2, insert 2nd marker, K 16-16-20-21-19-19, insert 3rd marker, K 2 (= sleeve), insert 4th marker, K 39-43-43-45-53-59, insert 5th marker (= front piece), K 2, insert 6th marker, K 16-16-20-21-19-19, insert 7th marker, K 2 (= sleeve), insert 8th marker, K 17-19-19-20-25-28.

READ ALL OF THE FOLLOWING SECTION BEFORE CONTINUING!
Work an elevation at the back of neck from mid back AT THE SAME TIME inc for raglan.
ELEVATION:
K 8 sts past marker, turn, tighten yarn and P 16 sts back, turn, tighten yarn and K 24 sts, turn, continue to work 8 sts more in stocking st for every turn until a total of 80 sts have been worked after last turn.
RAGLAN:
Inc for raglan on every row from RS as follows: Inc 1 st before 1st and 7th marker and 1 st after 2nd and 8th marker. There are 6-6-6-6-4-4 sts inc in total on back piece and 3-3-3-2-2-2 sts on each sleeve.
When elevation has been worked, there are 124-132-140-144-156-168 sts on needle. Fasten off. Now work in the round from 1st marker.

Work next round as follows: (1st marker), K 2 (2nd marker), K 19-19-23-23-21-21, (3rd marker), K 2, (= sleeve), (4th marker), K 39-43-43-45-53-59 (= front piece), (5th marker), K 2, (6th marker), K 19-19-23-23-21-21, (7th marker), K 2, (8th marker) (= sleeve), K 39-43-43-45-53-59 (= back piece).

On next round beg inc for raglan. NOTE: Inc differently on body and sleeves. REMEMBER THE KNITTING TENSION

RAGLAN BODY:
Inc before 1st and 5th marker and after 4th and 8th marker as follows - READ INCREASE TIP: Inc every round 4-8-12-10-8-10 times, then every other round 13-11-11-12-14-13 times. There are 73-81-89-89-97-105 sts on front and back piece.

RAGLAN SLEEVE:
Inc after 2nd and 6th marker and before 3rd and 7th marker as follows: Inc every other round 15-15-17-17-18-18 times in total = 53-53-61-61-61-61 sts on each sleeve.

After inc for raglan, there are 252-268-300-300-316-332 sts in total. Then work pattern as follows: A.2 (= 2 sts), A.1 (= 8 sts) 6-6-7-7-7-7 times in total, work first st in A.1 (to make it the same in both sides), A.2, A.1 9-10-11-11-12-13 times in total, work first st in A.1, A.2, A.1 6-6-7-7-7-7 times in total, work first st in A.1, A.2, A.1 9-10-11-11-12-13 times in total, work first st in A.1. Continue with pattern like this AT THE SAME TIME continue to inc for raglan as follows:

RAGLAN:
NOTE: Inc differently on body and sleeves. Work the inc sts in the pattern A.1.
RAGLAN BODY:
Inc before 1st and 5th marker and after 4th and 8th marker as follows:
Inc every other round 8-6-11-14-15-18 times, then every 4th round 1-3-0-0-0-0 times. There are 91-99-111-117-127-141 sts on front and back piece.
RAGLAN SLEEVE:
Inc after 2nd and 6th marker and before 3rd and 7th marker as follows:
Inc every other round 0-0-0-0-1-2 times, every 4th round 5-6-1-1-7-8 times and every 6th round 0-0-3-4-0-0 times. There are 63-65-69-71-77-81 sts for each sleeve.

When all inc are done there are 308-328-360-376-408-444 sts on needle. Continue with pattern as before. Work next round as follows: Slip the first 63-65-69-71-77-81 sts on a stitch holder for sleeve, cast on 8-8-8-10-10-10 sts under sleeve (insert a marker in the middle of the new sts), work 91-99-111-117-127-141 sts, slip the next 63-65-69-71-77-81 sts on a stitch holder for sleeve, cast on 8-8-8-10-10-10 sts under sleeve (insert a marker in the middle of the new sts), work 91-99-111-117-127-141 sts = 198-214-238-254-274-302 sts. Work the 8-8-8-10-10-10 new sts under each sleeve in pattern, i.e. pattern is reversed at the markers in the side. NOW MEASURE PIECE FROM HERE!

BODY:
Continue with A.1 until it has been worked 1 time vertically, then continue piece with dark grey blue Karisma / dark blue Merino Extra Fine. When piece measures 4 cm, dec 1 st on each side of markers in the side - READ DECREASE TIP (= 4 sts dec). Repeat dec every 14-30-10-14-10-14 cm 2-1-3-2-3-2 more times = 186-206-222-242-258-290 sts. When piece measures 39-40-41-41-41-41 cm (approx. 7 cm remain in total on body), K 1 round while AT THE SAME TIME dec 0-2-0-2-0-2 sts evenly = 186-204-222-240-258-288 sts. Then work A.3 (= 6 sts) 31-34-37-40-43-48 times in total in width. When A.3 has been worked 1 time vertically, continue with dark grey blue / dark blue Merino Extra Fine. On next round, dec 9-6-3-6-9-6 sts evenly = 177-198-219-234-249-282 sts. Switch to circular needle size 3 mm. Work rib = K 1/P 2. When rib measures 4 cm, K 1 round. Cast off.

SLEEVE:
Worked in the round on double pointed needles.
Slip the 63-65-69-71-77-81 sts from stitch holder back on double pointed needles size 4 mm. Cast on 8-8-8-10-10-10 new sts under sleeve, insert 1 marker in the middle of the new sts = 71-73-77-81-87-91 sts. NOW MEASURE PIECE FROM HERE! Continue with A.1 over all sts. Work the 8-8-8-10-10-10 new sts and sts from A.2 in pattern A.1, i.e. pattern is reversed at the marker. When A.1 has been work to A.z, skip A.z on sleeve and continue on first row after A.z. When piece measures 4 cm, dec 1 st on each side of marker. Repeat dec every 5½-5½-4½-4-3-2½ cm 7-7-8-9-11-12 more times = 55-57-59-61-63-65 sts. When piece measures 47-47-46-45-44-42 cm, dec 1-3-5-1-3-5 sts evenly = 54-54-54-60-60-60 sts. Approx. 7 cm remain until total length of sleeve. Work A.3 9-9-9-10-10-10 times in total in width. When A.3 has been worked 1 time vertically, continue with dark grey blue Karisma / dark blue Merino Extra Fine. K 1 round. Switch to double pointed needles size 3 mm and work rib = K 1/P 2. Cast off when piece measures 54-54-53-52-51-49 cm (shorter measurements in the larger sizes because of wider shoulders). Work the other sleeve the same way.

ASSEMBLY:
Sew the openings under the sleeves. Fold neckband double to wrong side and stitch in place loosely.

This pattern has been corrected.

Updated online: 30.01.2020
ELEVATION - RAGLAN:
Inc for raglan on every row from RS as follows: Inc 1 st before 1st and 7th marker and 1 st after 2nd and 8th marker.

Diagram

symbols = off white
symbols = dark grey blue Karisma / dark blue Merino Extra Fine
symbols = wine red Karisma / red Merino Extra Fine
symbols = light blue grey Karisma / light greyish green Merino Extra Fine
diagram
diagram

Each of our patterns has specific tutorial videos to help you.

Do you have a question? See a list of frequently asked questions (FAQ)

Knitting tension is what determines the final measurements of your work, and is usually measured per 10 x 10 cm. It is provided like so: number of stitches in width x number of rows in height - eg: 19 stitches x 26 rows = 10 x 10 cm.

The knitting tension is very individual; some people knit/crochet loosely while others work tightly. You adjust the knitting tension with the needle size, which is why the suggested needle size is only meant as a guide! You need to adjust this (up or down) to ensure that YOUR knitting tension matches the knitting tension provided in the pattern. If you work with a different knitting tension than provided you will have a different yarn consumption, and your work will have different measurements than what the pattern suggests.

The knitting tension also determines which yarns can replace each other. As long as you achieve the same knitting tension you can replace one yarn with another.

See DROPS lesson: How to measure your tension/gauge

See DROPS video: How to make a gauge tension swatch

The required amount of yarn is provided in grams, eg: 450 g. To calculate how many balls you’ll need you first need to know how many grams are in 1 ball (25g, 50g or 100g). This information is available if you click on the individual yarn quality on our pages. Divide the amount required with the amount of each ball. For example, if each ball is 50g (the most common amount), the calculation will be as follows: 450 / 50 = 9 balls.

The important thing when changing from one yarn to another is that the knitting/crochet tension remains the same. This is so that the measurements of the finished piece will be the same as on the sketch provided. It is easier to achieve the same knitting tension using yarns from the same yarn group. It is also possible to work with multiple strands of a thinner yarn to achieve the knitting tension of a thicker one. Please try our yarn converter. We recommend you to always work a test swatch.

Please NOTE: when changing yarn the garment might have a different look and feel to the garment in the photo, due to individual properties and qualities of each yarn.

See DROPS lesson: Can I use a different yarn than the one mentioned in the pattern?

All our yarns are categorised into yarn groups (from A to F) according to thickness and knitting tension – group A contains the thinnest yarns and group F the thickest. This makes it easier for you to find alternative yarns to our patterns, should you wish to switch yarn. All yarns within the same group have a similar knitting tension and can easily replace each other. However, different yarn qualities have different structures and properties which will give the finished work a unique look and feel.

Click here for an overview of the yarns in each yarn group

At the top of all our patterns you’ll find a link to our yarn calculator, which is a helpful tool should you wish to use a different yarn than suggested. By filling in the yarn quality you wish to replace, the amount (in your size) and number of strands, the calculator will present good alternative yarns with the same knitting tension. Additionally it will tell you how much you’ll require in the new qualities and whether you’ll need to work with multiple strands. Most skeins are 50g (some are 25g or 100g).

If the pattern is worked with multiple colours, every colour will have to be calculated separately. Similarly, if the pattern is worked with several strands of different yarns (for example 1 strand Alpaca and 1 strand Kid-Silk) you will have to find alternatives for each, individually.

Click here to see our yarn calculator

Since different yarns have different qualities and textures we have chosen to keep the original yarn in our patterns. However, you can easily find options among our available qualities by using our yarn calculator, or simply pick a yarn from the same yarn group.

It is possible that some retailers still have discontinued yarns in stock, or that someone has a few skeins at home that they would like to find patterns for.

The yarn calculator will provide both alternative yarn as well as required amount in the new quality.

If you think it's hard to decide what size to make, it can be a good idea to measure a garment you own already and like the size of. Then you can pick the size by comparing those measures with the ones available in the pattern's size chart.

You'll find the size chart at the bottom of the pattern.

See DROPS lesson: How to read size chart

The needle size provided in the pattern serves only as a guide, the important thing is to follow the knitting tension. And since knitting tension is very individual, you will have to adjust the needle size to ensure that YOUR tension is the same as in the pattern – maybe you’ll have to adjust 1, or even 2 needle sizes, up or down to achieve the correct tension. For this, we recommend that you work test swatches.

Should you work with a different knitting tension than the one provided, the measurements of the finished garment might deviate from the measurement sketch.

See DROPS lesson: How to measure your tension/gauge

See DROPS video: How to make a tension/gauge swatch

Working a garment top-down provides more flexibility and room for personal adjustment. For example it is easier to try the garment on while working, as well as making adjustments to length of yoke and shoulder caps.

The instructions are carefully explaining every step, in the correct order. Diagrams are adjusted to the knitting direction and are worked as usual.

The diagram depicts all rows/rounds, and every stitch seen from the right side. It is read from bottom to top, from right to left. 1 square = 1 stitch.

When working back and forth, every other row is worked from the right side and every other row is worked from the wrong side. When working from the wrong side, the diagram will have to be worked reversed: from left to right, knit stitches are purled, purl stitches are knit etc.

When working in the round every round is worked from the right side and the diagram are worked from right to left on all rounds.

See DROPS lesson: How to read knitting diagrams

The diagram depicts all rows/rounds, and every stitch seen from the right side. It is worked from bottom to top, from right to left.

When working back and forth every other row is worked from the right side: from right to left and every other row is worked from the wrong side: from left to right.

When working in the round, every row in the diagram are worked from the right side, from right to left.

When working a circular diagram you start in the middle and work your way outwards, counter clockwise, row by row.

The rows usually start with a given number of chain stitches (equivalent to the height of the following stitch), this will either be depicted in the diagram or explained in the pattern.

See DROPS lesson: How to read crochet diagrams

Instructions for working several diagrams after each other on the same row/round, will often be written like so: “work A.1, A.2, A.3 a total of 0-0-2-3-4 times". This means you work A.1 once, then A.2 is worked once, and A.3 is repeated (in width) the number of times provided for your size – in this case like so: S = 0 times, M = 0 times, L=2 times, XL= 3 times and XXL = 4 times.

The diagrams are worked as usual: begin with the first row in A.1, then work the first row in A.2 etc.

See DROPS lesson: How to read knitting diagrams

See DROPS lesson: How to read crochet diagrams

The total width of the garment (from wrist-to-wrist) will be larger in the larger sizes, despite the actual sleeves being shorter. The larger sizes have longer sleeve caps and wider shoulders, so there will be a good fit in all sizes.

The measurement sketch/schematic drawing provides information regarding the full length of the garment. If it’s a jumper or a jacket the length is measured from the highest point on the shoulder closest to the neckline, and straight down to the bottom of the garment. It is NOT measured from the tip of shoulder. Similarly, the length of yoke is measured from the highest point on the shoulder and down to where yoke is split into body and sleeves.

On a jacket measures are never taken along bands, unless specifically stated. Always measure inside band stitches when measuring the length.

See DROPS lesson: How to read a schematic drawing

Diagrams are often repeated on the round or in height. 1 repeat is the diagram the way it appears in the pattern. If it says to work 5 repeats of A.1 in the round, then you work A.1 a total of 5 times after/next to each other in the round. If it says to work 2 repeats of A.1 vertically/in height you work the entire diagram once, then begin again at the start and work the entire diagram one more time.

Chain stitches are slightly narrower than other stitches and to avoid working the cast-on edge too tight, we simply chain more stitches to begin with. The stitch count will be adjusted on the following row to fit the pattern and measurement sketch.

The rib edge is more elastic and will contract slightly compared to, for example, stocking stitch. By increasing before the rib edge, you avoid a visible difference in width between the rib edge and the rest of the body.

It’s very easy to cast off too tightly, and by making yarn overs while casting off (and simultaneously casting these off) you avoid a too tight cast off edge.

See DROPS video: How to bind off with yarn overs (yo)

To achieve an even increase (or decrease) you can increase on, for example: every 3rd and 4th row alternately, like so: work 2 rows and increase on the 3rd row, work 3 rows and increase on the 4th. Repeat this until the increase is complete.

See DROPS lesson: Increase or decrease 1 st on every 3rd and 4th row alternately

Should you prefer to work in the round instead of back and forth, you may of course adjust the pattern. You’ll need to add steeks mid-front (usually 5 stitches), and follow the instructions. When you would normally turn and work from the wrong side, simply work across the steek and continue in the round. At the end you’ll cut the piece open, pick up stitches to work bands, and cover the cut edges.

See DROPS video: How to knit steeks and cut open

Should you prefer to work back and forth instead of in the round, you may of course adjust the pattern so you work the pieces separately and then assemble them at the end. Divide the stitches for the body in 2, add 1 edge stitch in each side (for sewing) and work the front and back pieces separately.

See DROPS lesson: Can I adapt a pattern for circular needles into straight needles?

Pattern repeats can vary slightly in the different sizes, in order to get the correct proportions. If you’re not working the exact same size as the garment in the photo, yours might deviate slightly. This has been carefully developed and adjusted so that the complete impression of the garment is the same in all sizes.

Make sure to follow instructions and diagrams for your size!

If you have found a pattern you like which is available in women’s size it’s not very difficult to convert it to men’s size. The biggest difference will be the length of sleeves and body. Start working on the women size that you think would fit across the chest. The additional length will be worked right before you cast off for the armhole/sleeve cap. If the pattern is worked top-down you can add the length right after the armhole or before the first decrease on sleeve.

Regarding additional yarn amount, this will depend on how much length you add, but it is better with a skein too many than too few.

All yarns will have excess fibres (from production) that might come off as lint or shedding. Brushed yarns (ie hairier yarns) have more of these loose, excess fibres, causing more shedding.

Shedding also depends on what is worn under or over the garment, and whether this pulls at the yarn fibres. It’s therefore not possible to guarantee that there will be no shedding

Below are some tips on how to get the best result when working with hairier yarns:

1. When the garment is finished (before you wash it) shake it vigorously so the looser hairs come off. NOTE: do NOT use a lint roller, brush or any method that pulls at the yarn.

2. Place the garment in a plastic bag and put it in your freezer - the temperature will cause the fibres to become less attached to each other, and excess fibres will come off easier.

3. Leave in the freezer for a few hours before taking it out and shaking it again.

4. Wash the garment according to the instructions on the yarn label.

Pilling is a natural process that happens to even the most exclusive of fibers. It's a natural sign of wear and tear that is hard to avoid, and that is most visible in high friction areas of your garment like a sweater's arms and cuffs.

You can make your garment look as new by removing the pilling, using a fabric comb or a pill/lint remover.

Still can't find the answer you need? Then scroll down and leave your question so one of our experts can try to help you. This will be done normally within 5 to 10 working days.
In the meantime, you can read the questions and answers that others have left to this pattern or join the DROPS Workshop on Facebook to get help from fellow knitters/crocheters!

You might also like...

Ólafur

Titta, Finland

Sweater for lillebror

Annika, Germany

Ólafur jumper

@fantantisch, Germany

Post a comment to pattern DROPS Extra 0-1146

We would love to hear what you have to say about this pattern!

If you want to leave a question, please make sure you select the correct category in the form below, to speed up the answering process. Required fields are marked *.

Comments / Questions (119)

country flag Marjut wrote:

Alkaako mallikuvio keskeltä takaa vai hihasta 1.hiha merkin jälkeen?Onko mallikuivion järjestys oikein ohjeessa?

13.10.2023 - 21:01

DROPS Design answered:

Hei, mallineule alkaa 1.merkin kohdalta. Kuvioiden järjestys on oikea.

18.10.2023 - 16:42

country flag Edina wrote:

Na de ronding brei ik weer alle steken. De meerderingen die dan beginnen voor het lijf en de mouw geven aan, dat ik uiteindelijk voor het lijf ( voor- en achterpand) 135 steken per pand krijg. In de beschrijving staat 89 steken. Dit geldt ook voor de mouw. Als ik goed tel kom ik op 91 st. per mouw ipv 61. De 2 steken tussen de meerderingen tel ik dan nog niet eens mee. Uiteindelijk kom ik op 452 st. ipv de aangegeven 300 steken. Graag Uw uitleg hierover

12.10.2023 - 20:20

DROPS Design answered:

Dag Edina,

Bij elke meerdering komen er 2 steken bij op elke mouw en dit doe je 17 keer. Er komen dus 34 steken bij op elke mouw. Er zitten 23 steken op de mouw plus de 2 steken aan elke kant, is 27 steken. 27+34=61. Ik weet niet welke maat je precies aan het breien bent, maar dit kun je ook voor de panden uitrekenen.

15.10.2023 - 17:10

country flag Dorte Lundbak wrote:

Hvordan skal man forstå afsnittet (5linjer) der begynder således: Efter udtagningen til raglan er der 300 m totalt.....Jeg forstår ikke, hvordan og hvor A2 skal sættes ind. Er det i begge sider???

20.09.2023 - 09:57

DROPS Design answered:

Hej Dorte, Når du har taget ud til raglan og har 300 masker og skal nu strikke mønster; A.2=2m, A.1 8mx7=56m+1,A.2=2m, A.1 8x11=88m+1, A.2=2, A.1 8x7=56+1, A.2=2, A.1 8x11=88+1 = 300 masker. :)

26.09.2023 - 14:58

country flag Katrien wrote:

Er staat een fout in het Nederlands, onder "lijf". Er staat op het einde: "meerder" in de volgende nld (...)= 177-198-219(...). Logischerwijze moet dit "minder" zijn.

23.05.2023 - 19:26

country flag Jakub wrote:

Nebylo mi jasné, za kterou značkou se uplete prvních 8 ok a zjistil jsem, že v překladu je oproti (pravděpodobně originální) Dánské verzi chybějící informace v sekci "ZVÝŠENÍ: Upleteme hladce 8 ok za značkou,...". V Dánské verzi je předtím ještě "Vložte 1 značku do středu zadní části", pak je jasné, od které je myšleno, že se má uplést prvních 8 ok. Bylo by dobré tuto informaci do návodu doplnit :)

02.03.2023 - 14:44

DROPS Design answered:

Dobrý den, Jakube, děkujeme za upozornění - opraveno. Hodně zdaru! Hana

26.04.2023 - 13:02

country flag Colombe Lemay wrote:

Bonjour,pour celles qui ont de la difficulté à comprendre LA RE HAUSSE j'ai un très bon truc. Calculez 80 mailles ( pour M ) donc 40 en partant du milieu du dos vers la droite....on met un marqueur et 40 en partant du milieu du dos vers la gauche et on met un autre marqueur. Comme ça vos augmentations sont délimitées et vous êtes certaine d'obtenir le bon nombre de retour

08.02.2023 - 22:12

country flag FRANCESCA MICARELLI wrote:

Buongiorno Quando si inizia lo schema io sono a 300 maglie bisogna lavorare solo A1? Quindi 4 panna 1 blu e 3 panna e poi ripetere per tutto il giro?perché non mi tornano i conti

16.01.2023 - 23:22

DROPS Design answered:

Buonasera Francesca, a quale parte del modello si sta riferendo? Deve lavorare i diagrammi come indicato, quindi A.1 e A2 nelle sequenze indicate. Buon lavoro!

17.01.2023 - 22:08

country flag FRANCESCA wrote:

Buongiorno Sto iniziando il diagramma. Quando dite di fare la 1 maglia in A2 bisogna farlo per tutto il giro o solo la prima?

16.01.2023 - 14:18

DROPS Design answered:

Buonasera Francesca, quando richiesto deve lavorare la 1° maglia di A.1 poi proseguire come indicato. Buon lavoro!

16.01.2023 - 22:39

country flag Hedvig Poulsen wrote:

Når raglan er færdigstrikket og masker deles i ærmer og for- og bagstykke: Citat: "...strik 91-99-111-117-127-141 m, sæt de næste 63-65-69-71-77-81 m på en tråd til ærme, slå 8-8-8-10-10-10 nye m op under ærmet (sæt et mærke midt mellem disse nye m), strik 91-99-111-117-127-141 m = 198-214-238-254-274-302 m." Der er noget galt i dette regnestykke. Skal der ikke tages 8 masker (L) ud i siderne af for-bagstykke? Ligesom i ærmerne? Hvordan får I det ellers til 238 m? Mvh Hedvig 0

27.12.2022 - 20:07

DROPS Design answered:

Hej Hedvig, ærmemaskerne i hver side sættes på en tråd, så du strikker 111 masker slår 8 nye masker op til ærmegab, strikket 111 masker og slår 8 nye masker op til ærmegab i den anden side = 238 masker

03.01.2023 - 12:15

country flag Teresa wrote:

Nach der Raglanzunahme der Ärmel beginnt das Muster, allerdings werden danach noch weiterhin Maschen zugenommen (11M, 2 Mal). Jetzt ist das Muster auf dem Vorder- und Hinterteil nicht mehr intakt. Ich befürchte ich muss wieder auftrennen. Wie kann ich dieses Problem lösen? Vielen Dank.

23.05.2022 - 22:01

DROPS Design answered:

Liebe Teresa, wenn Sie die richtigen Maschenanzahl haben, dann soll das Muster auf jedem Teil (Ärmel sowie Vorder- und Rückenteil) passen: A.1 wird wiederholt und dann stricken Sie die 1. Masche in A.1 damit das Muster symmetrisch wird, die nächsten Raglanzunahmen werden im Muster gestrickt, so daß das Muster auch beidseitig immer gleich/symmetrisch wird. Kann das Ihnen helfen? Oder misverstehe ich Ihre Frage?

24.05.2022 - 08:07