DROPS Karisma
DROPS Karisma
100% Wool
from 4.15 CAD /50g
Get the yarn to make this pattern from 49.80CAD.

The yarn cost is calculated from the pattern’s smallest size and the yarn’s cheapest product type. Looking for an even better price? You might find it on the DROPS Deals!

DROPS SS24

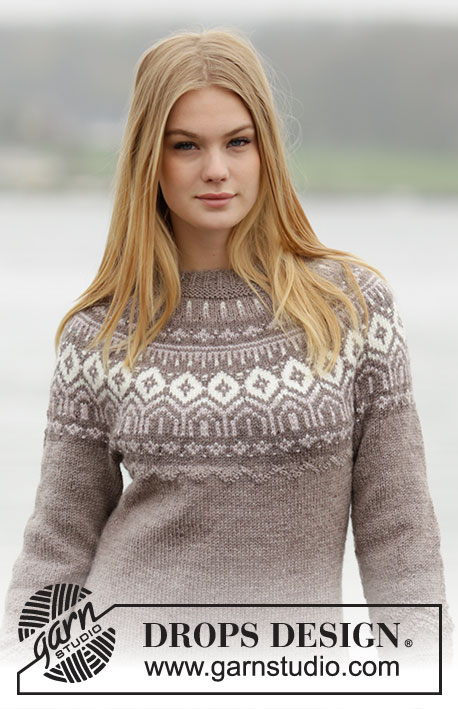
English Afternoon Cardigan

Knitted DROPS fitted jacket with round yoke, Nordic pattern and purl stitches, worked top down in ”Karisma”. Size: S - XXXL.

DROPS 164-22
DROPS design: Pattern no u-772
Yarn group B
----------------------------------------------------------
Size: S - M - L - XL - XXL - XXXL

Materials:
DROPS KARISMA from Garnstudio
300-350-350-400-450-500 color no 55, light beige brown
200-200-200-250-250-300 g color no 54, beige brown.
50-50-50-100-100-100 g color no 71, silver pink
50-50-50-50-50-50 g color no 01, off white

DROPS DOUBLE POINTED NEEDLES AND CIRCULAR NEEDLE (40 and 80 cm / 16" and 32") SIZE 4 mm/US 6 - or size needed to get 21 sts x 28 rows in stockinette st = 4" x 4" (10 x 10 cm).
DROPS DOUBLE POINTED NEEDLES and CIRCULAR NEEDLE (80 cm / 32") SIZE 3.5 mm/US 4 - for garter st/rib.
DROPS MOTHER-OF-PEARL BUTTON ARCHED (white), NO 522: 7 pieces in all sizes

-------------------------------------------------------

Alternative Yarn – See how to change yarns here
Yarn Groups A to F – Use the same pattern and change the yarn here
Yarn usage using an alternative yarn – Use our yarn converter here

-------------------------------------------------------

DROPS Karisma
DROPS Karisma
100% Wool
from 4.15 CAD /50g
Get the yarn to make this pattern from 49.80CAD.

The yarn cost is calculated from the pattern’s smallest size and the yarn’s cheapest product type. Looking for an even better price? You might find it on the DROPS Deals!

Pattern instructions

NOTE: This pattern is written in American English. All measurements in charts are in cm. For conversion from inches to cm - click here. There are different terms for crocheting in American and British English. If this pattern includes crochet, click for "crochet terms" here. For this pattern in British English, please click here.
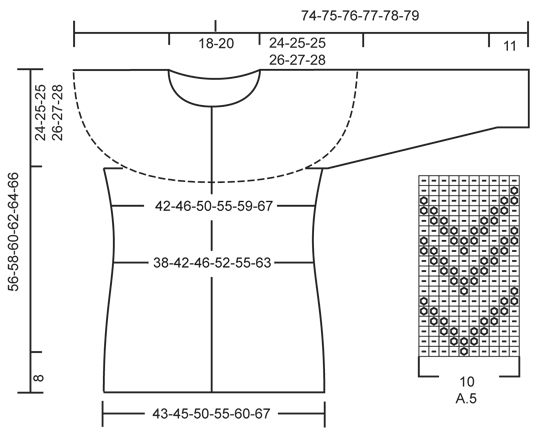
KNITTING TIP:
To avoid the knitting gauge to tighten when working pattern, it is important not to tighten the strands on back side of piece. Switch to a higher needle no when working pattern if the pattern is somewhat tight.

GARTER ST (worked in the round):
* K 1 round and P 1 round *, repeat from *-*. 1 ridge = 2 rounds.

GARTER ST (back and forth):
K all rows. 1 ridge = K2 rows.

PATTERN:
See diagrams A.1-A.5. The diagrams show all rounds/rows in pattern seen from RS.

INCREASE TIP 1:
Inc 1 st by making 1 YO. On next row/round work YO twisted, i.e. work in the back loop of st instead of front to avoid holes.

INCREASE TIP 2 (applies to inc in round yoke):
To calculate how often inc should be done on row, use the total no of sts on row (e.g. 118 sts) and subtract the 12 band sts (= 106 sts), then divide by no of inc to be done (e.g. 27 sts) = 3.92. I.e. in this example inc 1 st alternately for every 3rd and 4th st.

DECREASE TIP:
All dec are done from RS!
Dec as follows before marker: K 2 tog.
Dec as follows after marker: Slip 1 st as if to K, K 1, psso.

BUTTONHOLES:
Dec for buttonholes on right band from WS. 1 buttonhole = K tog fourth and fifth st from edge and make 1 YO.
Dec for buttonholes when piece measures:
SIZE S: 2, 10, 19, 27, 36, 44 and 53 cm /
3/4",4",7½",10½",14¼",17¼",21".
SIZE M: 2, 10, 19, 27, 36, 45 and 54 cm /
3/4",4",7½",10½",14¼",17¾",21¼".
SIZE L: 2, 10, 19, 28, 37, 46 and 55 cm /
3/4",4",7½",11",14½",18",21½".
SIZE XL: 2, 11, 20, 29, 38, 47 and 56 cm /
3/4",4½",8",11½",15",18½",22"
SIZE XXL: 2, 11, 21, 30, 40, 49 and 59 cm /
3/4",4½",8¼",11¾",15¾",19¼",23¼".
SIZE XXXL: 2, 11, 21, 30, 40, 50 and 60 cm /
3/4",4½",8¼",11¾",15¾",19¾",23½".
----------------------------------------------------------

JACKET:
Worked back and forth on circular needle, top down. READ KNITTING TIP! NOTE: Work band in base color in pattern but on pattern row with off white and silver pink, work band in beige brown.

YOKE:
Cast on 118-121-127-130-133-142 sts on circular needle size 3.5 mm / US 4 with beige brown. Work as follows: 6 band sts in GARTER ST – see explanation above -, * K 1, P 2 *, repeat from *-* until 7 sts remain, K 1, 6 band sts in garter st. REMEMBER BUTTONHOLES! When rib measures 3 cm / 1", P 1 row from WS with 6 band sts in garter st in each side (NOTE: Work band sts in garter st until finished measurements). Then work 3 ridges over all sts. Switch to circular needle size 4 mm / US 6. Work 2 row in stockinette st while inc 27-28-34-35-36-39 sts evenly - READ INCREASE TIP 1 and INCREASE TIP 2 (but not over band sts) = 145-149-161-165-169-181 sts. Now work pattern as follows: Work 6 band sts in garter st, A.1 until 7 sts remain, work 1st st in A.1 (so that pattern is the same in each side) 6 band sts in garter st.
On 7th row, inc 36-38-38-46-48-48 sts evenly = 181-187-199-211-217-229 sts. REMEMBER THE KNITTING GAUGE Now continue A.1 (inside band sts) until 7 sts remain, work 1st st in A.1 (so that pattern is the same in each side) 6 band sts in garter st. On 15th row, inc 34-40-44-48-50-54 sts evenly = 215-227-243-259-267-283 sts. Continue pattern. On 19th row, inc 32-36-40-44-56-60 sts evenly = 247-263-283-303-323-343 sts. Continue A.1 (inside band sts) until 9 sts remain. Work the first 3 sts in A.1 (so that pattern is the same in each side) 6 band sts in garter st.
When A.1 has been worked vertically, work pattern as follows: 6 band sts in garter st, A.2 (= 22 sts) 12-13-14-15-16-17 times in width, 6 band sts in garter st, AT THE SAME TIME on first row inc 29-35-37-39-41-43 sts evenly (but not over bands) = 276-298-320-342-364-386 sts. NOTE: On 13th row in diagram, inc 1 st (= 12-13-14-15-16-17 inc in total on row) = 288-311-334-357-380-403 sts. When entire diagram A.2 has been worked vertically, repeat the last 2 row in diagram 0-0-0-2-2-2 more times. Now work last st in A.3, then continue A.3, AT THE SAME TIME on 1st row inc 7-8-9-16-17-24 sts evenly = 295-319-343-373-397-427 sts. When entire A.3 has been worked vertically, work 1 row in stockinette st with beige brown while inc 2-2-2-4-4-6 sts evenly = 297-321-345-377-401-433 sts. Then work 0-2-4-4-6-8 rows in stockinette st. Now work as follows from WS: Work the first 44-48-52-58-62-70 sts (= right front piece), slip the next 66-70-74-78-82-82 sts on a stitch holder (= sleeve), cast on 12 new sts under sleeve, work the next 77-85-93-105-113-129 sts (= back piece), slip the next 66-70-74-78-82-82 sts on a stitch holder (= sleeve), cast on 12 new sts under sleeve, work the remaining 44-48-52-58-62-70 sts (= left front piece). Piece measures approx. 24-25-25-26-27-28 cm / 9½"-9¾"-9¾"-10¼"-10½"-11".

BODY:
There are now 189-205-221-245-261-293 sts for body. Insert a marker after 50-54-58-64-68-76 sts in from each side (= sides). Markers follow downwards when working. Then work in light beige brown until finished measurements. NOW MEASURE THE PIECE FROM HERE. Now work pattern as follows: 6 band sts in garter st, A.4 (= 8 sts) until 7 sts remain, work first st in A.4, 6 band sts in garter st. When A.4 has been worked vertically, continue in stockinette st inside band sts. On next row dec 1 st on each side of each marker in the sides - SEE DECREASE TIP. Repeat dec every 8th row (i.e. every 4th row from RS) 3 more times in all sizes = 173-189-205-229-245-277 sts. When piece measures 19 cm / 7½", inc 1 st on each side of each marker. Repeat inc every 6th row (i.e. every 3rd row from RS) 3 more times in all sizes = 189-205-221-245-261-293 sts. When piece measures 24-25-26-27-28-30 cm / 9½"-9¾"-10¼"-10½"-11"-11¾", adjust no of sts to = 193-203-223-243-263-293. Now work A.5 inside band sts, work last st before band as 1st st in diagram. When entire diagram has been worked vertically, switch to circular needle size 3.5 mm / US 4. Work 1 row in stockinette st while inc 8-8-9-11-13-14 sts evenly (but not over bands) = 201-211-232-254-276-307 sts. Work 3 ridges and bind off. Piece measures 56-58-60-62-64-66 cm / 22"-22¾"-23⅝"-24⅜"-25¼"-26" in total.

SLEEVE:
Work sleeve in stockinette st in the round on circular needle/double pointed needles with light beige brown. There are 66-70-74-78-82-82 sts for sleeve. Slip sts from stitch holder back on circular needle/double pointed needles size 4 mm / US 6 and cast on 12 new sts under sleeve = 78-82-86-90-94-94 sts. Work in stockinette st, AT THE SAME TIME insert a marker in the middle of the new sts under sleeve (i.e. 6 new sts on each side of marker). NOW MEASURE THE PIECE FROM HERE. When piece measures 3 cm / 1", dec 1 st on each side of marker. Repeat dec every 5th-4th-4th-3rd-4th-4th round 13-15-17-19-16-16 more times = 50-50-50-50-60-60 sts. When sleeve measures 30-30-30-29-29-30 cm / 11¾"-11¾"-11¾"-11½"-11½"-11¾", work A.5 (= 5-5-5-5-6-6 times on round). When entire A.5 has been worked vertically, work 4 rounds in stockinette st while AT THE SAME TIME on last round inc 4-7-7-10-3-6 sts evenly = 54-57-57-60-63-66 sts. Work 3 ridge in GARTER ST - see explanation above. Then work 1 round in stockinette st before working rib = K 1/P 2 for 3 cm / 1". Bind off sts with K over K and P over P. Make another sleeve the same way.

ASSEMBLY:
Sew the openings under the sleeves. Sew the buttons on to left band.

This pattern has been corrected.

Updated online: 01.04.2019
Correction: color no. 71 silver pink

Diagram

symbols = K from RS, P from WS with beige brown
symbols = K from RS, P from WS with silver pink
symbols = K from RS, P from WS with off white
symbols = P from RS, K from WS with beige brown
symbols = P from RS, K from WS with off white
symbols = K from RS, P from WS with light beige brown
symbols = 1 YO between 2 sts with beige brown
symbols = P from RS, K from WS
symbols = inc row - see explanation in pattern
diagram
diagram
diagram

Each of our patterns has specific tutorial videos to help you.

Do you have a question? See a list of frequently asked questions (FAQ)

Knitting tension is what determines the final measurements of your work, and is usually measured per 10 x 10 cm. It is provided like so: number of stitches in width x number of rows in height - eg: 19 stitches x 26 rows = 10 x 10 cm.

The knitting tension is very individual; some people knit/crochet loosely while others work tightly. You adjust the knitting tension with the needle size, which is why the suggested needle size only serve as a guide! You need to adjust this (up or down) to ensure that YOUR knitting tension matches the knitting tension provided in the pattern. If you work with a different knitting tension than provided you will have a different yarn consumption, and your work will have different measurements than what the pattern suggests.

The knitting tension also determines which yarns can replace each other. As long as you achieve the same knitting tension you can replace one yarn with another.

See DROPS lesson: How to measure your tension/gauge

See DROPS video: How to make a gauge tension swatch

The required amount of yarn is provided in grams, eg: 450 g. To calculate how many balls you’ll need you first need to know how many grams are in 1 ball (25g, 50g or 100g). This information is available if you click on the individual yarn quality on our pages. Divide the amount required with the amount of each ball. For example, if each ball is 50g (the most common amount), the calculation will be as follows: 450 / 50 = 9 balls.

The important thing when changing from one yarn to another is that the knitting/crochet tension remains the same. This is so that the measurements of the finished piece will be the same as on the sketch provided. It is easier to achieve the same knitting tension using yarns from the same yarn group. It is also possible to work with multiple strands of a thinner yarn to achieve the knitting tension of a thicker one. Please try our yarn converter. We recommend you to always work a test swatch.

Please NOTE: when changing yarn the garment might have a different look and feel to the garment in the photo, due to individual properties and qualities of each yarn.

See DROPS lesson: Can I use a different yarn than the one mentioned in the pattern?

All our yarns are categorised into yarn groups (from A to F) according to thickness and knitting tension – group A contains the thinnest yarns and group F the thickest. This makes it easier for you to find alternative yarns to our patterns, should you wish to switch yarn. All yarns within the same group have a similar knitting tension and can easily replace each other. However, different yarn qualities have different structures and properties which will give the finished work a unique look and feel.

Click here for an overview of the yarns in each yarn group

At the top of all our patterns you’ll find a link to our yarn converter, which is a helpful tool should you wish to use a different yarn than suggested. By filling in the yarn quality you wish to replace, the amount (in your size) and number of strands, the converter will present good alternative yarns with the same knitting tension. Additionally it will tell you how much you’ll require in the new qualities and whether you’ll need to work with multiple strands. Most skeins are 50g (some are 25g or 100g).

If the pattern is worked with multiple colours, every colour will have to be converted separately. Similarly, if the pattern is worked with several strands of different yarns (for example 1 strand Alpaca and 1 strand Kid-Silk) you will have to find alternatives for each, individually.

Click here to see our yarn converter

Since different yarns have different qualities and textures we have chosen to keep the original yarn in our patterns. However, you can easily find options among our available qualities by using our yarn converter, or simply pick a yarn from the same yarn group.

It is possible that some retailers still have discontinued yarns in stock, or that someone has a few skeins at home that they would like to find patterns for.

The yarn converter will provide both alternative yarn as well as required amount in the new quality.

If you think it's hard to decide what size to make, it can be a good idea to measure a garment you own already and like the size of. Then you can pick the size by comparing those measures with the ones available in the pattern's size chart.

You'll find the size chart at the bottom of the pattern.

See DROPS lesson: How to read size chart

The needle size provided in the pattern serves only as a guide, the important thing is to follow the knitting tension. And since knitting tension is very individual, you will have to adjust the needle size to ensure that YOUR tension is the same as in the pattern – maybe you’ll have to adjust 1, or even 2 needle sizes, up or down to achieve the correct tension. For this, we recommend that you work test swatches.

Should you work with a different knitting tension than the one provided, the measurements of the finished garment might deviate from the measurement sketch.

See DROPS lesson: How to measure your tension/gauge

See DROPS video: How to make a gauge tension swatch

Working a garment top-down provides more flexibility and room for personal adjustment. For example it is easier to try the garment on while working, as well as making adjustments to length of yoke and shoulder caps.

The instructions are carefully explaining every step, in the correct order. Diagrams are adjusted to the knitting direction and are worked as usual.

The diagram depicts all rows/rounds, and every stitch seen from the right side. It is read from bottom to top, from right to left. 1 square = 1 stitch.

When working back and forth, every other row is worked from the right side and every other row is worked from the wrong side. When working from the wrong side, the diagram will have to be worked reversed: from left to right, knit stitches are purled, purl stitches are knit etc.

When working in the round every round is worked from the right side and the diagram are worked from right to left on all rounds.

See DROPS lesson: How to read knitting diagrams

The diagram depicts all rows/rounds, and every stitch seen from the right side. It is worked from bottom to top, from right to left.

When working back and forth every other row is worked from the right side: from right to left and every other row is worked from the wrong side: from left to right.

When working in the round, every row in the diagram are worked from the right side, from right to left.

When working a circular diagram you start in the middle and work your way outwards, counter clockwise, row by row.

The rows usually start with a given number of chain stitches (equivalent to the height of the following stitch), this will either be depicted in the diagram or explained in the pattern.

See DROPS lesson: How to read crochet diagrams

Instructions for working several diagrams after each other on the same row/round, will often be written like so: “work A.1, A.2, A.3 a total of 0-0-2-3-4 times". This means you work A.1 once, then A.2 is worked once, and A.3 is repeated (in width) the number of times provided for your size – in this case like so: S = 0 times, M = 0 times, L=2 times, XL= 3 times and XXL = 4 times.

The diagrams are worked as usual: begin with the first row in A.1, then work the first row in A.2 etc.

See DROPS lesson: How to read knitting diagrams

See DROPS lesson: How to read crochet diagrams

The total width of the garment (from wrist-to-wrist) will be larger in the larger sizes, despite the actual sleeves being shorter. The larger sizes have longer sleeve caps and wider shoulders, so there will be a good fit in all sizes.

The measurement sketch/schematic drawing provides information regarding the full length of the garment. If it’s a jumper or a jacket the length is measured from the highest point on the shoulder (usually closest to the neckline), and straight down to the bottom of the garment. It is NOT measured from the tip of shoulder. Similarly, the length of yoke is measured from the highest point on the shoulder and down to where yoke is split into body and sleeves.

See DROPS lesson: How to read a schematic drawing

Diagrams are often repeated on the round or in height. 1 repeat is the diagram the way it appears in the pattern. If it says to work 5 repeats of A.1 in the round, then you work A.1 a total of 5 times after/next to each other in the round. If it says to work 2 repeats of A.1 vertically/in height you work the entire diagram once, then begin again at the start and work the entire diagram one more time.

Chain stitches are slightly narrower than other stitches and to avoid working the cast-on edge too tight, we simply chain more stitches to begin with. The stitch count will be adjusted on the following row to fit the pattern and measurement sketch.

The rib edge is more elastic and will contract slightly compared to, for example, stocking stitch. By increasing before the rib edge, you avoid a visible difference in width between the rib edge and the rest of the body.

It’s very easy to cast off too tightly, and by making yarn overs while casting off (and simultaneously casting these off) you avoid a too tight cast off edge.

See DROPS video: How to bind off with yarn overs (yo)

To achieve an even increase (or decrease) you can increase on, for example: every 3rd and 4th row alternately, like so: work 2 rows and increase on the 3rd row, work 3 rows and increase on the 4th. Repeat this until the increase is complete.

See DROPS lesson: Increase or decrease 1 st on every 3rd and 4th row alternately

Should you prefer to work in the round instead of back and forth, you may of course adjust the pattern. You’ll need to add steeks mid-front (usually 5 stitches), and follow the instructions. When you would normally turn and work from the wrong side, simply work across the steek and continue in the round. At the end you’ll cut the piece open, pick up stitches to work bands, and cover the cut edges.

See DROPS video: How to knit steeks and cut open

Should you prefer to work back and forth instead of in the round, you may of course adjust the pattern so you work the pieces separately and then assemble them at the end. Divide the stitches for the body in 2, add 1 edge stitch in each side (for sewing) and work the front and back pieces separately.

See DROPS lesson: Can I adapt a pattern for circular needles into straight needles?

Pattern repeats can vary slightly in the different sizes, in order to get the correct proportions. If you’re not working the exact same size as the garment in the photo, yours might deviate slightly. This has been carefully developed and adjusted so that the complete impression of the garment is the same in all sizes.

Make sure to follow instructions and diagrams for your size!

If you have found a pattern you like which is available in women’s size it’s not very difficult to convert it to men’s size. The biggest difference will be the length of sleeves and body. Start working on the women size that you think would fit across the chest. The additional length will be worked right before you cast off for the armhole/sleeve cap. If the pattern is worked top-down you can add the length right after the armhole or before the first decrease on sleeve.

Regarding additional yarn amount, this will depend on how much length you add, but it is better with a skein too many than too few.

All yarns will have excess fibres (from production) that might come off as lint or shedding. Brushed yarns (ie hairier yarns) have more of these loose, excess fibres, causing more shedding.

Shedding also depends on what is worn under or over the garment, and whether this pulls at the yarn fibres. It’s therefore not possible to guarantee that there will be no shedding

Below are some tips on how to get the best result when working with hairier yarns:

1. When the garment is finished (before you wash it) shake it vigorously so the looser hairs come off. NOTE: do NOT use a lint roller, brush or any method that pulls at the yarn.

2. Place the garment in a plastic bag and put it in your freezer - the temperature will cause the fibres to become less attached to each other, and excess fibres will come off easier.

3. Leave in the freezer for a few hours before taking it out and shaking it again.

4. Wash the garment according to the instructions on the yarn label.

Pilling is a natural process that happens to even the most exclusive of fibers. It's a natural sign of wear and tear that is hard to avoid, and that is most visible in high friction areas of your garment like a sweater's arms and cuffs.

You can make your garment look as new by removing the pilling, using a fabric comb or a pill/lint remover.

Still can't find the answer you need? Then scroll down and leave your question so one of our experts can try to help you. This will be done normally within 5 to 10 working days.
In the meantime, you can read the questions and answers that others have left to this pattern or join the DROPS Workshop on Facebook to get help from fellow knitters/crocheters!

You might also like...

Post a comment to pattern DROPS 164-22

We would love to hear what you have to say about this pattern!

If you want to leave a question, please make sure you select the correct category in the form below, to speed up the answering process. Required fields are marked *.

Comments / Questions (15)

country flag Debbie Quinn wrote:

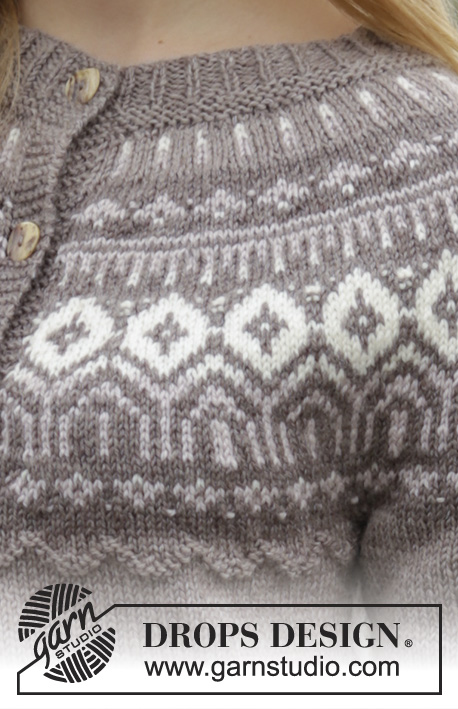
I am near the end of the yoke, chart A.3. The picture and the chart are not the same. The picture shows a diamond shape the chart shows a V shape. Please advise on how I should proceed. Which is correct, the chart or the picture?

08.10.2023 - 21:28

DROPS Design answered:

Dear Debbie, as the chart shows, the silver pink stitches form a pyramid, but there is a white stitch right under it (as shown in the chart) and it makes it look like a diamond from afar. Happy knitting!

09.10.2023 - 01:15

country flag Solveig wrote:

Veldig vanskelig mønster, tror jeg gir opp.....!

24.02.2022 - 12:54

country flag Hanne Nielsen wrote:

Jeg vil gerne strikke DROPS 164-22 i DROPS cotton merino. Jeg kan godt lide kombinationen af uld og bomuld. Jeg vil dog gerne strikke den i en grå version. Hvilke farver numre skal jeg vælge? Hvad kan jeg sætte sammen?

21.04.2017 - 13:12

DROPS Design answered:

Hei Hanne. Om du går inn på fargekartet til Cotton Merino vil du se de gråfargene vi har og dens fargenr. Her kan du da velge ut de fargene du ønsker og syns vil passe deg best. Fargekart Cotton Merino God Fornøyelse!

24.04.2017 - 13:02

country flag June wrote:

Helt umulig opskrift! Prøver at finde en anden opskrift jeg kan bruge garnet til. ØV! Har virkelig forsøgt mange gange, spild af tid!

02.12.2016 - 09:00

DROPS Design answered:

Hej June. Det er da aergeligt. Husk du kan altid spörge om hjaelp her - vi kan da pröve at hjaelpe dig videre med at forstaa opskriften.

02.12.2016 - 15:06

Hanne wrote:

Dårlig opskrift, synes jeg. Nået til midt på første ærme og kan se at garnforbruget ikke stemmer - jeg kommer til at mangle farve 55. Nu trævler jeg det hele op for jeg synes pasformen er elendig til mig. Bærestykket er alt for "bulket" og ærmerne for smalle.

09.01.2016 - 02:11

country flag Ingrid Rosbag wrote:

Ik had geen ruimte meer om mijn vraag af toemaken. Wat ik graag wil is in het rond breien top down. Hoe weet ik hoeveel steken ik op moet zetten . En welke maten moet ik in de gaten houden b.v welke hoogte moet ik stoppen om de steken voor de mouwen apart te zetten en hoeveel St. ik wil met shetland wol breien , hopelijk komt U eruit wat ik bedoel Hg. Ingrid

20.10.2015 - 16:35

DROPS Design answered:

Hoi Ingrid. Ik kan helaas niet helpen met individuele aanpassingen op de gratis patronen. Maar je hebt een maattekening onderaan, de stekenverhouding van het patroon (aantal st x nld per 10 x 10 cm), dus het is mogelijk om zelf de berekeningen te maken. Veel plezier mee.

21.10.2015 - 16:55

country flag Ingrid Rosbag wrote:

Hallo, ik wil graag een vest breien in fairIlse techniek, nu zit ik met een probleem, ik ben van boven niet zo breed maar naar beneden wel .Ik heb maat 56 nu heb ik voor zo ver ik weet alles na gekeken en vragen gesteld op site's maar zonder een goed antwoord. Ik zou graag in het rond breien met een doorknipbies middenvoor. En heel graag met ronde pas, heel veel vragen maar ik hoop dat U mij die kan beantwoorden.

20.10.2015 - 13:21

DROPS Design answered:

Hoi Ingrid. Wat wil je precies weten? Je wilt het model breder maken beneden dan boven? Je kan het patroon aanpassen door gebruik van de maattekening onderaan het patroon - eventueel een combi maken van een grotere maat beneden en dan minderen en de pas in een kleinere maat te breien

20.10.2015 - 15:53

country flag Märtha Sohlberg wrote:

Mycket vacker kofta. Den här ska jag sticka.

20.06.2015 - 18:52

Liv wrote:

A definite on the make list

15.06.2015 - 06:24

country flag José wrote:

Mooi patroon. De pauwensteek langs de onderrand vind ik een prachtig extraatje. De mouwen zou ik iets langer maken.

13.06.2015 - 16:33