
Popular categories
Looking for a yarn?


|
|||||||||||||||||||||||||||||||||||||||||||||||||
Autumn Delight |
|||||||||||||||||||||||||||||||||||||||||||||||||
 |
 |
||||||||||||||||||||||||||||||||||||||||||||||||
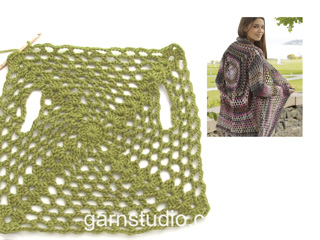
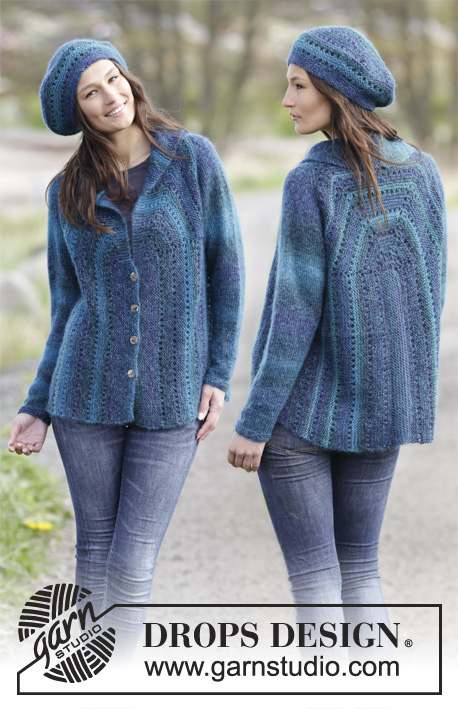
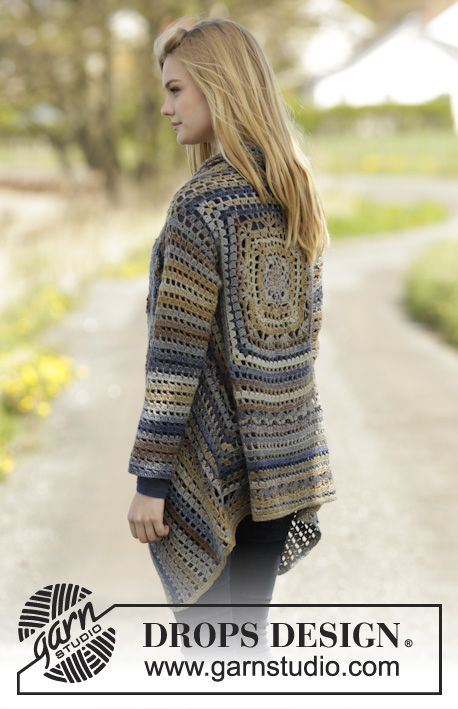
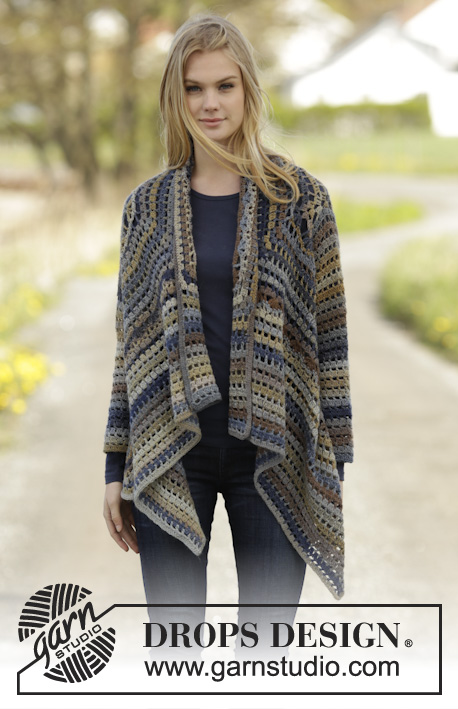
Crochet DROPS jacket worked in a square in "Delight". Size: S - XXXL.
DROPS 166-22 |
|||||||||||||||||||||||||||||||||||||||||||||||||
|
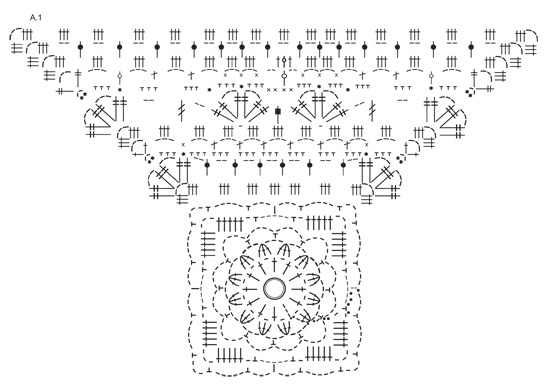
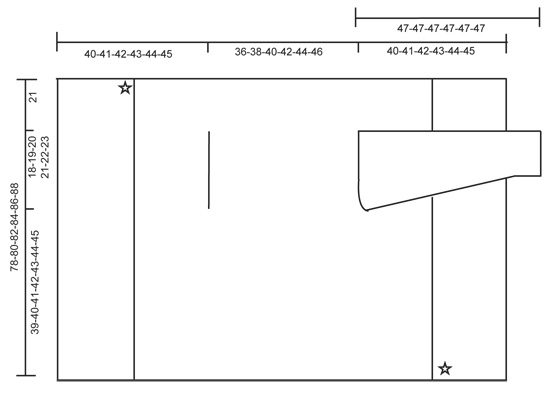
PATTERN: See diagrams A.1 to A.4. 3 DC TOG AT BEG OF ROUND: 3 ch, work next dc around same ch but wait with last YO and pull through, work 1 dc around same ch but pull last YO through all 3 sts on hook. 3 DC TOG: Work 1 dc around ch but wait with last pull through, work 1 dc around same ch, but wait the last pull through, work last dc around same ch but now pull last YO through all 4 sts on hook DECREASE TIP: Work 1 dc but wait with last YO and pull through, work next dc but pull last YO through all 3 sts on hook = 2 dc worked tog. ---------------------------------------------------------- JACKET: Work 4 ch on hook size 3,5 mm / C with Delight and form a ring with 1 sl st in first ch. Then work according to diagram A.1, i.e. work as follows: ROUND 1: Work 4 ch (= 1 dc + 1 ch), * 1 dc in ch-ring, 1 ch *, repeat from *-* a total of 11 times, finish with 1 sl st in 3rd ch from beg of round = 12 dc with 1 ch between every dc. REMEMBER THE CROCHET GAUGE! ROUND 2: 1 sl st around first ch, work 3 dc TOG AT BEG OF ROUND – see explanation above, * ch 3, 3 dc TOG around next ch – see explanation above *, repeat from *-* 11 times in total and finish with 3 ch and 1 sl st at the top of first dc-group = 12 dc-groups with 3 ch between every dc-group. ROUND 3: 1 sl st around first ch-space, ch 1, 1 sc around same ch-space, * ch 5, 1 sc around next ch-space, ch 5, 1 sc around next ch-space, ch 6, 1 sc around next ch-space *, repeat from *-* 4 times in total, but finish with 1 sl st in first sc at beg of round (instead of 1 sc around next ch-space). ROUND 4: Work 1 sl st around first ch-space, ch 1, 1 sc around same ch-space, * ch 5, 1 sc around next ch-space, ch 1, around next ch-space (ch-space with 6 ch) work 5 dc + 3 ch + 5 dc (= corner), ch 1, 1 sc around next ch-space *, repeat from *-* 4 times in total, but finish with 1 sl st in first sc at beg of round (instead of 1 sc around next ch-space). ROUND 5: Work sl sts until middle of first ch-space (ch-space with 5 ch), work 5 ch (= 1 hdc + 3 ch), * 1 sc around ch before dc-group, ch 5, 1 sc around ch-space in corner, ch 3, 1 sc around same ch-space, ch 5, 1 sc around ch-space after next dc-group, ch 3, 1 hdc around next ch-space, 3 ch *, repeat from *-* 4 times in total, but finish with 1 sl st in 2nd ch from beg of round (instead of 1 hdc in next ch-space, 3 ch). Cut the yarn. The round now starts around the ch-space in first corner. ROUND 6: 1 sl st around ch-space in the corner, 3 ch (= 1 dc), 2 dc + 3 ch + 3 dc around same ch-space, * work 3 dc around each of the first 2 ch-spaces, 3 dc in hdc, 3 dc around each of the next 2 ch-spaces, work 3 dc + 3 ch + 3 dc around ch-space in the corner *, repeat from *-* 3 times in total, work 3 dc around every ch-space and 3 dc in every hdc until the corner and finish with 1 sl st in 3rd ch at beg of round. ROUND 7: Work sl sts until ch-space in corner, 4 ch (= 1 tr), work 1 tr + 3 ch + 2 tr + 3 ch + 2 tr around same ch-space (= corner), * (2 ch, skip 1 dc-group, 1 dc before next dc-group = between 2 dc-groups), repeat from (-) 6 times in total, ch 2, 2 tr + 3 ch + 2 tr + 3 ch + 2 tr around ch-space in corner *, repeat from *-* 3 times in total, repeat from (-) 6 times in total and finish with 2 ch and 1 sl st in 4th ch from beg of round. ROUND 8: Work sl sts until the middle of the 2 tr in corner, 3 ch (= 1 sc + 2 ch), 1 sc between the same middle tr in corner, * 3 sc around space, 1 sc between the next 2 tr, then work 3 sc around every ch-space until tr in corner, 1 sc between the first 2 tr, 3 sc around next ch-space, 1 sc + 2 ch + 1 sc between the middle 2 tr in corner *, repeat from *-* 3 times in total, 3 sc around ch-space, 1 sc between the next 2 tr, then work 3 sc around every ch-space until tr in corner, 1 sc between the first 2 tr, 3 sc around ch-space and finish with 1 sl st in first ch from beg of round. ROUND 9: Work 1 sl st around ch-space in corner, 6 ch (= 1 dc + 3 ch), 1 dc around same ch-space, * ch 3, skip 3 sc, 1 sc in next sc, (3 ch, skip 2 sc, 1 hdc in next sc), repeat from (-) 6 times in total, ch 3, skip 3 sc, 1 sc in next sc, ch 3, 1 dc + 3 ch + 1 dc around ch-space in corner *, repeat from *-* the entire round, but finish with 1 sl st in 3rd ch from beg of round (instead of 1 dc + 3 ch + 1 dc in corner). ROUND 10: 1 sl st in ch-space in corner, 3 ch (= 1 dc), 2 dc + 3 ch + 3 dc around same ch-space, * work 3 dc around each of the first 3 ch-space, ch 1, 3 dc around each of the next 3 ch-spaces, ch 1, 3 dc around each of the next 3 ch-spaces, in corner work 3 dc + 3 ch + 3 dc around ch-space *, repeat from *-* the entire round, but finish with 1 sl st in 3rd ch from beg of round (instead 3 dc + 3 ch + 3 dc in corner). ROUND 11: Work sl st until ch-space in corner, 4 ch (= 1 tr), work 1 tr + 3 ch + 2 tr + 3 ch + 2 tr around same ch-space (= corner), * ch 2, skip 2 dc-groups, 1 tr before next dc-group, ch 2, skip 2 dc-groups, around ch before next dc-group work 2 tr + 3 ch + 2 tr + 3 ch + 2 tr, skip 1 dc-group, 1 tr in the middle dc in next dc-group, skip 1 dc-group, around ch before next dc-groups work 2 tr + 3 ch + 2 tr + 3 ch + 2 tr, ch 2, skip 2 dc-groups, 1 tr before next dc-group, ch 2, around ch-space in corner work 2 tr + 3 ch + 2 tr + 3 ch + 2 tr *, repeat from *-* the entire round, but finish with 1 sl st in 4th ch from beg of round (instead of tr-groups in corner). ROUND 12: Work sl sts until middle of the middle 2 tr in corner, 3 ch (= 1 sc + 2 ch), 1 sc between the middle tr in corner, * 3 sc around ch-space, 1 sc between the next 2 tr, 3 sc around each of the next 2 ch-spaces, 1 sc between the next 2 tr, 3 sc around next ch-space, 1 sc between the next 2 tr, 3 sc around next ch-space, 1 sc in each of the next 2 tr, skip 1 tr, 1 sc in each of the next 2 tr, 3 sc around next ch-space, 1 sc between 2 tr, 3 sc around next ch-space, 1 sc between 2 tr, 3 sc around each of the next 2 ch-spaces, 1 sc between 2 tr, 3 sc around next ch-space, 1 sc + 2 ch + 1 sc between the 2 middle tr in corner *, repeat from *-* the entire round but finish with 1 sl st in first ch on round (instead of 1 sc + 2 ch + 1 sc in corner). ROUND 13: Work 1 sl st around ch-space in corner, 7 ch (= 1 tr + 3 ch), 1 tr around same ch-space, * ch 3, skip 3 sc, 1 dc in next sc, ch 3, skip 2 sc, 1 hdc in next sc, ch 3, skip 1 sc, 1 hdc in next sc, ch 3, skip 3 sc, 1 sc in next sc, ch 3, skip 1 sc, 1 sc in next sc, ch 3, skip 1 sc, 1 sc in next sc, ch 2, skip 2 sc, 1 dc in next sc, ch 2, skip 3 sc, 1 sc in next sc, ch 3, skip 1 sc, 1 sc in next sc, ch 3, skip 1 sc, 1 sc in next sc, ch 3, skip 3 sc, 1 hdc in next sc, ch 3, skip 1 sc, 1 hdc in next sc, ch 3, skip 2 sc, 1 dc in next sc, ch 3, skip 3 sc and work 1 tr + 3 ch + 1 tr around ch-space in corner *, repeat from *-* the entire round but finish with 1 sl st in 4th ch from beg of round (instead of 1 tr + 3 ch + 1 tr around ch-space in corner). ROUND 14: 1 sl st around ch-space in corner, 3 ch (= 1 dc), 2 dc + 3 ch + 3 dc around same ch-space, * work 3 dc around each of the first 6 ch-spaces, 1 dc around 2-ch-space, 1 dc in dc, 1 dc around 2-ch-space, work 3 dc around each of the next 6 ch-spaces, in corner work 3 dc + 3 ch + 3 dc around ch-space *, repeat from *-* the entire round but finish with 1 sl st in 3rd ch from beg of round (instead of 3 dc + 3 ch + 3 dc in corner). ROUND 15: 1 sl st around ch-space in corner, 3 ch (= 1 dc), 2 dc + 3 ch + 3 dc around same ch-space, * (2 ch, 1 dc before next dc-group), repeat from (-) until corner, ch 2, around ch-space in corner work 3 dc + 3 ch + 3 dc *, repeat from *-* the entire round, but finish with 1 sl st in 3rd ch from beg of round (instead of dc-group in corner). ROUND 16: 1 sl st around ch-space in corner, 3 ch (= 1 dc), 2 dc + 3 ch + 3 dc around same ch-space, * work 3 dc in every ch-space until corner, work 3 dc + 3 ch + 3 dc around ch-space in corner *, repeat from *-* 3 times in total, work 3 dc around every ch-space until corner and finish with 1 sl st in 3rd ch from beg of round. Continue repeating 15th and 16th round until square measures 36-38-40-42-44-46 cm / 14¼''-15''-15¾''-16½''-17¼''-18'' x 36-38-40-42-44-46 cm / 14¼''-15''-15¾''-16½''-17¼''-18''. Now work armholes as follows: Work as before until first corner, work 3 dc + 3 ch + 3 dc in ch-space in the corner. Now work ch until the middle of next side (i.e. in the middle between 1st and 2nd corner) as follows: Work 1 ch for every ch/dc skipped. Then work pattern as before until the middle between 3rd and 4th corner. Now work ch until beg of round as follows: Work 1 ch for every ch/dc skipped. On next round work pattern and inc as before over all sts, also in ch for armholes. Continue repeating15th and 16th round until no of ch-spaces between each corner is divisible with 3. Continue to work as follows: ROUND 1: 1 sl st around ch-space in corner, 3 ch (= 1 dc), 2 dc + 3 ch + 3 dc around same ch-space, * (work 3 dc around each of the first 3 ch-spaces, 1 ch), repeat from (-) until 3 ch-spaces remain before corner, work 3 dc around each of the next ch-spaces, in corner work 3 dc + 3 ch + 3 dc around ch-space *, repeat from *-* the entire round but finish with 1 sl st in 3rd ch at beg of round (instead of 3 dc + 3 ch + 3 dc in corner). ROUNDS 2-4: Work as 11th-13th round (work 1 dc-group around every ch from previous round). ROUNDS 5-18: Work as 15th and 16th round. Repeat these 2 rounds 7 times in total. Repeat 18th round until square measures 78-80-82-84-86-88 cm x 78-80-82-84-86-88 cm / 30¾''-31½''-32¼''-33''-33 7/8''-34 5/8'' x 30¾''-31½''-32¼''-33''-33 7/8''-34 5/8''8'' (i.e. 21 cm / 8 1/4'' in all sizes from armhole). Cut the yarn. FRONT PIECES: Now work back and forth between first and second corner. NOTE: Work front piece without inc. ROW 1: Work according to A.2 as follows: Work sl sts until the middle of first corner: ch 5,* skip 3 dc, 1 dc between 2 dc-groups, 2 ch *, repeat from *-*, skip 3 dc and finish with 1 dc around ch-space in second corner. ROW 2: Turn and work as follows: ch 3, 2 dc around first ch-space, then work 3 dc around every ch-space, last time finish with 1 dc in 3rd ch at beg of previous row. Repeat 1st and 2nd row for 19-20-21-22-23-24 cm / 7½''-8''-8¼''-8¾''-9''-9½'', cut the yarn. Repeat on the other side, now work back and forth from third to fourth corner. Finally work a round around the entire square, work pattern as before but in ch-space in each corner work 6 dc. Fasten off. SLEEVES: Work around the armhole and down, work every round tog with 1 sl st in 3rd ch from beg of round. Insert 1 marker in piece, mid under sleeve. NOW MEASURE PIECE FROM HERE! Beg by working 81-84-87-93-96-99 dc evenly around the opening for sleeve, beg of row should be under sleeve. Continue with A.2 - when piece measures 4 cm / 1½'' dec under sleeve as follows: Dec as shown in A.3/A.4 – READ DECREASE TIP alternately on right and left side of marker. Dec like this every 4th round 10-11-11-6-6-7 times, then every other round 0-0-0-7-7-7 times = 51-51-54-54-57-57 dc. Work A.2 until sleeve measures approx. 47 cm / 18½'' in all sizes. Fasten off. Work the other sleeve the same way. |
|||||||||||||||||||||||||||||||||||||||||||||||||
Diagram explanations |
|||||||||||||||||||||||||||||||||||||||||||||||||
|
|||||||||||||||||||||||||||||||||||||||||||||||||
|
|||||||||||||||||||||||||||||||||||||||||||||||||

|
|||||||||||||||||||||||||||||||||||||||||||||||||
|
|||||||||||||||||||||||||||||||||||||||||||||||||
|
Have you made this or any other of our designs? Tag your pictures in social media with #dropsdesign so we can see them! Do you need help with this pattern?You'll find tutorial videos, a Comments/Questions area and more by visiting the pattern on garnstudio.com. © 1982-2024 DROPS Design A/S. We reserve all rights. This document, including all its sub-sections, has copyrights. Read more about what you can do with our patterns at the bottom of each pattern on our site. |
|||||||||||||||||||||||||||||||||||||||||||||||||


With over 40 years in knitting and crochet design, DROPS Design offers one of the most extensive collections of free patterns on the internet - translated to 17 languages. As of today we count 304 catalogs and 11422 patterns - 11417 of which are translated into English (US/in).
We work hard to bring you the best knitting and crochet have to offer, inspiration and advice as well as great quality yarns at incredible prices! Would you like to use our patterns for other than personal use? You can read what you are allowed to do in the Copyright text at the bottom of all our patterns. Happy crafting!
Comments / Questions (73)
Hi, ik wil graag een patroon haken van een vest, maar snap niks van dat A l1 en A2 etc. Heb de tutorial ook al gelezen. \\r\\nIs het mogelijk dat jullie dat deel ook uitschrijven zoals toer 1, 2 etc. echter wil ik hier best voor betalen.\\r\\nIk hoor het graag.\\r\\n\\r\\nMet vriendelijke groet, \\r\\n\\r\\nAstrid Brussel
16.08.2022 - 16:40DROPS Design answered:
Dag Brussel,
Het is voor ons helaas niet mogelijk om het telpatroon uit te schrijven, we werken meestal met telpatronen. Misschien kun je aangeven waar je precies tegenaan loopt met de telpatronen, zodat we je beter kunnen helpen. Of misschien is het mogelijk om bij een verkooppunt langs te gaan voor hulp.
17.08.2022 - 16:42Hallo Ist das Rückenteil von Armloch zu Armloch tatsächlich nur 38 cm breit in Größe M? Das kommt mir sehr wenig vor. LG
16.05.2022 - 12:10DROPS Design answered:
Liebe Pauline, es stimmt ja, gerne ziehen Sie die Jacke an, nachdem Sie die Runde mit dem Armloch gehäkelt haben, und so können Sie mal schauen ob es passt, oder ob Sie anpassen sollen. Viel Spaß beim häkeln!
16.05.2022 - 16:43Korreksjon til spørsmålet under - kragekanten blir 21, ikke 24, cm fra ermehullene - men virker altså like fullt lang :)
23.03.2022 - 18:25DROPS Design answered:
Hei Astrid, Målene er fra bunn av ermehullet. God fornøyelse!
24.03.2022 - 07:10Jeg mener å ha fulgt oppskriften for bolen på medium, men "kragen", 24 cm lengde fra armhullene, virker mye lenger enn på avbildede modell, og må rulles flere ganger bak nakken. Stemmer dette med oppskriften:)?
23.03.2022 - 18:19DROPS Design answered:
Hei Astrid. Om du ser på målskissen skal det være 21 cm fra øverst av armhullet og opp, og kragen blir leggende litt dobbelt ved nakken. Om du får 24 cm, har du da overholdt heklefastheten? mvh DROPS Design
28.03.2022 - 11:47Bonjour, Meilleurs voeux 2021 à votre sympathique équipe! Ma question est la suivante: j\'aime beaucoup -et depuis longtemps- la Delight. Dans les modèles proposés par Drops, pour les ouvrages au crochet, parfois vous préconisez le 3,5, parfois le 5. Qu'est-ce ce qui justifie cette différence de numéros... Que me conseillez vous comme numéro pour un châle le plus souple possible ? Merci de votre réponse!
06.01.2021 - 10:45DROPS Design answered:
Bonjour Mme Mack et merci pour vos vœux, recevez les nôtres en retour! Le choix de la taille du crochet est lié à la structure souhaitée, pour un châle par exemple, on va choisir un crochet plus gros pour obtenir un résultat plus souple, plus aérien, et pour un gilet, comme celui-ci, on va choisir un crochet plus fin. Fiez-vous toujours à l'échantillon indiqué et adaptez la taille du crochet pour que votre échantillon soit juste. Bon crochet!
06.01.2021 - 13:16I have to express my appreciation for this lovely pattern. It's easy to follow, especially because a schematic is also included. I'm so pleased with my jacket. Thank you again! I look forward to future creations from DROPS. I'm not a social media user, but will attempt to post a picture and hashtag it on Instagram.
01.11.2020 - 16:38Vanaf toer 6 onbegrijpelijk en komt telpatroon niet over een met beschrijving. Zoals helaas vaak met jullie patronen veel fouten hebben.
02.11.2019 - 17:30How much yarn do I need if I want to make this in a solid color? Thanks!
26.10.2019 - 22:20DROPS Design answered:
Dear Sherry, the pattern uses Drops Delight yarn, which is a self striping yarn, so if you want to make this in a solid color, íou would need the same amount of the same yarn group (450-500-550-600-650-750 gramm-depending on the size oyu want to make). Happy Crafting!
27.10.2019 - 01:44How much yarn do I need if I want to make this in one color? Trying to get busy on Christmas presents!! Thank you in advance!!
26.10.2019 - 22:04DROPS Design answered:
Dear Sherry, the same amount from the same yarn group, or please use our yarn converter. Happy Knitting!
27.10.2019 - 01:48Hi. I'm loving this pattern but need help on the first pattern row (16) after the armholes have been created. The pattern says "On next round work pattern and inc as before over all sts, also in ch for armholes." Does this mean I should stitch 4 treble crochet in each chain space on this row, then 5 in the next etc?
01.09.2019 - 17:06DROPS Design answered:
Dear Kristin, on the round after you have crocheted the both chains for armhole, you continue in pattern as you worked before, but this time crochet in the stitches from previous round + in the chains from both chain-stitches as before (=as if you haven't crocheted these chains) so that you create a hole for sleeves. Happy crocheting!
02.09.2019 - 10:34