DROPS Karisma
DROPS Karisma
100% Wool
from 2.50 € /50g
Get the yarn to make this pattern from 30.00€.

The yarn cost is calculated from the pattern’s smallest size and the yarn’s cheapest product type. Looking for an even better price? You might find it on the DROPS Deals!

DROPS SS24

English Afternoon

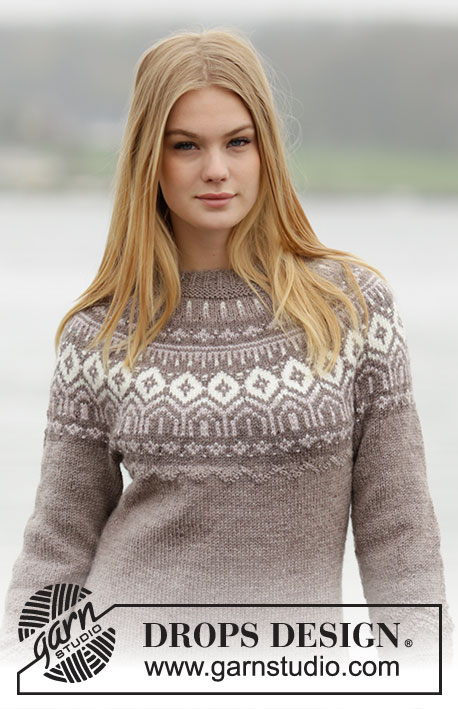
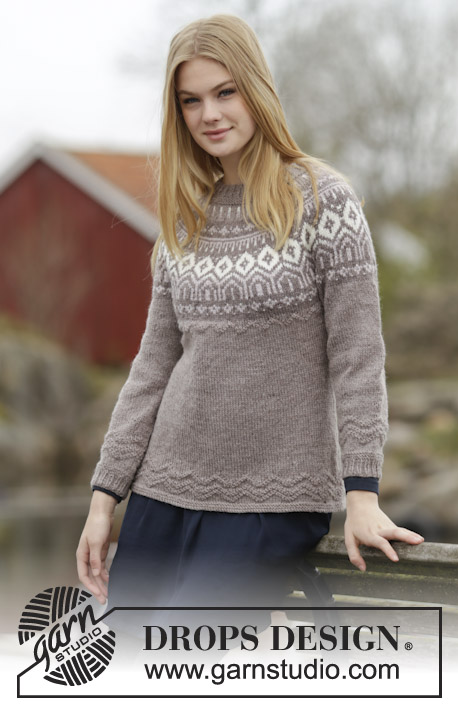
Knitted DROPS fitted jumper with round yoke, Nordic pattern and purl stitches, worked top down in ”Karisma”. Size: S - XXXL.

DROPS 164-23
DROPS design: Pattern no u-773
Yarn group B
----------------------------------------------------------
Size: S - M - L - XL - XXL - XXXL
Materials:
DROPS KARISMA from Garnstudio
300-350-350-400-450-500 colour no 55, light beige brown
200-200-200-250-250-300 g colour no 54, beige brown.
50-50-50-100-100-100 g colour no 71, silver pink
50-50-50-50-50-50 g colour no 01, off white

DROPS DOUBLE POINTED NEEDLES AND CIRCULAR NEEDLE (40 and 80 cm) SIZE 4 mm - or size needed to get 21 sts x 28 rows in stocking st = 10 x 10 cm.
DROPS DOUBLE POINTED NEEDLES and CIRCULAR NEEDLE (40 and 80 cm) SIZE 3.5 mm - for garter st/rib.

-------------------------------------------------------

Alternative Yarn – See how to change yarns here
Yarn Groups A to F – Use the same pattern and change the yarn here
Yarn usage using an alternative yarn – Use our yarn converter here

-------------------------------------------------------

DROPS Karisma
DROPS Karisma
100% Wool
from 2.50 € /50g
Get the yarn to make this pattern from 30.00€.

The yarn cost is calculated from the pattern’s smallest size and the yarn’s cheapest product type. Looking for an even better price? You might find it on the DROPS Deals!

Pattern instructions

NOTE: This pattern is written in British English. All measurements in charts are in cm. For conversion from cm to inches - click here. There are different terms for crocheting in British and American English. If this pattern includes crochet, click for "crochet terms" here. For this pattern in American English, please click here.
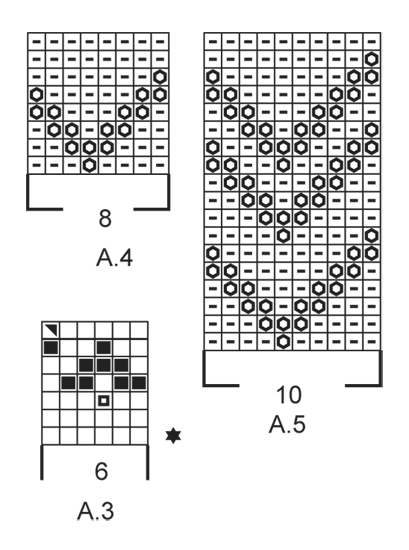
KNITTING TIP:
To avoid the knitting tension to tighten when working pattern, it is important not to tighten the strands on back side of piece. Switch to a higher needle no when working pattern if the pattern is somewhat tight.

GARTER ST (worked in the round):
* K 1 round and P 1 round *, repeat from *-*. 1 ridge = 2 rounds.

PATTERN:
See diagrams A.1-A.5.

INCREASE TIP 1:
Inc 1 st by making 1 YO. On next row K YO twisted, i.e. work in the back loop of st instead of front to avoid holes.

INCREASE TIP 2 (applies to inc in round yoke):
To calculate how often inc should be done, use the total no of sts on round (= 106 sts) and divide by no of inc to be done (e.g. 27 sts) = 3.92. I.e. in this example inc 1 st alternately for every 3rd and 4th st.

DECREASE TIP:
Dec as follows before marker: K 2 tog.
Dec as follows after marker: Slip 1 st as if to K, K 1, psso.
----------------------------------------------------------

JUMPER:
Worked in the round on circular needle, top down. READ KNITTING TIP! Rounds start mid back.

YOKE:
Cast on 105-108-114-117-120-129 sts on circular needle size 3.5 mm with beige brown. Work rib = K 1/P 2 for 3 cm. Work 1 round in stocking st. Then work 3 ridges in GARTER ST - see explanation above. Switch to circular needle size 4 mm. Work 2 rounds in stocking st while inc 27-28-34-35-36-39 sts evenly - READ INCREASE TIP 1 and INCREASE TIP 2 = 132-136-148-152-156-168 sts. Work A.1. On 7th round, inc 36-38-38-46-48-48 sts evenly = 168-174-186-198-204-216 sts. REMEMBER THE KNITTING TENSION On 15th round, inc 34-40-44-48-50-54 sts evenly = 202-214-230-246-254-270 sts. Continue pattern. On 19th round, inc 34-38-42-46-58-62 sts evenly = 236-252-272-292-312-332 sts. Work the remaining round in A.1. Now work A.2 (= 22 sts) 12-13-14-15-16-17 times in width, AT THE SAME TIME on first round inc 28-34-36-38-40-42 sts evenly = 264-286-308-330-352-374 sts. NOTE: On 13th round in diagram, inc 1 st (= 12-13-14-15-16-17 inc in total on round) = 276-299-322-345-368-391 sts. When entire diagram A.2 has been worked vertically, repeat the last 2 round in diagram 0-0-0-2-2-2 more times. Now work A.3, AT THE SAME TIME on 1st round inc 6-7-8-15-16-23 sts evenly = 282-306-330-360-384-414 sts. When entire A.3 has been worked vertically, work 1 round in stocking st with beige brown while inc 2-2-2-4-4-6 sts evenly = 284-308-332-364-388-420 sts. Then work 0-2-4-4-6-8 rounds in stocking st. Now work as follows: Work the first 38-42-46-52-56-64 sts (= half back piece), slip the next 66-70-74-78-82-82 sts on a stitch holder (= sleeve), cast on 12 new sts under sleeve, work the next 76-84-92-104-112-128 sts (= front piece), slip the next 66-70-74-78-82-82 sts on a stitch holder (= sleeve), cast on 12 new sts under sleeve, work the remaining 38-42-46-52-56-64 sts (= half back piece). Piece measures approx. 24-25-25-26-27-28 cm.

BODY:
There are now 176-192-208-232-248-280 sts for body. Insert a marker 44-48-52-58-62-70 sts in from beg of round in each side (= sides). Markers follow downwards when working. Then work in light beige brown until finished measurements. NOW MEASURE THE PIECE FROM HERE. Now work pattern A.4 (= 8 sts) over all sts. When A.4 has been worked vertically, continue in stocking st. On next round dec 1 st on each side of each marker in the sides - SEE DECREASE TIP. Repeat dec every 8th round 3 more times in all sizes = 160-176-192-216-232-264 sts. When piece measures 19 cm, inc 1 st on each side of each marker. Repeat inc every 6th round 3 more times in all sizes = 176-192-208-232-248-280 sts. When piece measures 24-25-26-27-28-30 cm, adjust no of sts to = 180-190-210-230-250-280. Now work A.5 (= 10 sts). When entire diagram has been worked vertically, switch to circular needle size 3.5 mm. Work 1 round in stocking st while inc 8-8-9-11-13-14 sts evenly = 188-198-219-241-263-294 sts. Work 3 ridges and cast off. Piece measures 56-58-60-62-64-66 cm in total.

SLEEVE:
Work sleeve in stocking st in the round on circular needle/double pointed needles with light beige brown. There are 66-70-74-78-82-82 sts for sleeve. Slip sts from stitch holder back on circular needle/double pointed needles size 4 mm and cast on 12 new sts under sleeve = 78-82-86-90-94-94 sts. Work in stocking st, AT THE SAME TIME insert a marker in the middle of the new sts under sleeve (i.e. 6 new sts on each side of marker). NOW MEASURE THE PIECE FROM HERE.
When piece measures 3 cm, dec 1 st on each side of marker. Repeat dec every 5th-4th-4th-3rd-4th-4th round 13-15-17-19-16-16 more times = 50-50-50-50-60-60 sts. When sleeve measures 30-30-30-29-29-30 cm, work A.5 (= 5-5-5-5-6-6 times on round). When entire A.5 has been worked vertically, work 4 rounds in stocking st while AT THE SAME TIME on last round inc 4-7-7-10-3-6 sts evenly = 54-57-57-60-63-66 sts. Work 3 ridges. Then work 1 round in stocking st before working rib = K 1/P 2 for 3 cm. Cast off sts with K over K and P over P. Knit another sleeve the same way.

ASSEMBLY:
Sew the openings under the sleeves.

This pattern has been corrected.

Updated online: 01.04.2019
Correction: colour no. 71 silver pink

Diagram

symbols = K with beige brown
symbols = K with silver pink
symbols = K with off white
symbols = P with beige brown
symbols = P with off white
symbols = K with light beige brown
symbols = 1 YO between 2 sts with beige brown
symbols = P with light beige brown
symbols = inc round - see explanation in pattern
diagram
diagram
diagram

Each of our patterns has specific tutorial videos to help you.

Do you have a question? See a list of frequently asked questions (FAQ)

Knitting tension is what determines the final measurements of your work, and is usually measured per 10 x 10 cm. It is provided like so: number of stitches in width x number of rows in height - eg: 19 stitches x 26 rows = 10 x 10 cm.

The knitting tension is very individual; some people knit/crochet loosely while others work tightly. You adjust the knitting tension with the needle size, which is why the suggested needle size is only meant as a guide! You need to adjust this (up or down) to ensure that YOUR knitting tension matches the knitting tension provided in the pattern. If you work with a different knitting tension than provided you will have a different yarn consumption, and your work will have different measurements than what the pattern suggests.

The knitting tension also determines which yarns can replace each other. As long as you achieve the same knitting tension you can replace one yarn with another.

See DROPS lesson: How to measure your tension/gauge

See DROPS video: How to make a gauge tension swatch

The required amount of yarn is provided in grams, eg: 450 g. To calculate how many balls you’ll need you first need to know how many grams are in 1 ball (25g, 50g or 100g). This information is available if you click on the individual yarn quality on our pages. Divide the amount required with the amount of each ball. For example, if each ball is 50g (the most common amount), the calculation will be as follows: 450 / 50 = 9 balls.

The important thing when changing from one yarn to another is that the knitting/crochet tension remains the same. This is so that the measurements of the finished piece will be the same as on the sketch provided. It is easier to achieve the same knitting tension using yarns from the same yarn group. It is also possible to work with multiple strands of a thinner yarn to achieve the knitting tension of a thicker one. Please try our yarn converter. We recommend you to always work a test swatch.

Please NOTE: when changing yarn the garment might have a different look and feel to the garment in the photo, due to individual properties and qualities of each yarn.

See DROPS lesson: Can I use a different yarn than the one mentioned in the pattern?

All our yarns are categorised into yarn groups (from A to F) according to thickness and knitting tension – group A contains the thinnest yarns and group F the thickest. This makes it easier for you to find alternative yarns to our patterns, should you wish to switch yarn. All yarns within the same group have a similar knitting tension and can easily replace each other. However, different yarn qualities have different structures and properties which will give the finished work a unique look and feel.

Click here for an overview of the yarns in each yarn group

At the top of all our patterns you’ll find a link to our yarn calculator, which is a helpful tool should you wish to use a different yarn than suggested. By filling in the yarn quality you wish to replace, the amount (in your size) and number of strands, the calculator will present good alternative yarns with the same knitting tension. Additionally it will tell you how much you’ll require in the new qualities and whether you’ll need to work with multiple strands. Most skeins are 50g (some are 25g or 100g).

If the pattern is worked with multiple colours, every colour will have to be calculated separately. Similarly, if the pattern is worked with several strands of different yarns (for example 1 strand Alpaca and 1 strand Kid-Silk) you will have to find alternatives for each, individually.

Click here to see our yarn calculator

Since different yarns have different qualities and textures we have chosen to keep the original yarn in our patterns. However, you can easily find options among our available qualities by using our yarn calculator, or simply pick a yarn from the same yarn group.

It is possible that some retailers still have discontinued yarns in stock, or that someone has a few skeins at home that they would like to find patterns for.

The yarn calculator will provide both alternative yarn as well as required amount in the new quality.

If you think it's hard to decide what size to make, it can be a good idea to measure a garment you own already and like the size of. Then you can pick the size by comparing those measures with the ones available in the pattern's size chart.

You'll find the size chart at the bottom of the pattern.

See DROPS lesson: How to read size chart

The needle size provided in the pattern serves only as a guide, the important thing is to follow the knitting tension. And since knitting tension is very individual, you will have to adjust the needle size to ensure that YOUR tension is the same as in the pattern – maybe you’ll have to adjust 1, or even 2 needle sizes, up or down to achieve the correct tension. For this, we recommend that you work test swatches.

Should you work with a different knitting tension than the one provided, the measurements of the finished garment might deviate from the measurement sketch.

See DROPS lesson: How to measure your tension/gauge

See DROPS video: How to make a tension/gauge swatch

Working a garment top-down provides more flexibility and room for personal adjustment. For example it is easier to try the garment on while working, as well as making adjustments to length of yoke and shoulder caps.

The instructions are carefully explaining every step, in the correct order. Diagrams are adjusted to the knitting direction and are worked as usual.

The diagram depicts all rows/rounds, and every stitch seen from the right side. It is read from bottom to top, from right to left. 1 square = 1 stitch.

When working back and forth, every other row is worked from the right side and every other row is worked from the wrong side. When working from the wrong side, the diagram will have to be worked reversed: from left to right, knit stitches are purled, purl stitches are knit etc.

When working in the round every round is worked from the right side and the diagram are worked from right to left on all rounds.

See DROPS lesson: How to read knitting diagrams

The diagram depicts all rows/rounds, and every stitch seen from the right side. It is worked from bottom to top, from right to left.

When working back and forth every other row is worked from the right side: from right to left and every other row is worked from the wrong side: from left to right.

When working in the round, every row in the diagram are worked from the right side, from right to left.

When working a circular diagram you start in the middle and work your way outwards, counter clockwise, row by row.

The rows usually start with a given number of chain stitches (equivalent to the height of the following stitch), this will either be depicted in the diagram or explained in the pattern.

See DROPS lesson: How to read crochet diagrams

Instructions for working several diagrams after each other on the same row/round, will often be written like so: “work A.1, A.2, A.3 a total of 0-0-2-3-4 times". This means you work A.1 once, then A.2 is worked once, and A.3 is repeated (in width) the number of times provided for your size – in this case like so: S = 0 times, M = 0 times, L=2 times, XL= 3 times and XXL = 4 times.

The diagrams are worked as usual: begin with the first row in A.1, then work the first row in A.2 etc.

See DROPS lesson: How to read knitting diagrams

See DROPS lesson: How to read crochet diagrams

The total width of the garment (from wrist-to-wrist) will be larger in the larger sizes, despite the actual sleeves being shorter. The larger sizes have longer sleeve caps and wider shoulders, so there will be a good fit in all sizes.

The measurement sketch/schematic drawing provides information regarding the full length of the garment. If it’s a jumper or a jacket the length is measured from the highest point on the shoulder closest to the neckline, and straight down to the bottom of the garment. It is NOT measured from the tip of shoulder. Similarly, the length of yoke is measured from the highest point on the shoulder and down to where yoke is split into body and sleeves.

On a jacket measures are never taken along bands, unless specifically stated. Always measure inside band stitches when measuring the length.

See DROPS lesson: How to read a schematic drawing

Diagrams are often repeated on the round or in height. 1 repeat is the diagram the way it appears in the pattern. If it says to work 5 repeats of A.1 in the round, then you work A.1 a total of 5 times after/next to each other in the round. If it says to work 2 repeats of A.1 vertically/in height you work the entire diagram once, then begin again at the start and work the entire diagram one more time.

Chain stitches are slightly narrower than other stitches and to avoid working the cast-on edge too tight, we simply chain more stitches to begin with. The stitch count will be adjusted on the following row to fit the pattern and measurement sketch.

The rib edge is more elastic and will contract slightly compared to, for example, stocking stitch. By increasing before the rib edge, you avoid a visible difference in width between the rib edge and the rest of the body.

It’s very easy to cast off too tightly, and by making yarn overs while casting off (and simultaneously casting these off) you avoid a too tight cast off edge.

See DROPS video: How to bind off with yarn overs (yo)

To achieve an even increase (or decrease) you can increase on, for example: every 3rd and 4th row alternately, like so: work 2 rows and increase on the 3rd row, work 3 rows and increase on the 4th. Repeat this until the increase is complete.

See DROPS lesson: Increase or decrease 1 st on every 3rd and 4th row alternately

Should you prefer to work in the round instead of back and forth, you may of course adjust the pattern. You’ll need to add steeks mid-front (usually 5 stitches), and follow the instructions. When you would normally turn and work from the wrong side, simply work across the steek and continue in the round. At the end you’ll cut the piece open, pick up stitches to work bands, and cover the cut edges.

See DROPS video: How to knit steeks and cut open

Should you prefer to work back and forth instead of in the round, you may of course adjust the pattern so you work the pieces separately and then assemble them at the end. Divide the stitches for the body in 2, add 1 edge stitch in each side (for sewing) and work the front and back pieces separately.

See DROPS lesson: Can I adapt a pattern for circular needles into straight needles?

Pattern repeats can vary slightly in the different sizes, in order to get the correct proportions. If you’re not working the exact same size as the garment in the photo, yours might deviate slightly. This has been carefully developed and adjusted so that the complete impression of the garment is the same in all sizes.

Make sure to follow instructions and diagrams for your size!

If you have found a pattern you like which is available in women’s size it’s not very difficult to convert it to men’s size. The biggest difference will be the length of sleeves and body. Start working on the women size that you think would fit across the chest. The additional length will be worked right before you cast off for the armhole/sleeve cap. If the pattern is worked top-down you can add the length right after the armhole or before the first decrease on sleeve.

Regarding additional yarn amount, this will depend on how much length you add, but it is better with a skein too many than too few.

All yarns will have excess fibres (from production) that might come off as lint or shedding. Brushed yarns (ie hairier yarns) have more of these loose, excess fibres, causing more shedding.

Shedding also depends on what is worn under or over the garment, and whether this pulls at the yarn fibres. It’s therefore not possible to guarantee that there will be no shedding

Below are some tips on how to get the best result when working with hairier yarns:

1. When the garment is finished (before you wash it) shake it vigorously so the looser hairs come off. NOTE: do NOT use a lint roller, brush or any method that pulls at the yarn.

2. Place the garment in a plastic bag and put it in your freezer - the temperature will cause the fibres to become less attached to each other, and excess fibres will come off easier.

3. Leave in the freezer for a few hours before taking it out and shaking it again.

4. Wash the garment according to the instructions on the yarn label.

Pilling is a natural process that happens to even the most exclusive of fibers. It's a natural sign of wear and tear that is hard to avoid, and that is most visible in high friction areas of your garment like a sweater's arms and cuffs.

You can make your garment look as new by removing the pilling, using a fabric comb or a pill/lint remover.

Still can't find the answer you need? Then scroll down and leave your question so one of our experts can try to help you. This will be done normally within 5 to 10 working days.
In the meantime, you can read the questions and answers that others have left to this pattern or join the DROPS Workshop on Facebook to get help from fellow knitters/crocheters!

You might also like...

Post a comment to pattern DROPS 164-23

We would love to hear what you have to say about this pattern!

If you want to leave a question, please make sure you select the correct category in the form below, to speed up the answering process. Required fields are marked *.

Comments / Questions (14)

country flag Liette wrote:

Bonjour je voudrais savoir les mesures sur le dessin est-ce en pouces ou en centimètres et comment savoir l'aisance que l'on doit mettre pour avoir une belle tombée PS: je fais toujours l'échantillon Merci et bonne journée

09.02.2024 - 16:02

DROPS Design answered:

Bonjour Liette, les mesures du schéma sont indiquées en cm; pour trouver votre taille (et l'aisance souhaitée), mesurez un vêtement similaire que vous avez et dont vous aimez la forme et comparez ces mesures à celles du schéma; retrouvez plus d'infos ici. Bon tricot!

12.02.2024 - 07:09

country flag Eveline De Leeuw wrote:

English Afternoon 164-23. opm.2: ook bij de telkleuren uitleg staan de kleuren anders vermeld dan in het oorspronkelijke patroon... (denk ik)

06.10.2022 - 13:04

country flag Eveline De Leeuw wrote:

English Afternoon 164-23: ik denk dat er een vertaalfout is gemaakt met de beginkleur, deze zegt in NL patroon lichtbruin (2e kleur) maar er moet mijns inziens opgezet worden met de hoofdkleur, dit is beige. Ik heb het Noorse patroon erbij gehaald en daar is de beginkleur inderdaad de hoofdkleur (lys brunmelert). Ter info

06.10.2022 - 12:58

country flag Helene wrote:

Slet venligst den sidste besked fra mig. Jeg har fundet ud af, hvilken fejl, jeg begik, og er startet forfra.

11.11.2020 - 23:15

country flag Helene wrote:

Hej. Jeg er i gang med at strikke denne trøje, og jeg er næsten færdig med A.1. Jeg læser diagrammerne ovenfra og ned. Når jeg kigger på diagram A. 2 og sammenligner med billedet af den færdige trøje, ser det ud til at diagrammet vender på hovedet. Den nærmest rombeformede figur er ifølge diagrammert den sidste figur i A.2. Men på billedet er det næstsidste figur. Begår jeg en fejl, når jeg læser diagrammerne ovenfra og ned? Med venlig hilsen Helene

11.11.2020 - 13:49

DROPS Design answered:

Hej Helene. Så fint att det du kom på hur du ska göra. Mvh DROPS Design

13.11.2020 - 10:45

country flag Jacqueline Donovan wrote:

The wool requirements state 4 colours, 55, 54, 71 & 01. In the diagram, silver pink is mentioned but not in the requirements??? Can yiu advise please? Kind regards, Jacquie

29.03.2019 - 22:54

DROPS Design answered:

Dear Jaquie, there is a typo under colour no 71, it should be silver pink instead of light beige, pattern will be edited, thanks for the tip! Happy knitting!

01.04.2019 - 11:48

country flag Hildegunn Nesjan wrote:

Strikket denne i str L, og er veldig fornøyd med resultatet. Men jeg fikk ikke den oppgitte garnmengde til å stemme. Brukte 400g av farge 53, og 150g av farge 54.

12.08.2017 - 08:16

country flag Jo Janssen V D Rijt wrote:

Hoe komt t dat ik n patroon niet kan printen heb n hp laserprinter

13.11.2016 - 14:40

DROPS Design answered:

Hoi Jo. Ik kan het patroon printen, ik denk dat het probleem dan ligt bij jou printer / instellingen. Hier kan ik helaas niet mee helpen.

14.11.2016 - 14:32

country flag Loes wrote:

Welk blokje in het tel patroon wordt gebruikt voor de kleur beige. Er wordt toch met 4 kleuren gewerkt?

01.11.2016 - 18:21

DROPS Design answered:

Hoi Loes. De kleurnamen waren aangepast, maar vergeten in de vertaling voor de symbolen. Ik heb het nu aangepast. Bedankt.

02.11.2016 - 12:22

country flag Stine Bjørnsdatter Nygård wrote:

Er det riktig at bol og ermer skal strikkes i lys brunmelert? Jeg får det ikke til å stemme med bildet og garnmengden. Jeg tror bol og ermer skal være i beige melert (eller den bunnfargen man måtte velge). Tar jeg helt feil?

10.08.2015 - 22:06

DROPS Design answered:

Hej. Färgerna är riktiga men garnmängden var tidigare fel, detta har nu rättats. Mvh DROPS Design

12.08.2015 - 08:38