
Popular categories
Looking for a yarn?


|
||||||||||||||||||||||||||||||||||||||||
Renaissance |
||||||||||||||||||||||||||||||||||||||||
 |
 |
|||||||||||||||||||||||||||||||||||||||
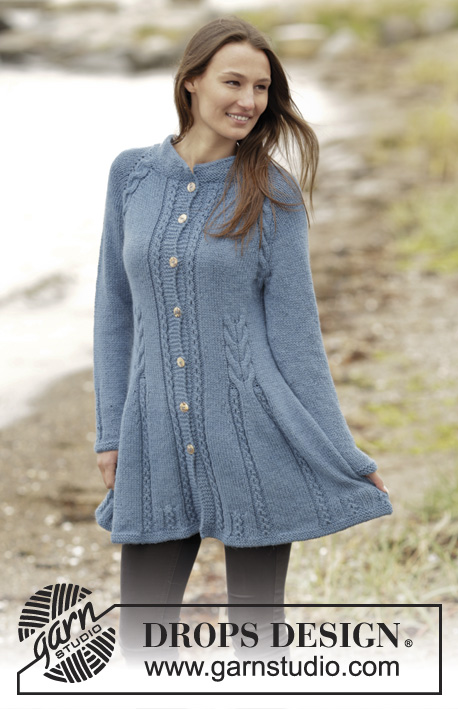
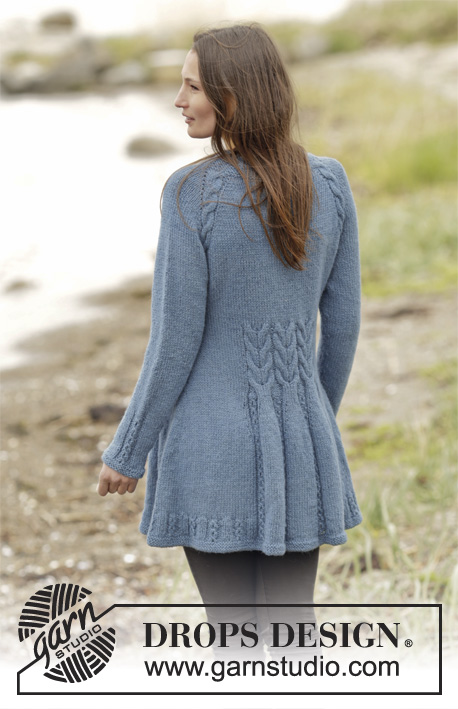
Knitted DROPS fitted jacket with cables, raglan and edges in garter st, worked top down in 2 strands "Alpaca". Size: S - XXXL.
DROPS 165-3 |
||||||||||||||||||||||||||||||||||||||||
|
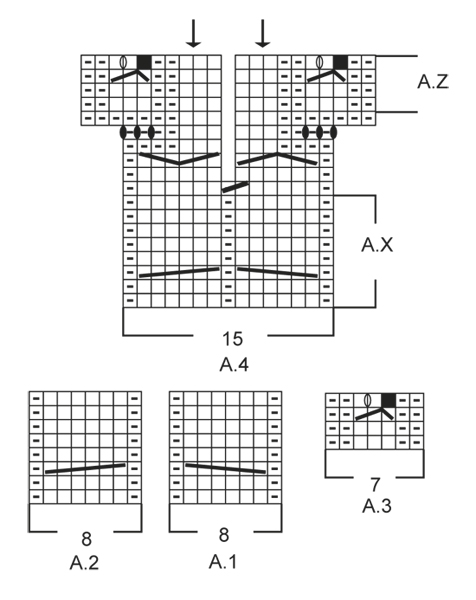
GARTER ST (worked in the round): 1 ridge = 2 rounds. * K 1 round and P 1 round *, repeat from *-*. GARTER ST (back and forth): K all rows. 1 ridge = 2 rows K. PATTERN: See diagrams A.1-A.5. The diagrams show all rows in pattern seen from RS. SHORT ROWS (band): Work short rows over sts in band to avoid it contracting vertically. Work as follows from RS on every 20th row: K 5 (= left band), turn and work back. Work 1 row over all sts as before. Turn and K 5 (= right band), turn and work back. Turn and work 1 row over all sts as before. RAGLAN: All inc are done from RS. Inc 1 st on each side of every repetition A.1 and A.2 by making one YO. On next row P YOs twisted (i.e. work in back loop of st instead of front) to avoid holes. Then work the new sts in stocking st. INCREASE TIP: Inc 1 st by making 1 YO, on next row P YO twisted (i.e. work in back loop of st instead front) to avoid holes. DECREASE TIP: Dec as follows before marker: Work until 3 sts remain before marker, K 2 tog, 2 sts in stocking st (marker is between these sts), slip 1 st as if to K, K 1, psso. BUTTONHOLES: Dec for buttonhole on right band (i.e. band at the end of row seen from RS). 1 buttonhole = K tog third and fourth st from edge and make 1 YO. Dec for buttonholes when piece measures (from cast-on edge and along the band): SIZE S: 5, 13, 21, 29, 37, 45 and 53 cm SIZE M: 5, 13, 21, 29, 37, 46 and 55 cm SIZE L: 5, 13, 22, 31, 40, 49 and 58 cm SIZE XL: 5, 13, 21, 29, 37, 45, 53 and 61 cm. SIZE XXL: 5, 13, 21, 29, 37, 45, 54 and 63 cm. SIZE XXXL: 5, 13, 21, 29, 38, 47, 56 and 65 cm. ---------------------------------------------------------- JACKET: Worked back and forth on circular needle, top down. Cast on 73-76-76-79-79-82 sts on circular needle size 4.5 mm with 2 strands Alpaca. Work 1 ridge in GARTER ST - see explanation above. Continue in garter st and work a collar with short rows, beg from RS: * Work all sts. Turn and work back until 5 sts remain in the other side. Turn and work until 5 sts remain, turn and work back until 10 sts remain. Turn and work until 10 sts remain, turn and work back over all sts *, repeat from *-* 1 more time. Then work an elevation in the neck as follows: Work until 28-29-29-29-29-30 sts remain on needle, turn and work back until 28-29-29-29-29-30 sts remain in the other side. Turn and work until 25-26-26-26-26-27 sts remain on needle, turn and work back until 25-26-26-26-26-27 sts remain in the other side. Turn and work until 23-24-24-24-24-25 sts remain on needle, turn and work back until 23-24-24-24-24-25 sts remain in the other side. Turn and work the remaining sts (from RS), turn and work back over all sts. REMEMBER BUTTONHOLES! Switch to circular needle size 5 mm. Insert a marker here. NOW MEASURE THE PIECE FROM HERE. Work 1 row in stocking st with 5 band sts in garter st in each side while inc 18-19-19-24-32-45 sts evenly (but not over band sts) = 91-95-95-103-111-127 sts. Continue the 5 band sts in garter st in each side of piece until finished measurements and work SHORT ROWS - see explanation above, over band sts. Work 1 row. Now work pattern as follows from RS: 5 band sts in garter st, A.3 (= 7 sts), 3-4-4-6-8-12 sts in stocking st, A.1 (= 8 sts), 6 sts in stocking st, A.2 (= 8 sts), 17-19-19-23-27-35 sts in stocking st, A.1, 6 sts in stocking st, A.2, 3-4-4-6-8-12 sts in stocking st, A.3, 5 band sts in garter st. NOTE: Note which way the cables go. Cables on back piece are reversed from each other and cables on each front piece are reversed from each other. REMEMBER THE KNITTING TENSION On next row from RS beg inc for RAGLAN - see explanation above, on each side of every A.1 and A.2 (= 8 inc). Repeat inc every other row (i.e. every row from RS) 9-14-19-25-28-29 more times, and every 4th row (i.e. every other row from RS) 7-5-3-0-0-0 times = 227-255-279-311-343-367 sts. Piece measures approx. 21-22-23-24-26-27 cm measured along band. Now work as follows: Work the first 36-40-43-48-53-58 sts (= left front piece), slip the next 48-54-60-66-72-74 sts on a stitch holder (= sleeve), cast on 8 new sts under sleeve, work the next 59-67-73-83-93-103 sts (= back piece), slip the next 48-54-60-66-72-74 sts on a stitch holder (= sleeve), cast on 8 new sts under sleeve, work the remaining 36-40-43-48-53-58 sts (= right front piece). BODY: There are now 147-163-175-195-215-235 sts for body. NOW MEASURE THE PIECE FROM HERE. Now work pattern as follows: 5 band sts in garter st, A.3, stocking st over the next 28-32-35-40-45-50 sts, insert a marker (= side), stocking st over the next 67-75-81-91-101-111 sts, insert a marker (= side), stocking st over the next 28-32-35-40-45-50 sts, A.3, 5 band sts in garter st. When piece measures 3 cm, dec 1 st on each side of each marker - READ DECREASE TIP. Repeat dec when piece measures 5-6-7-8-8-9 cm = 139-155-167-187-207-227 sts. When piece measures 8-9-10-11-11-12 cm, work next row from RS as follows: 5 band sts in garter st, A.3, work 8 sts in stocking st. Work in stocking st over the next 12 sts in all sizes and inc 3 sts evenly. Work in stocking st over the next 20-28-34-44-54-64 sts. Work in stocking st over the next 35 sts in all sizes and inc 10 sts evenly. Work in stocking st over the next 20-28-34-44-54-64 sts. Work in stocking st over the next 12 sts and inc 3 sts evenly. Work in stocking st over the next 8 sts, A.3, 5 band sts in garter st. There are now 155-171-183-203-223-243 sts on needle. READ ALL OF THE FOLLOWING SECTION BEFORE CONTINUING! Now continue with pattern and inc sts as explained below: PATTERN AND INC BETWEEN CABLES: On next row from RS work as follows: Work as before over the first 20 sts, A.4 (= 15 sts), stocking st over the next 6-10-13-18-23-28 sts, insert a new marker (follows down until inc in the sides are done), stocking st over the next 14-18-21-26-31-36 sts, A.5 (= 45 sts), stocking st over the next 14-18-21-26-31-36 sts, insert a new marker (follows down until inc in the sides are done), stocking st over the next 6-10-13-18-23-28 sts, A.4, work the remaining 20 sts as before. Continue like this back and forth until A.X has been worked 3 times in total vertically. Then work the remaining rows in A.4 and A.5. NOTE: Adjust so that cable in A.Z beg on same row as cable in A.3 towards mid front. When entire A.4 and A.5 are done vertically, repeat A.Z until finished measurements, AT THE SAME TIME inc sts in stocking st as follows - see arrow in diagram: Work until 1 st before first repetition A.4, 1 YO, 1 st in stocking st, work the first 8 sts in A.4, 1 YO, stocking st until 8 sts remain in diagram, 1 YO, work the remaining 8 sts in A.4. Continue in stocking st until A.5. Work the first 8 sts in A.5, * 1 YO, stocking st until 1 st remains before next P st in diagram, 1 YO, work the next 9 sts *, repeat from *-* 1 more time, 1 YO, work in stocking st until 1 st remains before next P st, 1 YO, work the remaining 8 sts in A.5. Then work in stocking st until next repetition A.4. Work the first 8 sts in A.4, 1 YO, stocking st until 8 sts remain in diagram, 1 YO, work the remaining 8 sts in A.4, 1 st in stocking st, 1 YO, work the remaining sts on row. 12 sts inc in total on row. On next row P YOs twisted to avoid holes. Repeat inc every 6th row 3 more times. INC IN EACH SIDE: When piece measures 12-13-14-15-15-16 cm, inc 1 st on each side of marker in each side (= 4 sts inc) – see INCREASE TIP. Repeat inc every 2 cm 14-15-16-16-16-16 more times = 50-60-68-78-88-98 sts in every section with stocking st in each side. When all inc in diagram and in the sides are done, there are 274-294-310-330-350-370 sts on needle. Continue with pattern until piece measures 69-71-73-75-77-79 cm, adjust so that next row from RS is 3rd row in A.3. Now continue pattern and inc sts in sections with stocking st as follows: Inc 1 st in section with stocking st inside bands and A.3 in each side, and inc 3-3-5-5-5-5 sts evenly in section with stocking st in each side of jacket (i.e. between A.4 and A.5) = 282-302-322-342-362-382 sts. Now work a finishing edge as follows: 5 band sts in garter st, A.3, 3 sts in stocking st, A.3, 3 sts in stocking st, continue the next 28 sts as before, * 3 sts in stocking st, A.3 *, repeat from *-* 4-5-6-7-8-9 more times, 3 sts in stocking st, work the next 70 sts as before, ** 3 sts in stocking st, A.3 **, repeat from **-** 4-5-6-7-8-9 more times, 3 sts in stocking st. Work the next 28 sts as before, 3 sts in stocking st, A.3, 3 sts in stocking st, A.3, 5 band sts in garter st. Continue like this until A.3 has been worked 3 times vertically. Switch to circular needle size 4.5 mm and work 1 row in stocking st while inc 16-18-19-20-22-22 sts evenly (but not over bands) = 298-320-341-362-384-404 sts. Work 3 ridges and cast off. SLEEVE: Work sleeve in stocking st in the round on circular needle/double pointed needles. There are 48-54-60-66-72-74 sts for each sleeve. Slip sts from stitch holder back on circular needle/double pointed needles size 5 mm and cast on 8 new sts under sleeve = 56-62-68-74-80-82 sts. Work in stocking st, AT THE SAME TIME insert a marker in the middle of the new sts under sleeve. NOW MEASURE THE PIECE FROM HERE. When piece measures 3 cm, dec 1 st on each side of marker. Repeat dec approx. every 3-2½-2-1½-1½-1 cm, 9-11-13-16-19-19 more times = 36-38-40-40-40-42 sts. When sleeve measures 34-33-33-33-32-31 cm, inc 1 st = 37-39-41-41-41-43 sts. On next round, work as follows: Work the first 15-16-17-17-17-18 sts, A.3, work the remaining 15-16-17-17-17-18 sts. Continue like this until A.3 has been worked 6 times vertically. Switch to double pointed needles size 4.5 mm and inc 2-2-3-3-3-3 sts evenly = 39-41-44-44-44-46 sts. Work 3 ridges. Cast off. Knit another sleeve the same way. ASSEMBLY: Sew the openings under the sleeves. Sew the buttons on to left band. |
||||||||||||||||||||||||||||||||||||||||
Diagram explanations |
||||||||||||||||||||||||||||||||||||||||
|
||||||||||||||||||||||||||||||||||||||||
|
||||||||||||||||||||||||||||||||||||||||

|
||||||||||||||||||||||||||||||||||||||||

|
||||||||||||||||||||||||||||||||||||||||
|
Have you made this or any other of our designs? Tag your pictures in social media with #dropsdesign so we can see them! Do you need help with this pattern?You'll find tutorial videos, a Comments/Questions area and more by visiting the pattern on garnstudio.com. © 1982-2024 DROPS Design A/S. We reserve all rights. This document, including all its sub-sections, has copyrights. Read more about what you can do with our patterns at the bottom of each pattern on our site. |
||||||||||||||||||||||||||||||||||||||||


With over 40 years in knitting and crochet design, DROPS Design offers one of the most extensive collections of free patterns on the internet - translated to 17 languages. As of today we count 304 catalogues and 11422 patterns - 11422 of which are translated into English (UK/cm).
We work hard to bring you the best knitting and crochet have to offer, inspiration and advice as well as great quality yarns at incredible prices! Would you like to use our patterns for other than personal use? You can read what you are allowed to do in the Copyright text at the bottom of all our patterns. Happy crafting!
Comments / Questions (98)
Hva skjer om en bare bruker en tråd av garntype A ?
28.02.2024 - 13:05DROPS Design answered:
Hei Birgit. Da vil ikke strikkefasthet, målene, garnmengde, målene osv osv stemme. mvh DROPS Design
04.03.2024 - 11:57Hello, I don't really understand what the black square (already decreased) means. Is this only relevant on the repeat?
19.05.2023 - 23:15DROPS Design answered:
Hello, yes, these black squares mark the places where there is no longer any stitch because we have decrease it in the previous row. We use them to preserve the transparency of the diagram. So just skip them and continue with the next symbol. Happy knitting!
20.05.2023 - 09:25Under afsnittet: LÆS HELE NÆSTE AFSNIT FØR DET STRIKKES! henvises der til en forklaring om udtagninger MØNSTER OG UDTAGNING MELLEM SNONINGERNE Den finder jeg IKKE i opskriften ?? Vh Mona
29.03.2023 - 19:24DROPS Design answered:
Hej Mona, det er det stykke som står direkte efter MØNSTER OG UDTAGNING..... i opskriften :)
13.04.2023 - 09:49Hej Jag fattar inte konverterare eller byte av garn 🙈 Men går det att byta till drops Catton ?
19.01.2023 - 21:41DROPS Design answered:
Hei Christin. Denne jakken er strikket med 2 tråder. Du kan da velge å strikke med 2 tråder fra andre garn i garngruppe A eller du kan strikke denne jakken med 1 tråd og da garn fra garngruppe C. Disse valgene gjør du under: Garnåtgång vid alternativt garn – Använd vår garn-konverterare här. F.eks bytte til 1 tråd i str. L, fyll inn: Alpaca, 800 gram og 2 tråder. Klikk på Finn alternativer og du vil få opp 8 alternativer fra garngruppe C. Eller f.eks 2 tråd i str. L, fyll inn: Alpaca, 800 gram og 1 tråder. Klikk på Finn alternativer og du vil få opp 10 alternativer fra garngruppe A. Kan ikke byttes til DROPS Cotton Merino eller Cotton Light. mvh DROPS Design
23.01.2023 - 09:22Hello! In case I want to do this with a single strand of A yarn, is it possible to adapt it by doubling the stitches? Is there a way to adapt the design for a different gauge? Thanks beforehand!
15.04.2022 - 19:07DROPS Design answered:
Dear Bel, you would need to adapt it to a new gauge, you don't exactly duplicate the amount of stitches. You need to take the gauge you obtain in 10 cm (sts x rows) and recalculate all of the other stitches accordingly. For example, you need to cast on 73 sts for the smallest size with a 17 sts gauge. If your gauge is 23 sts instead (which is the typical one for yarn A), you will have to cast on (73 x 23) / 17 sts = 98 sts. Happy knitting!
15.04.2022 - 19:44Please can you advise chest size for each of the sizes as I can’t work out what the sizes are. Thank you
07.11.2021 - 19:26DROPS Design answered:
Dear Miss T, for the finished measurements of the piece, please see the shcematic drawing at the bottom of the pattern. Happy stitching!
07.11.2021 - 21:14Can this jacket be knitted on straight needles ?\r\nI am not too good at knitting in the round.\r\nThanks \r\nLindsey Frost
29.08.2021 - 16:36DROPS Design answered:
Dear Lindsey, we knit most of this piece on circular needles because of the number of stitches might make it uncomfortable to knit it on straight needles. We have a lesson HEREhttps://www.garnstudio.com/lesson.php?id=13&cid=19out adapting patterns for straight needles. Happy Stitching!
30.08.2021 - 03:19Can this jacket be knitted on straight needles ?\r\nI am not too good at knitting in the round.\r\nThanks \r\nLindsey Frost
29.08.2021 - 16:35DROPS Design answered:
Dear Lindsey, since it's worked in one piece, you use the circular needles due to the high amount of stitches. You can work with straight needles. However, you'll have trouble putting all the stitches on them (having 147 stitches in the body). You can also work with separate parts, but you need to recalculate the pattern to add stitches for the seam.
30.08.2021 - 19:05When a pattern calls for 1050 grams of yarn but it’s knitted double will I need 2100 grams of yarn or the 1050 grams ?
04.07.2021 - 22:18DROPS Design answered:
Dear Lynn, no, you will 1050 gramms, but hold the yarn double. Happy Stitching!
05.07.2021 - 02:28May I ask about the cables in the A.1 and A.2 at the Reglan part, you said pay attention to the directions of cables, you mean that in the first repeat of A.1 and A.2 is opposite the second repeat of A.1 and A.2?
03.06.2021 - 19:13DROPS Design answered:
Hi Nida, just work the diagram as explained and shown, ie A.1, 6 sts in stocking stitch, A.2 - so that back piece starts with A.2 and ends with A.1 (= cables are mirrored). you have then A.1 on left front piece and A.2 on right front piece. Happy knitting!
04.06.2021 - 07:04