DROPS Cotton Merino
DROPS Cotton Merino
50% Wool, 50% Cotton
from 4.45 $ /50g
Get the yarn to make this pattern from 44.50$.

The yarn cost is calculated from the pattern’s smallest size and the yarn’s cheapest product type. Looking for an even better price? You might find it on the DROPS Deals!

DROPS SS24

Northern Wind

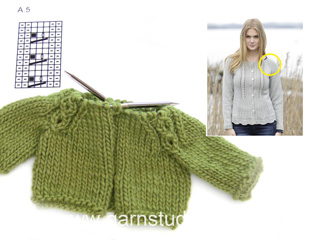
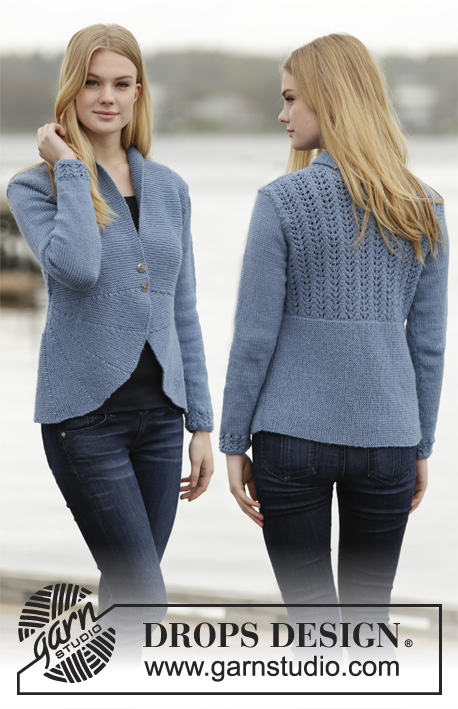
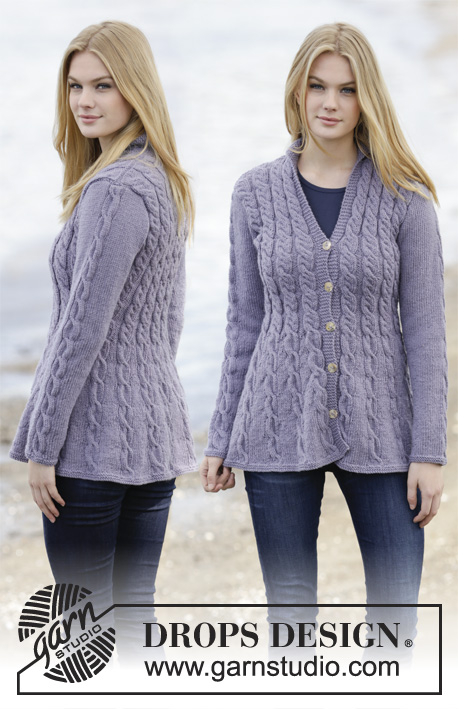
Knitted DROPS jacket with raglan, cables, lace pattern and wave pattern in ”Cotton Merino”. Size: S - XXXL.

DROPS 165-16
DROPS design: Pattern no cm-039
Yarn group B
----------------------------------------------------------
Size: S - M - L - XL - XXL - XXXL

Materials:
DROPS COTTON MERINO from Garnstudio
500-550-600-650-750-800 g color no 20, light gray

DROPS DOUBLE POINTED NEEDLES AND CIRCULAR NEEDLE (80 cm / 32'') SIZE 4 mm/US 6 - or size needed to get 21 sts x 28 rows in stockinette st = 4'' x 4'' (10 x 10 cm), and 28 sts x 30 rows in wavepattern = 4'' x 4'' (10 x 10 cm).
DROPS DOUBLE POINTED NEEDLES size 3.5 mm / US 4 – for rib
DROPS BUTTON ARCHED (white), NO 521: 7-7-7-7-8-8 pieces

-------------------------------------------------------

Alternative Yarn – See how to change yarns here
Yarn Groups A to F – Use the same pattern and change the yarn here
Yarn usage using an alternative yarn – Use our yarn converter here

-------------------------------------------------------

DROPS Cotton Merino
DROPS Cotton Merino
50% Wool, 50% Cotton
from 4.45 $ /50g
Get the yarn to make this pattern from 44.50$.

The yarn cost is calculated from the pattern’s smallest size and the yarn’s cheapest product type. Looking for an even better price? You might find it on the DROPS Deals!

Pattern instructions

NOTE: This pattern is written in American English. All measurements in charts are in cm. For conversion from inches to cm - click here. There are different terms for crocheting in American and British English. If this pattern includes crochet, click for "crochet terms" here. For this pattern in British English, please click here.
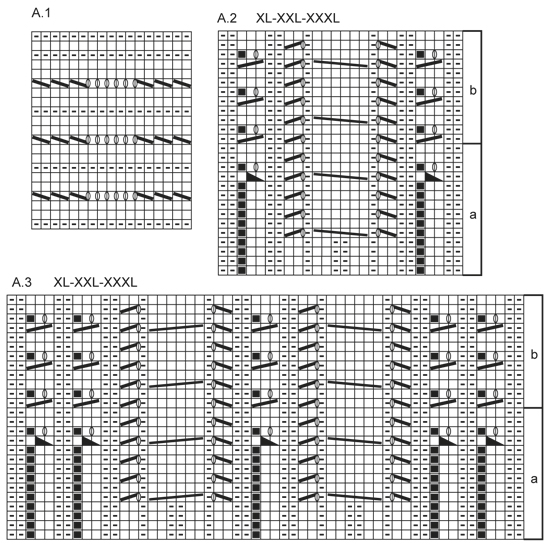
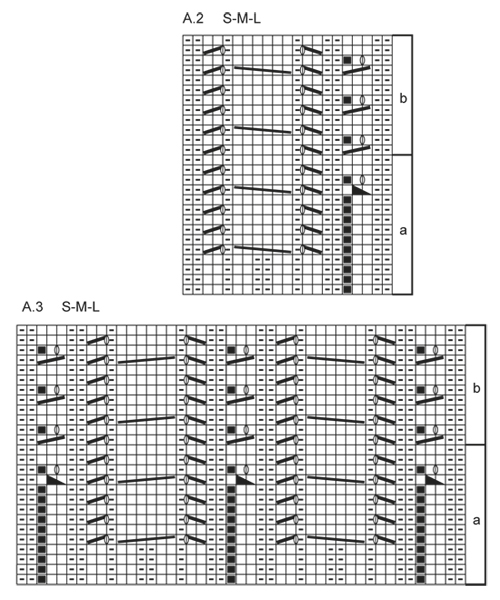
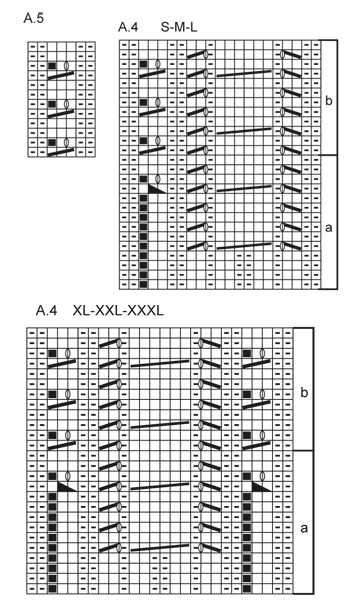
GARTER ST (back and forth):
K all rows. 1 ridge = K2 rows.

DECREASE TIP:
Dec 1 st by P 2 tog. Dec alternately at beg and end of P section.

PATTERN:
See diagrams A.1 to A.5. The diagrams show all rows in pattern seen from RS. Diagram A.2, A.3 and A.4: See diagram for size!

RAGLAN:
Dec 2 sts in every transition between body and sleeves, dec on each side of A.5. NOTE: Dec differently on body and sleeves.
Dec as follows from RS:
Before A.5: K 2 tog.
After A.5. Slip 1 st as if to K, K 1, psso.
Dec as follows from WS:
Before A.5: P 2 twisted tog.
After A.5. P 2 tog.

BUTTONHOLES:
Dec for buttonholes on right band. 1 buttonhole = K tog 2nd and 3rd st from mid front, then make 1 YO. Dec for buttonholes when piece measures:
SIZE S: 13, 20, 27, 34, 41, 48 and 55 cm /
5",8",10½",13½"16",19",21½"
SIZE M: 13, 20, 27, 34, 41, 49 and 57 cm /
5",8",10½",13½"16",19 1/4",22½''
SIZE L: 13, 20, 27, 35, 43, 51 and 59 cm /
5",8",10½",13 3/4",17",20",23 1/4"
SIZE XL: 13, 21, 29, 37, 45, 53 and 61 cm /
5",8 1/4",11½",14½",17 3/4",21",24"
SIZE XXL: 13, 20, 27, 34, 41, 48, 55 and 63 cm /
5",8",10½",13½"16",19",21½",24 3/4".
SIZE XXXL: 13, 20, 27, 34, 41, 49, 57 and 65 cm /
5",8",10½",13½"16",19 1/4",22½'',25½".
----------------------------------------------------------

BODY:
Worked back and forth on circular needle from mid front.
Cast on 265-282-299-333-367-401 sts (includes 5 band sts in each side towards mid front) on circular needle size 4 mm / US 6 with Cotton Merino. Work next row as follows from WS: Work 5 sts in GARTER ST - see explanation above, work A.1 (= 17 sts) over the next 255-272-289-323-357-391 sts, finish with 5 sts in garter st. Work A.1 one time vertically, on last row in A.1 dec 21-22-23-25-31-41 sts evenly = 244-260-276-308-336-360 sts. Dec for BUTTONHOLES on right band - see explanation above. Then work as follows from RS:

SIZE S-M-L: 5 sts in garter st, K 2, P 2, K 2, P 5, K 2, P 4, K 2, P 5, K 2, P 4, K 2, P 2, K 47-55-63, P 2, K 2, P 5, K 2, P 4, K 2, P 5, K 2, P 4, K 2, P 5, K 2, P 5, K 2, P 4, K 2, P 5, K 2, P 4, K 2, P 5, K 2, P 2, K 47-55-63, P 2, K 2, P 4, K 2, P 5, K 2, P 4, K 2, P 5, K 2, P 2, K 2, 5 sts in garter st.

SIZE XL-XXL-XXXL: 5 sts in garter st, K 2, P 2, K 2, P 5, K 2, P 4, K 2, P 5, K 2, P 4, K 2, P 5, K 2, P 2, K 65-79-91, P 2, K 2, P 5, K 2, P 5, K 2, P 4, K 2, P 5, K 2, P 4, K 2, P 5, K 2, P 5, K 2, P 4, K 2, P 5, K 2, P 4, K 2, P 5, K 2, P 5, K 2, P 2, K 65-79-91, P 2, K 2, P 5, K 2, P 4, K 2, P 5, K 2, P 4, K 2, P 5, K 2, P 2, K 2, 5 sts in garter st.

Continue this pattern, when piece measures 12 cm / 4¾'', dec 1 st in every P section with 4 and 5 sts P - READ DECREASE TIP. Repeat dec when piece measures 17 and 22 cm / 6 3/4" and 8 3/4" = 190-206-222-242-270-294 sts. Continue like this until piece measures 23 cm / 9''. REMEMBER THE KNITTING GAUGE Now work as follows from RS (NOTE: See diagram for size!) 5 sts in garter st, K 2, A.2 a (20-20-20-24-24-24 sts), K 47-55-63-65-79-91, A.3 a (= 42-42-42-50-50-50 sts), K 47-55-63-65-79-91, A.4 a (= 20-20-20-24-24-24 sts), K 2, 5 sts in garter st. Insert 2 markers in the piece; 51-55-59-64-71-77 sts in from each side (back piece = 88-96-104-114-128-140 sts). When A.2 a, A.3 a and A.4 a have been worked one time vertically, continue with A.2 b, A.3 b and A.4 b (there are now 195-211-227-251-279-303 sts on needle). When piece measures 29 cm / 11½'', inc 1 st on each side of every marker (= 4 sts inc). Repeat inc every 3-3-4-4-4-5 cm / 1"-1"-1½''-1½''-2'' 3 more times = 211-227-243-267-295-319 sts. When piece measures 41-42-43-44-45-46 cm / 16 1/8''-16½''-17''-17¼''-17¾''-18'', bind off 4 sts on each side of every marker (= 8 sts in each side) and put piece aside. There are now 91-99-107-119-133-145 sts on back piece and 52-56-60-66-73-79 sts on each front piece.

SLEEVE:
Worked in the round on double pointed needles.
Cast on 52-52-56-56-60-60 sts on double pointed needles size 3.5 mm / US 4 with Cotton Merino. K 1 round. Then work rib (= K 2/P 2). When rib measures 4 cm / 1½'', dec 8-6-8-6-8-6 sts evenly = 44-46-48-50-52-54 sts. Insert 1 marker at beg of round (= mid under sleeve). Switch to double pointed needles size 4 mm / US 6 and work in stockinette st. When piece measures 8 cm / 3 1/8'', inc 2 sts mid under sleeve. Inc every 3-3-2½-2½-2-2 cm / 1 1/8"-1 1/8"-7/8"-7/8"-3/4"-3/4" 13-14-15-16-17-18 times in total = 70-74-78-82-86-90 sts. When piece measures 50-49-49-48-48-47 cm / 19 3/4"-19 1/4"-19 1/4"-19"-19"-18½", bind off the middle 8 sts under sleeve = 62-66-70-74-78-82 sts. Put piece aside and make another sleeve.

YOKE:
Slip sleeves on to same circular needle as body where armholes were bound off = 319-343-367-399-435-467 sts. Then work as follows from RS:
5 sts in garter st, K 2, A.2 (= 21-21-21-26-26-26 sts), K 20-24-28-29-36-42, A.5 (= 7 sts), K 55-59-63-67-71-75, A.5, K 20-24-28-29-36-42, A.3 (= 45-45-45-55-55-55 sts), K 20-24-28-29-36-42, A.5, K 55-59-63-67-71-75, A.5, K 20-24-28-29-36-42, A.4 (= 21-21-21-26-26-26 sts), K 2, 5 sts in garter st. Continue with stockinette st and pattern, on next row from RS beg dec for RAGLAN – see explanation above.

Dec is different on sleeves and front/back piece.

FRONT/BACK PIECE:
Dec every 4th row 4-0-0-0-0-0 times, every other row 16-24-23-25-21-18 times and then every row 0-0-5-4-15-24 times (= 20-24-28-29-36-42 times in total).
SLEEVES:
Dec every other row 22-23-23-24-25-26 times and then every row 2-3-5-6-7-8 times (= 24-26-28-30-32-34 times in total).

After all dec for raglan 143-143-143-163-163-163 sts remain on needle. Work 2 ridges over all sts, on first row dec 43-37-31-45-39-33 sts evenly = 100-106-112-118-124-130 sts. Bind off.

ASSEMBLY: Sew the opening mid under the sleeves. Sew the buttons on to the left band.

This pattern has been corrected.

Updated online: 10.10.2016
Diagram A.4 size XL-XXL-XXXL: The big cable was turning the wrong way (row 5, 11, 17 and 23).

Diagram

All measurements in charts are in cm.

symbols = K from RS, P from WS
symbols = P from RS, K from WS
symbols = 1 YO between 2 sts
symbols = K 2 tog
symbols = slip 1 st as if to K, K 1, psso
symbols = slip 3 sts on cable needle behind piece, K 3, K 3 from cable needle
symbols = slip 3 sts on cable needle in front of piece, K 3, K 3 from cable needle
symbols = no stitch, skip this square
symbols = slip 1 st as if to K, work 2 sts in next st, psso
symbols = slip 1 st as if to K, K 2, psso
diagram
diagram
diagram
diagram

Each of our patterns has specific tutorial videos to help you.

Do you have a question? See a list of frequently asked questions (FAQ)

Knitting tension is what determines the final measurements of your work, and is usually measured per 10 x 10 cm. It is provided like so: number of stitches in width x number of rows in height - eg: 19 stitches x 26 rows = 10 x 10 cm.

The knitting tension is very individual; some people knit/crochet loosely while others work tightly. You adjust the knitting tension with the needle size, which is why the suggested needle size only serve as a guide! You need to adjust this (up or down) to ensure that YOUR knitting tension matches the knitting tension provided in the pattern. If you work with a different knitting tension than provided you will have a different yarn consumption, and your work will have different measurements than what the pattern suggests.

The knitting tension also determines which yarns can replace each other. As long as you achieve the same knitting tension you can replace one yarn with another.

See DROPS lesson: How to measure your tension/gauge

See DROPS video: How to make a gauge tension swatch

The required amount of yarn is provided in grams, eg: 450 g. To calculate how many balls you’ll need you first need to know how many grams are in 1 ball (25g, 50g or 100g). This information is available if you click on the individual yarn quality on our pages. Divide the amount required with the amount of each ball. For example, if each ball is 50g (the most common amount), the calculation will be as follows: 450 / 50 = 9 balls.

The important thing when changing from one yarn to another is that the knitting/crochet tension remains the same. This is so that the measurements of the finished piece will be the same as on the sketch provided. It is easier to achieve the same knitting tension using yarns from the same yarn group. It is also possible to work with multiple strands of a thinner yarn to achieve the knitting tension of a thicker one. Please try our yarn converter. We recommend you to always work a test swatch.

Please NOTE: when changing yarn the garment might have a different look and feel to the garment in the photo, due to individual properties and qualities of each yarn.

See DROPS lesson: Can I use a different yarn than the one mentioned in the pattern?

All our yarns are categorised into yarn groups (from A to F) according to thickness and knitting tension – group A contains the thinnest yarns and group F the thickest. This makes it easier for you to find alternative yarns to our patterns, should you wish to switch yarn. All yarns within the same group have a similar knitting tension and can easily replace each other. However, different yarn qualities have different structures and properties which will give the finished work a unique look and feel.

Click here for an overview of the yarns in each yarn group

At the top of all our patterns you’ll find a link to our yarn converter, which is a helpful tool should you wish to use a different yarn than suggested. By filling in the yarn quality you wish to replace, the amount (in your size) and number of strands, the converter will present good alternative yarns with the same knitting tension. Additionally it will tell you how much you’ll require in the new qualities and whether you’ll need to work with multiple strands. Most skeins are 50g (some are 25g or 100g).

If the pattern is worked with multiple colours, every colour will have to be converted separately. Similarly, if the pattern is worked with several strands of different yarns (for example 1 strand Alpaca and 1 strand Kid-Silk) you will have to find alternatives for each, individually.

Click here to see our yarn converter

Since different yarns have different qualities and textures we have chosen to keep the original yarn in our patterns. However, you can easily find options among our available qualities by using our yarn converter, or simply pick a yarn from the same yarn group.

It is possible that some retailers still have discontinued yarns in stock, or that someone has a few skeins at home that they would like to find patterns for.

The yarn converter will provide both alternative yarn as well as required amount in the new quality.

If you think it's hard to decide what size to make, it can be a good idea to measure a garment you own already and like the size of. Then you can pick the size by comparing those measures with the ones available in the pattern's size chart.

You'll find the size chart at the bottom of the pattern.

See DROPS lesson: How to read size chart

The needle size provided in the pattern serves only as a guide, the important thing is to follow the knitting tension. And since knitting tension is very individual, you will have to adjust the needle size to ensure that YOUR tension is the same as in the pattern – maybe you’ll have to adjust 1, or even 2 needle sizes, up or down to achieve the correct tension. For this, we recommend that you work test swatches.

Should you work with a different knitting tension than the one provided, the measurements of the finished garment might deviate from the measurement sketch.

See DROPS lesson: How to measure your tension/gauge

See DROPS video: How to make a gauge tension swatch

Working a garment top-down provides more flexibility and room for personal adjustment. For example it is easier to try the garment on while working, as well as making adjustments to length of yoke and shoulder caps.

The instructions are carefully explaining every step, in the correct order. Diagrams are adjusted to the knitting direction and are worked as usual.

The diagram depicts all rows/rounds, and every stitch seen from the right side. It is read from bottom to top, from right to left. 1 square = 1 stitch.

When working back and forth, every other row is worked from the right side and every other row is worked from the wrong side. When working from the wrong side, the diagram will have to be worked reversed: from left to right, knit stitches are purled, purl stitches are knit etc.

When working in the round every round is worked from the right side and the diagram are worked from right to left on all rounds.

See DROPS lesson: How to read knitting diagrams

The diagram depicts all rows/rounds, and every stitch seen from the right side. It is worked from bottom to top, from right to left.

When working back and forth every other row is worked from the right side: from right to left and every other row is worked from the wrong side: from left to right.

When working in the round, every row in the diagram are worked from the right side, from right to left.

When working a circular diagram you start in the middle and work your way outwards, counter clockwise, row by row.

The rows usually start with a given number of chain stitches (equivalent to the height of the following stitch), this will either be depicted in the diagram or explained in the pattern.

See DROPS lesson: How to read crochet diagrams

Instructions for working several diagrams after each other on the same row/round, will often be written like so: “work A.1, A.2, A.3 a total of 0-0-2-3-4 times". This means you work A.1 once, then A.2 is worked once, and A.3 is repeated (in width) the number of times provided for your size – in this case like so: S = 0 times, M = 0 times, L=2 times, XL= 3 times and XXL = 4 times.

The diagrams are worked as usual: begin with the first row in A.1, then work the first row in A.2 etc.

See DROPS lesson: How to read knitting diagrams

See DROPS lesson: How to read crochet diagrams

The total width of the garment (from wrist-to-wrist) will be larger in the larger sizes, despite the actual sleeves being shorter. The larger sizes have longer sleeve caps and wider shoulders, so there will be a good fit in all sizes.

The measurement sketch/schematic drawing provides information regarding the full length of the garment. If it’s a jumper or a jacket the length is measured from the highest point on the shoulder (usually closest to the neckline), and straight down to the bottom of the garment. It is NOT measured from the tip of shoulder. Similarly, the length of yoke is measured from the highest point on the shoulder and down to where yoke is split into body and sleeves.

See DROPS lesson: How to read a schematic drawing

Diagrams are often repeated on the round or in height. 1 repeat is the diagram the way it appears in the pattern. If it says to work 5 repeats of A.1 in the round, then you work A.1 a total of 5 times after/next to each other in the round. If it says to work 2 repeats of A.1 vertically/in height you work the entire diagram once, then begin again at the start and work the entire diagram one more time.

Chain stitches are slightly narrower than other stitches and to avoid working the cast-on edge too tight, we simply chain more stitches to begin with. The stitch count will be adjusted on the following row to fit the pattern and measurement sketch.

The rib edge is more elastic and will contract slightly compared to, for example, stocking stitch. By increasing before the rib edge, you avoid a visible difference in width between the rib edge and the rest of the body.

It’s very easy to cast off too tightly, and by making yarn overs while casting off (and simultaneously casting these off) you avoid a too tight cast off edge.

See DROPS video: How to bind off with yarn overs (yo)

To achieve an even increase (or decrease) you can increase on, for example: every 3rd and 4th row alternately, like so: work 2 rows and increase on the 3rd row, work 3 rows and increase on the 4th. Repeat this until the increase is complete.

See DROPS lesson: Increase or decrease 1 st on every 3rd and 4th row alternately

Should you prefer to work in the round instead of back and forth, you may of course adjust the pattern. You’ll need to add steeks mid-front (usually 5 stitches), and follow the instructions. When you would normally turn and work from the wrong side, simply work across the steek and continue in the round. At the end you’ll cut the piece open, pick up stitches to work bands, and cover the cut edges.

See DROPS video: How to knit steeks and cut open

Should you prefer to work back and forth instead of in the round, you may of course adjust the pattern so you work the pieces separately and then assemble them at the end. Divide the stitches for the body in 2, add 1 edge stitch in each side (for sewing) and work the front and back pieces separately.

See DROPS lesson: Can I adapt a pattern for circular needles into straight needles?

Pattern repeats can vary slightly in the different sizes, in order to get the correct proportions. If you’re not working the exact same size as the garment in the photo, yours might deviate slightly. This has been carefully developed and adjusted so that the complete impression of the garment is the same in all sizes.

Make sure to follow instructions and diagrams for your size!

If you have found a pattern you like which is available in women’s size it’s not very difficult to convert it to men’s size. The biggest difference will be the length of sleeves and body. Start working on the women size that you think would fit across the chest. The additional length will be worked right before you cast off for the armhole/sleeve cap. If the pattern is worked top-down you can add the length right after the armhole or before the first decrease on sleeve.

Regarding additional yarn amount, this will depend on how much length you add, but it is better with a skein too many than too few.

All yarns will have excess fibres (from production) that might come off as lint or shedding. Brushed yarns (ie hairier yarns) have more of these loose, excess fibres, causing more shedding.

Shedding also depends on what is worn under or over the garment, and whether this pulls at the yarn fibres. It’s therefore not possible to guarantee that there will be no shedding

Below are some tips on how to get the best result when working with hairier yarns:

1. When the garment is finished (before you wash it) shake it vigorously so the looser hairs come off. NOTE: do NOT use a lint roller, brush or any method that pulls at the yarn.

2. Place the garment in a plastic bag and put it in your freezer - the temperature will cause the fibres to become less attached to each other, and excess fibres will come off easier.

3. Leave in the freezer for a few hours before taking it out and shaking it again.

4. Wash the garment according to the instructions on the yarn label.

Pilling is a natural process that happens to even the most exclusive of fibers. It's a natural sign of wear and tear that is hard to avoid, and that is most visible in high friction areas of your garment like a sweater's arms and cuffs.

You can make your garment look as new by removing the pilling, using a fabric comb or a pill/lint remover.

Still can't find the answer you need? Then scroll down and leave your question so one of our experts can try to help you. This will be done normally within 5 to 10 working days.
In the meantime, you can read the questions and answers that others have left to this pattern or join the DROPS Workshop on Facebook to get help from fellow knitters/crocheters!

You might also like...

Post a comment to pattern DROPS 165-16

We would love to hear what you have to say about this pattern!

If you want to leave a question, please make sure you select the correct category in the form below, to speed up the answering process. Required fields are marked *.

Comments / Questions (74)

country flag Anne wrote:

Due to an eye problem I am unable to read charts. I understand them but don't see the symbols in the proper place, but I can read written instructions Ok ,sometimes I have to magnify but it doesn;t seem to work the same with charts..my question is, Can I make this cardi without a chart please

13.11.2023 - 01:45

country flag Anne BERNARD wrote:

Bonjour sur le dernier rang de a1 je dois diminuer 25 m sur les333 que j'ai . Je n'arrive pas à calculer tous les combien de mailles je dois tricoter 2 ensemble. Merci pour votre aide

25.08.2022 - 10:34

DROPS Design answered:

Bonjour Mme Bernard, Retirez la bordure des devants (10 mailles) de ces 333 mailles = 323 et divisez par le nombre de diminutions = 12.9 - cette leçon va vous aider à calculer comment répartir vos diminutions - cf Exemple 2. Bon tricot!

25.08.2022 - 11:47

country flag Gudrun Jonsson-Delin wrote:

Hej jag undrar hur mönster A 1 ska stickas får det inte att stämma

30.07.2021 - 10:36

DROPS Design answered:

Hej Gudrun, varv 4 stickar du såhär: 2ihop, 2ihop, 2ihop, omslag, 1r, omslag, 1r, omslag, 1r,omslag, 1r, omslag, 1 r, 1omslag, 2ihop, 2ihop, 2ihop. Nu har du lika många omslag som maskor du stickar ihop. Börja om med 2 ihop x 3 osv...

05.08.2021 - 13:30

country flag Joan Jørgensen wrote:

Hej, jeg forstår ikke indtagning til raglan, der står forstyk og rygstyk for sig og ærmer for sig, men de hænger da sammen, (forstyk og ærme) og ( rygstyk og ærme) På forhånd tak, Mvh Joan.

22.07.2021 - 21:24

DROPS Design answered:

Hej Joan, ja du har alle masker på en rundpind og så tager du ind i hver raglanovergang, på hver side af A.5. Læs i stykket øverst hvor der står RAGLAN: God fornøjelse!

05.08.2021 - 13:53

country flag Julie wrote:

I am working on the sleeves and am worried they might end up too long. I don't understand why size small has longer sleeves than size large. If my arm measures 47 cm from armpit to wrist would it be correct to knit the sleeve until it is 47 cm long then join it with the body?

26.04.2021 - 13:38

DROPS Design answered:

Dear Julie, it might be wise to measure a similar jacket you have and like the shape and compare the measurement with these in the chart - Read more here about chart - remember numbers in chart are in cm. Happy knitting!

26.04.2021 - 14:40

country flag Monique wrote:

Is dit patroon ook beschikbaar om te breien met breinaalden met knop? Ik vind breien met rondbreinaalden moeilijk.

22.02.2021 - 09:33

DROPS Design answered:

Dag Monique,

We hebben hiervoor geen apart patroon en vanwege de patronen die doorlopen in de zijnaden en de raglan is dit model niet zo geschikt om met rechte naalden te breien. Tenzij je heel erg handig bent in het aanpassen, zodat deze stukken mooi door kunnen lopen.

Om een patroon aan te passen om op rechte naalden te breien hebben we een instructie gemaakt. Deze vind je hier.

23.02.2021 - 12:50

country flag Roy wrote:

I am trying to get the right size for my wife. I was never good with metric math. I think I have the right size but I am not sure about the amount of yarn I will need to complete the sweater. I am pretty sure that the size large (my wife isn't big ) but she doesn't like here sweaters fitting too snuggly. How many skeins would I need for the size large so I can place my order ASAP. Thank you!!!!

03.02.2021 - 04:24

DROPS Design answered:

Hi Roy, Cotton Merino comes in 50 g skeins and you need 600 g for size large. This will be 12 skeins. Happy knitting!

03.02.2021 - 07:53

country flag Carol wrote:

I am confused on the A2b thru A4b pattern. The first row of the pattern (where it starts with b) you have a slip 1 st as if to K, K 2, psso. The next line above it shows that there should be 2 stitches. However, this stitch decreases 3 stitches to 1. Your video shows the stitch as 3 stitches into 1.

23.11.2020 - 06:12

DROPS Design answered:

Dear Carol, you slip 1 stitch as if to K, knit the next 2 stitches (do not knit them together) and pass the slipped stitch over the knitted stitches = you decreased 1 stitch = 2 sts remain between the purl sts. Happy knitting!

23.11.2020 - 10:30

country flag Isabel Fernández Vicioso wrote:

Ha quedado precioso, tal cual el modelo!!!!

09.11.2020 - 21:15

country flag Gudrun wrote:

2. Teil Ich befürchte, hier liegt ein Fehler vor, vor allem, weil bei anderen Massskizzen von DROPS die Hüftweite gleichmässig ansteigt. Damit wäre auch die Anschlagsmaschenzahl falsch...

24.05.2020 - 20:27