DROPS Alpaca
DROPS Alpaca
100% Alpaca
from 4.85 $ /50g
Get the yarn to make this pattern from 43.65$.

The yarn cost is calculated from the pattern’s smallest size and the yarn’s cheapest product type. Looking for an even better price? You might find it on the DROPS Deals!

DROPS SS24

Vintage Honeycomb

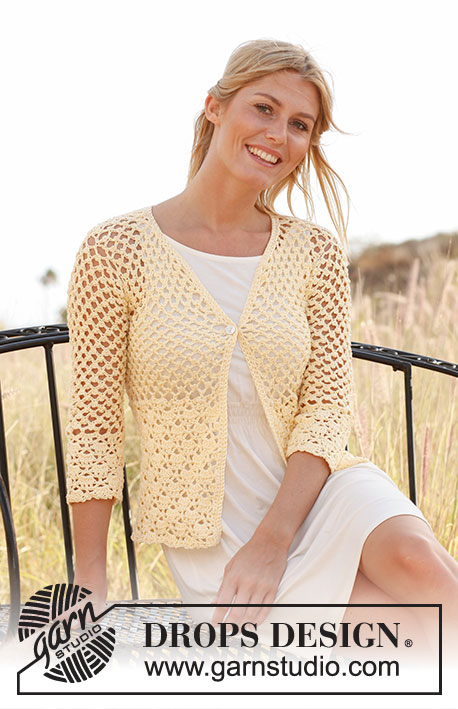
Crochet DROPS jacket with lace pattern in squares and shawl collar in ”Alpaca”. Size: S - XXXL.

DROPS 166-17
DROPS design: Pattern no z-718
Yarn group A
----------------------------------------------------------
Size: S - M - L - XL - XXL -XXXL
All measurements in chart in cm. Conversion to inch - see page 4.

Materials:
DROPS ALPACA from Garnstudio
450-500-550-600-650-750 g color no 2923, goldenrod

DROPS CROCHET HOOK SIZE 2.5 mm/C/2 – or size needed to get 28 dc x 16 rows = 4'' x 4'' (10 x 10 cm).
DROPS MOTHER-OF-PEARL BUTTON: Arched (white), NO 522: 3 pieces in all sizes

-------------------------------------------------------

Alternative Yarn – See how to change yarns here
Yarn Groups A to F – Use the same pattern and change the yarn here
Yarn usage using an alternative yarn – Use our yarn converter here

-------------------------------------------------------

DROPS Alpaca
DROPS Alpaca
100% Alpaca
from 4.85 $ /50g
Get the yarn to make this pattern from 43.65$.

The yarn cost is calculated from the pattern’s smallest size and the yarn’s cheapest product type. Looking for an even better price? You might find it on the DROPS Deals!

Pattern instructions

NOTE: This pattern is written in American English. All measurements in charts are in cm. For conversion from inches to cm - click here. There are different terms for crocheting in American and British English. If this pattern includes crochet, click for "crochet terms" here. For this pattern in British English, please click here.
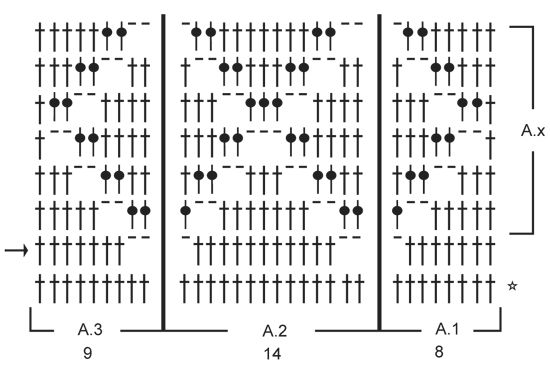
PATTERN:
See diagrams A.1 to A.3. The diagrams show all rows in pattern seen from RS.

CROCHET INFO:
Replace first dc at beg of every dc row with 3 ch.
Replace first sc at beg of every sc row with 1 ch.

DECREASE TIP:
Dec 1 dc by working 2 dc tog as follows:
Work 1 dc in first st but wait with last pull through, work 1 dc in next st but on last pull through, pull yarn through all 3 loops on hook.

BUTTONHOLES:
Make buttonholes on right band. 1 buttonhole = replace fourth dc from edge with 1 ch. On next row work band st as before (work 1 dc around ch). Work for buttonholes when piece measures:
SIZE S: 10, 18 and 26 cm / 4",7",10 1/4"
SIZE M: 11, 19 and 27 cm / 4½",7½",10½"
SIZE L: 12, 20 and 28 cm / 4 3/4",8",11"
SIZE XL: 13, 21 and 29 cm / 5",8 1/4",11½"
SIZE XXL: 12, 21 and 30 cm / 4 3/4",8 1/4",11 3/4"
SIZE XXXL: 13, 22 and 31 cm / 5",8 3/4",12 1/4"
----------------------------------------------------------

BODY:
Worked back and forth from mid front.
Work 332-367-402-437-472-507 ch (includes 3 ch to turn with) on hook size 2.5 mm/C with Alpaca. Work first row (= from WS) as follows: 1 dc in 4th ch from hook (= 2 dc) - READ CROCHET INFO, then work 1 dc in each of the next ch 3, * skip ch 1, 1 dc in each of the next 4 ch *, repeat from *-* the entire row = 265-293-321-349-377-405 dc. Work 1 row with 1 dc in every dc. Now work pattern according to diagram as follows (1st row = from WS): Work 1 dc in each of the first 5 dc (= left band), A.3 (= 9 sts), repeat A.2 (= 14 sts) 17-19-21-23-25-27 times in total, A.1 (= 8 sts), finish with 1 dc in each of the next 5 dc (= right band). When A.1-A.3 have been worked 1 time vertically, repeat A.x upwards. REMEMBER THE CROCHET GAUGE and remember BUTTONHOLES on right band - see explanation above. When piece measures 35-36-37-38-39-40 cm / 13¾''-14¼''-14½''-15''-15¼''-15¾'', adjust so that last row is from WS, finish each front piece and back piece separately. Insert 1 marker 69-76-83-90-97-104 sts in from each side (= 127-141-155-169-183-197 sts on back piece).

RIGHT FRONT PIECE:
Work pattern (from RS) as before until 5 sts remain before marker (= armhole) = 64-71-78-85-92-99 sts - NOTE: Work sts in the side that do not fit A.2 in dc. Work until piece measures 52-54-56-58-60-62 cm / 20½''-21¼''-22''-22¾''-23 5/8''-24 3/8'' - adjust after 1 whole repetition of A.2 (last row = from WS). The outermost 44-51-56-63-67-74 sts towards armhole (= shoulder), are no longer worked. Then work collar over the first 20-20-22-22-25-25 sts from RS as follows: * Work 1 dc (work in dc but around ch) in each of the first 12-12-13-13-14-14 sts, 1 hdc in each of the next 2 sts, 1 sc in each of the next 6-6-7-7-9-9 sts, turn and work 1 sc in each of the first 6-6-7-7-9-9 sc - see CROCHET INFO, 1 hdc in each of the next 2 sts, 1 dc in each of the next 12-12-13-13-14-14 sts, turn *, repeat from *-* until collar measures approx. 5-5-6-6-7-7 cm / 2''-2''-2 3/8''-2 3/8''-2 3/4''-2 3/4'' on the most narrow part. Fasten off.

LEFT FRONT PIECE:
Work as right front piece but reversed. Do not work over the first 5 sts on first row from RS. Work until piece measures 52-54-56-58-60-62 cm / 20½''-21¼''-22''-22¾''-23 5/8''-24 3/8'' - adjust after 1 whole repetition of A.2 (last row = from WS). Cut the yarn. The first 44-51-56-63-67-74 sts towards armhole (= shoulder), are no longer worked. Then work collar over the last 20-20-22-22-25-25 sts, beg from RS as follows: * Work 1 sc in each of the first 6-6-7-7-9-9 sts, 1 hdc in each of the next 2 sts, 1 dc in each of the next 12-12-13-13-14-14 sts, turn and work 1 dc in each of the first 12-12-13-13-14-14 sts, 1 hdc in each of the next 2 sts, 1 sc in each of the next 6-6-7-7-9-9 sts, turn *, repeat from *-* until collar measures approx. 5-5-6-6-7-7 cm / 2''-2''-2 3/8''-2 3/8''-2 3/4''-2 3/4'' on the most narrow part. Fasten off.

BACK PIECE:
Work pattern as before over the middle 117-131-145-159-173-187 sts (= 5 sts in each side for armholes) - NOTE: Work sts in the side that do not fit A.2 in dc. When piece measures approx. 50-52-54-56-58-60 cm / 19 3/4''-20½''-21¼''-22''-22¾''-23 5/8'' - adjust pattern so that next row is 4th row in A.x (3 rows remain), the middle 27-27-31-31-37-37 dc (= neck) are no longer worked, finish each shoulder separately = 45-52-57-64-68-75 sts for shoulder. Continue pattern as before over the last 3 rows (NOTE: Replace every ch in pattern with 1 dc) - on first row dec 1 dc towards neck - READ DECREASE TIP = 44-51-56-63-67-74 sts. Fasten off. Piece measures approx. 52-54-56-58-60-62 cm / 20½''-21¼''-22''-22¾''-23 5/8''-24 3/8''.

SLEEVE:
Worked back and forth.
Work 67-72-75-77-82-85 ch (includes 3 ch to turn with) on hook size 2.5 mm with Alpaca. Work first row as follows: 1 dc in 4th ch from hook (= 2 dc), then work 1 dc in each of the next 3-3-1-3-3-1 ch, * skip ch 1, 1 dc in each of the next 4 ch *, repeat from *-* the entire row = 53-57-59-61-65-67 dc. Remember CROCHET INFO! Work 1 row with 1 dc in every dc. Work next row (= from RS) as follows: 1 dc in each of the first 4-6-7-1-3-4 dc, A.1, A.2 2-2-2-3-3-3 times in total, A.3, finish with 1 dc in each of the next 4-6-7-1-3-4 dc. When A.1-A.3 have been worked 1 time vertically, repeat A.x upwards. When piece measures 10-10-10-10-8-8 cm / 4"-4"-4"-4"-3"-3", inc 1 dc in each side by working 2 dc in the second and next to last dc in each side. Repeat inc in each side of piece every 3rd row 16-14-7-3-0-0 more times, then every other row 4-7-16-21-25-22 times in total and every row 0-0-0-0-0-5 times in total = 95-101-107-111-117-123 sts. When piece measures 49-48-46-45-43-42 cm / 19 1/4"-19"-18"-17 3/4"-17"-16½" (shorter measurements in the larger sizes because of wider shoulders), fasten off. Work another sleeve the same way.

ASSEMBLY:
Sew the shoulder seams. Sew collar tog mid back, edge to edge and then sew collar to neck line on back piece. Sew sleeves in body. Sew sleeve seams edge to edge from the bottom and up.

Diagram

All measurements in charts are in cm.

symbols = ch
symbols = dc in st
symbols = dc around ch
symbols = beg here
symbols = first row is explained in pattern
diagram
diagram
Do you have a question? See a list of frequently asked questions (FAQ)

Knitting tension is what determines the final measurements of your work, and is usually measured per 10 x 10 cm. It is provided like so: number of stitches in width x number of rows in height - eg: 19 stitches x 26 rows = 10 x 10 cm.

The knitting tension is very individual; some people knit/crochet loosely while others work tightly. You adjust the knitting tension with the needle size, which is why the suggested needle size only serve as a guide! You need to adjust this (up or down) to ensure that YOUR knitting tension matches the knitting tension provided in the pattern. If you work with a different knitting tension than provided you will have a different yarn consumption, and your work will have different measurements than what the pattern suggests.

The knitting tension also determines which yarns can replace each other. As long as you achieve the same knitting tension you can replace one yarn with another.

See DROPS lesson: How to measure your tension/gauge

See DROPS video: How to make a gauge tension swatch

The required amount of yarn is provided in grams, eg: 450 g. To calculate how many balls you’ll need you first need to know how many grams are in 1 ball (25g, 50g or 100g). This information is available if you click on the individual yarn quality on our pages. Divide the amount required with the amount of each ball. For example, if each ball is 50g (the most common amount), the calculation will be as follows: 450 / 50 = 9 balls.

The important thing when changing from one yarn to another is that the knitting/crochet tension remains the same. This is so that the measurements of the finished piece will be the same as on the sketch provided. It is easier to achieve the same knitting tension using yarns from the same yarn group. It is also possible to work with multiple strands of a thinner yarn to achieve the knitting tension of a thicker one. Please try our yarn converter. We recommend you to always work a test swatch.

Please NOTE: when changing yarn the garment might have a different look and feel to the garment in the photo, due to individual properties and qualities of each yarn.

See DROPS lesson: Can I use a different yarn than the one mentioned in the pattern?

All our yarns are categorised into yarn groups (from A to F) according to thickness and knitting tension – group A contains the thinnest yarns and group F the thickest. This makes it easier for you to find alternative yarns to our patterns, should you wish to switch yarn. All yarns within the same group have a similar knitting tension and can easily replace each other. However, different yarn qualities have different structures and properties which will give the finished work a unique look and feel.

Click here for an overview of the yarns in each yarn group

At the top of all our patterns you’ll find a link to our yarn converter, which is a helpful tool should you wish to use a different yarn than suggested. By filling in the yarn quality you wish to replace, the amount (in your size) and number of strands, the converter will present good alternative yarns with the same knitting tension. Additionally it will tell you how much you’ll require in the new qualities and whether you’ll need to work with multiple strands. Most skeins are 50g (some are 25g or 100g).

If the pattern is worked with multiple colours, every colour will have to be converted separately. Similarly, if the pattern is worked with several strands of different yarns (for example 1 strand Alpaca and 1 strand Kid-Silk) you will have to find alternatives for each, individually.

Click here to see our yarn converter

Since different yarns have different qualities and textures we have chosen to keep the original yarn in our patterns. However, you can easily find options among our available qualities by using our yarn converter, or simply pick a yarn from the same yarn group.

It is possible that some retailers still have discontinued yarns in stock, or that someone has a few skeins at home that they would like to find patterns for.

The yarn converter will provide both alternative yarn as well as required amount in the new quality.

If you think it's hard to decide what size to make, it can be a good idea to measure a garment you own already and like the size of. Then you can pick the size by comparing those measures with the ones available in the pattern's size chart.

You'll find the size chart at the bottom of the pattern.

See DROPS lesson: How to read size chart

The needle size provided in the pattern serves only as a guide, the important thing is to follow the knitting tension. And since knitting tension is very individual, you will have to adjust the needle size to ensure that YOUR tension is the same as in the pattern – maybe you’ll have to adjust 1, or even 2 needle sizes, up or down to achieve the correct tension. For this, we recommend that you work test swatches.

Should you work with a different knitting tension than the one provided, the measurements of the finished garment might deviate from the measurement sketch.

See DROPS lesson: How to measure your tension/gauge

See DROPS video: How to make a gauge tension swatch

Working a garment top-down provides more flexibility and room for personal adjustment. For example it is easier to try the garment on while working, as well as making adjustments to length of yoke and shoulder caps.

The instructions are carefully explaining every step, in the correct order. Diagrams are adjusted to the knitting direction and are worked as usual.

The diagram depicts all rows/rounds, and every stitch seen from the right side. It is read from bottom to top, from right to left. 1 square = 1 stitch.

When working back and forth, every other row is worked from the right side and every other row is worked from the wrong side. When working from the wrong side, the diagram will have to be worked reversed: from left to right, knit stitches are purled, purl stitches are knit etc.

When working in the round every round is worked from the right side and the diagram are worked from right to left on all rounds.

See DROPS lesson: How to read knitting diagrams

The diagram depicts all rows/rounds, and every stitch seen from the right side. It is worked from bottom to top, from right to left.

When working back and forth every other row is worked from the right side: from right to left and every other row is worked from the wrong side: from left to right.

When working in the round, every row in the diagram are worked from the right side, from right to left.

When working a circular diagram you start in the middle and work your way outwards, counter clockwise, row by row.

The rows usually start with a given number of chain stitches (equivalent to the height of the following stitch), this will either be depicted in the diagram or explained in the pattern.

See DROPS lesson: How to read crochet diagrams

Instructions for working several diagrams after each other on the same row/round, will often be written like so: “work A.1, A.2, A.3 a total of 0-0-2-3-4 times". This means you work A.1 once, then A.2 is worked once, and A.3 is repeated (in width) the number of times provided for your size – in this case like so: S = 0 times, M = 0 times, L=2 times, XL= 3 times and XXL = 4 times.

The diagrams are worked as usual: begin with the first row in A.1, then work the first row in A.2 etc.

See DROPS lesson: How to read knitting diagrams

See DROPS lesson: How to read crochet diagrams

The total width of the garment (from wrist-to-wrist) will be larger in the larger sizes, despite the actual sleeves being shorter. The larger sizes have longer sleeve caps and wider shoulders, so there will be a good fit in all sizes.

The measurement sketch/schematic drawing provides information regarding the full length of the garment. If it’s a jumper or a jacket the length is measured from the highest point on the shoulder (usually closest to the neckline), and straight down to the bottom of the garment. It is NOT measured from the tip of shoulder. Similarly, the length of yoke is measured from the highest point on the shoulder and down to where yoke is split into body and sleeves.

See DROPS lesson: How to read a schematic drawing

Diagrams are often repeated on the round or in height. 1 repeat is the diagram the way it appears in the pattern. If it says to work 5 repeats of A.1 in the round, then you work A.1 a total of 5 times after/next to each other in the round. If it says to work 2 repeats of A.1 vertically/in height you work the entire diagram once, then begin again at the start and work the entire diagram one more time.

Chain stitches are slightly narrower than other stitches and to avoid working the cast-on edge too tight, we simply chain more stitches to begin with. The stitch count will be adjusted on the following row to fit the pattern and measurement sketch.

The rib edge is more elastic and will contract slightly compared to, for example, stocking stitch. By increasing before the rib edge, you avoid a visible difference in width between the rib edge and the rest of the body.

It’s very easy to cast off too tightly, and by making yarn overs while casting off (and simultaneously casting these off) you avoid a too tight cast off edge.

See DROPS video: How to bind off with yarn overs (yo)

To achieve an even increase (or decrease) you can increase on, for example: every 3rd and 4th row alternately, like so: work 2 rows and increase on the 3rd row, work 3 rows and increase on the 4th. Repeat this until the increase is complete.

See DROPS lesson: Increase or decrease 1 st on every 3rd and 4th row alternately

Should you prefer to work in the round instead of back and forth, you may of course adjust the pattern. You’ll need to add steeks mid-front (usually 5 stitches), and follow the instructions. When you would normally turn and work from the wrong side, simply work across the steek and continue in the round. At the end you’ll cut the piece open, pick up stitches to work bands, and cover the cut edges.

See DROPS video: How to knit steeks and cut open

Should you prefer to work back and forth instead of in the round, you may of course adjust the pattern so you work the pieces separately and then assemble them at the end. Divide the stitches for the body in 2, add 1 edge stitch in each side (for sewing) and work the front and back pieces separately.

See DROPS lesson: Can I adapt a pattern for circular needles into straight needles?

Pattern repeats can vary slightly in the different sizes, in order to get the correct proportions. If you’re not working the exact same size as the garment in the photo, yours might deviate slightly. This has been carefully developed and adjusted so that the complete impression of the garment is the same in all sizes.

Make sure to follow instructions and diagrams for your size!

If you have found a pattern you like which is available in women’s size it’s not very difficult to convert it to men’s size. The biggest difference will be the length of sleeves and body. Start working on the women size that you think would fit across the chest. The additional length will be worked right before you cast off for the armhole/sleeve cap. If the pattern is worked top-down you can add the length right after the armhole or before the first decrease on sleeve.

Regarding additional yarn amount, this will depend on how much length you add, but it is better with a skein too many than too few.

All yarns will have excess fibres (from production) that might come off as lint or shedding. Brushed yarns (ie hairier yarns) have more of these loose, excess fibres, causing more shedding.

Shedding also depends on what is worn under or over the garment, and whether this pulls at the yarn fibres. It’s therefore not possible to guarantee that there will be no shedding

Below are some tips on how to get the best result when working with hairier yarns:

1. When the garment is finished (before you wash it) shake it vigorously so the looser hairs come off. NOTE: do NOT use a lint roller, brush or any method that pulls at the yarn.

2. Place the garment in a plastic bag and put it in your freezer - the temperature will cause the fibres to become less attached to each other, and excess fibres will come off easier.

3. Leave in the freezer for a few hours before taking it out and shaking it again.

4. Wash the garment according to the instructions on the yarn label.

Pilling is a natural process that happens to even the most exclusive of fibers. It's a natural sign of wear and tear that is hard to avoid, and that is most visible in high friction areas of your garment like a sweater's arms and cuffs.

You can make your garment look as new by removing the pilling, using a fabric comb or a pill/lint remover.

Still can't find the answer you need? Then scroll down and leave your question so one of our experts can try to help you. This will be done normally within 5 to 10 working days.
In the meantime, you can read the questions and answers that others have left to this pattern or join the DROPS Workshop on Facebook to get help from fellow knitters/crocheters!

You might also like...

Post a comment to pattern DROPS 166-17

We would love to hear what you have to say about this pattern!

If you want to leave a question, please make sure you select the correct category in the form below, to speed up the answering process. Required fields are marked *.

Comments / Questions (21)

country flag Christine wrote:

Danke ! Gut, dann ist das eben so : Die dritte Reihe ist beim Rumpfteil eine Rück- , bei den Ärmeln jedoch eine Hinreihe, obwohl bei den ersten beiden Reihen jeweils gleichermaßen nur Stäbchen gehäkelt werden. Warum das so sein soll, bleibt ein Rätsel. Vielleicht soll man das Muster mal von der anderen Seite anschauen ? : )

02.11.2023 - 11:18

country flag Christine wrote:

Danke für die schnelle Antwort ! Ich weiß aber immer noch nicht, ob die Ärmel ebenso beginnen. Dort ist die dritte Reihe ( laut Anleitung ) doch eine Hinreihe... Freundlichen Gruß !

30.10.2023 - 19:20

DROPS Design answered:

Liebe Christine, bei den Ärmeln häkeln Sie zuerst 2 Reihen Stäbchen, dann häkeln Sie die 1. Reihe von den Diagrammen = Hin-Reihen: zuerst A.1, dann A.2 und A.3 (mit Stäbchen beidseitig). Viel Spaß beim häkeln!

31.10.2023 - 15:45

country flag Christine wrote:

Wann genau beginnt das Muster ? Ist das so gemeint : Die 1. Reihe vom Rumpfteil ist eine Rückreihe, die 2. Reihe ( Hinreihe ) sind Stäbchen, die 3. Reihe ( Rückreihe ) entspricht der 1. Reihe des Diagramms und in der 4. Reihe ( 2. Reihe der Diagramms ) beginnt das "Lochmuster" ? Verfährt man bei den Ärmeln dann auch so ? Laut Anleitung ist die 3. Reihe aber eine Hinreihe. Beginnt das "Lochmuster" in dem Fall eher ? Ich bin verwirrt... Freundliche Grüße ! Christine

29.10.2023 - 13:20

DROPS Design answered:

Liebe Christine, ja genau, die 3. Reihe beim Rumpfteil ist eine Rückreihe und die 1. Reihe mit den Diagrammen. Beginnen Sie die Diagramme beim Pfeil, dh lesen Sie diese 1. Reihe / Rückreihe links nach rechts - die Hin-Reihen lesen Sie dann rechts bei links. Viel Spaß beim stricken!

30.10.2023 - 16:28

country flag Sini wrote:

Tolle Modell habt ihr wirklich ABER eure Muster sind eine Katastrophe \r\nDa vergeht einen schon die Lust beim ersten drauf Blick \r\nSo wirr und konfus selbst für Häkelschrift \r\nSelbst meine Mutter die seit über 45 Jahren strickt hat aufgegeben bei Drops was nach zu arbeiten

26.09.2022 - 16:39

country flag Liliia wrote:

Hi, I make size M with Drops Alpaca, hook 2,5 as you recommended. BUT the size of body is enormous 138 cm, I did almost 22 cm of work and seem like need to undo it...so I tried with sleeves and they have perfect feet. So, what am I doing wrong?)

26.11.2021 - 01:06

DROPS Design answered:

Dear Lilia, if your tension is right, then you should get on the very first row on body a total of 293 treble crochets (UK)/double crochets (US), ie approx. 105 cm . You start with 367 chains but you will skip evenly chains on first row to get a lose edge (most of the time the foundation chain is tighter reason why you cast on here more chains than you need stitches). Happy crocheting!

26.11.2021 - 07:47

country flag Sandra wrote:

I mönstret på bakstycket står att de 27 m i mitten virkas det inte längre över. Men två rader under står det " obs: varje lm i mönstret över halsen ersätts med 1 st. Ska det virkas något på de 27m i mitten eller inte? Vintage honeycomb tröjan...

23.12.2020 - 13:31

DROPS Design answered:

Hei Sandra. Det hekles ikke noe mer over de 27 maskene på bakstykket, men kragen som er heklet på forstykkene skal sys sammen midt bak kant i kant og deretter sys kragen til halsrigningen på bakstykket. mvh DROPS design

11.01.2021 - 14:41

country flag BAYE Sophie wrote:

Bonjour. Je suis arrivée aux manches de ce joli modèle. Je voulais savoir si comme on augmente sur les cotes'est ce qu'on reprend le motif ou on continue toujours en brides sur cette partie là merci

21.11.2019 - 08:19

DROPS Design answered:

Bonjour Mme Baye, vous pouvez crocheter les augmentations en suivant le point ajouré, dès que vous avez suffisamment de mailles pour bien conserver la continuité du motif, ainsi les manches seront plus jolies au niveau du début/fin des tours. Bon crochet!

21.11.2019 - 09:31

country flag Lucienne Brokerhof wrote:

Op de foto's is slechts een klein sjaalkraagje te zien terwijl hij wel groter in het schemapatroon staat.

21.10.2018 - 13:20

country flag Lene Iversen wrote:

Forstår ikke hvordan opskriften startes. 1.rk består af st med lm huller, 2.rk kun st (ignorerer lm hullerne, så =indtagning), dernæst mønster efter diagram. Hvorfor skal man lave hulmønster på første række og ignorere det på næste? Hvorfor ikke bare slå det færre antal maske op og lave to solide rækker (st rk)?

02.10.2018 - 13:38

country flag Christine wrote:

When we work the back section how come it is only 117 sts 265-(69X2)= 127 not 117 would you please explain more

28.02.2018 - 05:07

DROPS Design answered:

Dear Christine, you leave 5 sts unworked for armhole on each piece: front pieces are worked over 64 sts (= 5 sts unworked for armhole) and back piece is worked over 117 sts (= 5 sts unworked for armhole on each side), so that you have: 64 sts (front piece), 10 sts unworked (armhole), 117 sts (back piece), 10 sts unworked (armhole), 64 sts (front piece) = 64+10+117+10+64= 265 sts. Happy crocheting!

28.02.2018 - 10:17