
Popular categories
Looking for a yarn?


|
||||||||||||||||||||||||||||||||||||||||||||||||||||
Ice Rose |
||||||||||||||||||||||||||||||||||||||||||||||||||||
 |
 |
|||||||||||||||||||||||||||||||||||||||||||||||||||
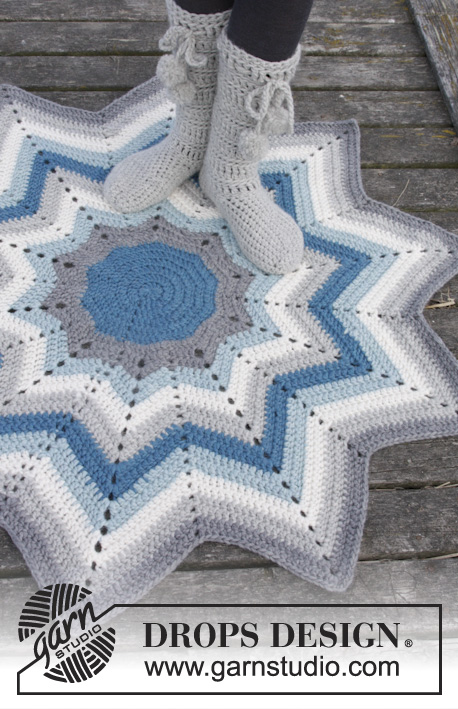
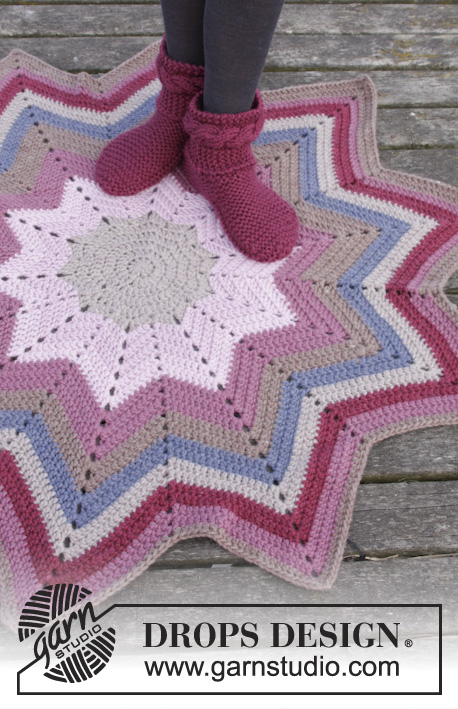
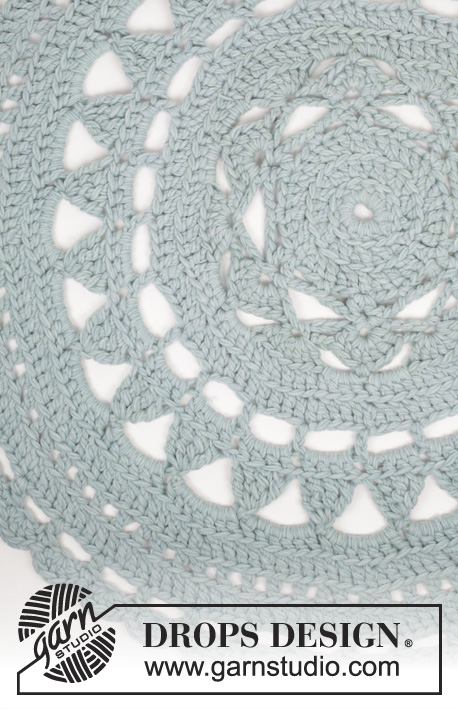
Crochet DROPS rug in 3 strands "Snow".
DROPS 163-20 |
||||||||||||||||||||||||||||||||||||||||||||||||||||
|
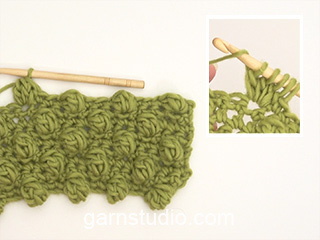
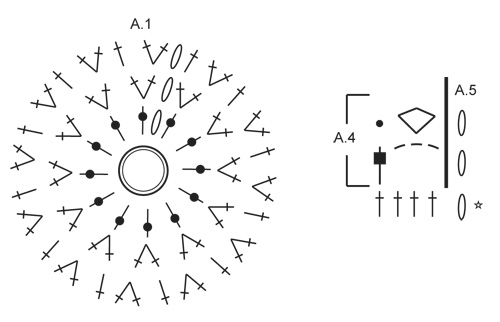
CROCHET INFO: Beg every round with dc with 3 ch (do not replace first dc) and finish with 1 sl st in 3rd ch at beg of round. BOBBLE: Work 1 tr in back loop of first/next dc but wait with last pull through (= 2 sts on hook), work 1 tr in each of the next 3 dc the same way, pull yarn through all 5 sts on hook PATTERN: See diagrams A.1-A.5. Diagram A.5 shows how round beg and ends. NOTE: In diagrams A.2-A.4 first round in diagram is last round on previous diagram, it is not worked but shows how to continue. ---------------------------------------------------------- RUG: Crochet 5 ch on hook size 12 mm with 3 strands Snow and form a ring with 1 sl st in first ch. Then work PATTERN – see explanation above, or according diagram A.1 as follows: ROUND 1: Work 3 ch - READ CROCHET INFO, 12 dc in ch-ring, finish with 1 sl st in 3rd ch. ROUND 2: Work 2 dc in back loop of every dc = 24 dc. ROUND 3: Work * 2 dc in back loop of first dc, 1 dc in back loop of next dc *, repeat from *-* the entire round = 36 dc. REMEMBER THE CROCHET GAUGE! Then work A.2 (A.5 shows beg and end of round) 6 times on round in total as follows: ROUND 4: Work ch 3, * 1 dc in both loops of first/next dc, ch 1, 1 dc in both loops of same dc, ch 3, skip 2 dc, 1 sc in next dc, ch 3, skip 2 dc *, repeat from *-* 5 more times, finish with 1 sl st in 3rd ch at beg of round. ROUND 5: Work ch 1, * 1 sc around first/next ch, ch 3, 1 sc around same ch, ch 7, skip 3 ch + 1 sc + 3 ch *, repeat from *-* 5 more times, finish with 1 sl st in first ch at beg of round. ROUND 6: Work ch 3, * 7 dc around first/next ch-space (= 3 ch-space), ch 3, 1 sc around next ch-space (= 7 ch-space), 3 ch *, repeat from *-* 5 more times, finish with 1 sl st in 3rd ch at beg of round = 6 dc-groups on round. ROUND 7: Work ch 3, * skip 3 dc, 1 sc in next dc, ch 3, skip 3 dc and ch 3, 7 dc in next sc, 3 ch *, repeat from *-* 5 more times, finish with 1 sl st in 3rd ch at beg of round = 6 dc-groups on round. ROUND 8: Work ch 3, * 4 dc around first/next ch-space, 1 dc in back loop of each of the next 7 dc, 4 dc around next ch-space *, repeat from *-* 5 more times, finish with 1 sl st in 3rd ch at beg of round = 90 dc. ROUND 9: Work ch 3, * 2 dc in back loop of first/next dc, 1 dc in back loop of each of the next 10 dc, 2 dc in back loop of next dc, 1 dc in back loop of each of the next 3 dc *, repeat from *-* 5 more times, finish with 1 sl st in 3rd ch at beg of round = 102 dc. ROUND 10: Work ch 3, * 1 dc in both loops of first/next dc, ch 4, skip 3 dc, 1 dc in both loops of next dc, ch 4, skip 3 dc, 1 dc in both loops of next dc, ch 4, skip 3 dc, 1 dc in both loops of next dc, ch 4, skip 4 dc *, repeat from *-* 5 more times, finish with 1 sl st in 3rd ch at beg of round = 24 ch-spaces. ROUND 11: Work ch 3, * ch 1, 4 dc around first/next ch-space *, repeat from *-* 23 more times, finish with 1 sl st in 3rd ch at beg of round = 96 dc and 24 ch. Then work A.3 (A.5 shows beg and end of round) 12 times on round in total as follows: ROUND 12: Work ch 4, * ch 3, work 1 BOBBLE – see explanation above – in the next/first 4 dc, ch 6, 1 bobble in the next 4 dc, 3 ch *, repeat from *-* 11 more times, finish with 1 sl st in 4th ch at beg of round = 24 bobbles. ROUND 13: Work ch 3, 3 dc around first ch-space, * 6 dc around next ch-space, 7 dc around next ch-space *, repeat from *-* 10 more times, 6 dc around next ch-space, 4 dc around last ch-space, finish with 1 sl st in 3rd ch at beg of round = 156 dc. ROUND 14: Work ch 3, * 2 dc in back loop of first/next dc, 1 dc in back loop of each of the next 12 dc *, repeat from *-* 11 more times, finish with 1 sl st in 3rd ch at beg of round = 168 dc. ROUND 15: Work ch 3, * 1 dc in back loop of first/next dc, ch 1, 1 dc in back loop of next dc, ** ch 1, skip 1 dc, 1 dc in back loop of next dc **, repeat from **-** 4 more times, ch 1, 1 dc in back loop of next dc, ch 1, skip 1 dc *, repeat from *-* 11 more times, finish with 1 sl st in 3rd ch at beg of round = 96 dc and 96 ch. ROUND 16: Work ch 3, 1 dc in back loop of every dc and 1 dc in back loop of every ch = 192 dc. Then work A.4 (A.5 shows beg and end of round) 48 times on round in total as follows: ROUND 17: Work ch 3, * ch 3, skip 3 dc, 1 dc in both loops of next dc *, repeat from *-* 47 more times, finish with 1 sl st in 3rd ch at beg of round = 48 ch-spaces. ROUND 18: Work ch 3, * work 5 dc in middle ch, 1 sc in first/next dc *, repeat from *-* 47 more times, finish with 1 sl st in 3rd ch at beg of round = 48 dc-groups. Fasten off. |
||||||||||||||||||||||||||||||||||||||||||||||||||||
Diagram explanations |
||||||||||||||||||||||||||||||||||||||||||||||||||||
|
||||||||||||||||||||||||||||||||||||||||||||||||||||
|
||||||||||||||||||||||||||||||||||||||||||||||||||||

|
||||||||||||||||||||||||||||||||||||||||||||||||||||

|
||||||||||||||||||||||||||||||||||||||||||||||||||||
|
Have you made this or any other of our designs? Tag your pictures in social media with #dropsdesign so we can see them! Do you need help with this pattern?You'll find tutorial videos, a Comments/Questions area and more by visiting the pattern on garnstudio.com. © 1982-2024 DROPS Design A/S. We reserve all rights. This document, including all its sub-sections, has copyrights. Read more about what you can do with our patterns at the bottom of each pattern on our site. |
||||||||||||||||||||||||||||||||||||||||||||||||||||


With over 40 years in knitting and crochet design, DROPS Design offers one of the most extensive collections of free patterns on the internet - translated to 17 languages. As of today we count 304 catalogs and 11422 patterns - 11417 of which are translated into English (US/in).
We work hard to bring you the best knitting and crochet have to offer, inspiration and advice as well as great quality yarns at incredible prices! Would you like to use our patterns for other than personal use? You can read what you are allowed to do in the Copyright text at the bottom of all our patterns. Happy crafting!
Comments / Questions (24)
Kan de 3 lm i starten av hver omgang være en st.? Blir ett strek som følger hele matten opp
04.04.2024 - 10:00DROPS Design answered:
Hei Natalie, Ja, 3 lm tilsvarer en stav. God fornøyelse!
05.04.2024 - 06:58Klopt het dat de 4 beginlossen van toer 12 de ruimte tussen de eerste en laatste bobbel in tweeen deelt? Ik vind dat niet zo mooi staan
19.10.2022 - 10:25DROPS Design answered:
Dag Wilma,
Ja klopt, er komt wat een onderbreking in de breedte van het patroon. Misschien is het een oplossing dat je na de 4 beginlossen gelijk 6 lossen haakt voor het boogje en aan het eind van de toer 3 dubbele stokjes haakt en de bij de laatste doorhaling de haaknaald ook door de 4e losse van de 4 beginlossen steekt, zodat deze bij de laatste bobbel komen?
26.10.2022 - 09:22Que veux dire la barre oblique entre deux explications ? Merci!*1 B sous les 2 brins de la 1ère B/de la B suivant
02.09.2021 - 17:30DROPS Design answered:
Bonjour Mme Gagné, la première fois que vous allez crocheté cette bride,/maille serrée, ce sera dans/autour de la première maille, (= avant le premier *), mais lorsque vous répèterez de *-*, vous crochèterez cette bride/maille serrée dans/autour de la maille suivante. Bon crochet!
03.09.2021 - 07:15Bonjour, Je souhaite réaliser ce modèle en coton avec un crochet numéro 8 et n'utiliser qu'un seul fil. Pouvez-vous me conseiller sur la qualité de coton que je peux utiliser? Travailler avec 3 fils et un crochet numéro 12 me semble trop compliqué. Par contre j'aimerais garder la même taille de tapis (environ 1 m.). Est-ce possible? Merci d'avance de votre réponse.
20.04.2021 - 17:08DROPS Design answered:
Bonjour Sylvie, malheureusement non, ce modèle a été crocheté avec un crochet 12 (et 3 fils) et une tension de 5 brides = 10 cm; si vous utilisez un crochet de taille différente, vous n'aurez pas le même échantillon et nous ne sommes malheureusement pas en mesure de pouvoir adapter chacun de nos modèles à chaque demande. Consultez nos autres modèles de tapis qui se réalisent avec un crochet 8, cela pourra peut-être vous inspirer. Bon crochet!
21.04.2021 - 07:15Hej når jeg kommer til 11 række så er det altid 25 lm hvad er der galt ?
16.03.2020 - 14:01Hei. Jeg står fast på omg 15, får det ikke til å stemme
07.04.2019 - 09:42DROPS Design answered:
Hei Marianne. Du hekler etter A.3. På omg 15 (4 rad i diagrammet, ikke inkludert raden med hvit stjerne) hekles det annenhver st og lm over hele omgangen. Du hekler først 3 lm, videre hekler du 1 st, 1 lm og 1 st = 3 første symbolene i A.3. Så skal du gjenta neste avsnitt 4 ganger: 1 lm, hopp over 1 st, 1 st i bakre ledd av neste st (altså 1 st og 1 lm) = de neste 8 symbolene i A.3. Så hekler du1 lm, 1 st i neste st, 1 lm, 1 st i neste st 1 lm = de siste 5 symbolene i A.3. Slik forstetter du over hele omgangen. Hvert symbol i A.3 hekles akkurat slik det står, og st hekles i st rett under, på forrige rad. God fornøyelse
09.04.2019 - 11:13Bonjour, je voulais savoir si on veut laver ce tapis il feutre ou pas car cette laine est prévue pour cela je crois. Et si on veut feutrer ce tapis combien faut-il de grammes de laine esquimo en plus pour avoir la même taille. Merci
22.05.2018 - 08:55DROPS Design answered:
Bonjour Aline, vous trouverez les consignes d'entretien sur le nuancier de DROPS Eskimo et également quelques généralités sur l'entretien des laines ici. Ce tapis n'est pas feutré, il nous est donc difficile de donner la quantité nécessaire pour le même en version feutrée, vous trouverez ici quelques indications complémentaires sur le feutrage. Votre magasin DROPS pourra vous aider si besoin, même par mail ou téléphone. Bon crochet!
22.05.2018 - 09:57Finnes det noen instruksjonsvideo på mønster a2? Jeg evner ikke å få dette til..
04.03.2018 - 21:28DROPS Design answered:
Hej Åse, det har vi desværre ikke, vi kan skrive det på ønskelisten. Prøv at spørge i butikken hvor du har købt dit DROPS garn, de kan helt sikkert hjælpe dig videre. Held og lykke!
06.03.2018 - 16:58Bibi wrote:
Bedankt voor dit patroon. Ik heb Het als Pdf kunnen bewaren bij mijn iBooks op mijn iPad.
27.02.2018 - 19:31Noha wrote:
Bonjour je voulais savoir si le matériel est Cotton ou laine et qu'elle est la meilleure pour les tapis. Merci beaucoup pour tout ces belles choses que vous nous faites.
11.02.2018 - 10:53DROPS Design answered:
Bonjour Mme Noha, ce tapis a été réalisé en Laine (= DROPS Eskimo), si vous voulez le réaliser en Cotton, vous trouverez ici quelques informations et conseil à propos des alternatives. Bon crochet!
12.02.2018 - 09:13