DROPS Cotton Merino
DROPS Cotton Merino
50% Wool, 50% Cotton
from 4.45 $ /50g
Get the yarn to make this pattern from 40.05$.

The yarn cost is calculated from the pattern’s smallest size and the yarn’s cheapest product type. Looking for an even better price? You might find it on the DROPS Deals!

DROPS SS24

Green Forest Cardigan

Knitted DROPS jacket with raglan and lace pattern in ”Cotton Merino” or "Belle". Size: S - XXXL.

DROPS 164-13
DROPS design: Pattern no cm-038
Yarn group B
----------------------------------------------------------
Size: S - M - L - XL - XXL - XXXL

Materials:
DROPS COTTON MERINO from Garnstudio
450-500-550-600-650-750 g color no 11, forest green

Or use:
DROPS BELLE from Garnstudio
450-500-550-550-600-700 g colour no 10, moss green

DROPS DOUBLE POINTED NEEDLES AND CIRCULAR NEEDLE (60 or 80 cm / 60 or 80 cm / 24'' or 32'') SIZE 4 mm/US 6 - or size needed to get 21 sts x 28 rows in stockinette st = 4'' x 4'' (10 x 10 cm).
DROPS BUTTON ARCHED (white), NO 521: 7 pieces in all sizes

-------------------------------------------------------

Alternative Yarn – See how to change yarns here
Yarn Groups A to F – Use the same pattern and change the yarn here
Yarn usage using an alternative yarn – Use our yarn converter here

-------------------------------------------------------

DROPS Cotton Merino
DROPS Cotton Merino
50% Wool, 50% Cotton
from 4.45 $ /50g
Get the yarn to make this pattern from 40.05$.

The yarn cost is calculated from the pattern’s smallest size and the yarn’s cheapest product type. Looking for an even better price? You might find it on the DROPS Deals!

Pattern instructions

NOTE: This pattern is written in American English. All measurements in charts are in cm. For conversion from inches to cm - click here. There are different terms for crocheting in American and British English. If this pattern includes crochet, click for "crochet terms" here. For this pattern in British English, please click here.
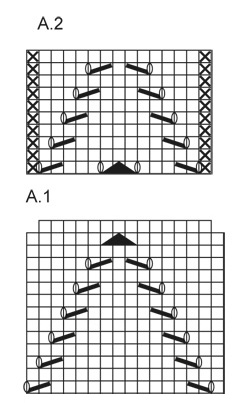
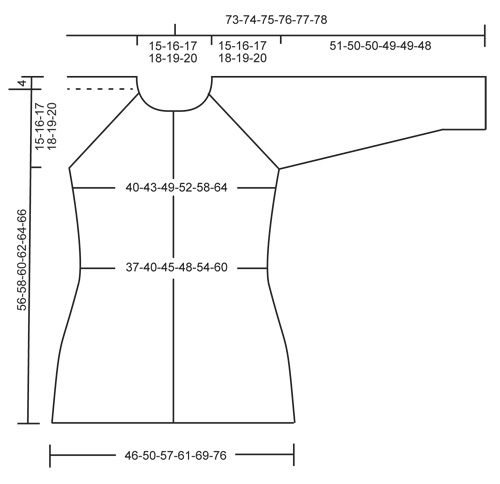
GARTER ST (back and forth):
K all rows. 1 ridge = K2 rows.

GARTER ST (in the round on double pointed needles):
* K 1 round and P 1 round *, repeat from *-*. 1 ridge = 2 rounds.
PATTERN:
See diagrams A.1 and A.2. The diagrams show all rows in pattern seen from RS.

RAGLAN:
Dec 2 sts in every transition between body and sleeves.
Dec as follows from RS:
Beg 3 sts before marker and work as follows: K 2 tog, K 2 (marker is between these 2 sts), slip 1 st as if to K, K 1, psso.
Dec as follows from WS:
Beg 3 sts before marker and work as follows: P 2 twisted tog, P 2 (marker is between these 2 sts), P 2 tog.

BUTTONHOLES:
Dec for buttonholes on right band. 1 buttonhole = K tog third and fourth st from edge and make 1 YO.
Dec for buttonholes when piece measures:
SIZE S: 11, 17, 23, 30, 37, 44 and 51 cm /
4½",6 3/4",9",11 3/4",14½",17 1/4",20"
SIZE M: 11, 18, 25, 32, 39, 46 and 53 cm /
4½",7",9 3/4",12½",15 1/4",18",21"
SIZE L: 11, 18, 25, 32, 39, 47 and 55 cm /
4½",7",9 3/4",12½",15 1/4",18½",21½"
SIZE XL: 11, 18, 26, 34, 42, 50 and 57 cm /
4½",7",10 1/4",13½",16½",19 3/4",22½''
SIZE XXL: 11, 19, 27, 35, 43, 51 and 59 cm /
4½",7½",10½",13 3/4",17",20",23 1/4"
SIZE XXXL: 11, 20, 29, 37, 45, 53 and 61 cm /
4½",8",11½",14½",17 3/4",21",24"
----------------------------------------------------------

JACKET:
Worked back and forth on circular needle.
Cast on 203-219-251-267-299-331 sts (includes 5 band sts in each side) on circular needle size 4 mm / US 6 with Cotton Merino. Work 1 ridge in GARTER ST - see explanation above. Work next row as follows - from RS: 5 sts in garter st, A.1 over the next 192-208-240-256-288-320 sts, 1 st in stockinette st, 5 sts in garter st. When A.1 has been worked 1 time vertically, there are 179-193-221-235-263-291 sts on needle. Insert 2 markers in the piece; 46-50-58-62-70-77 sts in from each side (back piece = 87-93-105-111-123-137 sts). Continue in stockinette st with 5 st in garter st in each side (= band). REMEMBER THE KNITTING GAUGE When piece measures 8 cm / 3 1/8'', dec 1 st on each side of markers (= 4 sts dec), repeat dec every 3 cm / 1'' 4 more times = 159-173-201-215-243-271 sts. Dec for BUTTONHOLES on right front piece - see explanation above. When piece measures 26 cm / 10 1/4'', inc 1 st on each side of each marker (= 4 sts inc), repeat inc every 4-4½-4½-5-5-5½ cm / 1½"-1 3/4"-1 3/4"-2"-2"-2 1/4" 3 more times = 175-189-217-231-259-287 sts. When piece measures 41-42-43-44-45-46 cm / 16 1/8''-16½''-17''-17¼''-17¾''-18'', bind off for armholes in each side as follows: Work until 4 sts remain before first marker in the side, bind off the next 8 sts, work until 4 sts remain before marker in the other side, bind off the next 8 sts and work the rest of row. There are now 77-83-95-101-113-127 sts on back piece and 41-45-53-57-65-72 sts on each front piece. Put piece aside and knit the sleeves.

SLEEVE:
Worked in the round on double pointed needles. Cast on 45-47-49-51-53-55 sts on double pointed needles size 4 mm / US 6 with Cotton Merino. Work 2 ridges. Insert 1 marker at the beg of round. Then work as follows: K 15-16-17-18-19-20, A.2 (= 15 sts), K 15-16-17-18-19-20. Continue this pattern upwards AT THE SAME TIME when piece measures 8 cm / 3 1/8'', inc 1 st on each side of marker. Inc every 3½-3-3-2½-2-2 cm / 1 1/4"-1 1/8"-1 1/8"-7/8"-3/4"-3/4" 11-12-13-14-16-17 more times = 69-73-77-81-87-91 sts. Work inc sts in stockinette st. When piece measures 51-50-50-49-49-48 cm / 20"-19 3/4"-19 3/4"-19 1/4"-19 1/4"-19" (NOTE! Shorter measurements in the larger sizes because of longer raglan dec and larger neck width) bind off the 4 sts on each side of marker = 61-65-69-73-79-83 sts. Put piece aside and make another sleeve.

YOKE:
Slip sleeves on to same circular needle as body where armholes were bound off = 281-303-339-361-401-437 sts. Insert 1 marker in all transitions between sleeves and body (= 4 markers). Continue in stockinette st over sts on body and pattern and in stockinette st as before on sleeves and in garter st on band sts, AT THE SAME TIME on next row beg dec for RAGLAN – see explanation above (= 8 sts dec). Repeat dec on every other row 20-22-23-23-23-24 more times and then on every row 0-0-1-3-6-7 times. After all dec for raglan 113-119-139-145-161-181 sts remain on needle. Work 2 ridges while AT THE SAME TIME on first row dec 12-14-30-31-43-59 sts evenly = 101-105-109-114-118-122 sts. Bind off.

ASSEMBLY: Sew the opening under the sleeves. Sew the buttons on to left front piece.

Diagram

All measurements in charts are in cm.

symbols = K from RS, P from WS
symbols = P from RS, K from WS
symbols = slip 1 st as if to K, K 1, psso
symbols = K 2 tog
symbols = slip 1 st as if to K, K 2 tog, psso
symbols = 1 YO between 2 sts
diagram
diagram

Each of our patterns has specific tutorial videos to help you.

Do you have a question? See a list of frequently asked questions (FAQ)

Knitting tension is what determines the final measurements of your work, and is usually measured per 10 x 10 cm. It is provided like so: number of stitches in width x number of rows in height - eg: 19 stitches x 26 rows = 10 x 10 cm.

The knitting tension is very individual; some people knit/crochet loosely while others work tightly. You adjust the knitting tension with the needle size, which is why the suggested needle size only serve as a guide! You need to adjust this (up or down) to ensure that YOUR knitting tension matches the knitting tension provided in the pattern. If you work with a different knitting tension than provided you will have a different yarn consumption, and your work will have different measurements than what the pattern suggests.

The knitting tension also determines which yarns can replace each other. As long as you achieve the same knitting tension you can replace one yarn with another.

See DROPS lesson: How to measure your tension/gauge

See DROPS video: How to make a gauge tension swatch

The required amount of yarn is provided in grams, eg: 450 g. To calculate how many balls you’ll need you first need to know how many grams are in 1 ball (25g, 50g or 100g). This information is available if you click on the individual yarn quality on our pages. Divide the amount required with the amount of each ball. For example, if each ball is 50g (the most common amount), the calculation will be as follows: 450 / 50 = 9 balls.

The important thing when changing from one yarn to another is that the knitting/crochet tension remains the same. This is so that the measurements of the finished piece will be the same as on the sketch provided. It is easier to achieve the same knitting tension using yarns from the same yarn group. It is also possible to work with multiple strands of a thinner yarn to achieve the knitting tension of a thicker one. Please try our yarn converter. We recommend you to always work a test swatch.

Please NOTE: when changing yarn the garment might have a different look and feel to the garment in the photo, due to individual properties and qualities of each yarn.

See DROPS lesson: Can I use a different yarn than the one mentioned in the pattern?

All our yarns are categorised into yarn groups (from A to F) according to thickness and knitting tension – group A contains the thinnest yarns and group F the thickest. This makes it easier for you to find alternative yarns to our patterns, should you wish to switch yarn. All yarns within the same group have a similar knitting tension and can easily replace each other. However, different yarn qualities have different structures and properties which will give the finished work a unique look and feel.

Click here for an overview of the yarns in each yarn group

At the top of all our patterns you’ll find a link to our yarn converter, which is a helpful tool should you wish to use a different yarn than suggested. By filling in the yarn quality you wish to replace, the amount (in your size) and number of strands, the converter will present good alternative yarns with the same knitting tension. Additionally it will tell you how much you’ll require in the new qualities and whether you’ll need to work with multiple strands. Most skeins are 50g (some are 25g or 100g).

If the pattern is worked with multiple colours, every colour will have to be converted separately. Similarly, if the pattern is worked with several strands of different yarns (for example 1 strand Alpaca and 1 strand Kid-Silk) you will have to find alternatives for each, individually.

Click here to see our yarn converter

Since different yarns have different qualities and textures we have chosen to keep the original yarn in our patterns. However, you can easily find options among our available qualities by using our yarn converter, or simply pick a yarn from the same yarn group.

It is possible that some retailers still have discontinued yarns in stock, or that someone has a few skeins at home that they would like to find patterns for.

The yarn converter will provide both alternative yarn as well as required amount in the new quality.

If you think it's hard to decide what size to make, it can be a good idea to measure a garment you own already and like the size of. Then you can pick the size by comparing those measures with the ones available in the pattern's size chart.

You'll find the size chart at the bottom of the pattern.

See DROPS lesson: How to read size chart

The needle size provided in the pattern serves only as a guide, the important thing is to follow the knitting tension. And since knitting tension is very individual, you will have to adjust the needle size to ensure that YOUR tension is the same as in the pattern – maybe you’ll have to adjust 1, or even 2 needle sizes, up or down to achieve the correct tension. For this, we recommend that you work test swatches.

Should you work with a different knitting tension than the one provided, the measurements of the finished garment might deviate from the measurement sketch.

See DROPS lesson: How to measure your tension/gauge

See DROPS video: How to make a gauge tension swatch

Working a garment top-down provides more flexibility and room for personal adjustment. For example it is easier to try the garment on while working, as well as making adjustments to length of yoke and shoulder caps.

The instructions are carefully explaining every step, in the correct order. Diagrams are adjusted to the knitting direction and are worked as usual.

The diagram depicts all rows/rounds, and every stitch seen from the right side. It is read from bottom to top, from right to left. 1 square = 1 stitch.

When working back and forth, every other row is worked from the right side and every other row is worked from the wrong side. When working from the wrong side, the diagram will have to be worked reversed: from left to right, knit stitches are purled, purl stitches are knit etc.

When working in the round every round is worked from the right side and the diagram are worked from right to left on all rounds.

See DROPS lesson: How to read knitting diagrams

The diagram depicts all rows/rounds, and every stitch seen from the right side. It is worked from bottom to top, from right to left.

When working back and forth every other row is worked from the right side: from right to left and every other row is worked from the wrong side: from left to right.

When working in the round, every row in the diagram are worked from the right side, from right to left.

When working a circular diagram you start in the middle and work your way outwards, counter clockwise, row by row.

The rows usually start with a given number of chain stitches (equivalent to the height of the following stitch), this will either be depicted in the diagram or explained in the pattern.

See DROPS lesson: How to read crochet diagrams

Instructions for working several diagrams after each other on the same row/round, will often be written like so: “work A.1, A.2, A.3 a total of 0-0-2-3-4 times". This means you work A.1 once, then A.2 is worked once, and A.3 is repeated (in width) the number of times provided for your size – in this case like so: S = 0 times, M = 0 times, L=2 times, XL= 3 times and XXL = 4 times.

The diagrams are worked as usual: begin with the first row in A.1, then work the first row in A.2 etc.

See DROPS lesson: How to read knitting diagrams

See DROPS lesson: How to read crochet diagrams

The total width of the garment (from wrist-to-wrist) will be larger in the larger sizes, despite the actual sleeves being shorter. The larger sizes have longer sleeve caps and wider shoulders, so there will be a good fit in all sizes.

The measurement sketch/schematic drawing provides information regarding the full length of the garment. If it’s a jumper or a jacket the length is measured from the highest point on the shoulder (usually closest to the neckline), and straight down to the bottom of the garment. It is NOT measured from the tip of shoulder. Similarly, the length of yoke is measured from the highest point on the shoulder and down to where yoke is split into body and sleeves.

See DROPS lesson: How to read a schematic drawing

Diagrams are often repeated on the round or in height. 1 repeat is the diagram the way it appears in the pattern. If it says to work 5 repeats of A.1 in the round, then you work A.1 a total of 5 times after/next to each other in the round. If it says to work 2 repeats of A.1 vertically/in height you work the entire diagram once, then begin again at the start and work the entire diagram one more time.

Chain stitches are slightly narrower than other stitches and to avoid working the cast-on edge too tight, we simply chain more stitches to begin with. The stitch count will be adjusted on the following row to fit the pattern and measurement sketch.

The rib edge is more elastic and will contract slightly compared to, for example, stocking stitch. By increasing before the rib edge, you avoid a visible difference in width between the rib edge and the rest of the body.

It’s very easy to cast off too tightly, and by making yarn overs while casting off (and simultaneously casting these off) you avoid a too tight cast off edge.

See DROPS video: How to bind off with yarn overs (yo)

To achieve an even increase (or decrease) you can increase on, for example: every 3rd and 4th row alternately, like so: work 2 rows and increase on the 3rd row, work 3 rows and increase on the 4th. Repeat this until the increase is complete.

See DROPS lesson: Increase or decrease 1 st on every 3rd and 4th row alternately

Should you prefer to work in the round instead of back and forth, you may of course adjust the pattern. You’ll need to add steeks mid-front (usually 5 stitches), and follow the instructions. When you would normally turn and work from the wrong side, simply work across the steek and continue in the round. At the end you’ll cut the piece open, pick up stitches to work bands, and cover the cut edges.

See DROPS video: How to knit steeks and cut open

Should you prefer to work back and forth instead of in the round, you may of course adjust the pattern so you work the pieces separately and then assemble them at the end. Divide the stitches for the body in 2, add 1 edge stitch in each side (for sewing) and work the front and back pieces separately.

See DROPS lesson: Can I adapt a pattern for circular needles into straight needles?

Pattern repeats can vary slightly in the different sizes, in order to get the correct proportions. If you’re not working the exact same size as the garment in the photo, yours might deviate slightly. This has been carefully developed and adjusted so that the complete impression of the garment is the same in all sizes.

Make sure to follow instructions and diagrams for your size!

If you have found a pattern you like which is available in women’s size it’s not very difficult to convert it to men’s size. The biggest difference will be the length of sleeves and body. Start working on the women size that you think would fit across the chest. The additional length will be worked right before you cast off for the armhole/sleeve cap. If the pattern is worked top-down you can add the length right after the armhole or before the first decrease on sleeve.

Regarding additional yarn amount, this will depend on how much length you add, but it is better with a skein too many than too few.

All yarns will have excess fibres (from production) that might come off as lint or shedding. Brushed yarns (ie hairier yarns) have more of these loose, excess fibres, causing more shedding.

Shedding also depends on what is worn under or over the garment, and whether this pulls at the yarn fibres. It’s therefore not possible to guarantee that there will be no shedding

Below are some tips on how to get the best result when working with hairier yarns:

1. When the garment is finished (before you wash it) shake it vigorously so the looser hairs come off. NOTE: do NOT use a lint roller, brush or any method that pulls at the yarn.

2. Place the garment in a plastic bag and put it in your freezer - the temperature will cause the fibres to become less attached to each other, and excess fibres will come off easier.

3. Leave in the freezer for a few hours before taking it out and shaking it again.

4. Wash the garment according to the instructions on the yarn label.

Pilling is a natural process that happens to even the most exclusive of fibers. It's a natural sign of wear and tear that is hard to avoid, and that is most visible in high friction areas of your garment like a sweater's arms and cuffs.

You can make your garment look as new by removing the pilling, using a fabric comb or a pill/lint remover.

Still can't find the answer you need? Then scroll down and leave your question so one of our experts can try to help you. This will be done normally within 5 to 10 working days.
In the meantime, you can read the questions and answers that others have left to this pattern or join the DROPS Workshop on Facebook to get help from fellow knitters/crocheters!

You might also like...

Post a comment to pattern DROPS 164-13

We would love to hear what you have to say about this pattern!

If you want to leave a question, please make sure you select the correct category in the form below, to speed up the answering process. Required fields are marked *.

Comments / Questions (39)

country flag Claire wrote:

Bonjour, Je suis en train de réaliser ce magnifique gilet. Que faut-il comprendre concernant les diminutions du raglan, tous les 2 rangs et 0 fois tous les rangs pour la taille M ? Dans mon idée les diminutions se font toujours sur l’endroit . Est-ce juste ? Je vous remercie de m’éclairer . Bien à vous

14.11.2022 - 05:18

DROPS Design answered:

Bonjour Claire, tout à fait, en M, vous diminuez uniquement tous les 2 rangs (tous les rangs sur l'endroit). Bon tricot!

14.11.2022 - 10:20

country flag Petra Dörges wrote:

Hallo zusammen Stricke gerade 164-13 , Bin bei der Passe und weiss nicht ob die Raglan Abnahmen in jeder Reihe also Hin und Rückreihe gestrickt werden müssen.? Unter Raglan Abnahmen steht hin und Rückreihe Abnahmen stricken und unter Passe steht jede 2. Reihe Abnahmen stricken?.. Können Sie mir da helfen? Gruß Petra Dörges

21.03.2021 - 19:44

DROPS Design answered:

Liebe Frau Dörges, die Raglanabnahmen werden zuerst 21 bis 25 Mal (siehe Größe) in jeder 2. Reihe (= in jeder Hinreihe) und dann erst in jeder Reihe - je nach der Größe nur (in 1. und 2. Größe wird es nicht in jeder Reihe abgenommen). Viel Spaß beim stricken!

22.03.2021 - 08:59

country flag Sabine Roth wrote:

Beziehen sich die cm Angaben im Schnittbild auf die Körpermaße oder die Jackenmaße? Man braucht ja bei einer Strickjacke eine Bequemlichkeitszugabe . Ich stricke die Jacke nicht für mich. Sie wird ein Geschenk und ich habe deshalb nur die Körpermaße vorliegen und kein vorhandenes Kleidungsstück zum Vergleich. Wenn es sich um die Körpermaße handelt, wieviel cm müßte ich dann für die Bequemlichkeit zugeben dass die Jacke locker aber nicht sackig sitzt?

30.09.2019 - 17:47

DROPS Design answered:

Liebe Frau Roch, hier lesen Sie mehr über die Maßskizze. Viel Spaß beim stricken!

01.10.2019 - 09:54

country flag Saskia wrote:

Hoe wordt het zwarte driehoekje bovenaan A1 gebreid? Staat volgens mij niet beschreven.

12.02.2019 - 20:31

DROPS Design answered:

Dag Saskia,

Deze brei je als volgt: 1 steek afhalen, 2 recht samenbreien en de afgehaalde steek overhalen. Hierdoor minder je 2 steken.

13.02.2019 - 10:37

country flag Asraa wrote:

Hi. In the yoke where we have to decrease 22 times for the medium size, does that mean that the decrease has to be done on both the right and wrong side of the work? (44 rows) Thank you.

04.02.2019 - 17:51

DROPS Design answered:

Dear Asraa, in size M you decrease for raglan a total of 22 times every other row, ie every row from RS, there will be no decrease made from WS in size M. Happy knitting!

05.02.2019 - 08:16

country flag Janou LE PONTOIS-M%ENOT wrote:

Bonjour Dans la partie des explications ci-dessous : Tricoter le rang suivant ainsi - sur l'endroit: 5 m point mousse, A.1 sur les 192-208-240-256-288-320 m suivantes, 1 m jersey, 5 m point mousse. Quand A.1 a été tricoté 1 fois en hauteur, on a 179-193-221-235-263-291 m. pouvez-vous me dire où et comment on fait 36 diminutions puisqu'on doit n'avoir plus que 263 m après avoir tricoté 1 fois A1 Merci pour votre réponse

27.12.2017 - 19:53

DROPS Design answered:

Bonjour Mme Le Pontois-Menot, à l'avant-dernier rang de A.1, on diminue 2 mailles au milieu de chaque motif sans compenser ces diminutions par des jetés, si vous répétez 18 fois le diagramme, vous aurez ainsi 2 diminutions x 18 = 36 diminutions. Bon tricot!

02.01.2018 - 09:02

country flag Else Panagiotaki wrote:

Hei Hvor stor (brystmål i cm og lengde) er str S

02.02.2017 - 19:36

DROPS Design answered:

Hej Else. Se maalskitsen nederst. Her staar alle maal i cm per str.

06.02.2017 - 13:59

country flag Carole wrote:

Bonjour, Je ne suis pas sûre de comprendre le motif A1. Le 1er rang se tricote sur l'endroit du travail, donc les jetés et diminutions (rang 2 du motif) sont exécutés sur l'envers. Est-ce bien cela ? Merci pour votre aide.

21.09.2016 - 21:01

DROPS Design answered:

Bonjour Carole, dans A.1 les rangs avec les jetés doivent être sur l'endroit. Tricotez d'abord 1 rang avant de commencer le diagramme (1er rang = sur l'envers) ou commencez, au choix, au 2ème rang (= les dim et les jetés sur l'endroit). Cette information va être remontée à notre équipe, merci. Bon tricot!

22.09.2016 - 08:48

country flag Schiatti wrote:

J'ai commandé et payé de la laine chez Luce tricot pour faire le pull GREEN FOREST depuis le 31 mai dernier et je n'ai rien reçu??? Et je n'ai pas de nouvelles. Que puis je faire? Merci de votre réponse

14.07.2016 - 17:12

DROPS Design answered:

Bonjour Mme Schiatti, merci de bien vouloir les contacter directement par mail, téléphone ou sur leur page Facebook, eux seuls peuvent vous répondre. Merci. Bon tricot!

15.07.2016 - 09:58

country flag Hillary wrote:

You give pattern sizes from S to XXXL but don't say what that means. What bust sizes do they correspond to? Any measurement would be more helpful than the ones you give. Thank you!

12.04.2016 - 15:01

DROPS Design answered:

Dear Hillary, you'll find a measurement chart scrolling down the page. Compare these measures with a garment you have, and you'll find the right size. Happy knitting!

12.04.2016 - 15:34