DROPS Cotton Merino
DROPS Cotton Merino
50% Wool, 50% Cotton
from 6.20 CAD /50g
Get the yarn to make this pattern from 24.80CAD.

The yarn cost is calculated from the pattern’s smallest size and the yarn’s cheapest product type. Looking for an even better price? You might find it on the DROPS Deals!

DROPS SS24

Sweet Alice

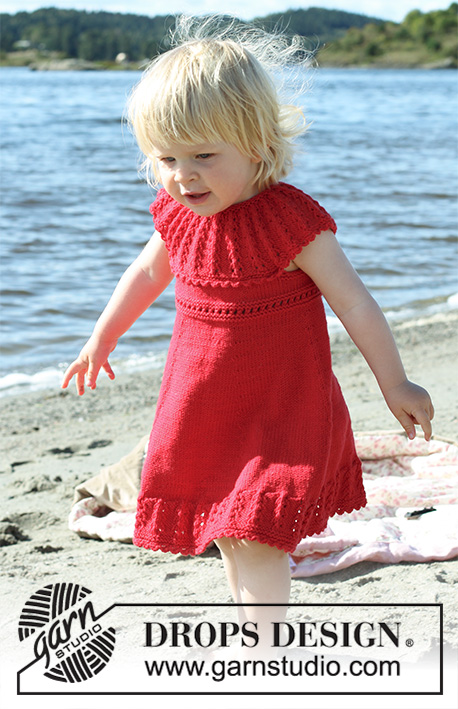
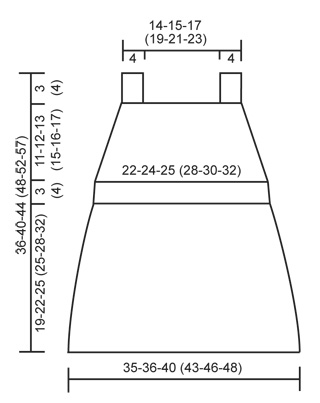
Knitted dress with lace pattern and hair bow in garter st, in DROPS Cotton Merino. For baby and children in sizes 1 month - 6 years

DROPS Children 26-4
DROPS design: Pattern no cm-007-bn
Yarn group B
----------------------------------------------------------
DRESS:
Size: 1/3 - 6/9 - 12/18 months (2 - 3/4 - 5/6 years)
All measurements in chart in cm. Conversion to inch - see page 4.
Materials:
DROPS COTTON MERINO from Garnstudio
150-150-150 (200-200-250) g color no 06, red

DROPS CIRCULAR NEEDLE (80 and 40 cm / 32" and 16") SIZE 3.5 mm/US 4 - or size needed to get 22 sts x 30 rows in stockinette st = 4'' x 4'' (10 x 10 cm).
DROPS CIRCULAR NEEDLE (80 cm / 32'') SIZE 3 mm/US 2.5 – for rib.

HAIR BOW:
Measurements: Small approx. 5 x 8 cm / 2" x 3'' Large approx. 9 x 12 cm / 3½" x 4¾''
Materials:
DROPS COTTON MERINO from Garnstudio
50 g color no 06, red (small bow weighs approx. 6 g and large bow weighs approx. 10 g).

DROPS STRAIGHT NEEDLES size 3.5 mm / US 4 - or size needed to get 22 sts x 45 rows in garter st = 4'' x 4'' (10 x 10 cm).
ACCESSORY: Silk ribbon or hair pin for fastening the bow.

-------------------------------------------------------

Alternative Yarn – See how to change yarns here
Yarn Groups A to F – Use the same pattern and change the yarn here
Yarn usage using an alternative yarn – Use our yarn converter here

-------------------------------------------------------

DROPS Cotton Merino
DROPS Cotton Merino
50% Wool, 50% Cotton
from 6.20 CAD /50g
Get the yarn to make this pattern from 24.80CAD.

The yarn cost is calculated from the pattern’s smallest size and the yarn’s cheapest product type. Looking for an even better price? You might find it on the DROPS Deals!

Pattern instructions

NOTE: This pattern is written in American English. All measurements in charts are in cm. For conversion from inches to cm - click here. There are different terms for crocheting in American and British English. If this pattern includes crochet, click for "crochet terms" here. For this pattern in British English, please click here.
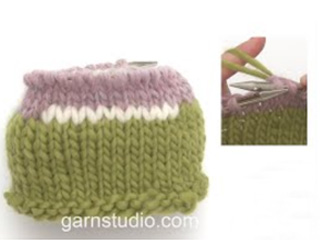
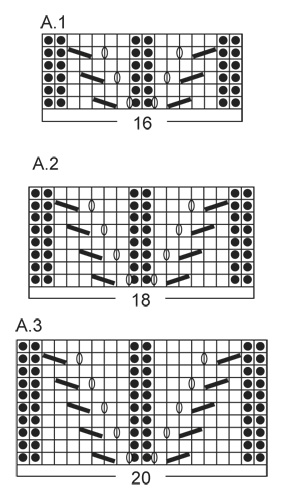
GARTER ST (worked in the round):
* K 1 round and P 1 round *, repeat from *-*. 1 ridge = 2 rounds.

GARTER ST (back and forth):
K all rows. 1 ridge = K2 rows.

PATTERN:
See diagrams A.1, A.2 or A.3. The diagrams show all rows in pattern seen from RS. See diagrams for desired size.
Size 1/3 + 6/9 months: Work A.1.
Size 12/18 months and 2 years: Work A.2.
Size 3/4 and 5/6 years: Work A.3.

DECREASE TIP:
Dec 1 st as follows after 1st, 2nd, 4th and 5th marker: Slip 1 st as if to K, K 1, psso.
Dec 1 st as follows before 3rd-4th-6th and 1st marker: Beg 2 sts before marker, K 2 sts tog.

DECREASE TIP-2:
All dec are done from RS!
Dec as follows after 4 edge sts in garter st: Slip 1 st as if to K, K 1, psso.
Dec as follows before 4 edge sts in garter st: Beg 2 sts before 4 edge sts and K 2 tog.
----------------------------------------------------------

DRESS:
Worked in the round on circular needle from bottom up.
Cast on 152-160-176 (188-204-212) sts on circular needle size 3.5 mm / US 4 with Cotton Merino. Work 3 ridges in GARTER ST in the round - see explanation above. Now insert 6 markers in the piece as follows: Insert 1st marker at beg of round (= side), 2nd marker after 23-25-27 (29-31-33) sts, 3rd marker after another 30-30-34 (36-40-40) sts, 4th marker after another 23-25-27 (29-31-33) sts (= side), 5th marker after another 23-25-27 (29-31-33) sts, 6th marker after another 30-30-34 (36-40-40) sts (23-25-27 (29-31-33) sts remain on round after last marker). Work in stockinette st and move the markers upwards when working. REMEMBER THE KNITTING GAUGE
When piece measures 4 cm / 1½'', dec 1 st on each side of 1st and 4th marker, dec 1 st after 2nd and 5th marker and 1 st before 3rd and 6th marker – READ DECREASE TIP (= 8 sts dec). Repeat dec every 2½-3-3 (3-3-3½) cm / 7/8"-1"-1" (1"-1"-1 1/4") 7-7-8 (8-9-9) times in total = 96-104-112 (124-132-140) sts. Continue in stockinette st until piece measures 19-22-25 (25-28-32) cm / 7½"-8 3/4"-9 3/4" (9 3/4"-11"-12½"). Switch to circular needle size 3 mm / US 2.5 and work rib in the round as follows: K 1, * P 2, K 2 *, repeat from *-* until 3 sts remain on round and finish with P 2 and K 1. When rib measures 1½-1½-1½-2-2-2 cm / ½"-½"-½" (3/4"-3/4"-3/4"), work lace edge as follows: K 1, * P 2 tog, 1 YO, K 2 *, repeat from *-* until 3 sts remain on round, finish with P 2 tog, 1 YO and K 1. Work until 1 round remain before rib measures 3-3-3-4-4-4 cm / 1 1/8''-1 1/8''-1 1/8'' (1½''-1½''-1½''). Work next round as follows: Work rib over the first 48-52-56 (62-66-70) sts (= front piece), LOOSELY bind off the next 48-52-56 (62-66-70) sts with K over K and P over P (= back piece).

FRONT PIECE:
Insert 1 marker – NOW MEASURE PIECE FROM HERE.
Switch to circular needle size 3.5 mm / US 4 and work first row from RS as follows: 4 edge sts in GARTER ST – see explanation above, 12-14-15 (18-19-21) sts in stockinette st, work pattern according to diagram A.1, A.2 OR A.3 (see diagram for your size = 16-16-18 (18-20-20) sts), 12-14-15 (18-19-21) sts in stockinette st and 4 edge sts in GARTER ST. Continue pattern back and forth like this, AT THE SAME TIME after 1 cm / 3/8'', dec 1 st in each side - READ DECREASE TIP 2. Repeat dec in each side every 1-1-1½ (1½-1½-1½) cm / 3/8"-3/8"-½" (½"-½"-½") 9-9-9 (10-10-10) times in total = 30-34-38 (42-46-50) sts remain. When piece measures 11-12-13 (15-16-17) cm / 4½"-4 3/4"-5" (6"-6 1/4"-6 3/4") from marker (adjust so that next row is from RS), work 3 ridges back and forth over all sts. Work next row as follows from RS: K 8 and slip these sts on 1 stitch holder for shoulder strap, bind off the next 14-18-22 (26-30-34) sts and K the last 8 sts (= shoulder strap).

SHOULDER STRAP:
Continue in garter st back and forth until shoulder strap measures approx. 18-25 cm / 7"-9 3/4" (or desired length). Bind off and repeat in the other side. Sew strap to rib at the back of dress.

TIES:
Cut 2 lengths Cotton Merino yarn of approx. 3 metres/3.2 yds each. Twine the strands tog until they resist, fold the string double so that it twines again. Make a knot at each end. Beg mid front and thread tie up and down through eyelet row on rib in waist.


----------------------------------------------------------
HAIR BOW:
Numbers in ( ) applies to large bow.
Cast on 10 (20) sts on needle size 3.5 mm / US 4 with Cotton Merino. Work in GARTER ST – see explanation above – back and forth until piece measures 8 (12) cm / 3" (4 3/4"), bind off.

MIDDLE BAND:
Cast on 10 (15) sts on needle size 3.5 mm / US 4 and work 4 (5) ridges. Bind off. Sew the short ends tog to form a ring.

Pull the bow through the ring and fasten the two parts tog with a couple of stitches. Fasten bow with a silk ribbon or a hair pin with a couple of stitches.

Diagram

symbols = K from RS, P from WS
symbols = P from RS, K from WS
symbols = 1 YO between 2 sts
symbols = K 2 tog
symbols = slip 1 st as if to K, K 1, psso
diagram
diagram

Each of our patterns has specific tutorial videos to help you.

Do you have a question? See a list of frequently asked questions (FAQ)

Knitting tension is what determines the final measurements of your work, and is usually measured per 10 x 10 cm. It is provided like so: number of stitches in width x number of rows in height - eg: 19 stitches x 26 rows = 10 x 10 cm.

The knitting tension is very individual; some people knit/crochet loosely while others work tightly. You adjust the knitting tension with the needle size, which is why the suggested needle size only serve as a guide! You need to adjust this (up or down) to ensure that YOUR knitting tension matches the knitting tension provided in the pattern. If you work with a different knitting tension than provided you will have a different yarn consumption, and your work will have different measurements than what the pattern suggests.

The knitting tension also determines which yarns can replace each other. As long as you achieve the same knitting tension you can replace one yarn with another.

See DROPS lesson: How to measure your tension/gauge

See DROPS video: How to make a gauge tension swatch

The required amount of yarn is provided in grams, eg: 450 g. To calculate how many balls you’ll need you first need to know how many grams are in 1 ball (25g, 50g or 100g). This information is available if you click on the individual yarn quality on our pages. Divide the amount required with the amount of each ball. For example, if each ball is 50g (the most common amount), the calculation will be as follows: 450 / 50 = 9 balls.

The important thing when changing from one yarn to another is that the knitting/crochet tension remains the same. This is so that the measurements of the finished piece will be the same as on the sketch provided. It is easier to achieve the same knitting tension using yarns from the same yarn group. It is also possible to work with multiple strands of a thinner yarn to achieve the knitting tension of a thicker one. Please try our yarn converter. We recommend you to always work a test swatch.

Please NOTE: when changing yarn the garment might have a different look and feel to the garment in the photo, due to individual properties and qualities of each yarn.

See DROPS lesson: Can I use a different yarn than the one mentioned in the pattern?

All our yarns are categorised into yarn groups (from A to F) according to thickness and knitting tension – group A contains the thinnest yarns and group F the thickest. This makes it easier for you to find alternative yarns to our patterns, should you wish to switch yarn. All yarns within the same group have a similar knitting tension and can easily replace each other. However, different yarn qualities have different structures and properties which will give the finished work a unique look and feel.

Click here for an overview of the yarns in each yarn group

At the top of all our patterns you’ll find a link to our yarn converter, which is a helpful tool should you wish to use a different yarn than suggested. By filling in the yarn quality you wish to replace, the amount (in your size) and number of strands, the converter will present good alternative yarns with the same knitting tension. Additionally it will tell you how much you’ll require in the new qualities and whether you’ll need to work with multiple strands. Most skeins are 50g (some are 25g or 100g).

If the pattern is worked with multiple colours, every colour will have to be converted separately. Similarly, if the pattern is worked with several strands of different yarns (for example 1 strand Alpaca and 1 strand Kid-Silk) you will have to find alternatives for each, individually.

Click here to see our yarn converter

Since different yarns have different qualities and textures we have chosen to keep the original yarn in our patterns. However, you can easily find options among our available qualities by using our yarn converter, or simply pick a yarn from the same yarn group.

It is possible that some retailers still have discontinued yarns in stock, or that someone has a few skeins at home that they would like to find patterns for.

The yarn converter will provide both alternative yarn as well as required amount in the new quality.

If you think it's hard to decide what size to make, it can be a good idea to measure a garment you own already and like the size of. Then you can pick the size by comparing those measures with the ones available in the pattern's size chart.

You'll find the size chart at the bottom of the pattern.

See DROPS lesson: How to read size chart

The needle size provided in the pattern serves only as a guide, the important thing is to follow the knitting tension. And since knitting tension is very individual, you will have to adjust the needle size to ensure that YOUR tension is the same as in the pattern – maybe you’ll have to adjust 1, or even 2 needle sizes, up or down to achieve the correct tension. For this, we recommend that you work test swatches.

Should you work with a different knitting tension than the one provided, the measurements of the finished garment might deviate from the measurement sketch.

See DROPS lesson: How to measure your tension/gauge

See DROPS video: How to make a gauge tension swatch

Working a garment top-down provides more flexibility and room for personal adjustment. For example it is easier to try the garment on while working, as well as making adjustments to length of yoke and shoulder caps.

The instructions are carefully explaining every step, in the correct order. Diagrams are adjusted to the knitting direction and are worked as usual.

The diagram depicts all rows/rounds, and every stitch seen from the right side. It is read from bottom to top, from right to left. 1 square = 1 stitch.

When working back and forth, every other row is worked from the right side and every other row is worked from the wrong side. When working from the wrong side, the diagram will have to be worked reversed: from left to right, knit stitches are purled, purl stitches are knit etc.

When working in the round every round is worked from the right side and the diagram are worked from right to left on all rounds.

See DROPS lesson: How to read knitting diagrams

The diagram depicts all rows/rounds, and every stitch seen from the right side. It is worked from bottom to top, from right to left.

When working back and forth every other row is worked from the right side: from right to left and every other row is worked from the wrong side: from left to right.

When working in the round, every row in the diagram are worked from the right side, from right to left.

When working a circular diagram you start in the middle and work your way outwards, counter clockwise, row by row.

The rows usually start with a given number of chain stitches (equivalent to the height of the following stitch), this will either be depicted in the diagram or explained in the pattern.

See DROPS lesson: How to read crochet diagrams

Instructions for working several diagrams after each other on the same row/round, will often be written like so: “work A.1, A.2, A.3 a total of 0-0-2-3-4 times". This means you work A.1 once, then A.2 is worked once, and A.3 is repeated (in width) the number of times provided for your size – in this case like so: S = 0 times, M = 0 times, L=2 times, XL= 3 times and XXL = 4 times.

The diagrams are worked as usual: begin with the first row in A.1, then work the first row in A.2 etc.

See DROPS lesson: How to read knitting diagrams

See DROPS lesson: How to read crochet diagrams

The total width of the garment (from wrist-to-wrist) will be larger in the larger sizes, despite the actual sleeves being shorter. The larger sizes have longer sleeve caps and wider shoulders, so there will be a good fit in all sizes.

The measurement sketch/schematic drawing provides information regarding the full length of the garment. If it’s a jumper or a jacket the length is measured from the highest point on the shoulder (usually closest to the neckline), and straight down to the bottom of the garment. It is NOT measured from the tip of shoulder. Similarly, the length of yoke is measured from the highest point on the shoulder and down to where yoke is split into body and sleeves.

See DROPS lesson: How to read a schematic drawing

Diagrams are often repeated on the round or in height. 1 repeat is the diagram the way it appears in the pattern. If it says to work 5 repeats of A.1 in the round, then you work A.1 a total of 5 times after/next to each other in the round. If it says to work 2 repeats of A.1 vertically/in height you work the entire diagram once, then begin again at the start and work the entire diagram one more time.

Chain stitches are slightly narrower than other stitches and to avoid working the cast-on edge too tight, we simply chain more stitches to begin with. The stitch count will be adjusted on the following row to fit the pattern and measurement sketch.

The rib edge is more elastic and will contract slightly compared to, for example, stocking stitch. By increasing before the rib edge, you avoid a visible difference in width between the rib edge and the rest of the body.

It’s very easy to cast off too tightly, and by making yarn overs while casting off (and simultaneously casting these off) you avoid a too tight cast off edge.

See DROPS video: How to bind off with yarn overs (yo)

To achieve an even increase (or decrease) you can increase on, for example: every 3rd and 4th row alternately, like so: work 2 rows and increase on the 3rd row, work 3 rows and increase on the 4th. Repeat this until the increase is complete.

See DROPS lesson: Increase or decrease 1 st on every 3rd and 4th row alternately

Should you prefer to work in the round instead of back and forth, you may of course adjust the pattern. You’ll need to add steeks mid-front (usually 5 stitches), and follow the instructions. When you would normally turn and work from the wrong side, simply work across the steek and continue in the round. At the end you’ll cut the piece open, pick up stitches to work bands, and cover the cut edges.

See DROPS video: How to knit steeks and cut open

Should you prefer to work back and forth instead of in the round, you may of course adjust the pattern so you work the pieces separately and then assemble them at the end. Divide the stitches for the body in 2, add 1 edge stitch in each side (for sewing) and work the front and back pieces separately.

See DROPS lesson: Can I adapt a pattern for circular needles into straight needles?

Pattern repeats can vary slightly in the different sizes, in order to get the correct proportions. If you’re not working the exact same size as the garment in the photo, yours might deviate slightly. This has been carefully developed and adjusted so that the complete impression of the garment is the same in all sizes.

Make sure to follow instructions and diagrams for your size!

If you have found a pattern you like which is available in women’s size it’s not very difficult to convert it to men’s size. The biggest difference will be the length of sleeves and body. Start working on the women size that you think would fit across the chest. The additional length will be worked right before you cast off for the armhole/sleeve cap. If the pattern is worked top-down you can add the length right after the armhole or before the first decrease on sleeve.

Regarding additional yarn amount, this will depend on how much length you add, but it is better with a skein too many than too few.

All yarns will have excess fibres (from production) that might come off as lint or shedding. Brushed yarns (ie hairier yarns) have more of these loose, excess fibres, causing more shedding.

Shedding also depends on what is worn under or over the garment, and whether this pulls at the yarn fibres. It’s therefore not possible to guarantee that there will be no shedding

Below are some tips on how to get the best result when working with hairier yarns:

1. When the garment is finished (before you wash it) shake it vigorously so the looser hairs come off. NOTE: do NOT use a lint roller, brush or any method that pulls at the yarn.

2. Place the garment in a plastic bag and put it in your freezer - the temperature will cause the fibres to become less attached to each other, and excess fibres will come off easier.

3. Leave in the freezer for a few hours before taking it out and shaking it again.

4. Wash the garment according to the instructions on the yarn label.

Pilling is a natural process that happens to even the most exclusive of fibers. It's a natural sign of wear and tear that is hard to avoid, and that is most visible in high friction areas of your garment like a sweater's arms and cuffs.

You can make your garment look as new by removing the pilling, using a fabric comb or a pill/lint remover.

Still can't find the answer you need? Then scroll down and leave your question so one of our experts can try to help you. This will be done normally within 5 to 10 working days.
In the meantime, you can read the questions and answers that others have left to this pattern or join the DROPS Workshop on Facebook to get help from fellow knitters/crocheters!

You might also like...

Post a comment to pattern DROPS Children 26-4

We would love to hear what you have to say about this pattern!

If you want to leave a question, please make sure you select the correct category in the form below, to speed up the answering process. Required fields are marked *.

Comments / Questions (10)

country flag Chiara wrote:

Potrei realizzare questo vestitino per una bimba di 8 anni, semplicemente aumentando lo spessore di filato e ferri? Rimarrebbe un lavoro proporzionato? Grazie!

23.07.2023 - 22:23

DROPS Design answered:

Buonasera Chiara, per una taglia in più andranno riprogettate maglie e misure: per un'assistenza così personalizzata può rivolgersi al suo rivenditore DROPS di fiducia. Buon lavoro!

24.07.2023 - 19:17

country flag Martta wrote:

Kun teen mekossa sitä kohtaa mihin tulee naru niin kun ohjeessa sanotaan tee 1o, 2 yhteen nurin ja langankierto niin neulotaanko nurjat silmukat yhteen? Jos näin tekee niin silmukoiden määrä vähenee ja silloin myöhemmässä vaiheessa minulla ei ole niitä 140 silmukkaa jotka tarvitsen, vai menikö minulta jokin ohi :D?

19.05.2023 - 17:18

DROPS Design answered:

Kyllä, nurjat silmukat neulotaan yhteen. Jokaisen kavennuksen jälkeen tehdään kuitenkin langankierto, eli työhön lisätään jokaisen kavennuksen jälkeen 1 silmukka (silmukkaluku pysyy tällöin samana).

24.05.2023 - 12:44

country flag Rasha wrote:

I’ve just finished this dress, it is gorgeous, I wish I could share the dress I knitted with you. Thanks for your amazing patterns

17.03.2023 - 01:52

country flag Dionisio wrote:

Merci pour votre réponse. Est-ce la même chose pour le tour ajouré ?

01.03.2021 - 09:25

DROPS Design answered:

Bonjour Mme Dionisio, tout à fait, ce tour permettra d'y glisser la cordelette de la taille. Bonne continuation!

01.03.2021 - 10:10

country flag Martine Dionisio wrote:

Bonjour, Je voudrais savoir s’il faut tricoter le jeté par le brin avant ou le brin arrière ? Merci d’avance pour votre réponse

27.02.2021 - 23:44

DROPS Design answered:

Bonjour Mme Dionisio, les jetés des diagrammes A.1, A.2 et A.3 se tricotent normalement (= dans le brin avant) au tour suivant, ils doivent former des trous pour le point ajouré. Bon tricot!

01.03.2021 - 09:13

country flag Danielle Daoust wrote:

Pour faire un 8 ans comment faire ?

19.07.2018 - 04:32

DROPS Design answered:

Bonjour Mme Daoust, ce modèle est uniquement disponible jusqu'au 5/6 ans, nous ne sommes malheureusement pas en mesure de pouvoir ajuster chaque modèle à chaque demande individuelle, n'hésitez pas à contacter votre magasin ou un forum tricot pour toute assistance complémentaire. Bon tricot!

19.07.2018 - 09:34

country flag Hanna wrote:

Beste drops, Ik heb een vraag over het jurkje en over het minderen. Ik brei de maat voor 2 jaar. Ik moet dus iedere 3 cm minderen rondom de markeerders 8x in totaal. Dat is 8x3=24cm + de 4 cm voor de eerste mindering. Dan zit ik in totaal aan 28 cm, dat terwijl het eerste deel 25 cm moet meten. Kunt u dit voor mij ophelderen? Bedankt!

15.10.2016 - 16:00

DROPS Design answered:

Hoi Hanna. Je mindert de eerste keer op 4 cm en herhaalt in totaal 8 keer op elke 3 cm, dus: 1e: 4 cm, 2e: 7 cm, 3e: 10 cm, 4e: 13 cm, 5e: 16 cm, 6e: 19, 7e: 22 cm, 8e: 25 cm

18.10.2016 - 14:52

Katie wrote:

Thanks again for another very speedy reply :) Think I am with you, not sure why I am so confused :) I will use measurements on schematic for chest/waist size, measurements the top of the page is the length/height. I wouldn't mind but I have used a lot of your other patterns with no problems! Anyway, thanks again, love this pattern & can't wait to start (and so many others, just need more time!) K.

05.09.2016 - 16:10

Katie wrote:

Hi, thanks for the reply. I have measured the size I need is 21" / 53.3 (approx. cm). My question is, which size do I use - the "size in cm" or the sizes given in the schematic. For 12-18 months the "size in cm" is 80/86 cm and the size in the schematic is 25cm (x2 =50cm). I am just wondering which of your sizes I would go with to get my desired 53/54 cm. Thanks again.

05.09.2016 - 12:22

DROPS Design answered:

Dear Katie, the size (80/86 cm) is meant stature in cm - the 25 cm ( x 2 = 50 cm) in 3rd size are for the width. There will be some rib at waist, so that you can easily adjust, checking measurement from a similar garment. Happy knitting!

05.09.2016 - 13:33

country flag Katie wrote:

Hi, my daughter measures 21" around the chest approx. 53cm. Going by the "size in cm" that would mean I should make the 1-3 months but if I look at the schematic the chest size for 1-3 months is 22cmx2=44cm so I should go with either 12-18 months - 25cmx2 or the 2 years - 28cmx2. Sorry if this is a bit confused, a steer in the right direction would be appreciated. Thanks so much.

05.09.2016 - 11:38

DROPS Design answered:

Dear Katie, the best is to measure a similar garment she has and compare with the measurement chart - read more here. Happy knitting!

05.09.2016 - 11:46