
Popular categories
Looking for a yarn?


|
|
Sailor Aksel |
|
 |
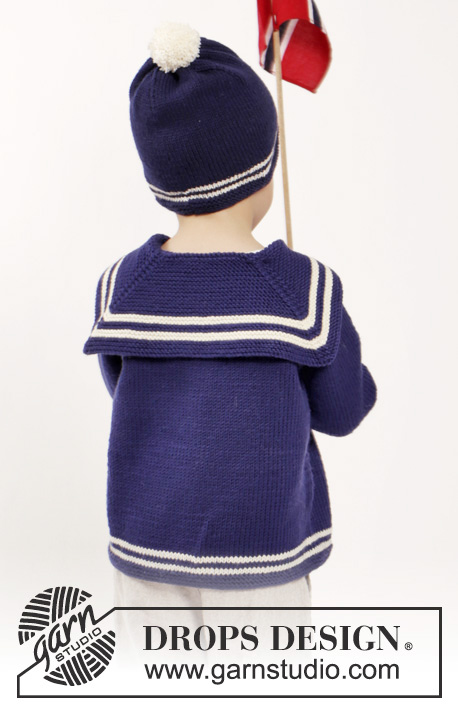 |
Knitted jacket with raglan, loose sailor's collar with bow, socks and hat with pompom in DROPS Merino Extra Fine. Size children 2 - 10 years
DROPS Children 26-7 |
|
|
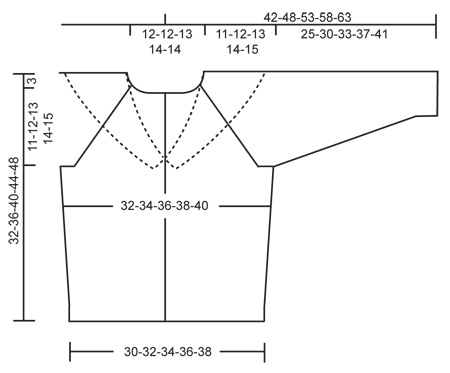
JACKET: GARTER ST (back and forth): K all rows. 1 ridge = K2 rows. GARTER ST (worked in the round): * K 1 round and P 1 round *, repeat from *-*. 1 ridge = 2 rounds. STRIPES 1 (applies to body and sleeves): 2 rows/rounds stockinette st with off white, 2 rows/rounds stockinette st with dark blue, 2 rows/rounds stockinette with off white (= 6 rows). STRIPES 2 (applies to sailor's collar): 4 rows/rounds K with off white, 4 rows/rounds K with dark blue, 4 rows/rounds K with off white. INCREASE TIP: Inc 1 st by making 1 YO. On next row/round work YO twisted to avoid holes. DECREASE TIP: Beg 2 sts before st with marker and work as follows: K 2 tog, K 1 (= st with marker), slip 1 st as if to K, K 1, psso (= 2 sts dec). RAGLAN: Dec on each side of marker in each raglan line. DEC AS FOLLOWS FROM RS: Beg 3 sts before marker and K 2 tog, K 2 (marker is between these 2 sts), slip 1 st as if to K, K 1, psso (= 2 sts dec). DEC AS FOLLOWS FROM WS: Beg 3 sts before marker and P 2 twisted tog, P 2 (marker is between these 2 sts) and P 2 tog (= 2 sts dec). BUTTONHOLES: Dec for buttonholes on left band. 1 buttonhole = make 1 YO when 4 sts remain on needle, K the next 2 sts tog and finish with 2 K. Dec for buttonholes when piece measures: SIZE 2 YEARS: 2, 8, 14, 20 and 27 cm / 3/4",3",5½",8",10½" SIZE 3/4 YEARS: 2, 8, 13, 19, 24 and 30 cm / 3/4",3",5",7½",9½",11 3/4" SIZE 5/6 YEARS: 2, 8, 15, 21, 28 and 34 cm / 3/4",3",6",8 1/4",11",13½". SIZE 7/8 YEARS: 2, 9, 16, 23, 30 and 37 cm / 3/4",3½",6 1/4",9",11 3/4",14½" SIZE 9/10 YEARS: 2, 10, 18, 26, 34 and 41 cm / 3/4",4",7",10 1/4",13½",16". ---------------------------------------------------------- JACKET: BODY: Worked back and forth on circular needle from mid front. Cast on 138-146-154-162-170 sts (includes 5 band sts in each side towards mid front) on circular needle size 3 mm / US 2.5 with dark blue. Work 4 ridges in GARTER ST and remember BUTTONHOLES on band - see explanation above. Switch to circular needle size 4 mm / US 6 and work STRIPES 1 – see explanation above – but continue the outermost 5 sts in each side in garter st until finished measurements (= bands). When stripes are done, continue with dark blue and stockinette st with 5 band sts in garter st in each side. REMEMBER THE KNITTING GAUGE Insert 1 marker 37-39-41-43-45 sts in from each side (= 64-68-72-76-80 sts between markers on back piece). When piece measures 6-7-8-9-10 cm / 4'', inc 1 st on each side of both markers – READ INCREASE TIP (= 4 sts inc). Repeat inc when piece measures 12-14-16-18-20 cm / 4 3/4"-5½"-6 1/4"-7"-8" = 146-154-162-170-178 sts. When piece measures 18-21-24-27-30 cm / 7"-8 1/4"-9½"-10½"-11 3/4", bind off 6 sts in each side for armholes (i.e. Bind off 3 sts on each side of both markers) = 36-38-40-42-44 sts remain on each front piece and 62-66-70-74-78 sts on back piece. Put piece aside and knit the sleeves. SLEEVE: Worked in the round on double pointed needles. Cast on 36-38-38-40-40 sts on double pointed needles size 3 mm / US 2.5 with dark blue and work 4 RIDGES in garter st - see explanation above. Switch to double pointed needles size 4 mm / US 6 and work STRIPES 1. When stripes are done, continue with dark blue and stockinette st until finished measurements. AT THE SAME TIME when piece measures 6-6-6-9-9 cm / 2½"-2½"-2½"-3½"-3½", inc 2 sts mid under sleeve. Repeat inc every 2½-2½-2½-2-2 cm / 7/8"-7/8"-7/8"-3/4"-3/4" a total of 8-9-11-13-15 times = 52-56-60-66-70 sts. When piece measures 25-30-33-37-41 cm / 9 3/4"-11 3/4"-13"-14½"-16", bind off the middle 6 sts mid under sleeve = 46-50-54-60-64 sts remain on needle. Put piece aside and Make another sleeve. YOKE: Slip sleeves on to same circular needle as body where armholes were bound off (without working them first) = 226-242-258-278-294 sts on needle. Insert 1 marker in all transitions between sleeves and body piece = 4 markers. Continue back and forth on circular needle as before in stockinette st and 5 band sts in garter st in each side towards mid front. AT THE SAME TIME on first row from RS dec for RAGLAN on each side of all markers – see explanation above (= 8 sts dec). Repeat dec for raglan on every other row (i.e. every row from RS) 16-16-16-17-18 times in total and then every row (i.e. both from RS and WS) 0-2-4-6-7 times in total. AT THE SAME TIME when piece measures approx. 28-31-35-38-42 cm / 11"-12 1/4"-13 3/4"-15"-16½" – adjust so that 1-2 rows have been worked after last buttonhole, slip the outermost 16-13-13-10-10 sts in each side towards mid front on 1 stitch holder for neck (work sts before slipping them on 1 stitch holder). Then bind off for neck at beg of every row in each side as follows: bind off 2 sts 0-1-1-2-2 times and 1 st 1-2-2-2-2 times. After all dec for raglan and bind offs for neck, 64-64-64-62-62 sts remain on needle. NECK EDGE: Pick up from RS approx. 96 to 116 sts around the neck (includes sts on stitch holders at the front) on circular needle size 3 mm / US 2.5 with dark blue. K 1 row from WS while AT THE SAME TIME dec evenly to 70-70-76-82-82 sts - NOTE: Do not dec over bands. K 4 rows and then loosely bind off with K from RS. ASSEMBLY: Sew the openings under the sleeves. Sew on buttons. SAILOR'S COLLAR: Worked back and forth on circular needle. Cast on 164-176-190-204-216 sts on circular needle size 3.5 mm / US 4 with dark blue. Work first row as follows from RS: K 52-56-60-64-68, K 1 and insert 1 marker in this st, K 58-62-68-74-78, K 1 and insert 1 marker in this st, work the remaining 52-56-60-64-68 sts. Then work in garter st back and forth while AT THE SAME TIME on next row from RS dec 1 st on each side of st with marker – READ DECREASE TIP (= 4 sts dec). Repeat dec every other row (i.e. every row from RS) 22-24-26-28-30 times in total. AT THE SAME TIME when 3 ridges have been worked with dark blue after cast-on edge, work STRIPES 2 - see explanation above (also work stripes in garter st). When stripes are done, continue with dark blue, in garter st and dec as before AT THE SAME TIME bind off at beg of every row in each side as follows: bind off 5 sts 1 time, 4 sts 1 time, 3 sts 3 times, 2 sts 5 times and 1 st 3-5-7-9-11 times. After all bind off's, 14-14-16-18-18 sts remain on needle, bind off. Fold the inner edge on sailor's collar approx. 1 cm / 3/8'' in towards WS and fasten neatly. Sew sailor's collar tog mid front with small sts. Place sailor's collar on jacket and sew a push-button between the jacket and the collar on each shoulder in towards the neck. BOW: Cast on 12 sts on needle size 3 mm / US 2.5 with red and work in GARTER ST back and forth for 8 cm / 3 1/8'', bind off. Cast on 10 sts on needle size 3 mm / US 2.5 with red and work 4 ridges in garter st, bind off. Sew short sides tog to form a ring, cut and fasten the strands. Pull the bow through the ring and sew the two part tog at the back. Fasten bow mid front on sailor's collar mid front to cover the seam. ---------------------------------------------------------- HAT: GARTER ST (worked in the round): * K 1 round and P 1 round *, repeat from *-*. 1 ridge = 2 rounds. STRIPES: 2 rounds stockinette with off white, 2 rounds stockinette with dark blue, 2 rounds stockinette with off white (= 6 rounds). DECREASE TIP: Dec 1 st after each marker as follows: Slip 1 st as if to K, K 1, psso. ---------------------------------------------------------- HAT: Worked in the round on circular needle, switch to double pointed needles when needed. Cast on 96-100-104 sts on circular needle size 3 mm / US 2.5 with dark blue. Work 4 ridges in GARTER ST - see explanation above. Switch to circular needle size 3.5 mm / US 4 and K 1 round. Then work STRIPES - see explanation above. When stripes are done, continue with dark blue and stockinette st until finished measurements. REMEMBER THE KNITTING GAUGE When piece measures 14-15-16 cm / 5½"-6"-6 1/4", insert 4 markers in the piece, 24-25-26 sts apart. Then dec 1 st after every marker – Read DECREASE TIP, (= 4 sts dec). Repeat dec on every other round 5-6-6 times in total and then on every round 6-6-7 times in total = 52 sts remain on needle in all sizes. Work 1 round in stockinette where all sts are worked K tog 2 by 2, repeat on next round = 13 sts remain on needle. Cut the yarn and pull it through the remaining sts, tighten tog and fasten. The hat measures approx. 20-21-23 cm / 8"-8 1/4"-9" vertically. POMPOM: Make a small pompom with off white, approx. 3-4 cm / 1"-1½" in diameter and fasten it at the top of hat. ---------------------------------------------------------- SOCKS: HEEL DECREASE: Row 1 (= from RS): Work until 5-5-6-6-8-8 sts remain, slip next st as if to K, K 1, psso, turn piece. Row 2 (= from WS): Work until 5-5-6-6-8-8 sts remain, slip next st as if to P, P 1, psso, turn piece. Row 3: Work until 4-4-5-5-7-7 sts remain, slip next st as if to K, K 1, psso, turn piece. Row 4: Work until 4-4-5-5-7-7 sts remain, slip next st as if to P, P 1, psso, turn piece. Continue dec like this with 1 st less before every dec until 10-10-12-12-12-12 sts remain on needle. DECREASE TIP: Dec as follows: Beg 3 sts before marker and K 2 tog, K 2 (marker is between these sts), slip 1 st as if to K, K 1, psso (= 2 sts dec). ---------------------------------------------------------- SOCKS: Cast on 42-46-52-56-62-66 sts on double pointed needles size 2.5 mm / US 1.5 with Merino Extra Fine. Work rib as follows: Size 22/23 + 24/25: P 2, K 2, P 4, K 2, P 4, * K 2, P 2 *, repeat from *-* 3-4 times in total, ** K 2, P 4 **, repeat from **-** 2-2 times in total and finish with K 2 and P 2. Size 26/28 + 29/31: K 1, P 4, K 2, P 4, K 2, P 4, * K 2, P 2 *, repeat from *-* 4-5 times in total, ** K 2, P 4 **, repeat from **-** 3-3 times in total and finish with K 1. Size 32/34 + 35/37: P 2, K 2, P 4, K 2, P 4, K 2, P 4, * K 2, P 2 *, repeat from *-* 5-6 times in total, ** K 2, P 4 **, repeat from **-** 3-3 times in total and finish with K 2 and P 2. When rib measures 3-3-3-4-4-4 cm / 1 1/8''-1 1/8''-1 1/8''-1½''-1½''-1½'', switch to double pointed needles size 3.5 mm / US 4. Then work in stockinette st but continue rib over the middle 28-28-34-34-40-40 sts mid back (= 14-18-18-22-22-26 sts in stockinette st at the front of sock). REMEMBER THE KNITTING GAUGE When piece measures 5-5-5-6-6-6 cm / 2''-2''-2''-2 3/8''-2 3/8''-2 3/8'', dec every other P 4 to P 3 (dec 1 st by P 2 tog = 3-3-3-3-4-4 sts dec). After 2½-3-4-5-6-6 cm / 7/8"-3"-1½"-2"-2½"-2½" dec the remaining P 4 to P 3. Repeat dec every 2½-3-4-5-6-6 cm / 7/8"-3"-1½"-2"-2½"-2½" 2 more times = 32-36-40-44-48-52 sts remain on needle and 2 P sts in each P section mid back. Continue to work until piece measures 15-18-21-24-27-29 cm / 6"-7"-8 1/4"-9½"-10½"-11½". Now keep the middle 18-18-22-22-26-26 sts mid back on needle for heel and slip the remaining 14-18-18-22-22-26 sts on 1 stitch holder (= mid on top of foot). Continue rib back and forth over heel sts for 4½-5-5-5½-5½-6 cm / 1 3/4"-2"-2"-2 1/4"-2 1/4"-2½". Insert 1 marker in middle of needle. Then work HEEL DECREASE - see explanation above. After heel dec pick up 10-11-11-12-12-13 sts on each side of heel and slip sts from stitch holder back on needle = 44-50-52-58-58-64 sts on needle. Continue in the round in stockinette st. AT THE SAME TIME dec on each side sts on top of foot as follows: K the last 2 sts before the 14-18-18-22-22-26 sts on top of foot tog and K the first 2 sts after the 14-18-18-22-22-26 sts twisted tog. Dec every other round 7-8-8-9-9-11 times in total = 30-34-36-40-40-42 sts. Continue to work until piece measures approx. 10-12-13-14-16-18 cm / 4"-4 3/4"-5"-5½"-6 1/4"-7" from marker on heel (approx. 3-3-4-4-4-4 cm / 1"-1"-1½"-1½"-1½"-1½" remain until finished measurements). Insert 1 marker in each side so that there are 15-17-18-20-20-21 sts on both upper foot and under foot. Then dec for toes on each side of both markers - READ DECREASE TIP. Repeat dec every other round a total of 4-4-5-5-5-5 times and then every round 2-2-2-3-3-3 times = 6-10-8-8-8-10 sts remain on needle. Cut the yarn and pull it through the remaining sts, tighten tog and fasten. Sock measures approx. 13-15-17-18-20-22 cm / 5"-6"-6 3/4"-7''-8''-8¾'' from marker on heel. Knit another sock. |
|
|
|
|
Have you made this or any other of our designs? Tag your pictures in social media with #dropsdesign so we can see them! Do you need help with this pattern?You'll find tutorial videos, a Comments/Questions area and more by visiting the pattern on garnstudio.com. © 1982-2024 DROPS Design A/S. We reserve all rights. This document, including all its sub-sections, has copyrights. Read more about what you can do with our patterns at the bottom of each pattern on our site. |
|


With over 40 years in knitting and crochet design, DROPS Design offers one of the most extensive collections of free patterns on the internet - translated to 17 languages. As of today we count 304 catalogs and 11422 patterns - 11417 of which are translated into English (US/in).
We work hard to bring you the best knitting and crochet have to offer, inspiration and advice as well as great quality yarns at incredible prices! Would you like to use our patterns for other than personal use? You can read what you are allowed to do in the Copyright text at the bottom of all our patterns. Happy crafting!
Comments / Questions (17)
Bonjour ,là je suis arrivée à l'assemblage du col :alors faut-il coudre bord à bord (les 18mailles) de chaque côté ensembles ou les superposer? Sinon le long du col je fais 1cm de petits point ourlés tout le tour du col marin .J'aimerai pour être sure de moi de bien faire .Merci beaucoup de votre réponse attendue pour vite finir et l'offrir à mon Petit Fils .bonne journée à votre belle équipe et merci encore
04.08.2023 - 07:49DROPS Design answered:
Bonjour Reine Marie, posez le col bien à plat sur le gilet pour qu'il soit bien placé et assemblez les devants ensemble au niveau où ils se rejoignent en veillant à ce qu'ils soient bien placés - assemblez sur la longueur nécessaire sans déformer le col/gilet. Cette couture sera ensuite cachée par le noeud papillon. Le long de l'intérieur du col (la partie contre le cou), repliez sur environ 1 cm et cousez tout le long. Bonne continuation!
04.08.2023 - 08:07EXCUSEZ MOI ENCORE POUR LES BOUTONS PRESSIONS FAUT IL COUDRE SUR L ENDROIT DE L EPAULE OU DESSOUS MERCI CAR CELA M EST UN PEU DIFFICILE .MERCI DE VOTRE REPONSE POUR CES DEUX QUESTIONS SEPAREE
02.08.2023 - 16:34DROPS Design answered:
Bonjour Reine Marie, placez les boutons pressions sur les épaules, près de l'encolure/du col et l'autre partie sur l'envers du col (celle qui se trouve posée contre le gilet). Bonnes finitions!
03.08.2023 - 07:52Bonjour ,on dit de coudre le col à petits points sur le devant es ce que c\'est au niveau de l\'encolure ou c\'est qu\'il faut coudre les pointes de 18mailles ensembles je ne sais pas ,.Merci de votre réponse
02.08.2023 - 15:15DROPS Design answered:
Bonjour Reine Marie, vous allez coudre les pointes ensemble, pour que ce soit bien joli, posez le gilet à plat et mettez le col en place puis assemblez les 2 côtés du col pour le maintenir, vous coudrez ensuite le noeud dessous pour cacher la couture. Bon tricot!
02.08.2023 - 16:34Merci beaucoup de votre réponse .Bonne soirée
01.08.2023 - 20:52Bonjour ,je suis entrain de tricoter le col marin alors pour les diminutions faut il laisser la maille a l endroit jersey ou faut il la tricoter en point mousse a chaque rang aussi de chaque cote des diminutions .Merci de votre réponse
01.08.2023 - 14:51DROPS Design answered:
Bonjour Reine Marie, les mailles avec les marqueurs se tricotent aussi au point mousse, comme les autres. Bon tricot!
01.08.2023 - 17:54Bonjour l'équipe ,merci c'est ce qui me semblait ,je vous remercie beaucoup .Bonne après midi ,le résultat va être super beau je l'espère .Merci encore
31.07.2023 - 15:20Bonjour pour le raglan de cette jolie veste marin faut t'il diminuer alternativement les mailles tous les deux rangs et tous les rangs ,ou faire d'abord : 17FOIS1MAILLES à la suite, et ensuite faire les diminutions tous les rangs pour finir ou alterner .Merci de votre réponse car là je doute .
29.07.2023 - 15:10DROPS Design answered:
Bonjour Reine Marie, pour le raglan, vous allez diminuer 8 mailles à chaque fois (1 sur chaque devant, 1 au début + 1 à la fin de chacune des manches et du dos, et répéter ces diminutions 17 fois tous les rangs sur l'endroit (tous les 2 rangs) puis 6 fois tous les rangs (sur l'endroit et sur l'envers). Diminuez comme indiqué sous RAGLAN au début des explications. Bon tricot!
31.07.2023 - 10:16Merci 🍀🌹🍀j\'ai compris ,bonne fin d\'après-midi.
24.07.2023 - 16:33Bonjour comment augmenter 2mailles sous la manche en tricotant en rond .merci de votre réponse
24.07.2023 - 14:02DROPS Design answered:
Bonjour, mettre un fil marqueur au debut du tour (milieu sous la manche). Ensuite suivez les explications. Pour augmenter 2 mailles sous la manche vous procedez comme suit: en commençant 1 maille avant le fil marqueur, 1 jeté, tricoter 2 mailles endroit (le fil marqueur est entre ces 2 mailles), 1 jeté. Au tour suivant, tricoter les jetés torse à l'endroit pour éviter des trous (on augmente 2 mailles). Tricoter ensuite les augmentations en jersey. Bon tricot!
24.07.2023 - 14:27Merci de votre réponse ;alors j'avais bien compris mais je préféré vous demander .Bonne soirée.
15.07.2023 - 18:04