
Popular categories
Looking for a yarn?


|
|||||||||||||||||||
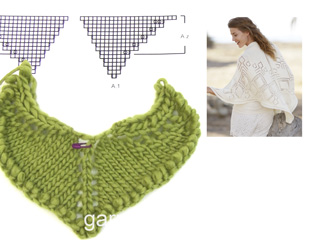
Summer Diamond Shawl |
|||||||||||||||||||
 |
 |
||||||||||||||||||
Knitted DROPS shawl with lace pattern in ”Cotton Merino”.
DROPS 160-10 |
|||||||||||||||||||
|
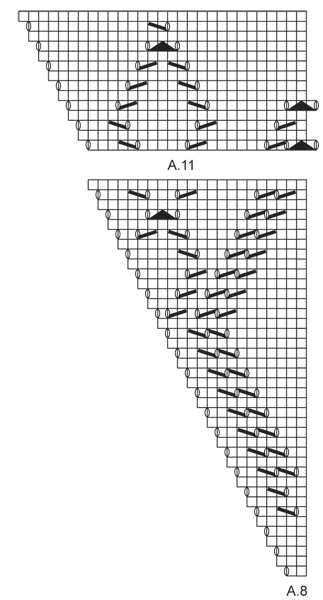
PATTERN: See diagrams A.1-A.11. The diagrams show all rows in pattern seen from RS. 3 EDGE STS: ROW 1 (= RS): K 1, slip 1 st as if to P (with yarn behind work), 1 YO, K 1. Work until 3 sts remain, K 1, 1 YO, slip 1 st as if to P (with yarn behind work), K 1. ROW 2 (= WS): K 1, P 1, drop YO off the needle, P 1. Work until 3 sts remain, P1, drop YO off the needle, P 1, K 1. ---------------------------------------------------------- SHAWL: Worked back and forth on circular needle to make room for all the sts. The shawl is worked from mid back and down. Cast on 9 sts on circular needle size 3.5 mm / US 4 with Cotton Merino. Insert 1 marker in 5th st (= mid st) and move it upwards in mid st when working. Work mid st in stockinette st. Work and inc as shown in diagram A.1 and A.2 as follows: Work 3 EDGE STS - see explanation above, work A.1 until mid st, 1 st in stockinette st, work A.2 until 3 edge sts remain and work 3 edge sts. REMEMBER THE KNITTING TENSION When diagram has been worked 1 time vertically, repeat inc as shown in A.z and A.x (i.e. work in stockinette st while at the same time inc 1 st on each side of mid st, but inc inside 3 edge sts in each side alternately: 2, 2, 2, 2 and 3 sts in the sides as in diagram (alternately 6, 6, 6, 6 and 8 sts on ever RS row in A.z-A.x). When inc in A.z-A.x have been worked 3 times, work A.z-A.x 1 more time BUT on the last row from RS (se star in diagram) inc only 1 sts (instead of 3 sts) in each of the sides, inc in the middle as in diag = there is now 177 sts on needle. On next row from RS inc 1 st inside 3 edge sts in each side and 1 st on each side of mid st (= 4 sts inc) = 181 sts on needle (i.e. 90 sts on each side of mid st). P 1 row from WS. Then work according to A.3-A.5 as follows: Work 3 edge sts, diagram A.3 over 1 st, repeat A.4 over the next 84 sts (= 3 times), A.5 over 2 sts, 1 st in stockinette st (= mid st), A.3 over 1 st, repeat A.4 over the next 84 sts (= 3 times), A.5 over 2 sts and work 3 edge sts. When diagram A.3-A.5 have been worked 1 time vertically, there are 293 sts on needle (i.e. 146 sts on each side of mid st). Work 3 edge sts, diagram A.6 over 1 st, repeat A.7 over the next 140 sts (= 5 times), A.8 over 2 sts, 1 st in stockinette st (= mid st), A.6 over 1 st, repeat A.7 over the next 140 sts (= 5 times), A.8 over 2 sts and work 3 edge sts. When diagram A.6-A.8 have been worked 1 time vertically, there are 373 sts on needle (i.e. 186 sts on each side of mid st). Work 3 edge sts, A.9 over 20 sts, repeat A.10 over the next 140 sts (= 5 times), A.11 over 23 sts, 1 st in stockinette st (= mid st), A.9 over 20 sts, A.10 over the next 140 sts (= 5 times), A.11 over 23 sts and work 3 edge sts. When diagram A.9-A.11 have been worked 1 time vertically, there are 401 sts on needle (i.e. 200 sts on each side of mid st). Now work an eyelet edge. EYELET EDGE: ROW 1 (1st row = RS): Work 3 edge sts, 1 YO, K until mid st, 1 YO, 1 st in stockinette st (= mid st), 1 YO, K until 3 sts remain, 1 YO, 3 edge sts. ROW 2: K all sts. ROW 3: As 1st row. ROW 4: Work 3 edge sts, P from WS until 3 sts remain, 3 edge sts. ROW 5: Work 3 edge sts, 1 YO, K 1, * K 2 tog, 1 YO *, repeat from *-* until 2 sts before mid st, K 2, 1 YO, 1 st in stockinette st (= mid st), 1 YO, K 2, * 1 YO, K 2 tog *, repeat from *-* until 4 sts remain, K 1, 1 YO and work 3 edge sts. ROW 6: Work 3 edge sts, P until 3 sts remain, 3 edge sts. Repeat 1st-2nd ROW 2 more times. Loosely bind off with K on next row. |
|||||||||||||||||||
Diagram explanations |
|||||||||||||||||||
|
|||||||||||||||||||

|
|||||||||||||||||||

|
|||||||||||||||||||

|
|||||||||||||||||||

|
|||||||||||||||||||
|
|||||||||||||||||||
|
Have you made this or any other of our designs? Tag your pictures in social media with #dropsdesign so we can see them! Do you need help with this pattern?You'll find tutorial videos, a Comments/Questions area and more by visiting the pattern on garnstudio.com. © 1982-2024 DROPS Design A/S. We reserve all rights. This document, including all its sub-sections, has copyrights. Read more about what you can do with our patterns at the bottom of each pattern on our site. |
|||||||||||||||||||


With over 40 years in knitting and crochet design, DROPS Design offers one of the most extensive collections of free patterns on the internet - translated to 17 languages. As of today we count 304 catalogs and 11422 patterns - 11417 of which are translated into English (US/in).
We work hard to bring you the best knitting and crochet have to offer, inspiration and advice as well as great quality yarns at incredible prices! Would you like to use our patterns for other than personal use? You can read what you are allowed to do in the Copyright text at the bottom of all our patterns. Happy crafting!
Comments / Questions (26)
Mitä tarkoittaa: Kun olet neulonut piirrokset loppuun, toista piirrosten A.z ja A.x lisäykset (eli neulo sileää neuletta ja lisää SAMALLA keskisilmukan molemmin puolin 1 s, mutta lisää kummankin reunan 3 reunasilmukan sisäpuolella vuorotellen: 2, 2, 2, 2 ja 3 s sivuun piirroksen mukaisesti (vuorotellen 6, 6, 6, 6 ja 8 s piirrosten A.z-A.x jokaisella oikean puolen krs:lla)). Saan tehtyä mallikerran A1 ja A2 vain kerran ja jään jumiin. En saa kasaan 177 silmukkaa.
23.07.2022 - 11:53No me queda claro la corrección del patrón? Donde iría la hebra que dice? El parón dibujado para A1 y A2 no es el correcto entonces? Muchas gracias por la ayuda
11.03.2022 - 05:19DROPS Design answered:
Hola Ana, la corrección es una advertencia, por si alguien tiene descargado o impreso el patrón, de que ha sido modificado. El diagrama que está ahora online es el diagrama correcto o definitivo. Si tienes impreso el patrón a una fecha previa a la de la realización de la corrección, podrías tener un diagrama erróneo, por lo que tendrías que imprimirlo de nuevo.
11.03.2022 - 18:12Hallo. Ich habe nun Ax & Az so gestrickt wie es in der Anleitung steht, allerdings habe ich viel mehr maschen als 177 auf der nadel. Ich muss dazu sagen es ist das erste Mal, dass ich mit Diagramm arbeite. Was hab ich falsch gemacht
01.07.2020 - 06:56DROPS Design answered:
Liebe Jasmin, nach A.1 und A.2 1x gestrickt sind haben Sie 53 M (23 M in jedem Diag. + 2 x 3 M + 1 mitt-M), dann wiederholen Sie 3 Mal die Reihen in A.x/A.z (16 Maschen werden in A.x + 16 Maschen in A.z zugenommen) = 85 M, nach 2. Mal = 117 Maschen und nach 3. Mal = 149 M. Jetzt wiederholen Sie die Diag. noch einmal aber mit nur 14 Zunahmen = 177 Maschen. Viel Spaß beim stricken!
01.07.2020 - 08:59Svårt mönster att förstå. Får inte ihop 177 maskor. Finns det en bättre förklaring på HUR man ska sticka?
10.04.2018 - 12:09DROPS Design answered:
Hei Ann-Cathrin. Du har helt rett i at det ikke blir 177 masker, det var en feil i oppskriften som nå er blitt rettet. A.z-A.x skal gjentas 3 ganger (ikke 4), så en gang til hvor det på siste pinne fra retten økes kun 1 maske i hver side =177. Altså, A.z-A.x skal strikkes totalt 4 ganger, inkludert den siste gangen med kun 1 maske økt i hver side. God fornøyelse
13.04.2018 - 11:52IOANA DETESAN wrote:
"DROPS CIRCULAR NEEDLE (80 cm) SIZE 3.5 mm" or "Cast on 9 sts on circular needle size 4 mm with Cotton Merino". How is it right? Best regards, Ioana
25.09.2015 - 20:48DROPS Design answered:
Dear Mrs Detesan, shawl is worked with needle size 3,5 mm, pattern has been updated, thank you. Happy knitting!
06.10.2015 - 13:04Est ce que le modèle n'est pas trop difficile à faire je tricote pas mal mais avec tous ces diagrammes ca me fait peur Merci
17.09.2015 - 09:21DROPS Design answered:
Bonjour Mme Gavanesch, pour vous aider à la réalisation de ce modèle, vous trouverez à droite de la photo un onglet "vidéos" qui reprend toutes les vidéos utilisées dans ce modèle. Pour toute assistance complémentaire, vous pouvez vous adresser à votre magasin DROPS, il pourra vous répondre par mail ou téléphone, ou au forum DROPS. Bon tricot!
17.09.2015 - 11:43Ik heb na alle meerderingen meer dan 177 steken ik begrijp de duitse en andere talige uitleg niet. Kan ik deze uitleg in het nederlands kriigen? alvast bedankt
31.07.2015 - 21:27DROPS Design answered:
Hoi Sylvia. Je kan ook kijken op het Nederlandse patroon - zie hier Of kies Nederlands in het Change Language menu onder de foto.
03.08.2015 - 13:44Fout in vertaling. Er staat als a.z -a.x 4 x......... HAAK Het is een brei patroon
21.07.2015 - 19:59DROPS Design answered:
Hoi Joke. Bedankt voor het melden, het is aangepast.
28.07.2015 - 16:09Bij benodigdheden staat rondbreinaald 3,5 maar het patroon begint met zet 9 steken op met naald 4. Op de cotton merino staat ook naald 4. Welke dikte naald wordt nu gebruikt voor het breien? Vriendelijke groet, Joke
14.07.2015 - 17:24DROPS Design answered:
Hoi Joke. Je moet 3,5 mm gebruiken. Excuses voor de wachttijd!
06.10.2015 - 12:49DROPS Design wrote:
Hej Sonja. Her er forklaring: Start med 9 m. M som strikkes i a.1 og a.2 er i starten 1 m. Etter a.1 1 x = 23 m. Så økes det 16 m 4 x og siste gang økes bare 14 m: 1 m blir til 23 (1 x A1) +16 = 39 ( 2 x) +16 = 55 ( 3 x) +16 = 71 ( 4 x) +16 = 87 - 2 økninger som ikke gjøres siste gang = 85 m (siste x). Dette er kun A.1, altså bare halve sjalet uten kant-m og midt m. Så da blir det 85 + 85 + kant-m og midt m = 7 = 177. Haaber det er tydeligt nu :-)
05.06.2015 - 09:44