
Popular categories
Looking for a yarn?


|
|||||||||||||||||||||||||
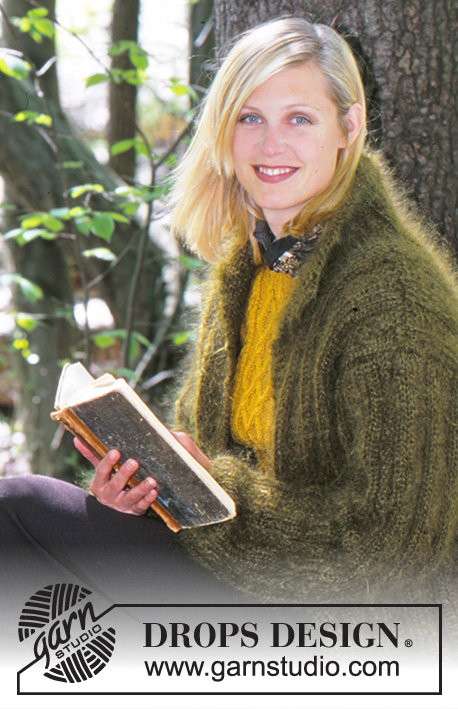
Forest Gem |
|||||||||||||||||||||||||
 |
 |
||||||||||||||||||||||||
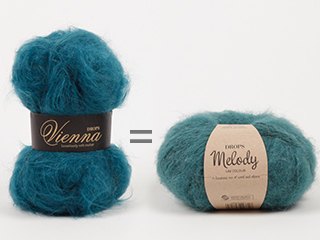
DROPS Cardigan in DROPS Vienna or DROPS Melody. Vest in Karisma Superwash.
DROPS 71-3 |
|||||||||||||||||||||||||
|
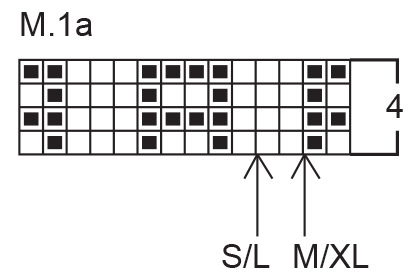
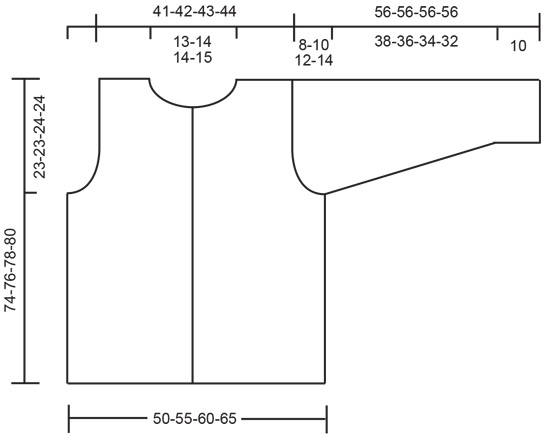
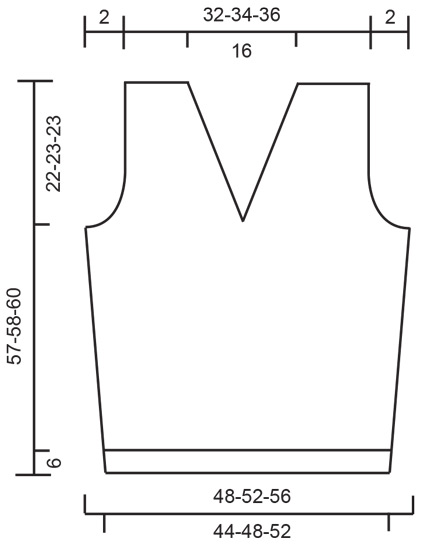
CARDIGAN: Gauge: 14 sts x 16 rows in pattern stitch = 10 x 10 cm [4" x 4"] Pattern: See chart for Pattern 1. The pattern is seen from right side. Arrows indicate the starting point for different sizes for the right front only – the left front is a mirror image. Garter st, when knitting flat: Knit all sts, all rows. Back: Cast on 72-79-86-93 sts. Knit 4 rows garter st, change to Pattern 1 - start at lower right edge of chart, not at arrow - but 1 st at each side is knit in stockinette st throughout. When the piece measures 51-53-54-56 cm [20" - 20-⅞" - 21.25" - 22"] bind off for armhole at each side every other row: 3 sts 1-1-1-2 times, 2 sts 1-2-3-3 times and 1 st 2-3-4-4 times = 58-59-60-61 sts. Continue in Pattern as established. When the piece measures 72-74-76-78 cm [28.25" - 29-⅛" - 29-⅞" - 30.75"] put the center 16-17-18-19 sts on a st holder for the neck. On the next row dec 1 st at each neck edge = 20 sts remain on each shoulder. Bind off when the piece measures 74-76-78-80 cm [29-⅛" - 29-⅞" - 30.75" - 31.5"]. Right front: Cast on 40-42-47-49 sts. Knit 4 rows garter st, then establish pattern on the next row as follows (right side row): 8 sts garter st (button band), then Pattern 1 - start at appropriate arrow on chart, last st (edge st) knit in stockinette st throughout. When the piece measures 51-53-54-56 cm [20" - 20-⅞" - 21.25" - 22"] bind off for armhole at the side as on back = 33-32-34-33 sts. When the piece measures 68-70-72-74 cm [26.75" - 27-⅝" - 28.25" - 29-⅛"] put the 8 button band sts on a st holder for the neck. Then dec 1 st for the neck every other row 5-4-6-5 times = 20 sts remain on shoulder. Bind off when the piece measures 74-76-78-80 cm [29-⅛" - 29-⅞" - 30.75" - 31.5"]. Left front: Cast on and knit the same as the right, but in order to make the pattern the mirror image of the right side, begin chart in mirror reverse as well (that is from lower left corner. For sizes S + L, begin 4 sts in from left corner; for sizes M + XL, begin 2 sts in from left corner.) Sleeve: Cast on 37-37-44-44 sts. Knit 4 rows garter st, change to Pattern 1 - but keep 1 st at each edge in stockinette st throughout, not in the pattern. When the piece measures 10 cm [4"] inc 1 st at each side inside edge st every 3-2.5-3.5-3 cm [1.25" - 1" - 1-3/8 - 1.25"] 13-13-10-10 times - knit the increased sts in the pattern as you go along = 63-63-64-64 sts. When the piece measures 48-46-44-42 cm [18-⅞" - 18-⅛" - 17.25" - 16.5"] bind off for sleeve cap at each side every other row: 3 sts 2-2-1-1 time, then bind off 2 sts at each side until the piece measures 55 cm [21-⅝"], then bind off 3 sts at each side 1 time. When the piece measures approx. 56 cm [22"], bind off the remaining sts. Belt: Cast on 8 sts and knit garter st for approx. 120-130-140-150 cm [47.25" - 51-⅛" - 55-⅛" - 59"] (or to desired length), bind off. Assembly: Sew shoulder seams. Collar: Pick up sts around the neck as follows: Size S: 8 sts from st holder on right front, 15 sts up along neck edge to back, 18 sts from st holder on back, 15 sts along neck edge of left front and 8 sts from st holder on left front = 64 sts. Size M: 8 sts from st holder on right front, 13 sts up along neck edge to back, 19 sts from st holder on back, 13 sts along neck edge of left front and 8 sts from st holder on left front = 61 sts. Size L: 8 sts from st holder on right front, 14 sts up along neck edge to back, 20 sts from st on back, 14 sts along neck edge of left front and 8 sts from st holder on left front = 64 sts. Size XL: 8 sts from st holder on right front, 12 sts up along neck edge to back, 21 sts from st on back, 12 sts along neck edge on left front and 8 sts from st holder on left front = 61 sts. Knit Pattern 1 keeping 8 sts in garter st at each side (button bands) - match up ribs from back and front. When the collar measures 14 cm [5.5"] bind off with double strands of yarn in pattern. Sew in sleeves. Sew sleeve and side seams. VEST IN KARISMA SUPERWASH: Gauge: 21 sts x 28 rows on larger needles in stockinette st = 10 x 10 cm [4"] Pattern: See charts for Patterns 1 and 2. The pattern is seen from the right side. Rib: * K 1, P 1 *, repeat from * - *. Garter st, when knitting flat: Knit all sts, all rows. Knitting tips (for front neck): All decs are made on right side rows. Dec 1 st inside 11 edge sts knit in pattern for the neck:Dec as follows before 11 pattern sts: K 2 tog. Dec as follows after 11 pattern sts: sl 1, K 1, psso. Front: Cast on 118-130-142 sts on smaller needles. Knit rib for 6 cm [2-⅜"]. Change to larger needles, P 1 row (wrong side row), decreasing 12-16-18 sts evenly distributed on the row = 106-114-124 sts. Establish pattern on the next row as follows (right side row): 27-31-36 sts stockinette st, Pattern 1 (16 sts), Pattern 2 (20 sts), Pattern 1 (16 sts), 27-31-36 sts stockinette st. Continue with pattern as established over all sts. When the piece measures 8 cm [3-⅛"] inc 1 st at each side every 5 cm [2"] a total of 4 times = 114-122-132 sts - knit the increased sts in stockinette st. When the piece measures 34-35-37 cm [13-⅜" - 13.75" - 14.5"] bind off for armhole at each side every other row: 4 sts 1-1-1 time, 3 sts 1-1-1 time, 2 sts 3-4-5 times and 1 st 3-3-4 times. At the same time when the piece measures approx. 40 cm [15.75"] (end after 17 rows of Pattern 2 - at arrow on the chart) bind off the 2 center sts for the neck. Now dec 1 st for the neck inside 11 edge sts (half of Pattern 2; that is, 9 sts after the 2 bound off center sts+ P 2 from Pattern 1 – therefore you are decreasing in Pattern 1) every other row a total of 22 times - see knitting tips = 18-20-22 sts remain on each shoulder. Bind off the remaining sts when the piece measures approx. 57-58-60 cm [22.5" - 22-⅞" - 23-⅝"]. Back: Cast on 118-130-142 sts on smaller needles. Knit Rib for 6 cm [2-⅜"]. Change to larger needles and stockinette st, decreasing 24-28-30 sts evenly distributed on the 1st row = 94-102-112 sts. When the piece measures 8 cm [3-⅛"] inc at each side as on front = 102-110-120 sts. When the piece measures 34-35-37 cm [13-⅜" - 13.75" - 14.5"] bind off for armhole at each side as on front = 70-74-78 sts remain. When the piece measures 52-53-54 cm [20.5" - 20-⅞" - 21.25"] bind off the center 32 sts for the neck. Then dec 1 st at each neck edge every other row 2 times = 18-20-22 sts remain on each shoulder. Bind off when piece measures the same as the front. Assembly: Sew shoulder- and side seams. Armhole: Pick up approx. 106 to 120 sts around armhole on smaller circular needles; join and place a marker at the join. P 1 row (right side row) then K 1 row (= 2 rows garter st). Change to rib. When band measures 2.5 cm [1"], bind off all sts in rib. Neckband: Pick up approx. 120 to 130 sts around the neck on smaller circular needles - pick up 1 st at center front, between the 2 bound-off sts; join and place a marker at the join. P 1 row (right side row) then K 1 row (= 2 rows garter st). Change to rib - make the 1 st at center front a K st. Dec 1 st each side of center front K 1 every other row. When the rib measures 2.5 cm [1"], bind off all sts in rib. |
|||||||||||||||||||||||||
Diagram explanations |
|||||||||||||||||||||||||
|
|||||||||||||||||||||||||
|
|||||||||||||||||||||||||
|
|||||||||||||||||||||||||

|
|||||||||||||||||||||||||
|
|||||||||||||||||||||||||
|
Have you made this or any other of our designs? Tag your pictures in social media with #dropsdesign so we can see them! Do you need help with this pattern?You'll find tutorial videos, a Comments/Questions area and more by visiting the pattern on garnstudio.com. © 1982-2024 DROPS Design A/S. We reserve all rights. This document, including all its sub-sections, has copyrights. Read more about what you can do with our patterns at the bottom of each pattern on our site. |
|||||||||||||||||||||||||


With over 40 years in knitting and crochet design, DROPS Design offers one of the most extensive collections of free patterns on the internet - translated to 17 languages. As of today we count 304 catalogs and 11422 patterns - 11417 of which are translated into English (US/in).
We work hard to bring you the best knitting and crochet have to offer, inspiration and advice as well as great quality yarns at incredible prices! Would you like to use our patterns for other than personal use? You can read what you are allowed to do in the Copyright text at the bottom of all our patterns. Happy crafting!
Comments / Questions (20)
Hei, nuo mallipiirroskuvat eivät avaudu, miksi?
24.03.2024 - 07:34DROPS Design answered:
Nyt piirrokset aukeavat.
27.03.2024 - 18:55Jag stickar västen i det här mönstret i storlek S, Jag har maskat av för armhålan men får inte rätt antal på stickorna när jag är klar med avmaskningen. Korsläser jag mönstret för fram- och bakstycke skall det kvarstå 70 maskor när man är klar med avmaskningen. Jag får det till 82 maskor. Vad gör jag för fel?
04.03.2024 - 12:19DROPS Design answered:
Hej Madelaine. Du maskar av såhär på varje sida: 4 m en gång (=8 m), 3 m en gång (=6 m), 2 m tre gånger (=12 m), 1 m tre gånger (=6 m). 102-8-6-12-6=72 m. Mvh DROPS Design
05.03.2024 - 08:14In dem Bild ist der Pullunder mit rundem Halsausschnitt zu sehen, die Beschreibung ist jedoch mit spitzen Ausschnitt. Ich bitte um Zurverrfügungstellung der Anleitung mit Rundhalsausschnitt. Danke!
31.01.2024 - 17:58DROPS Design answered:
Liebe Anstte, dieser Pullover hat einen V-Halsauschnitt, wie bei der Maßskizze gezeichnet; am 3. Foto kann man das auch mal besser sehen. Viel Spaß beim stricken!
01.02.2024 - 08:15Vest 71-3 når man fra retsiden strikker m1og m2 . Hvordan strikker man så tilbage fra vrang. Skal ret så være vrang set fra retsiden
30.01.2024 - 14:35DROPS Design answered:
Hei Ellen. Ja, i de nyere oppskriftene står det gjerne under diagramikonene: = rett fra retten, vrang fra vrangen OG = vrang fra retten, rett fra vrangen. Men i eldre oppskrifte, slik som 71-3 står det: Mønsteret i diagrammene sees fra retten. mvh DROPS Design
05.02.2024 - 14:05Bjr, j'ai du mal avec le col du gilet. Il est indiqué de réduire tjs à 9m du bord deuils le centre, mais de rester sur le M2, or sur la photo on voit la moitié du M2 qui continue de chaque côté, ainsi que la tresse 1/1 du M1, et les réductions se font sur tout le M1 finalement. Finalement il faut réduire après la tresse 1/1 du M 1 ? Ce qui ferait à 11 mailles du centre... Merci
11.09.2022 - 19:41DROPS Design answered:
Bonjour Mme Monier, effectivement, pour l'encolure V du pull sans manches, vous diminuez à 11 m du bord, donc ce sont les mailles de M.1 que l'on va diminuer mais on va continuer à tricoter les 9 mailles restantes deM.2 comme avant. Bon tricot!
12.09.2022 - 11:23Hallo, ich frage mich, wieso bei M2 in der 7. bis 9. Reihe an den Rändern des Musters rechts gestrickt werden soll. Dadurch wird der Zopf an diesen Stellen ja breiter als in der Mitte. Ist das richtig so?
04.10.2021 - 19:08DROPS Design answered:
Liebe Lena, stimmt sicher, unser Design Team wird das Diagram noch mal prüfen, danke für den Hinweis. Viel Spaß beim stricken!
06.10.2021 - 07:08I do not understand the decreases for neck edge. Can you please give me the exact instructions for the rows after binding off the 2 centre stitches? Thank you.
20.03.2021 - 17:01DROPS Design answered:
Dear Jacqueline, You did not specified if you meant the west or the cardigan, but from the 2 bound off stitch I suppose you are asking about the vest. On both side of the neck there are 9 stitches of the pattern + 2 P stitch, and you need to decrease before this two stitch on the left side of the vest (as you would wear it), and after the two P stitch following the pattern. If you still don't understand, remember, you can always ask for help, either in person, or over the phone) in the store where you bought your DROPS yarn from. Happy Knitting!
21.03.2021 - 23:23Hej! Det måste antingen vara fel i diagram förklaringen eller m2 i mönstret sjunde varvet och uppåt, Tredje till femte maskan den symbolen finns ej förklaringen och ej heller maskor 6-8.
13.03.2021 - 20:39DROPS Design answered:
Hej Susanne. Jag ser att symbolerna i förklaringen ser lite annorlunda ut, vi ska få rättat det. Men förklaringarna stämmer om du ser på symbolerna vilket håll strecket lutar åt. Mvh DROPS Design
17.03.2021 - 08:16Hej! Jag har skrivit fråga nummer två ang ovanstående mönster och emotser ert svar så snart som möjligt. Jag upprepar min fråga; hur många maskor från mittmaskan ska jag börja maska av? Jag förstår inte svaret "innanför" utan behöver veta när jag ska börja maska av för halsringningen. Mvh Christina Christina
13.01.2021 - 16:43Hej, den 1.12 skrev jag en fråga till er om den gula västen och hur jag ska tolka instruktionerna om avmaskning vid halsen. Ni svarade att avmaskning ska ske "innanför 11 m" men jag förstår fortfarande inte VAD innebär "innanför"?? Hur många maskor efter mittmaskan ska jag börja med avmaskningen? Jag har prövat olika sätt men behöver en tydligare förklaring. Tacksam för ett svar. Mvh Christina
31.12.2020 - 09:20DROPS Design answered:
Hej Christina, de 11 maskor som är närmast halsen fortsätter enligt flätmönster. Dvs när du stickar höger sida (när v är på). Stickar du de första 11 m från rätsidan enligt mönster, lyft 1 m, 1rm, drag den lyfta m över, slätst varvet ut. Sedan från avigsidan i slätst och mönster. Rätsidan 11 m enl mönster, minka som sist och slätst varvet ut. Fortsätt så :)
14.01.2021 - 13:06