DROPS Alpaca
DROPS Alpaca
100% Alpaca
from 3.40 £ /50g
Get the yarn to make this pattern from 20.40£.

The yarn cost is calculated from the pattern’s smallest size and the yarn’s cheapest product type. Looking for an even better price? You might find it on the DROPS Deals!

DROPS Super Sale

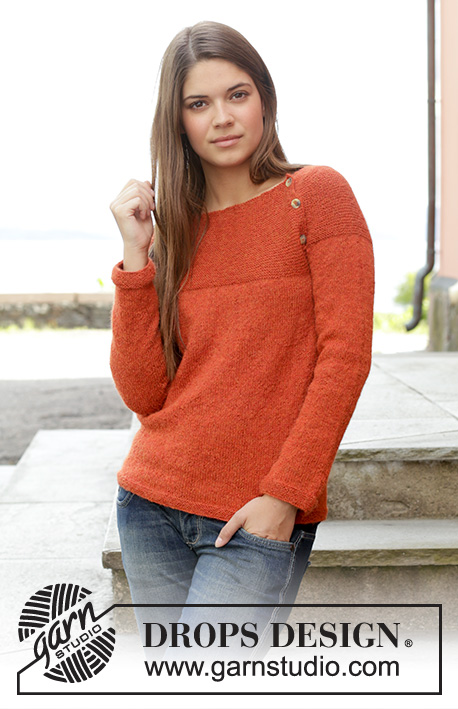
Take It Easy Cardigan

Knitted DROPS jacket in garter st with round yoke, worked top down in "Alpaca". Size: S - XXXL.

DROPS 158-2
DROPS design: Pattern no z-678
Yarn group A
----------------------------------------------------------
Size: S - M - L - XL - XXL - XXXL
Materials:
DROPS ALPACA from Garnstudio
300-350-400-400-450-500 g colour no 2925, rust

DROPS DOUBLE POINTED NEEDLES and CIRCULAR NEEDLE (80 cm) SIZE 3 mm - or size needed to get 24 sts x 32 rows in stocking st = 10 x 10 cm.
DROPS DOUBLE POINTED NEEDLES and CIRCULAR NEEDLE (80 cm) SIZE 2.5 mm - for edges in garter st.
DROPS MOTHER-OF-PEARL BUTTON NO 521: 7-7-7-8-8-8 pieces

-------------------------------------------------------

Alternative Yarn – See how to change yarns here
Yarn Groups A to F – Use the same pattern and change the yarn here
Yarn usage using an alternative yarn – Use our yarn converter here

-------------------------------------------------------

DROPS Alpaca
DROPS Alpaca
100% Alpaca
from 3.40 £ /50g
Get the yarn to make this pattern from 20.40£.

The yarn cost is calculated from the pattern’s smallest size and the yarn’s cheapest product type. Looking for an even better price? You might find it on the DROPS Deals!

DROPS Super Sale

SAVE 30% on 6 cotton favourites!
Valid until 12.04.2024

Pattern instructions

NOTE: This pattern is written in British English. All measurements in charts are in cm. For conversion from cm to inches - click here. There are different terms for crocheting in British and American English. If this pattern includes crochet, click for "crochet terms" here. For this pattern in American English, please click here.
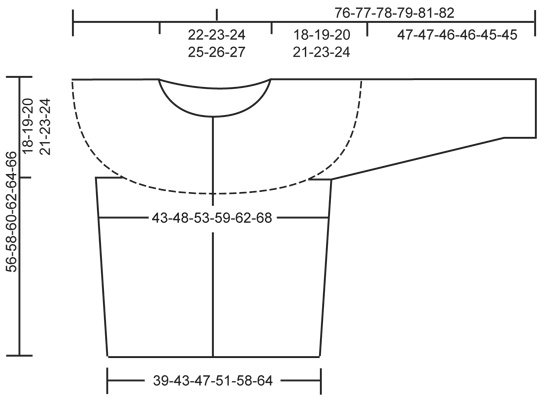
GARTER ST (back and forth on needle):
K all rows. 1 ridge = 2 rows K.

GARTER ST (in the round on double pointed needles):
* K 1 round and P 1 round *, repeat from *-*. 1 ridge = 2 rounds.

INCREASE TIP:
Inc 1 st by making a YO. On next row K YO twisted (i.e. work in back loop of st instead of front) to avoid holes.

DECREASE TIP:
Dec 1 st before marker as follows: Work until 2 sts remain before marker, slip 1 st as if to K, K 1, psso.
Dec 1 st after marker as follows: K 2 tog.

BUTTONHOLES:
Dec for buttonholes on right band. 1 buttonhole = K tog third and fourth st from edge and make 1 YO.
Dec for buttonholes when piece measures (measured from cast-on edge):
SIZE S: 2, 9, 16, 23, 30, 37 and 44 cm
SIZE M: 2, 9, 16, 23, 30, 37 and 44 cm
SIZE L: 2, 10, 18, 26, 34, 42 and 50 cm
SIZE XL: 2, 9, 16, 23, 30, 37, 44 and 51 cm.
SIZE XXL: 2, 10, 18, 26, 34, 42, 50 and 58 cm.
SIZE XXXL: 2, 10, 18, 26, 34, 42, 50 and 58 cm.
----------------------------------------------------------

JACKET:
Worked top down, back and forth on circular needle.

YOKE:
Cast on 120-124-128-132-136-140 sts (incl 6 band sts in each side of piece) on circular needle size 3 mm with Alpaca. Work 1 ridge in GARTER ST - see explanation above. Now work piece in garter st. Insert 8 markers in piece from RS as follows: Work 6 band sts in garter st, K 12-13-14-15-16-17 (= left front piece), insert 1st marker, K 5, insert 2nd marker, K 20 (= sleeve), insert 3rd marker, K 5, insert 4th marker, K 24-26-28-30-32-34 (= back piece), insert 5th marker, K 5, insert 6th marker, K 20 (= sleeve), insert 7th marker, K 5, insert 8th marker, K 12-13-14-15-16-17, finish with 6 band sts in garter st (= right front piece). REMEMBER THE KNITTING TENSION!
Remember BUTTONHOLES - see explanation above. Then inc 1 st – READ INCREASE TIP, before 1st-3rd-5th and 7th marker and 1 st after 2nd-4th-6th and 8th marker (= 8 sts inc). Repeat inc every 4th row 20-22-23-24-26-28 more times. AT THE SAME TIME when piece measures 4-3-2-2-2-1½ cm, inc as follows: Inc 2 sts evenly on each front piece (NOTE: Do not inc over band sts), 1 st on each sleeve and 4 sts evenly on back piece (= 10 sts inc). Repeat inc every 4-3-2-2-2-1½ cm 3-5-7-9-9-11 more times. When all inc are done there are 328-368-400-432-452-492 sts on needle. Piece measures approx. 18-19-20-21-23-24 cm. Work in stocking st with 6 band sts in garter st in each side of piece. Work next row as follows: Work 6 band sts in garter st, K 46-53-59-65-68-75 sts, slip the next 66-72-76-80-84-90 sts on a stitch holder for sleeve, cast on 10-10-10-12-12-12 new sts, insert 1 marker in the middle of the new sts, work the next 92-106-118-130-136-150 sts, slip the next 66-72-76-80-84-90 sts on a stitch holder for sleeve, cast on 10-10-10-12-12-12 new sts under sleeve, insert 1 marker in the middle of the new sts, K 46-53-59-65-68-75, finish with 6 band sts in garter st = 216-244-268-296-308-336 sts. Work band in garter st until finished measurements. NOW MEASURE PIECE FROM HERE!

BODY:
Work in stocking st with 6 band sts in garter st in each side of piece. When piece measures 4 cm, dec 1 st on each side of markers in the side - READ DECREASE TIP (= 4 sts dec). Repeat dec every 8-4-4-3-7-10 cm 3-6-7-9-4-3 more times = 200-216-236-256-288-320 sts. When piece measures 36-37-38-39-39-40 cm, switch to circular needle size 2.5 mm. Work 5 ridges. Cast off.

SLEEVE:
Worked in the round on double pointed needles.
Slip the 66-72-76-80-84-90 sts from stitch holder back on double pointed needles size 3 mm. Cast on 10-10-10-12-12-12 new sts under sleeve, insert 1 marker in the middle of the new sts = 76-82-86-92-96-102 sts. Work in stocking st. When piece measures 4 cm, dec 1 st on each side of marker. Repeat dec every 4-3-2½-2-2-1½ cm 9-12-13-15-16-18 more times = 56-56-58-60-62-64 sts. Work in stocking st until piece measures 44-44-43-43-42-42 cm. Switch to double pointed needles size 2.5 mm. Work in GARTER ST - see explanation above. Cast off when piece measures 47-47-46-46-45-45 cm (shorter measurements in the larger sizes because of wider shoulders). Work the other sleeve the same way.

ASSEMBLY:
Sew tog under sleeves. Sew the buttons on to the left band.

Diagram

diagram measurements

Each of our patterns has specific tutorial videos to help you.

Do you have a question? See a list of frequently asked questions (FAQ)

Knitting tension is what determines the final measurements of your work, and is usually measured per 10 x 10 cm. It is provided like so: number of stitches in width x number of rows in height - eg: 19 stitches x 26 rows = 10 x 10 cm.

The knitting tension is very individual; some people knit/crochet loosely while others work tightly. You adjust the knitting tension with the needle size, which is why the suggested needle size is only meant as a guide! You need to adjust this (up or down) to ensure that YOUR knitting tension matches the knitting tension provided in the pattern. If you work with a different knitting tension than provided you will have a different yarn consumption, and your work will have different measurements than what the pattern suggests.

The knitting tension also determines which yarns can replace each other. As long as you achieve the same knitting tension you can replace one yarn with another.

See DROPS lesson: How to measure your tension/gauge

See DROPS video: How to make a gauge tension swatch

The required amount of yarn is provided in grams, eg: 450 g. To calculate how many balls you’ll need you first need to know how many grams are in 1 ball (25g, 50g or 100g). This information is available if you click on the individual yarn quality on our pages. Divide the amount required with the amount of each ball. For example, if each ball is 50g (the most common amount), the calculation will be as follows: 450 / 50 = 9 balls.

The important thing when changing from one yarn to another is that the knitting/crochet tension remains the same. This is so that the measurements of the finished piece will be the same as on the sketch provided. It is easier to achieve the same knitting tension using yarns from the same yarn group. It is also possible to work with multiple strands of a thinner yarn to achieve the knitting tension of a thicker one. Please try our yarn converter. We recommend you to always work a test swatch.

Please NOTE: when changing yarn the garment might have a different look and feel to the garment in the photo, due to individual properties and qualities of each yarn.

See DROPS lesson: Can I use a different yarn than the one mentioned in the pattern?

All our yarns are categorised into yarn groups (from A to F) according to thickness and knitting tension – group A contains the thinnest yarns and group F the thickest. This makes it easier for you to find alternative yarns to our patterns, should you wish to switch yarn. All yarns within the same group have a similar knitting tension and can easily replace each other. However, different yarn qualities have different structures and properties which will give the finished work a unique look and feel.

Click here for an overview of the yarns in each yarn group

At the top of all our patterns you’ll find a link to our yarn calculator, which is a helpful tool should you wish to use a different yarn than suggested. By filling in the yarn quality you wish to replace, the amount (in your size) and number of strands, the calculator will present good alternative yarns with the same knitting tension. Additionally it will tell you how much you’ll require in the new qualities and whether you’ll need to work with multiple strands. Most skeins are 50g (some are 25g or 100g).

If the pattern is worked with multiple colours, every colour will have to be calculated separately. Similarly, if the pattern is worked with several strands of different yarns (for example 1 strand Alpaca and 1 strand Kid-Silk) you will have to find alternatives for each, individually.

Click here to see our yarn calculator

Since different yarns have different qualities and textures we have chosen to keep the original yarn in our patterns. However, you can easily find options among our available qualities by using our yarn calculator, or simply pick a yarn from the same yarn group.

It is possible that some retailers still have discontinued yarns in stock, or that someone has a few skeins at home that they would like to find patterns for.

The yarn calculator will provide both alternative yarn as well as required amount in the new quality.

If you think it's hard to decide what size to make, it can be a good idea to measure a garment you own already and like the size of. Then you can pick the size by comparing those measures with the ones available in the pattern's size chart.

You'll find the size chart at the bottom of the pattern.

See DROPS lesson: How to read size chart

The needle size provided in the pattern serves only as a guide, the important thing is to follow the knitting tension. And since knitting tension is very individual, you will have to adjust the needle size to ensure that YOUR tension is the same as in the pattern – maybe you’ll have to adjust 1, or even 2 needle sizes, up or down to achieve the correct tension. For this, we recommend that you work test swatches.

Should you work with a different knitting tension than the one provided, the measurements of the finished garment might deviate from the measurement sketch.

See DROPS lesson: How to measure your tension/gauge

See DROPS video: How to make a tension/gauge swatch

Working a garment top-down provides more flexibility and room for personal adjustment. For example it is easier to try the garment on while working, as well as making adjustments to length of yoke and shoulder caps.

The instructions are carefully explaining every step, in the correct order. Diagrams are adjusted to the knitting direction and are worked as usual.

The diagram depicts all rows/rounds, and every stitch seen from the right side. It is read from bottom to top, from right to left. 1 square = 1 stitch.

When working back and forth, every other row is worked from the right side and every other row is worked from the wrong side. When working from the wrong side, the diagram will have to be worked reversed: from left to right, knit stitches are purled, purl stitches are knit etc.

When working in the round every round is worked from the right side and the diagram are worked from right to left on all rounds.

See DROPS lesson: How to read knitting diagrams

The diagram depicts all rows/rounds, and every stitch seen from the right side. It is worked from bottom to top, from right to left.

When working back and forth every other row is worked from the right side: from right to left and every other row is worked from the wrong side: from left to right.

When working in the round, every row in the diagram are worked from the right side, from right to left.

When working a circular diagram you start in the middle and work your way outwards, counter clockwise, row by row.

The rows usually start with a given number of chain stitches (equivalent to the height of the following stitch), this will either be depicted in the diagram or explained in the pattern.

See DROPS lesson: How to read crochet diagrams

Instructions for working several diagrams after each other on the same row/round, will often be written like so: “work A.1, A.2, A.3 a total of 0-0-2-3-4 times". This means you work A.1 once, then A.2 is worked once, and A.3 is repeated (in width) the number of times provided for your size – in this case like so: S = 0 times, M = 0 times, L=2 times, XL= 3 times and XXL = 4 times.

The diagrams are worked as usual: begin with the first row in A.1, then work the first row in A.2 etc.

See DROPS lesson: How to read knitting diagrams

See DROPS lesson: How to read crochet diagrams

The total width of the garment (from wrist-to-wrist) will be larger in the larger sizes, despite the actual sleeves being shorter. The larger sizes have longer sleeve caps and wider shoulders, so there will be a good fit in all sizes.

The measurement sketch/schematic drawing provides information regarding the full length of the garment. If it’s a jumper or a jacket the length is measured from the highest point on the shoulder closest to the neckline, and straight down to the bottom of the garment. It is NOT measured from the tip of shoulder. Similarly, the length of yoke is measured from the highest point on the shoulder and down to where yoke is split into body and sleeves.

On a jacket measures are never taken along bands, unless specifically stated. Always measure inside band stitches when measuring the length.

See DROPS lesson: How to read a schematic drawing

Diagrams are often repeated on the round or in height. 1 repeat is the diagram the way it appears in the pattern. If it says to work 5 repeats of A.1 in the round, then you work A.1 a total of 5 times after/next to each other in the round. If it says to work 2 repeats of A.1 vertically/in height you work the entire diagram once, then begin again at the start and work the entire diagram one more time.

Chain stitches are slightly narrower than other stitches and to avoid working the cast-on edge too tight, we simply chain more stitches to begin with. The stitch count will be adjusted on the following row to fit the pattern and measurement sketch.

The rib edge is more elastic and will contract slightly compared to, for example, stocking stitch. By increasing before the rib edge, you avoid a visible difference in width between the rib edge and the rest of the body.

It’s very easy to cast off too tightly, and by making yarn overs while casting off (and simultaneously casting these off) you avoid a too tight cast off edge.

See DROPS video: How to bind off with yarn overs (yo)

To achieve an even increase (or decrease) you can increase on, for example: every 3rd and 4th row alternately, like so: work 2 rows and increase on the 3rd row, work 3 rows and increase on the 4th. Repeat this until the increase is complete.

See DROPS lesson: Increase or decrease 1 st on every 3rd and 4th row alternately

Should you prefer to work in the round instead of back and forth, you may of course adjust the pattern. You’ll need to add steeks mid-front (usually 5 stitches), and follow the instructions. When you would normally turn and work from the wrong side, simply work across the steek and continue in the round. At the end you’ll cut the piece open, pick up stitches to work bands, and cover the cut edges.

See DROPS video: How to knit steeks and cut open

Should you prefer to work back and forth instead of in the round, you may of course adjust the pattern so you work the pieces separately and then assemble them at the end. Divide the stitches for the body in 2, add 1 edge stitch in each side (for sewing) and work the front and back pieces separately.

See DROPS lesson: Can I adapt a pattern for circular needles into straight needles?

Pattern repeats can vary slightly in the different sizes, in order to get the correct proportions. If you’re not working the exact same size as the garment in the photo, yours might deviate slightly. This has been carefully developed and adjusted so that the complete impression of the garment is the same in all sizes.

Make sure to follow instructions and diagrams for your size!

If you have found a pattern you like which is available in women’s size it’s not very difficult to convert it to men’s size. The biggest difference will be the length of sleeves and body. Start working on the women size that you think would fit across the chest. The additional length will be worked right before you cast off for the armhole/sleeve cap. If the pattern is worked top-down you can add the length right after the armhole or before the first decrease on sleeve.

Regarding additional yarn amount, this will depend on how much length you add, but it is better with a skein too many than too few.

All yarns will have excess fibres (from production) that might come off as lint or shedding. Brushed yarns (ie hairier yarns) have more of these loose, excess fibres, causing more shedding.

Shedding also depends on what is worn under or over the garment, and whether this pulls at the yarn fibres. It’s therefore not possible to guarantee that there will be no shedding

Below are some tips on how to get the best result when working with hairier yarns:

1. When the garment is finished (before you wash it) shake it vigorously so the looser hairs come off. NOTE: do NOT use a lint roller, brush or any method that pulls at the yarn.

2. Place the garment in a plastic bag and put it in your freezer - the temperature will cause the fibres to become less attached to each other, and excess fibres will come off easier.

3. Leave in the freezer for a few hours before taking it out and shaking it again.

4. Wash the garment according to the instructions on the yarn label.

Pilling is a natural process that happens to even the most exclusive of fibers. It's a natural sign of wear and tear that is hard to avoid, and that is most visible in high friction areas of your garment like a sweater's arms and cuffs.

You can make your garment look as new by removing the pilling, using a fabric comb or a pill/lint remover.

Still can't find the answer you need? Then scroll down and leave your question so one of our experts can try to help you. This will be done normally within 5 to 10 working days.
In the meantime, you can read the questions and answers that others have left to this pattern or join the DROPS Workshop on Facebook to get help from fellow knitters/crocheters!

You might also like...

Post a comment to pattern DROPS 158-2

We would love to hear what you have to say about this pattern!

If you want to leave a question, please make sure you select the correct category in the form below, to speed up the answering process. Required fields are marked *.

Comments / Questions (26)

country flag Annamaria wrote:

Salve vorrei sapere se in 4cm di lavoro si possono fare gli aumenti ripetendoli ogni 4 ferri per 20 volte. Grazie...

29.11.2020 - 21:12

DROPS Design answered:

Buonasera Annamaria, deve lavorare gli aumenti in contemporanea. Buon lavoro!

29.11.2020 - 23:31

country flag Latricoteuse24 wrote:

Bonjour, Faut-il réaliser un steek pour ce modèle ?

11.09.2019 - 11:06

country flag Latricoteuse24 wrote:

Bonjour, Faut-il réaliser un steek pour ce modèle ?

11.09.2019 - 11:02

DROPS Design answered:

Bonjour Latricoteuse24, ce modèle se tricote sans mailles steek, on le tricote de haut en bas, en allers et retours; en commençant par le col, on augmente pour l'empiècement, on sépare les mailles des manches et on termine le bas du gilet et les manches séparément. Bon tricot!

11.09.2019 - 11:31

country flag Ruth Buttsworth wrote:

Hi I am doing the yoke on 'take it easy cardigan' got to point where I have increased & have 368 stitches (medium) & measuring 19cm. How do you then do the next part & end up with 244 stitches ? Also when you are doing this section do you take out the original markers? thanks

25.08.2019 - 13:46

DROPS Design answered:

Dear Ruth, in the next section you'll divide piece for back/front and sleeves as follows: Work 6 band sts in garter st, K 53 sts, slip 72 sts on a stitch holder for sleeve, cast on 10 new sts, work the next 106 sts, slip 72 sts on a stitch holder for sleeve, cast on 10 new sts under sleeve, K 53, finish with 6 band sts in garter st = 244 sts. You can remove all the markers and insert a marker in the middle of the 10 sts cast on for sleeves at each side. Happy knitting!

25.08.2019 - 15:37

country flag Francine wrote:

Bonjour,pour le point mousse,sur aiguilles doubles pointes c'est un tour endroit puis un tour envers.Pour les aiguilles circulaires c'est la même façon?Quand est-ce qu'on fait l'aller retours? Merci!

13.07.2017 - 23:17

DROPS Design answered:

Bonjour Francine, quand on tricote du point mousse en allers et retours, on tricote toujours à l'endroit, que ce soit sur aiguilles droites ou circulaire comme ici pour le gilet. Quand on tricote du point mousse en rond, on alterne 1 tour endroit et 1 tour envers, sur aiguilles doubles pointes ou sur aiguille circulaire. Bon tricot!

14.07.2017 - 10:06

country flag Zuzana Kozáková wrote:

Hello. I don´t understand how to continue with splitting into sleeves, back an so on. How do I add 10 loops together? Thank you for your answer. Zuzana

07.04.2017 - 18:48

DROPS Design answered:

Dobrý den, Zuzano, kromě pravidelného přidávání před a za značkami, jak je rozepsáno v návodu, přidáte navíc ještě další oka pro rozšíření jednotlivých dílů - nad každým předním dílem přidáte po 2 okách, nad každým rukávem po 1 oku a nad zády 4 oka (celkem tedy přidáte v jedné řadě 10 ok + přidávání u značek jako předtím). Přidáváte nahozením v pravidelných rozestupech v rámci toho kterého dílu. Hodně zdaru! Hana

10.04.2017 - 11:43

country flag Nathalie wrote:

Malgré la taille L, le gilet est trop étroit. Je pense rajouter une bande en point mousse sur la bordure où il n'y a pas les boutonnières. Je voudrais l'accrocher directement mais avec les mailles dans le même sens horizontal. Comment faire ? Merci pour votre réponse

03.01.2016 - 17:15

DROPS Design answered:

Bonjour Nathalie, pensez toujours à bien vérifier votre tension et les mesures du schéma en les comparant à un vêtement similaire que vous avez et dont vous aimez la forme. Pour toute assistance personnalisée, votre magasin DROPS saura vous donner toutes les astuces et conseils, même par mail ou téléphone. Bon tricot!

04.01.2016 - 09:37

country flag Mechthild wrote:

Hallo! Ich bin jetzt beim dritten Knopfloch und mir ist aufgefallen, dass die Knopflöcher, die ich nach der Anleitung gearbeitet habe, beim fertigen Modell, da die Jacke ja von oben nach unten gearbeitet wird, auf der linken Seite sein werden (abweichend vom Foto des Modells). Habe ich einen strukturellen Fehler gemacht oder ist das ein Fehler in der Anleitung? Viele Grüße und danke Mechthild

14.07.2015 - 18:30

DROPS Design answered:

Das rechte Vorderteil befindet sich am Ende der R (siehe Einteilung in der Anleitung), daher hätten Sie die Knopflöcher am Ende der R einarbeiten müssen. Man muss tatsächlich etwas aufpassen, damit einem dieser Fehler nicht unterläuft, es wird noch zur Verdeutlichung eine Ergänzung eingefügt.

20.07.2015 - 12:23

country flag Katherine Jacob wrote:

What should the gauge be for the garter stitch yoke? I'm using the correct yarn with 2.5 mm needles (for the garter stitch), but it's coming out too small. I tested the gauge for the stockinette stitch, but I don't know why it's wrong for the garter stitch.

10.07.2015 - 00:39

DROPS Design answered:

Dear Mrs Jacob, if your gauge in stocking st was correct in height (32 rows = 10 cm) your garter st should be correct too. Check the measurments for your size with a similar garment you have and like the shape and adjust if necessary. Happy knitting!

28.07.2015 - 10:13

country flag Olga wrote:

Vielen Dank für die Antvort. Habe meine Fehler verstanden. Ich stricke Gr. M.

14.03.2015 - 20:25

DROPS Design answered:

Liebe Olga, in Ordnung. Wenn Sie die Zunahmen nun verstanden haben, haben Sie ja die in der Anleitung angegebene Kontrolle - nach 19 cm (nach allen Zunahmen) müssten Sie 368 M auf der Nadel haben - 23 x 8 Zunahmen in jeder 4. R und 6 x 10 Zunahmen alle 3 cm. Das macht also 244 zugenommene M plus Anschlag 124 M = 368 M.

16.03.2015 - 10:15