Beth

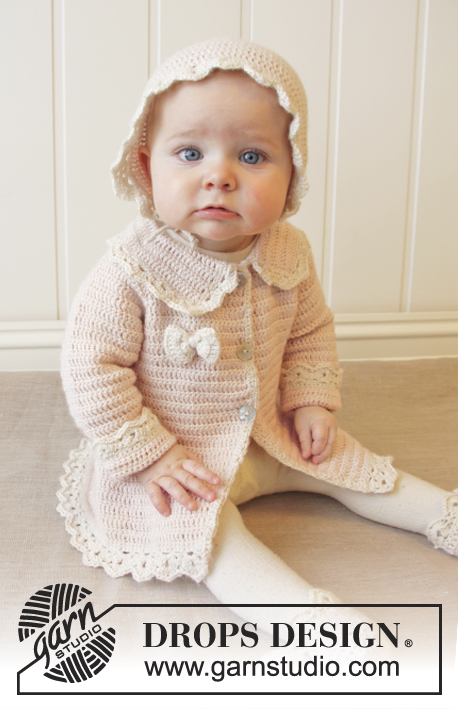
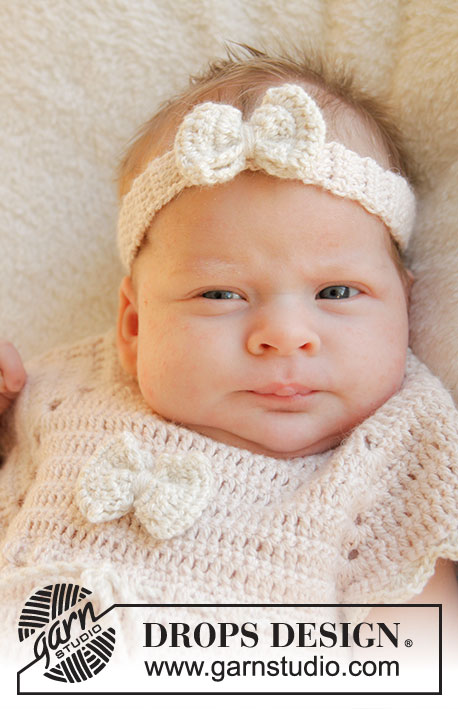
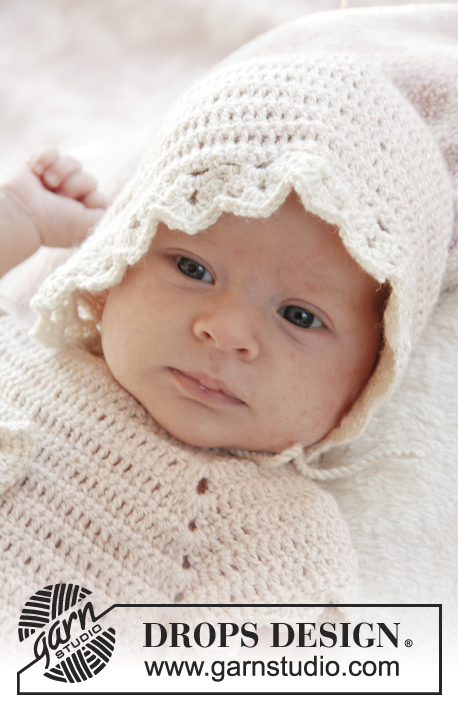
Crochet baby dress with raglan, short sleeves and fan edges, worked top down in DROPS BabyAlpaca Silk. Size 0-4 years

DROPS Baby 25-16
DROPS design: Pattern no bs-009-by
Yarn group A
-----------------------------------------------------------
Size: 0/1 - 1/3 - 6/9 - 12/18 months (2 - 3/4) years
Size in cm: 48/52 - 56/62 - 68/74 - 80/86 (92 - 98/104)
Materials:
DROPS BABYALPACA SILK from Garnstudio
100-100-100-150 (150-150) g colour no 1306, powder
50 g for all sizes in colour no 0100, off white

DROPS CROCHET HOOK SIZE 3.5 mm – or size needed to get 22 tr x 8 texture rows vertically = 10 x 10 cm.
DROPS MOTHER-OF-PEARL BUTTON NO 521: 3 pieces for all sizes

-------------------------------------------------------

Alternative Yarn – See how to change yarns here
Yarn Groups A to F – Use the same pattern and change the yarn here
Yarn usage using an alternative yarn – Use our yarn converter here

-------------------------------------------------------

Pattern instructions

NOTE: This pattern is written in British English. All measurements in charts are in cm. For conversion from cm to inches - click here. There are different terms for crocheting in British and American English. If this pattern includes crochet, click for "crochet terms" here. For this pattern in American English, please click here.
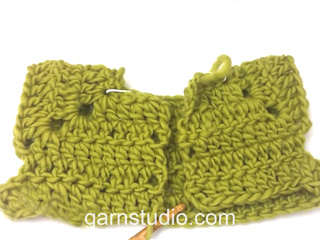
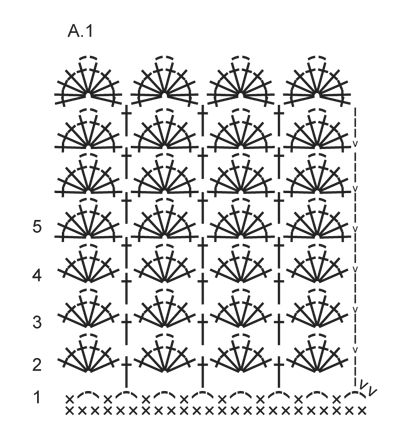
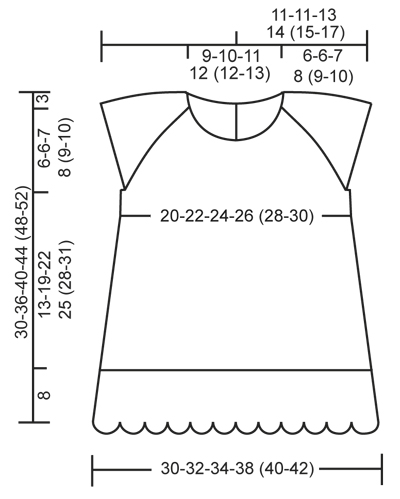
CROCHET INFO:
Replace first dc at beg of every dc round/row with 1 ch. Finish round with 1 sl st in ch from beg of round. Finish row with 1 dc in 3rd ch from beg of previous row.
Replace first tr at beg of every tr round/row with 3 ch. Finish round with 1 sl st in 3rd ch from beg of round. Finish row with 1 tr in ch from beg of previous row.

TEXTURE ROWS:
* 1 row/round dc, 1 row/round tr *, repeat from *-* (1 row/round dc + 1 row/round tr = 1 texture row).

INCREASE TIP:
Inc 1 dc/tr by working 2 dc/tr in same st.

PATTERN:
See diagram A.1.
----------------------------------------------------------

DRESS:
The piece is worked top down. Work back and forth from mid back to after vent mid back, then work piece in the round.

YOKE:
Work 67-71-75-79 (79-83) ch (incl 1 ch to turn with) on hook size 3.5 mm with powder. Work 1 dc in 2nd ch from hook, then work 1 dc in every ch the entire row = 66-70-74-78 (78-82) dc on row.
Now insert 4 markers in piece for raglan as follows (beg mid back – NOTE: Do NOT work while inserting markers): Skip 9-10-11-12 (12-13) dc (= right back piece), insert 1 marker in next dc, skip 13 dc (= sleeve), insert 1 marker in next dc, skip 18-20-22-24 (24-26) dc (= front piece), insert 1 marker in next dc, skip 13 dc (= sleeve) and insert last marker in next dc (there are now 9-10-11-12 (12-13) dc on left back piece after last marker).
READ ALL OF THE FOLLOWING SECTION BEFORE CONTINUING:
READ CROCHET INFO and work next row as follows from RS:
Work 1 tr in every dc but in every dc with marker work 2 tr + 2 ch + 2 tr = 78-82-86-90 (90-94) tr on row.
Then work TEXTURE ROWS – see explanation above (work back and forth with 1 dc/tr in every st from previous row but on every row with dc from WS work 2 ch over the 2 ch from previous row in raglan lines).
AT THE SAME TIME on 1st row from RS (i.e. row with tr) inc for raglan as follows: Work 2 tr + 2 ch + 2 tr in every ch-space in every raglan line (= 16 tr inc on row - NOTE: Work in both ch-spaces). Repeat inc on every row from RS 3-3-4-4 (5-6) more times (= 4-4-5-5 (6-7) times in total) = 142-146-166-170 (186-206) sts. REMEMBER THE CROCHET TENSION!
After last inc for raglan work 1 row with dc from WS as before.
Work next row as follows from RS: Work 1 tr in each of the first 19-20-23-24 (26-29) dc (= right back piece), skip the next 33-33-37-37 (41-45) dc (= sleeve), work 6-8-6-10 (10-8) ch, work 1 tr in each of the next 38-40-46-48 (52-58) dc (= front piece), skip the next 33-33-37-37 (41-45) dc (= sleeve), work 6-8-6-10 (10-8) ch and work 1 tr in each of the last 19-20-23-24 (26-29) dc (= left back piece).
Sleeve caps are now done and piece is worked in the round.

BODY:
Put piece tog mid back with RS out and work 1 round with dc (work 1 dc in every tr from previous round and 1 dc in every ch under each sleeve – remember CROCHET INFO) = 88-96-104-116 (124-132) sts on round. Insert 1 marker in each side = 44-48-52-58 (62-66) sts on front and back piece. Continue in the round with TEXTURE ROWS.
When piece measures approx. 2 cm from markers under sleeves, inc 1 st on each side of both markers - READ INCREASE TIP (= 4 sts inc). Repeat inc every 1½-2-3-3 (3-3½) cm 5-6-6-7 (8-8) more times (= 6-7-7-8 (9-9) times in total) = 112-124-132-148 (160-168) sts. When piece measures approx. 13-19-22-25 (28-31) cm from markers (finish after 1 round with tr, inc should be done), work 1 round dc AT THE SAME TIME inc 8-2-0-2 (2-0) dc evenly – READ INCREASE TIP = 120-126-132-150 (162-168) dc. Cut the yarn.
Switch to off white and work 1 round dc with 1 dc in every dc from previous round. Then work Fan pattern according to diagram A.1, i.e. work as follows:
ROUND 1: * 3 ch, skip 2 dc, 1 dc in next dc *, repeat from *-* the entire round and finish with 3 ch and 1 sl st in 1st ch from beg of round = 40-42-44-50 (54-56) ch-spaces.
ROUND 2: Work sl sts until mid of first ch-space, 3 ch (= 1 tr), * 3 tr + 2 ch + 3 tr in next ch-space, 1 tr in next ch-space *, repeat from *-* until 1 ch-space remains, work 3 tr + 2 ch + 3 tr in last ch-space and finish with 1 sl st in 3rd ch from beg of round = 20-21-22-25 (27-28) tr-groups with 1 tr between every tr-group.
ROUND 3-4: 3 ch (= 1 tr), * 3 tr + 2 ch + 3 tr in ch-space in mid of next tr-group, 1 tr in next tr *, repeat from *-* the entire round, finish with 3 tr + 2 ch + 3 tr in ch-space in mid of last tr-group and 1 sl st in 3rd ch from beg of round.
ROUND 5: Work as round 3-4 but in ch-space in the mid of every tr-group work 4 tr + 2 ch + 4 tr (instead of 3 tr + 2 ch + 3 tr). Repeat 5th round until edge measures approx. 6 cm in all sizes (or desired length). Then work last round the same way but with 5 tr + 2 ch + 5 tr in ch-space in the mid of every tr-group.

TWINED STRING:
Cut 3 lengths off white yarn of 3 metres each. Twine the strands tog until they resist, fold the string double so that it twines again. Make a knot at each end. Thread the string up and down through a tr row, approx. 2 cm below armhole on dress, beg from mid front.

BOW:
Work 11 ch on hook size 3.5 mm with off white. Work first row as follows: 1 tr in 4th ch from hook, 1 tr in each of the next 7 ch = 9 tr on row. Turn piece and work TEXTURE ROWS back and forth until piece measures approx. 10 cm – finish after 1 row with dc. Fasten off. Sew short sides tog to form a ring and twine some yarn around the mid of bow to tighten it neatly in the middle. Fasten bow mid front on dress, just above string.

ADJUSTING NECKLINE:
For better fit work a small elevation at the back of neck. Insert 1 marker in st in each corner in neck, i.e. at beg of every raglan line and 1 marker mid front.
Work on hook size 3.5 mm with powder as follows: Beg mid back, work 1 dc in every st until 1 st remains before st with marker, work 1 htr in next st, 1 tr in st with marker and 1 htr in next st, then work 1 dc in every st until 1 st remains before next st with marker, 1 htr in next st, 1 tr in st with marker and 1 htr in next st, the work 1 dc in every st until 4-4-5-5 (5-6) sts remain before marker mid front. Turn piece and work 1 dc in every dc back to mid back but at every marker work 3 dc tog, i.e. work 1 dc in htr but wait with last YO and pull through, work 1 dc in st with marker but wait with last YO and pull through, work 1 dc in next htr but now pull last YO through all 4 sts on hook (= 2 dc dec). Cut the yarn and repeat from mid back to mid front in the other side.

BUTTON BAND AT THE BACK:
Work along left opening mid back with powder as follows: 1 dc in every dc row and 2 dc in every tr row. Work a total of 4 rows dc back and forth, fasten off.
Along right opening mid back work buttonholes as follows (beg from RS at neckline): Work 3 dc (1 dc in dc row and 2 dc in tr row). 4 ch (= 1 buttonhole), skip approx. 1 cm, work dc until approx. mid on band, 4 ch, skip approx. 1 cm, work dc until 1 cm remains on band, 4 ch and fasten with 1 dc in last st. Fasten off. Sew the buttons on to button band in the left side.

NECK EDGE:
Work around the neck with off white as follows: 1 dc in first st, * 2 ch, skip 2 sts, 1 dc in next st *, repeat from *-* the entire row, fasten off.

FAN EDGE AROUND SLEEVE CAPS:
Work with off white as follows: Work 1 dc in each of the 6-8-6-10 (10-8) sts mid under sleeve, then work fan edge around the sleeve opening as follows: * Skip approx. 2 sts, in next st work 3 tr + 2 ch + 3 tr, skip approx. 2 sts, 1 dc in next st *, repeat from *-* and finish with 1 sl st in first dc from beg of round (= approx. 5-5-6-6 (7-7) fans along sleeve cap). Fasten off.
Repeat at the bottom around the other sleeve cap.

Diagram

symbols = 1 dc
symbols = 1 ch
symbols = 1 sl st
symbols = 1 tr
diagram
diagram
Do you have a question? See a list of frequently asked questions (FAQ)

Knitting tension is what determines the final measurements of your work, and is usually measured per 10 x 10 cm. It is provided like so: number of stitches in width x number of rows in height - eg: 19 stitches x 26 rows = 10 x 10 cm.

The knitting tension is very individual; some people knit/crochet loosely while others work tightly. You adjust the knitting tension with the needle size, which is why the suggested needle size is only meant as a guide! You need to adjust this (up or down) to ensure that YOUR knitting tension matches the knitting tension provided in the pattern. If you work with a different knitting tension than provided you will have a different yarn consumption, and your work will have different measurements than what the pattern suggests.

The knitting tension also determines which yarns can replace each other. As long as you achieve the same knitting tension you can replace one yarn with another.

See DROPS lesson: How to measure your tension/gauge

See DROPS video: How to make a gauge tension swatch

The required amount of yarn is provided in grams, eg: 450 g. To calculate how many balls you’ll need you first need to know how many grams are in 1 ball (25g, 50g or 100g). This information is available if you click on the individual yarn quality on our pages. Divide the amount required with the amount of each ball. For example, if each ball is 50g (the most common amount), the calculation will be as follows: 450 / 50 = 9 balls.

The important thing when changing from one yarn to another is that the knitting/crochet tension remains the same. This is so that the measurements of the finished piece will be the same as on the sketch provided. It is easier to achieve the same knitting tension using yarns from the same yarn group. It is also possible to work with multiple strands of a thinner yarn to achieve the knitting tension of a thicker one. Please try our yarn converter. We recommend you to always work a test swatch.

Please NOTE: when changing yarn the garment might have a different look and feel to the garment in the photo, due to individual properties and qualities of each yarn.

See DROPS lesson: Can I use a different yarn than the one mentioned in the pattern?

All our yarns are categorised into yarn groups (from A to F) according to thickness and knitting tension – group A contains the thinnest yarns and group F the thickest. This makes it easier for you to find alternative yarns to our patterns, should you wish to switch yarn. All yarns within the same group have a similar knitting tension and can easily replace each other. However, different yarn qualities have different structures and properties which will give the finished work a unique look and feel.

Click here for an overview of the yarns in each yarn group

At the top of all our patterns you’ll find a link to our yarn calculator, which is a helpful tool should you wish to use a different yarn than suggested. By filling in the yarn quality you wish to replace, the amount (in your size) and number of strands, the calculator will present good alternative yarns with the same knitting tension. Additionally it will tell you how much you’ll require in the new qualities and whether you’ll need to work with multiple strands. Most skeins are 50g (some are 25g or 100g).

If the pattern is worked with multiple colours, every colour will have to be calculated separately. Similarly, if the pattern is worked with several strands of different yarns (for example 1 strand Alpaca and 1 strand Kid-Silk) you will have to find alternatives for each, individually.

Click here to see our yarn calculator

Since different yarns have different qualities and textures we have chosen to keep the original yarn in our patterns. However, you can easily find options among our available qualities by using our yarn calculator, or simply pick a yarn from the same yarn group.

It is possible that some retailers still have discontinued yarns in stock, or that someone has a few skeins at home that they would like to find patterns for.

The yarn calculator will provide both alternative yarn as well as required amount in the new quality.

If you think it's hard to decide what size to make, it can be a good idea to measure a garment you own already and like the size of. Then you can pick the size by comparing those measures with the ones available in the pattern's size chart.

You'll find the size chart at the bottom of the pattern.

See DROPS lesson: How to read size chart

The needle size provided in the pattern serves only as a guide, the important thing is to follow the knitting tension. And since knitting tension is very individual, you will have to adjust the needle size to ensure that YOUR tension is the same as in the pattern – maybe you’ll have to adjust 1, or even 2 needle sizes, up or down to achieve the correct tension. For this, we recommend that you work test swatches.

Should you work with a different knitting tension than the one provided, the measurements of the finished garment might deviate from the measurement sketch.

See DROPS lesson: How to measure your tension/gauge

See DROPS video: How to make a tension/gauge swatch

Working a garment top-down provides more flexibility and room for personal adjustment. For example it is easier to try the garment on while working, as well as making adjustments to length of yoke and shoulder caps.

The instructions are carefully explaining every step, in the correct order. Diagrams are adjusted to the knitting direction and are worked as usual.

The diagram depicts all rows/rounds, and every stitch seen from the right side. It is read from bottom to top, from right to left. 1 square = 1 stitch.

When working back and forth, every other row is worked from the right side and every other row is worked from the wrong side. When working from the wrong side, the diagram will have to be worked reversed: from left to right, knit stitches are purled, purl stitches are knit etc.

When working in the round every round is worked from the right side and the diagram are worked from right to left on all rounds.

See DROPS lesson: How to read knitting diagrams

The diagram depicts all rows/rounds, and every stitch seen from the right side. It is worked from bottom to top, from right to left.

When working back and forth every other row is worked from the right side: from right to left and every other row is worked from the wrong side: from left to right.

When working in the round, every row in the diagram are worked from the right side, from right to left.

When working a circular diagram you start in the middle and work your way outwards, counter clockwise, row by row.

The rows usually start with a given number of chain stitches (equivalent to the height of the following stitch), this will either be depicted in the diagram or explained in the pattern.

See DROPS lesson: How to read crochet diagrams

Instructions for working several diagrams after each other on the same row/round, will often be written like so: “work A.1, A.2, A.3 a total of 0-0-2-3-4 times". This means you work A.1 once, then A.2 is worked once, and A.3 is repeated (in width) the number of times provided for your size – in this case like so: S = 0 times, M = 0 times, L=2 times, XL= 3 times and XXL = 4 times.

The diagrams are worked as usual: begin with the first row in A.1, then work the first row in A.2 etc.

See DROPS lesson: How to read knitting diagrams

See DROPS lesson: How to read crochet diagrams

The total width of the garment (from wrist-to-wrist) will be larger in the larger sizes, despite the actual sleeves being shorter. The larger sizes have longer sleeve caps and wider shoulders, so there will be a good fit in all sizes.

The measurement sketch/schematic drawing provides information regarding the full length of the garment. If it’s a jumper or a jacket the length is measured from the highest point on the shoulder closest to the neckline, and straight down to the bottom of the garment. It is NOT measured from the tip of shoulder. Similarly, the length of yoke is measured from the highest point on the shoulder and down to where yoke is split into body and sleeves.

On a jacket measures are never taken along bands, unless specifically stated. Always measure inside band stitches when measuring the length.

See DROPS lesson: How to read a schematic drawing

Diagrams are often repeated on the round or in height. 1 repeat is the diagram the way it appears in the pattern. If it says to work 5 repeats of A.1 in the round, then you work A.1 a total of 5 times after/next to each other in the round. If it says to work 2 repeats of A.1 vertically/in height you work the entire diagram once, then begin again at the start and work the entire diagram one more time.

Chain stitches are slightly narrower than other stitches and to avoid working the cast-on edge too tight, we simply chain more stitches to begin with. The stitch count will be adjusted on the following row to fit the pattern and measurement sketch.

The rib edge is more elastic and will contract slightly compared to, for example, stocking stitch. By increasing before the rib edge, you avoid a visible difference in width between the rib edge and the rest of the body.

It’s very easy to cast off too tightly, and by making yarn overs while casting off (and simultaneously casting these off) you avoid a too tight cast off edge.

See DROPS video: How to bind off with yarn overs (yo)

To achieve an even increase (or decrease) you can increase on, for example: every 3rd and 4th row alternately, like so: work 2 rows and increase on the 3rd row, work 3 rows and increase on the 4th. Repeat this until the increase is complete.

See DROPS lesson: Increase or decrease 1 st on every 3rd and 4th row alternately

Should you prefer to work in the round instead of back and forth, you may of course adjust the pattern. You’ll need to add steeks mid-front (usually 5 stitches), and follow the instructions. When you would normally turn and work from the wrong side, simply work across the steek and continue in the round. At the end you’ll cut the piece open, pick up stitches to work bands, and cover the cut edges.

See DROPS video: How to knit steeks and cut open

Should you prefer to work back and forth instead of in the round, you may of course adjust the pattern so you work the pieces separately and then assemble them at the end. Divide the stitches for the body in 2, add 1 edge stitch in each side (for sewing) and work the front and back pieces separately.

See DROPS lesson: Can I adapt a pattern for circular needles into straight needles?

Pattern repeats can vary slightly in the different sizes, in order to get the correct proportions. If you’re not working the exact same size as the garment in the photo, yours might deviate slightly. This has been carefully developed and adjusted so that the complete impression of the garment is the same in all sizes.

Make sure to follow instructions and diagrams for your size!

If you have found a pattern you like which is available in women’s size it’s not very difficult to convert it to men’s size. The biggest difference will be the length of sleeves and body. Start working on the women size that you think would fit across the chest. The additional length will be worked right before you cast off for the armhole/sleeve cap. If the pattern is worked top-down you can add the length right after the armhole or before the first decrease on sleeve.

Regarding additional yarn amount, this will depend on how much length you add, but it is better with a skein too many than too few.

All yarns will have excess fibres (from production) that might come off as lint or shedding. Brushed yarns (ie hairier yarns) have more of these loose, excess fibres, causing more shedding.

Shedding also depends on what is worn under or over the garment, and whether this pulls at the yarn fibres. It’s therefore not possible to guarantee that there will be no shedding

Below are some tips on how to get the best result when working with hairier yarns:

1. When the garment is finished (before you wash it) shake it vigorously so the looser hairs come off. NOTE: do NOT use a lint roller, brush or any method that pulls at the yarn.

2. Place the garment in a plastic bag and put it in your freezer - the temperature will cause the fibres to become less attached to each other, and excess fibres will come off easier.

3. Leave in the freezer for a few hours before taking it out and shaking it again.

4. Wash the garment according to the instructions on the yarn label.

Pilling is a natural process that happens to even the most exclusive of fibers. It's a natural sign of wear and tear that is hard to avoid, and that is most visible in high friction areas of your garment like a sweater's arms and cuffs.

You can make your garment look as new by removing the pilling, using a fabric comb or a pill/lint remover.

Still can't find the answer you need? Then scroll down and leave your question so one of our experts can try to help you. This will be done normally within 5 to 10 working days.
In the meantime, you can read the questions and answers that others have left to this pattern or join the DROPS Workshop on Facebook to get help from fellow knitters/crocheters!

You might also like...

Post a comment to pattern DROPS Baby 25-16

We would love to hear what you have to say about this pattern!

If you want to leave a question, please make sure you select the correct category in the form below, to speed up the answering process. Required fields are marked *.

Comments / Questions (47)

country flag Fia wrote:

Hur ska man göra i ökningarna på strukturvarvets fm-varv? Ska man virka 2fm+2lm+2fm?

25.10.2023 - 15:39

DROPS Design answered:

Hej Fia, ÖKNINGSTIPS: Det ökas 1 fm/st genom att virka 2 fm/st i samma m.

26.10.2023 - 13:56

country flag Maya wrote:

Jeg hækler str. 6/9. Jeg har lige sat de fire mærketråde i. Jeg forstår simpelthen ikke HÆKLEINFO. Jeg skal til at hækle 1 st i hver fm, men hvis jeg starter med 3 lm som erstatter 1. st, så øger det jo antallet? F.eks: Starten af højre rygstykke har 11 lm. Når jeg er færdig med første række af stangmasker, så er der jo 12 masker der. Hvad er det jeg ikke forstår ved HÆKLEINFO??

20.05.2023 - 15:05

DROPS Design answered:

Hej Maya, de 3 lm er til for at kommet en række op i højden. MEN se videoen vi har lavet til denne opskrift - du finder den nederst i opskriften :)

23.05.2023 - 11:10

country flag Camilla wrote:

Hej! Jag skulle vilja veta om jag kan byta ut garnet till detta mönster till bomull? I kalkylatorn så kan den inte ge något förslag på annat garn. Hur mycket behöver jag isf och hur blir det med fastheten/nålen? Mvh nybörjaren

18.03.2021 - 08:30

DROPS Design answered:

Hej Camilla, jo du får et forslag med DROPS Safran. Vælg BabyAlpaca Silk, vælg antal gram i din størrelse, vælg 1 tråd :)

18.03.2021 - 09:30

country flag Margareta Tjerneld wrote:

Hej får inte ökningen vid raglanökningen att stämma Exempel minsta storlek;efter en ökning 2 st+2lm+2st har man 4 ggr har man enligt mönstret 78m.Hur är det möjligt ? Man hade 66 m och ökade 6 m 4 ggr vilket är 24 m Det stämmer inte. De andra fortsatta ökningarna stämmer inte heller. Mvh Margareta

10.12.2020 - 20:45

DROPS Design answered:

Hej Margareta. Du ökar 3 st vid varje markör (istället för att virka 1 st så virkar du 2 st + 2 lm+ 2 st, dvs 3 st ökade). 3 st x 4 = 12 st ökade per varv. Mvh DROPS Design

11.12.2020 - 07:04

country flag Miriam wrote:

Hi, question about the body section , are the markers at the front or the back ? I am a bit confused ! Many thanks in advance.

01.03.2020 - 00:59

DROPS Design answered:

Dear Miriam, at the yoke the markers are at the 4 raglan-lone, and then, at the body there is 2 markers, 1 at each side of the dress. Happy Crafting!

01.03.2020 - 09:55

country flag Marte wrote:

Hei. :) Hvilket annet drops garn kan du anbefale å hekle denne kjolen i?

24.02.2020 - 17:24

DROPS Design answered:

Hej Marte, Prøv vores garnkalkulator som findes under billedet i opskriften, så får du alle de kvaliteter fra garngruppe A som du kan erstatte DROPS BabyAlpaca med. God fornøjelse!

25.02.2020 - 08:51

country flag MariAnne wrote:

Hei. Jeg holder på å hekle kjolen, men når jeg skal hekle rundt. Da jeg har heklet rundt en omgang, skal jeg snu og hekle motsatt av neste omgang? Jeg har heklet samme vei ved hver omgang, men begynnelse og slutt blir skjev jo lenger jeg kommer nedover kjolen.

05.01.2020 - 23:08

DROPS Design answered:

Hei MariAnne. Usikker på hva du gjør feil, men den skal ikke bli skeiv. Har du hoppet over noen masker når du snur? Prøv å telle maskene etter hver omgang. Husk å lese Hekleinfo i oppskriften. God Fornøyelse!

03.02.2020 - 14:24

country flag Amy Weisenburger wrote:

How many texture rows will there be in the yoke?

28.10.2019 - 22:45

DROPS Design answered:

Hello Amy! It depends on the size. Please look at the number for your size. Happy crocheting!

30.10.2019 - 14:12

country flag Charlotte Bundgaard wrote:

Skal man tælle de 3 luftmasker i begyndelsen af omgangen med, når man skal kontrollere at man har 146 stangmasker, når man er færdig med udtagning til raglan?

26.02.2019 - 17:35

DROPS Design answered:

Hei Charlotte. Første stav på omgangen erstattes av 3 luftmasker, så disse telles som 1 stav - se hekleinfo på toppen av oppskriften. God fornøyelse

07.03.2019 - 13:43

country flag Mette B wrote:

Så jeg skal ikke tælle den første række med udtagninger med? Altså den med de 90 st?

07.12.2018 - 15:43

DROPS Design answered:

Hei igjen Mette. Den første økingen der du øker til 90 staver er ikke medregnet i beskrivelsen av øking til raglan. Denne kommer i tillegg. Du øker altså først til 90 staver som beskrevet, og videre følger du økingen til raglan og øker slik totalt 6 ganger. Du har da 186 staver på omgangen. God fornøyelse.

10.12.2018 - 10:12