
Popular categories
Looking for a yarn?


|
|||||||||||||
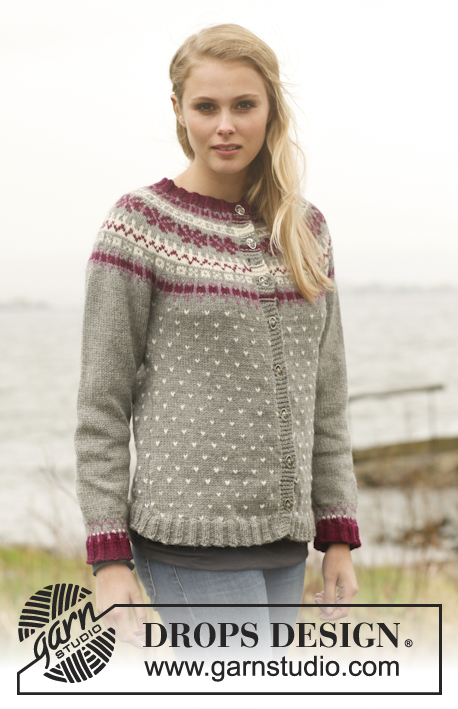
September Sweater |
|||||||||||||
|
|
|||||||||||||
Knitted DROPS jumper with round yoke and Nordic pattern in ”Lima”. Size: S - XXXL.
DROPS 150-15 |
|||||||||||||
|
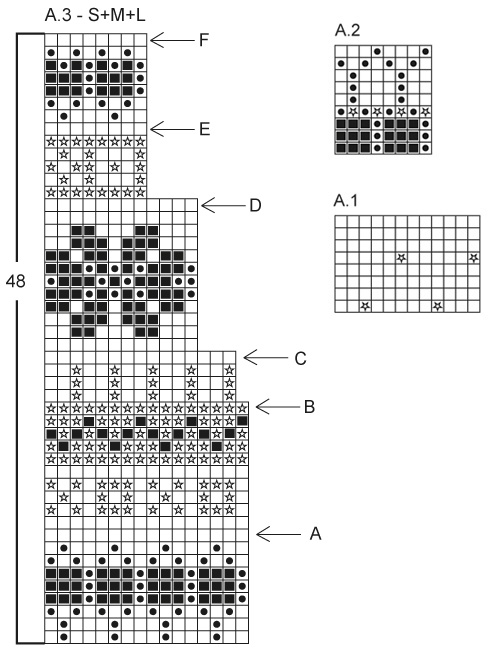
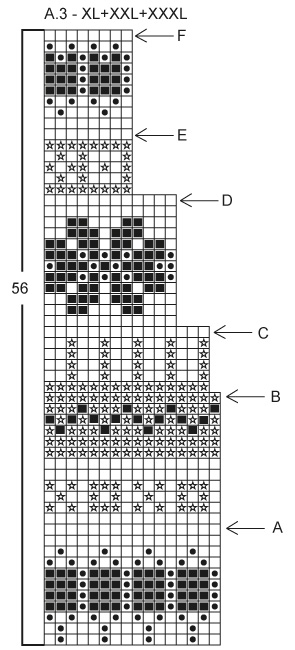
PATTERN: See diagrams A.1 to A.3. Work entire pattern in stockinette st. DECREASE TIP 1 (applies to body): Dec as follows before marker: K 2 tog. Dec as follows after marker: Slip 1 st as if to K, K 1, psso. DECREASE TIP 2 (applies to round yoke): To calculate how often dec should be done, use the total no of sts on row (e.g. 296 sts) and divide by no of dec to be done (e.g. 24) = 12.3. I.e. in this example K approx. every 11th and 12th st tog. INCREASE TIP: Inc 1 st by picking up a st from previous row/round, K this st. ---------------------------------------------------------- BODY: Worked in the round on circular needle. Cast on 212-228-248-280-308-336 sts on circular needle size 3 mm / US 2.5 with gray. K 1 round. Then work rib (= K 2/P 2) for 4 cm / 1½". Switch to circular needle size 4 mm / US 6 and K 1 round while AT THE SAME TIME dec 44-48-50-58-62-66 sts evenly = 168-180-198-222-246-270 sts. Insert 1 marker at beg of round and 1 marker after 84-90-99-111-123-135 sts (= in the sides). Then continue pattern in the round according to diagram A.1. REMEMBER THE KNITTING GAUGE. When piece measures 8 cm / 3", dec 1 st on each side of both markers - READ DECREASE TIP 1 (= 4 sts dec - NOTE: Work sts that do not fit the pattern in gray when dec). Repeat dec when piece measures 16 cm / 6¼"" = 160-172-190-214-238-262 sts. When piece measures 22 cm / 8¾", inc 1 st on each side of both markers - READ INCREASE TIP (= 4 sts inc - NOTE: Work sts that do not fit the pattern in gray when inc). Repeat inc every 3-3-3-3½-3½-4 cm / 1⅛"-1⅛"-1⅛"-1¼"-1¼"-1½", 3-4-4-4-4-4 more times (= 4-5-5-5-5-5 inc in total) = 176-192-210-234-258-282 sts. When piece measures approx. 36-37-38-39-40-41 cm / 14¼"-14½"-15"-14¼"-15¾"-16"– make sure that next round is a round with dots, bind off the middle 12 sts in each side for armholes (i.e. Bind off 6 sts on each side of both markers) = 76-84-93-105-117-129 sts remain on front and back piece. Put piece aside and knit the sleeves. SLEEVE: Worked in the round on double pointed needles. Cast on 64-64-68-68-76-76 sts on double pointed needles size 3 mm / US 2.5 with ruby red. K 1 round. Then work rib (= K 2/P 2) for 3 cm / 1⅛". Switch to double pointed needles size 4 mm / US 6 and K 1 round with ruby red while AT THE SAME TIME dec 16-16-16-16-20-20 sts evenly = 48-48-52-52-56-56 sts. Insert 1 marker at beg of round (= mid under sleeve) and work pattern in the round according to diagram A.2. After A.2 continue in the round in stockinette st with gray. When piece measures 8-8-10-10-12-10 cm / 3"-3"-4"-4"-4¾"-4", inc 1 st on each side of marker – see INCREASE TIP. Repeat inc every 3-2½-2½-2-2-2 cm / 1⅛"-⅞"-⅞"-¾"-¾"-¾" 12-14-13-15-14-16 more times (= 13-15-14-16-15-17 inc total) = 74-78-80-84-86-90 sts. When piece measures 45-45-45-44-44-44 cm / 17¾"-17¾"-17¾"-17¼"-17¼"-17¼" (shorter measurements in the larger sizes because of wider shoulder), bind off 12 sts mid under sleeve (i.e. Bind off 6 sts on each side of marker) = 62-66-68-72-74-78 sts remain on needle. Put piece aside and knit another sleeve. YOKE: Slip sleeves on to same circular needle as body where armholes were bound off = 276-300-322-354-382-414 sts. K 1 round with gray while AT THE SAME TIME dec 4-4-6-6-6-6 sts evenly - SEE DECREASE TIP 2 = 272-296-316-348-376-408 sts. Work 0-1-2-0-1-2 cm / 0-½"-¾"-0-½"-¾" in stockinette st with gray. Then work pattern in the round according to diagram A.3 (choose diagram for your size). AT THE SAME TIME on row marked with arrow A in diagram dec 16-24-28-28-40-40 sts evenly = 256-272-288-320-336-368 sts. Continue pattern. On row marked with arrow B in diagram dec 22-23-24-32-33-35 sts evenly = 234-249-264-288-303-333 sts. Continue pattern. On row marked with arrow C in diagram dec 30-33-36-36-39-45 sts evenly = 204-216-228-252-264-288 sts. Continue pattern. On row marked with arrow D in diagram dec 28-32-36-44-40-48 sts evenly = 176-184-192-208-224-240 sts. Continue pattern. On row marked with arrow E in diagram dec 36-40-44-52-64-64 sts evenly = 140-144-148-156-160-176 sts. Continue pattern. On row marked with arrow F in diagram (= last round) dec 36-36-36-40-40-48 sts evenly = 104-108-112-116-120-128 sts. Cut the yarn. Switch to circular needle size 3 mm / US 2.5 and ruby red, beg mid back and work rib in the round (= K 2/P 2) but make sure that either K 2 or P 2 are mid front. Insert 1 marker mid front between the 2 middle sts. AT THE SAME TIME after 2 rounds rib work an elevation at the back of neck with short rows as follows: Beg mid back and work rib as before until 19-19-21-21-23-23 sts remain before marker, turn and work rib back until 19-19-21-21-23-23 sts remain before marker in the other side. Turn and work rib until 27-27-29-29-31-31 sts remain before marker, turn and work rib back until 27-27-29-29-31-31 sts remain on the other side before marker. Turn and work rib until 35-35-37-37-39-39 sts remain on needle, turn and work rib back until 35-35-37-37-39-39 sts remain on the other side. Turn piece and work rib until beg of round beg (= mid back). Then continue rib in the round over all sts as before until rib measures approx. 3 cm / 1⅛" mid front. Loosely bind off with K over K and P over P. Yoke measures approx. 20-21-22-23-24-25 cm / 8"-8¼"-8¾"-9"-9½"-9¾" and entire jumper measures approx. 56-58-60-62-64-66 cm / 22"-22¾"-23⅝"-24⅜"-25¼"-26". ASSEMBLY: Sew the openings under the sleeves tog. |
|||||||||||||
Diagram explanations |
|||||||||||||
|
|||||||||||||
|
|||||||||||||
|
|||||||||||||

|
|||||||||||||
|
Have you made this or any other of our designs? Tag your pictures in social media with #dropsdesign so we can see them! Do you need help with this pattern?You'll find tutorial videos, a Comments/Questions area and more by visiting the pattern on garnstudio.com. © 1982-2024 DROPS Design A/S. We reserve all rights. This document, including all its sub-sections, has copyrights. Read more about what you can do with our patterns at the bottom of each pattern on our site. |
|||||||||||||


With over 40 years in knitting and crochet design, DROPS Design offers one of the most extensive collections of free patterns on the internet - translated to 17 languages. As of today we count 304 catalogs and 11422 patterns - 11417 of which are translated into English (US/in).
We work hard to bring you the best knitting and crochet have to offer, inspiration and advice as well as great quality yarns at incredible prices! Would you like to use our patterns for other than personal use? You can read what you are allowed to do in the Copyright text at the bottom of all our patterns. Happy crafting!
Comments / Questions (28)
Det undre mig at der skal tages ind efter ribborten. Det plejer at være modsat, så ribkanten kan sidde tæt på håndled/krop? Glæder mig til at komme i gang. Venligst Margrethe “til håndled/ krop?
15.06.2019 - 12:18DROPS Design answered:
Hei Margrethe. Vrangbord trekker seg mer sammen enn glattstrikk, og for at det ikke skal være en markant viddeforskjell på vrangborden og resten av plagget felles det masker etter vrangborden. God fornøyelse
17.06.2019 - 08:27Mönster 150-15. Jag har bystmått 113. Vilken storlek skall jag välja? Tycker inte det framgår.
18.05.2019 - 19:57DROPS Design answered:
Hei Ulla. Det er en målskisse helt nederst på siden, med alle plaggets mål i alle størrelser. Om du måler 113 cm rundt, vil det si du måler ca 57 cm tvers over. Da ville jeg valgt størrelse XXL som måler 62 cm tvers over (124 cm rundt). God fornøyelse
20.05.2019 - 11:04Kan jeg strikke denne model i Karisma i stedet?
24.03.2018 - 20:38DROPS Design answered:
Hej Lene, ja det kan du, DROPS Karisma tilhører samme garngruppe B som DROPS Lima. God fornøjelse!
04.04.2018 - 13:12Er det feil i oppgitt garnmengde? Jeg måttekjøpe inn to nøster ekstra av bunnfargen, enda strikkefastheten stemmer (str S). Og hvor er omgangsskiftet på bærestykket?
23.04.2017 - 23:18DROPS Design answered:
Hei Maria. Dette har vært en populær genser og vi har ikke fått noen tilbakemeldig om at det har vært for lite garn, men vi skal se nærmere på det. Når du har satt bolen og ermene på sammen pinne vil omgangsskiftet komme mellom det ene ermet og bolen. God fornøylse.
24.04.2017 - 12:03Jeg undrer meg over antall masker som skal legges opp på armen. XL = 68m Må være feil. jeg la opp 48 masker og likevel er det ikke stramt rundt håndleddet.
01.11.2016 - 07:25Heckmann wrote:
Bonjour , Je tricote pull en suivant vos explications pour le nombre de mailles , mais je souhaite tricoter l'empiècement rond au point mousse ; ma question : puis-je suivre le même diagramme ? car le point mousse "avance " différemment que le point jersey . merci
31.08.2016 - 16:14DROPS Design answered:
Bonjour Mme Heckmann, il va vous falloir faire quelques ajustements car le nbe de rangs point mousse n'est pas le même que celui en jersey pour la même hauteur. Vous aurez probablement besoin de plus de fils également, car le point mousse est plus "gourmand" que le jersey. Réalisez un échantillon au point mousse pour recalculer à quelle fréquence diminuer pour l'empiècement. Bon tricot!
31.08.2016 - 16:19Tengo la talla S, pero la manga me queda demasiado ancha, como podría hacerla más estrecha para que luego me coincida bien con el canesu?Muchas gracias
10.02.2016 - 18:37DROPS Design answered:
Hola Olga. Este modelo tiene la manga ya estrecha debido al dibujo realizado en el canesú. Si quieres hacerla aún más estrecha tendrías que recalcular la parte del dibujo del canesú.
23.02.2016 - 18:27Er staat dat je moet minderen na 8 cm moet je daar de boord ook bij rekenen of is dat vanaf de boord. Groetjes van Marga.
09.12.2014 - 16:55DROPS Design answered:
Hoi Marga. Je meet in totaal (dus inclusief de boord).
09.12.2014 - 16:58Vedr. mønster på bærestykke indtagning A. Man har først strikket en firkant af rubinrød ( fuldfarvet firkant), så strikker man 2 omgange med lyng og næste omgang strikkes i grå, hvor man så også skal tage ind. Når man så har taget ind og skal strikke med naturhvid ovenover (stjernerne), så kommer de vel til at blive forskubbet( i forhold til den rubinrøde forkant nedenunder) lidt for hver gang, der er taget en maske ind. Er det meningen, eller er der noget jeg har misforstået?
10.11.2014 - 22:27DROPS Design answered:
Hej Ditte, Diagrammet vil stadigvæk gå op efter indtagningerne, og stjernern kan du også stadigvæk få til at passe over firkanterne i rubinrød, men man behøver ikke få det til at passe (det gør det faktisk ikke på billedet) God fornøjelse!
25.11.2014 - 11:24Im Muster A3 sind jeweils nach den Abnahmerunden Spalten weggelassen. Wie strickt man hier weiter?
05.06.2014 - 22:12DROPS Design answered:
Liebe Romy, die weggelassenen Spalten können Sie nicht mehr stricken, denn die Maschen existieren ja nicht mehr. Sie nehmen ja mehrfach M ab, daher besteht ein Mustersatz aus weniger M. Daher ergeben sich kürzere Mustersätze in der Breite. Sie stricken also einfach immer die Kästchen, die gezeichnet sind.
08.06.2014 - 11:08