DROPS Delight
DROPS Delight
75% Wool, 25% Polyamide
Discontinued
find alternatives
DROPS Kid-Silk
DROPS Kid-Silk
75% Mohair, 25% Silk
from 4.60 £ /25g
DROPS SS24

Meadow Brown

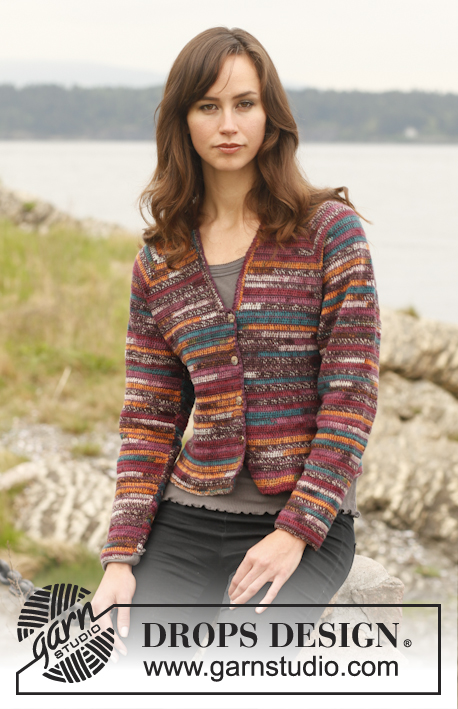
Knitted DROPS jacket in garter st with short sleeves in ”Delight” and ”Kid-Silk”. Size: S - XXXL.

DROPS 151-38
DROPS design: Pattern no de-105
Yarn group A + A
-----------------------------------------------------------
Size: S - M - L - XL - XXL - XXXL
Materials:
DROPS DELIGHT from Garnstudio
300-350-350-400-450-500 g colour no 02, plum/beige/heather

And use:
DROPS KID-SILK from Garnstudio
150-175-175-200-225-250 g colour no 02, black

DROPS CIRCULAR NEEDLE (80 cm) SIZE 5.5 mm – or size needed to get 16 sts x 30 rows in garter st with 1 strand of each yarn = 10 x 10 cm.

-------------------------------------------------------

Alternative Yarn – See how to change yarns here
Yarn Groups A to F – Use the same pattern and change the yarn here
Yarn usage using an alternative yarn – Use our yarn converter here

-------------------------------------------------------

DROPS Delight
DROPS Delight
75% Wool, 25% Polyamide
Discontinued
find alternatives
DROPS Kid-Silk
DROPS Kid-Silk
75% Mohair, 25% Silk
from 4.60 £ /25g

Pattern instructions

NOTE: This pattern is written in British English. All measurements in charts are in cm. For conversion from cm to inches - click here. There are different terms for crocheting in British and American English. If this pattern includes crochet, click for "crochet terms" here. For this pattern in American English, please click here.
GARTER ST (back and forth on circular needle):
K all rows. 1 ridge = 2 rows K.

PATTERN:
ROW 1 (= RS): K 1, * K 2 tog, 1 YO *, repeat from *-* until 1 st remains and finish with K 1.
ROW 2 (= WS): K all sts (and YOs).

SHORT ROWS 1:
Work short rows on front piece to get a rounded edge on the piece.
Work short rows as follows:
ROW 1: Work 59-66-73-80-91-101 sts, turn piece.
ROW 2: Work back.
ROW 3: Work 55-62-69-76-87-97 sts, turn piece.
ROW 4: Work back.
ROW 5: Work 52-59-66-73-84-94 sts, turn piece.
ROW 6: Work back.
ROW 7: Work 48-55-62-69-80-90 sts, turn piece.
ROW 8: Work back.
ROW 9: Work 45-52-59-66-77-87 sts, turn piece.
ROW 10: Work back.
Continue like this by working alternately 4 and 3 sts less for every time until only the last 3 sts have been worked 1 time back and forth.
Then work 2 rows PATTERN - see explanation above, over all sts. 18-20-22-24-27-30 ridges + 2 rows pattern have been worked at the outer edge and 2 rows pattern at the inner edge.
Repeat from 1st row 4 more times (= 5 repetitions with short rows).
The rounded edge now measures approx. 60-67-73-80-90-100 cm on the outer side and 3 cm on the inside.

SHORT ROWS 2:
Work short rows on front piece to get a rounded edge on the piece.
Work short rows as follows:
ROW 1: Work 66-72-84-90-100-102 sts, turn piece.
ROW 2: Work back.
ROW 3: Work 60-66-78-84-94-96 sts, turn piece.
ROW 4: Work back.
ROW 5: Work 54-60-72-78-88-90 sts, turn piece.
ROW 6: Work back.
Continue like this by working 6 sts less for every time until only the first 6 sts have been worked 1 time back and forth.
Then work 2 rows in PATTERN over all sts. 11-12-14-15-16-17 ridges + 2 rows pattern have been worked at the outer edge and 2 rows pattern at the inner edge. Repeat from 1st row 1 more time (= 2 repetitions with short rows).
The rounded edge now measures approx. 16-17-20-21-23-24 cm on the outer side and 1 cm on the inside.
----------------------------------------------------------

BACK PIECE:
Worked back and forth on circular needle.
Cast on 66-72-78-86-96-106 sts (incl 1 edge st in each side) on circular needle size 5.5 mm with 1 strand of each yarn (= 2 strands). Work in GARTER ST - see explanation above. When piece measures 3-4-5-3-4-5 cm, work as follows until finished measurements. * 2 rows PATTERN – see explanation above, and then 7-7-7-8-8-8 cm in garter st *, repeat from *-* upwards. AT THE SAME TIME when piece measures 31-32-33-34-35-36 cm, cast on new sts for sleeves at the end of every row in each side for short sleeves as follows: Cast on 1 st 3 times in total in each side and then 3 sts 1 time in each side = 78-84-90-98-108-118 sts. When piece measures 48-50-52-54-56-58 cm, cast off the middle 16-18-18-20-22-24 sts for neck and finish each shoulder separately. Continue to cast off 1 st on next row from neck = 30-32-35-38-42-46 sts remain on the shoulder. Continue to work until piece measures 50-52-54-56-58-60 cm and LOOSELY cast off. Repeat in the other side.

RIGHT FRONT PIECE:
Worked back and forth on circular needle.
ALL LENGTH MEASUREMENTS SHOULD BE DONE ON THE SHORTER SIDE!
Cast on 62-70-78-86-94-102 sts (incl 1 edge st in the side) on circular needle size 5.5 mm with 1 strand of each yarn (= 2 strands). Work in GARTER ST - see explanation above. When piece measures 3-4-5-3-4-5 cm, work as follows: * 2 rows PATTERN and then 7-7-7-8-8-8 cm in garter st *, repeat from *-* until piece measures approx. 28-29-30-31-32-33 cm (i.e. finish after 2 rows pattern). Then work SHORT ROWS 1, beg from RS – see explanation above. When 5 repetitions with short rows have been worked, work 1 ridge over all sts. NOW MEASURE PIECE FROM HERE - READ THE ENTIRE NEXT PARAGRAPH BEFORE CONTINUING!
Continue back and forth in garter st and 2 rows pattern as before, adjust so that the 2 rows with pattern fit back piece onwards (i.e. first stripe in garter st after short rows should measure approx. 10-10-10-11-11-11 cm).
AT THE SAME TIME at the end of every row towards the side after last short row, cast on new sts for sleeve as on back piece (i.e. 1 st 3 times in total and then 3 sts 1 time) = 68-76-84-92-100-108 sts on row. When piece measures 19-20-21-22-23-24 cm, work SHORT ROWS 2, beg from RS. On next row from WS after 2 repetitions with short rows, LOOSELY cast off the outermost 30-32-35-38-42-46 sts on needle for shoulder = 38-44-49-54-58-62 sts remain on needle. Work rest of row. Then work collar as follows (1st row = from RS): * Work 12-14-16-18-19-20 sts, turn and work back, work 24-28-32-36-38-40 sts, turn and work back, work over all 38-44-49-54-58-62 sts, turn and work back *. Repeat from *-* until collar measures 8-9-9-9-10-11 cm on the inner edge at the shoulder (measured at the shortest). Loosely cast off.

LEFT FRONT PIECE:
Cast on and work as right but reversed. I.e. short rows 1 and 2 beg from WS and cast off sts on shoulder from RS (instead of WS).

ASSEMBLY:
Sew shoulder seams - make sure the seam is not tight. Sew side seams inside 1 edge st (sew x on back piece against x on front piece – see chart). Sew collar tog mid back and sew on to neck line at the back of neck.

Diagram

diagram measurements
Do you have a question? See a list of frequently asked questions (FAQ)

Knitting tension is what determines the final measurements of your work, and is usually measured per 10 x 10 cm. It is provided like so: number of stitches in width x number of rows in height - eg: 19 stitches x 26 rows = 10 x 10 cm.

The knitting tension is very individual; some people knit/crochet loosely while others work tightly. You adjust the knitting tension with the needle size, which is why the suggested needle size is only meant as a guide! You need to adjust this (up or down) to ensure that YOUR knitting tension matches the knitting tension provided in the pattern. If you work with a different knitting tension than provided you will have a different yarn consumption, and your work will have different measurements than what the pattern suggests.

The knitting tension also determines which yarns can replace each other. As long as you achieve the same knitting tension you can replace one yarn with another.

See DROPS lesson: How to measure your tension/gauge

See DROPS video: How to make a gauge tension swatch

The required amount of yarn is provided in grams, eg: 450 g. To calculate how many balls you’ll need you first need to know how many grams are in 1 ball (25g, 50g or 100g). This information is available if you click on the individual yarn quality on our pages. Divide the amount required with the amount of each ball. For example, if each ball is 50g (the most common amount), the calculation will be as follows: 450 / 50 = 9 balls.

The important thing when changing from one yarn to another is that the knitting/crochet tension remains the same. This is so that the measurements of the finished piece will be the same as on the sketch provided. It is easier to achieve the same knitting tension using yarns from the same yarn group. It is also possible to work with multiple strands of a thinner yarn to achieve the knitting tension of a thicker one. Please try our yarn converter. We recommend you to always work a test swatch.

Please NOTE: when changing yarn the garment might have a different look and feel to the garment in the photo, due to individual properties and qualities of each yarn.

See DROPS lesson: Can I use a different yarn than the one mentioned in the pattern?

All our yarns are categorised into yarn groups (from A to F) according to thickness and knitting tension – group A contains the thinnest yarns and group F the thickest. This makes it easier for you to find alternative yarns to our patterns, should you wish to switch yarn. All yarns within the same group have a similar knitting tension and can easily replace each other. However, different yarn qualities have different structures and properties which will give the finished work a unique look and feel.

Click here for an overview of the yarns in each yarn group

At the top of all our patterns you’ll find a link to our yarn calculator, which is a helpful tool should you wish to use a different yarn than suggested. By filling in the yarn quality you wish to replace, the amount (in your size) and number of strands, the calculator will present good alternative yarns with the same knitting tension. Additionally it will tell you how much you’ll require in the new qualities and whether you’ll need to work with multiple strands. Most skeins are 50g (some are 25g or 100g).

If the pattern is worked with multiple colours, every colour will have to be calculated separately. Similarly, if the pattern is worked with several strands of different yarns (for example 1 strand Alpaca and 1 strand Kid-Silk) you will have to find alternatives for each, individually.

Click here to see our yarn calculator

Since different yarns have different qualities and textures we have chosen to keep the original yarn in our patterns. However, you can easily find options among our available qualities by using our yarn calculator, or simply pick a yarn from the same yarn group.

It is possible that some retailers still have discontinued yarns in stock, or that someone has a few skeins at home that they would like to find patterns for.

The yarn calculator will provide both alternative yarn as well as required amount in the new quality.

If you think it's hard to decide what size to make, it can be a good idea to measure a garment you own already and like the size of. Then you can pick the size by comparing those measures with the ones available in the pattern's size chart.

You'll find the size chart at the bottom of the pattern.

See DROPS lesson: How to read size chart

The needle size provided in the pattern serves only as a guide, the important thing is to follow the knitting tension. And since knitting tension is very individual, you will have to adjust the needle size to ensure that YOUR tension is the same as in the pattern – maybe you’ll have to adjust 1, or even 2 needle sizes, up or down to achieve the correct tension. For this, we recommend that you work test swatches.

Should you work with a different knitting tension than the one provided, the measurements of the finished garment might deviate from the measurement sketch.

See DROPS lesson: How to measure your tension/gauge

See DROPS video: How to make a tension/gauge swatch

Working a garment top-down provides more flexibility and room for personal adjustment. For example it is easier to try the garment on while working, as well as making adjustments to length of yoke and shoulder caps.

The instructions are carefully explaining every step, in the correct order. Diagrams are adjusted to the knitting direction and are worked as usual.

The diagram depicts all rows/rounds, and every stitch seen from the right side. It is read from bottom to top, from right to left. 1 square = 1 stitch.

When working back and forth, every other row is worked from the right side and every other row is worked from the wrong side. When working from the wrong side, the diagram will have to be worked reversed: from left to right, knit stitches are purled, purl stitches are knit etc.

When working in the round every round is worked from the right side and the diagram are worked from right to left on all rounds.

See DROPS lesson: How to read knitting diagrams

The diagram depicts all rows/rounds, and every stitch seen from the right side. It is worked from bottom to top, from right to left.

When working back and forth every other row is worked from the right side: from right to left and every other row is worked from the wrong side: from left to right.

When working in the round, every row in the diagram are worked from the right side, from right to left.

When working a circular diagram you start in the middle and work your way outwards, counter clockwise, row by row.

The rows usually start with a given number of chain stitches (equivalent to the height of the following stitch), this will either be depicted in the diagram or explained in the pattern.

See DROPS lesson: How to read crochet diagrams

Instructions for working several diagrams after each other on the same row/round, will often be written like so: “work A.1, A.2, A.3 a total of 0-0-2-3-4 times". This means you work A.1 once, then A.2 is worked once, and A.3 is repeated (in width) the number of times provided for your size – in this case like so: S = 0 times, M = 0 times, L=2 times, XL= 3 times and XXL = 4 times.

The diagrams are worked as usual: begin with the first row in A.1, then work the first row in A.2 etc.

See DROPS lesson: How to read knitting diagrams

See DROPS lesson: How to read crochet diagrams

The total width of the garment (from wrist-to-wrist) will be larger in the larger sizes, despite the actual sleeves being shorter. The larger sizes have longer sleeve caps and wider shoulders, so there will be a good fit in all sizes.

The measurement sketch/schematic drawing provides information regarding the full length of the garment. If it’s a jumper or a jacket the length is measured from the highest point on the shoulder closest to the neckline, and straight down to the bottom of the garment. It is NOT measured from the tip of shoulder. Similarly, the length of yoke is measured from the highest point on the shoulder and down to where yoke is split into body and sleeves.

On a jacket measures are never taken along bands, unless specifically stated. Always measure inside band stitches when measuring the length.

See DROPS lesson: How to read a schematic drawing

Diagrams are often repeated on the round or in height. 1 repeat is the diagram the way it appears in the pattern. If it says to work 5 repeats of A.1 in the round, then you work A.1 a total of 5 times after/next to each other in the round. If it says to work 2 repeats of A.1 vertically/in height you work the entire diagram once, then begin again at the start and work the entire diagram one more time.

Chain stitches are slightly narrower than other stitches and to avoid working the cast-on edge too tight, we simply chain more stitches to begin with. The stitch count will be adjusted on the following row to fit the pattern and measurement sketch.

The rib edge is more elastic and will contract slightly compared to, for example, stocking stitch. By increasing before the rib edge, you avoid a visible difference in width between the rib edge and the rest of the body.

It’s very easy to cast off too tightly, and by making yarn overs while casting off (and simultaneously casting these off) you avoid a too tight cast off edge.

See DROPS video: How to bind off with yarn overs (yo)

To achieve an even increase (or decrease) you can increase on, for example: every 3rd and 4th row alternately, like so: work 2 rows and increase on the 3rd row, work 3 rows and increase on the 4th. Repeat this until the increase is complete.

See DROPS lesson: Increase or decrease 1 st on every 3rd and 4th row alternately

Should you prefer to work in the round instead of back and forth, you may of course adjust the pattern. You’ll need to add steeks mid-front (usually 5 stitches), and follow the instructions. When you would normally turn and work from the wrong side, simply work across the steek and continue in the round. At the end you’ll cut the piece open, pick up stitches to work bands, and cover the cut edges.

See DROPS video: How to knit steeks and cut open

Should you prefer to work back and forth instead of in the round, you may of course adjust the pattern so you work the pieces separately and then assemble them at the end. Divide the stitches for the body in 2, add 1 edge stitch in each side (for sewing) and work the front and back pieces separately.

See DROPS lesson: Can I adapt a pattern for circular needles into straight needles?

Pattern repeats can vary slightly in the different sizes, in order to get the correct proportions. If you’re not working the exact same size as the garment in the photo, yours might deviate slightly. This has been carefully developed and adjusted so that the complete impression of the garment is the same in all sizes.

Make sure to follow instructions and diagrams for your size!

If you have found a pattern you like which is available in women’s size it’s not very difficult to convert it to men’s size. The biggest difference will be the length of sleeves and body. Start working on the women size that you think would fit across the chest. The additional length will be worked right before you cast off for the armhole/sleeve cap. If the pattern is worked top-down you can add the length right after the armhole or before the first decrease on sleeve.

Regarding additional yarn amount, this will depend on how much length you add, but it is better with a skein too many than too few.

All yarns will have excess fibres (from production) that might come off as lint or shedding. Brushed yarns (ie hairier yarns) have more of these loose, excess fibres, causing more shedding.

Shedding also depends on what is worn under or over the garment, and whether this pulls at the yarn fibres. It’s therefore not possible to guarantee that there will be no shedding

Below are some tips on how to get the best result when working with hairier yarns:

1. When the garment is finished (before you wash it) shake it vigorously so the looser hairs come off. NOTE: do NOT use a lint roller, brush or any method that pulls at the yarn.

2. Place the garment in a plastic bag and put it in your freezer - the temperature will cause the fibres to become less attached to each other, and excess fibres will come off easier.

3. Leave in the freezer for a few hours before taking it out and shaking it again.

4. Wash the garment according to the instructions on the yarn label.

Pilling is a natural process that happens to even the most exclusive of fibers. It's a natural sign of wear and tear that is hard to avoid, and that is most visible in high friction areas of your garment like a sweater's arms and cuffs.

You can make your garment look as new by removing the pilling, using a fabric comb or a pill/lint remover.

Still can't find the answer you need? Then scroll down and leave your question so one of our experts can try to help you. This will be done normally within 5 to 10 working days.
In the meantime, you can read the questions and answers that others have left to this pattern or join the DROPS Workshop on Facebook to get help from fellow knitters/crocheters!

You might also like...

Post a comment to pattern DROPS 151-38

We would love to hear what you have to say about this pattern!

If you want to leave a question, please make sure you select the correct category in the form below, to speed up the answering process. Required fields are marked *.

Comments / Questions (15)

country flag Carina A wrote:

Drops delight räckte inte i stl XL , Delight 400gr, 50gr/nystan ,175m, 8 nystan blir 1400 m Kid silk 200gr, 25gr/nystan, 200m, 8 nystan blir 1600m Den var jätterolig att sticka och blev skitsnygg, ( beställde ett extra nysta när jag upptäckte att det inte skulle räcka) mvh Carina

06.02.2020 - 17:25

country flag Marta Wilson wrote:

Hi im an accomplished knitter of 50 yrs, i cant get this pattern, do you use two strands of yarn throughout? And which two yarns if so? Black? Doesn’t tell you to change colors? Very confusing directions!

14.10.2019 - 16:43

DROPS Design answered:

Dear Mrs Wilson, you are using 1 yarn each quality together from the beginning to the end, ie you will work with 1 strand Delight + 1 strand Kid-Silk held together. There are no colour changes, they are automatically coming when working DROPS Delight. Happy knitting!

15.10.2019 - 09:26

country flag Letty Hoeve wrote:

Op het patroon staat vermeld dat de garenkosten is vanaf 34.65 euro, maar klopt dit wel? Mijn berekening komt uit op ca. 53,00 euro.

20.10.2013 - 22:29

DROPS Design answered:

U hebt gelijkt, het bedrag was niet correct. Per ongeluk werd ook voor de Kid-Silk in bollen van 50 gram gerekend. Het is aanbepast en het bedrag voor de kleinste maat is nu € 50,40.

21.10.2013 - 08:26

country flag Gerty Van Der Leer wrote:

Ik vroeg me af waarom je voor dit patroon een rondbreinaald moet gebruiken. Het is niet zo dat het heel erg veel steken zijn dat het niet op normale breinaalden kan. Dus vroeg ik me af waarom jullie voor rondbreinaalden gekozen hebben. Met vriendelijke groet, Gerty

21.09.2013 - 16:42

DROPS Design answered:

Hoi Gerty. In Scandinavië wordt vooral met rondbreinaald gebreid en dit zijn van oorsprong Noorse patronen. Wordt er heen en weer gebreid, dan kan je vaak rechte naalden gebruiken.

24.09.2013 - 10:44

country flag Sabine wrote:

Ich habe eben dieses Modell beendet. Es ist wirklich ein Traum geworden und passt wie angegossen! Und es ist so kuschelig! Die Anleitung war sehr leicht verständlich. Tausend Dank an die kreativen Köpfe, die dieses Stück entworfen haben!

11.09.2013 - 12:29

country flag Reinhilde wrote:

Een topper !!

29.06.2013 - 23:09

country flag Barbro wrote:

Vill gärna sticka den här modellen.

19.06.2013 - 10:24

country flag Elisabeth wrote:

Kan godt lide modellen men vil lave den i anden farve ..je

13.06.2013 - 17:49

country flag Campana Esther wrote:

Sehr schick und doch sportlich,würde dieses Model sofort häkeln....;-)

02.06.2013 - 11:04

Susan Barton wrote:

Love the fluidness of this and the asymmetric lines. Beautiful earthy shades too

02.06.2013 - 01:45