
Popular categories
Looking for a yarn?


|
||||||||||||||||||||||
Little Treasure |
||||||||||||||||||||||
 |
 |
|||||||||||||||||||||
Baby set in BabyMerino and Cotton Viscose. Blanket in Alaska and Cotton Viscose. Theme: Baby blanket
DROPS Children 9-25 |
||||||||||||||||||||||
|
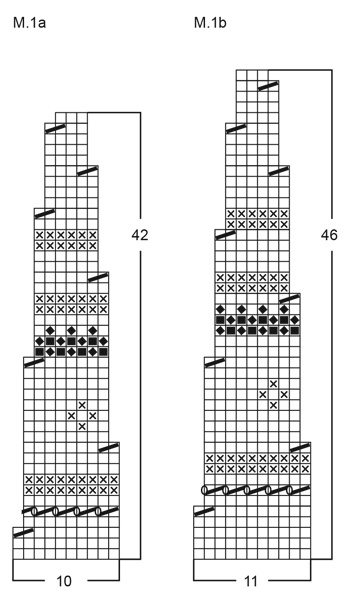
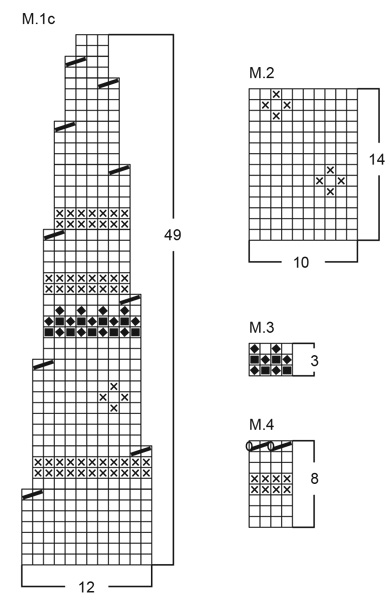
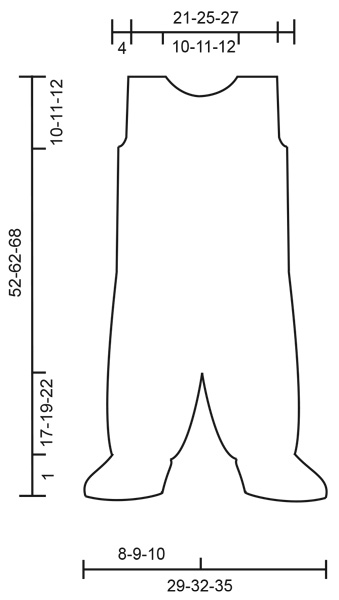
Knitting gauge: 26 sts x 35 rows in stockinette st on needle size 2.5 mm / US 1.5 = 4" x 4" (10 x 10 cm). Remember needle sizes are guidelines only! Pattern: See diagram. The diagrams are showing all rows seen from the RS. When binding off in the round follow the diagram for the appropriate size. Edge-1: Work 3 rows in Stockinette st with Baby Merino, change to Cotton Viscose, work 1 row stockinette st, next row as follows seen from RS: * K2 tog, yo*, repeat from *-* (= folding edge, measure piece from here!), 1 row stockinette st. Change to Baby Merino, work 3 rows stockinette st. Edge-2: Work in Baby Merino as follows: work 3 rows stockinette st, P1 row from RS, work 3 rows stockinette st. Bind off. Garter st (back and forth): 1st row: K, 2nd row: K. Rib edge: * K1, P1 *, repeat from *-*. Seed stitch: 1st row: * K1, P1 *, repeat from *-*. 2nd row: P over K and K over P. Repeat these two rows. ........................................................... JACKET: Back and front pieces: Knitted back and forth on circular needle from mid front. Cast on 137-157-177 sts (includes 1 edge st each side towards mid front) on circular needle size 2.5 mm / US 1.5 with Baby Merino. Work edge-1 - see explanation above, knit edge st in garter st throughout. After edge-1 work M.3 and then continue in M.2. REMEMBER THE GAUGE! When piece measures 14-15-17 cm/ 5½"-6"-6¾" work next row as follows: 31-36-41 sts front piece, bind off 8 sts for armhole, 59-69-79 sts back, bind off 8 sts for armhole, 31-36-41 sts front piece. Leave piece aside. Sleeve: Cast on 38-38-40 sts on double pointed needles size 2.5 mm / US 1.5 with Baby Merino. Work edge-1. After edge work M.3, at the same time inc 2-2-4 sts evenly on row = 40-40-44 sts. After M.3 continue with M.2 , at the same time inc 2 sts mid under arm: 6-9-9 times on every 8th round = 52-58-62 sts. When piece measures 19-21-22 cm/ 7½"-8¼"-8¾" bind off 8 sts mid under arm = 44-50-54 m. Leave piece aside. Yoke: Slip sleeves onto same circular needle as sweater where 8 sts have been bound off for armhole = 209-241-269 sts (includes 1 edge st on each side mid front). Continuing in M.1 and bind off following the diagram with edge st in garter st. On first row of diagram work as follows: Size 0/3 months: inc 3 sts evenly on row = 212 sts. Size 6/9 months: inc 3 sts evenly on row = 244 sts. Size 12/18 months: inc 3 sts evenly on row = 266 sts. When 9 rows are left of M.1 slip 5-7-8 sts on each side mid front on a holder for neck. Continue slipping sts on holder on every other row: 2 sts 2 times, 1 st 2 times. After M.1 slip sts from holder back onto needle. Work 1 row stockinette st at the same time dec evenly to = 64-70-74 sts. Collar: = 64-70-74 sts on row. Work 1 cm / ⅜" rib edge – see explanation above – with Baby Merino. Continuing, work collar so RS is seen when collar is lying down. Knit 3 rows garter st – with 3 sts seed stitch each side towards mid front - at the same time inc 12-16-12 sts evenly distributed on last row = 76-86-86 sts. Then work 11 rows of M.2 – continue with 3 sts seed stitch on each side. Then work 4 rows seed stitch on all sts, bind off. Assembly: Fold edges at bottom of sweater and sleeves double towards WS and sew. Sew openings under sleeves. Front band: Pick up approx 60-76 sts along right front band – within 1 edge st – on needle size 2.5 mm / US 1.5 with Baby Merino. Work Edge-2 – see explanation above. Repeat along left front band. Double edges towards WS and sew. Crochet edge: Work sc along front band and collar with Cotton Viscose on crochet hook size 2.5 mm/C - start at bottom of left front band, crochet sc into the P sts on the folding edge, continue up around collar and down along right front band – on right front band crochet 4 buttonholes evenly distributed over the top 10-11-12 cm/ 4"-4½"-4¾". One buttonhole = ch 3, skip 1 cm / ½", work 1 sc in next st. Sew on buttons. ------------------------------------------------------------------------------------------------------- JUMPSUIT: Size: 0/3-6/9-12/18 months Chest measurement: 52-60-68 cm / 20½"-23½"-26¾". Whole length: 26-28-31 cm / 10¼"-11"-12¼". Sleeve length: 19-21-22 cm / 7½"-8¼"-8¾". DROPS circular needles and double pointed needles size 2.5 mm / US 1.5. DROPS crochet hook size 2.5 mm / C . DROPS small buttons: 4 pcs. Knitting gauge: 26 sts x 35 rows on needle size 2.5 mm / US 1.5 in stockinette st = 4" x 4" (10 x 10 cm). Pattern: See diagram. The diagrams are showing all rows seen from the RS. Edge: work 3 rows stockinette st with Baby Merino, change to Cotton Viscose, work 1 row stockinette st, work next row as follows seen form RS: * K2 tog, yo *, repeat from *-* (= folding edge), 1 row stockinette st. Change to Baby Merino, work 3 rows stockinette st. Rib edge: * K1, P1 *, repeat from *-*. Left leg: Cast on 42-46-52 sts on double pointed needles 2.5 mm with Baby Merino, work edge – see explanation above. After edge work M.3, then inc 20 sts evenly on row = 62-66-72 sts. Continue with stockinette st in Baby Merino at the same time inc 2 sts mid inside leg: 11-13-13 times on every 5 rows = 84-92-98 sts. Remember knitting gauge! When piece measure 17-19-22 cm/ 6¾"-7½"-8¾" (from eyelet row = folding edge) divide inside of leg (= split – to make it easier to slip leg sts onto one circular needle afterwards) complete knitting back and forth on needle. Inc 1 st each side for seam = 86-94-100 sts. When piece measures 18-20-23 cm/ 7"-8"-9" bind off 5 sts each side. Leave piece aside. Right leg: Knit like left. Pants: Slip legs onto same circular needle = 152-168-180 sts. Continue in the round in stockinette st – at the same time on first round inc 1 st mid back on each side of the two middle sts and dec 1 st mid front on each side of the two middle sts. Inc mid back as follows: 1 st on every other row 8 times. Dec mid front as follows: 1 st on every other row 8 times. = 152-168-180 sts. When piece measures 37-46-51 cm/ 14½"-18"-20" work next round as follows: Size 0/3 months: dec 2 sts evenly. Size 6/9 months: inc 2 sts evenly. Size 12/18 months: no inc or dec. Now you have 150-170-180 sts on needle. Work 3 cm / 1" rib edge – see explanation above. Then continue with M.2 (ensure to place first "P sts" in pattern mid front). When piece measures 42-51-56 cm/ 16½"-20"-22" work next round as follows: bind off 3 sts for armhole, work 69-79-84 sts front piece, bind off 6 sts for armhole, work 69-79-84 sts back, bind off 3 sts for armhole. Complete front and back piece separately. Front piece: = 69-79-84 sts. Continue in M.2 at the same time bind off each side for armhole on every other row: 2 sts 2 times, 1 st 3 times = 55-65-70 sts. When piece measures 46-55-60 cm/ 18"-21½"-23½" bind off the middle 13-15-18 sts for neck and work each side separately. Bind off to shape the neckline on every other row: 2 sts 2 times, 1 st 3 times = 14-18-19 sts left on shoulder. When piece measures 52-62-68 cm/ 20½"-24½"-26¾" K 2 rows garter st before binding off. Back: = 69-79-84 sts. Bind off for armhole as described for front piece. Work until piece measures 50-60-66 cm/ 19¾"-23½"-26", now bind off the middle 21-23-26 sts for neck and work each side separately. Bind off to shape the neckline on every other row: 2 sts 1 time, 1 st 1 time = 14-18-19 sts left on shoulder. When piece measures 52-62-68 cm/ 20½"-24½"-26¾" work 1 cm / ½" rib edge before binding off. Assembly: Pick up approx 64-74 sts around right armhole on circular needle size 2.5 mm / US 1.5 with Baby Merino, work Edge back and forth on needle, bind off. Repeat around left armhole. Pick up approx 50-70 sts along front neckline on needle size 2.5 mm / US 1.5 with Baby Merino, work Edge back and forth on needle, bind off. Pick up approx 32-40 sts along back neckline on circular needle size 2.5 mm / US 1.5 with Baby Merino, work Edge back and forth on needle, bind off. Sew split tog on inside of each leg up to the bound off sts, then sew tog opening between legs from mid front to mid back on pants. Fold all edges double towards WS and sew. Crochet on hook size 2.5 mm/C with Baby Merino at the top of each shoulder on front pieces as follows: 1st row: sc. 2nd row: sc with two buttonholes evenly distributed, 1 buttonhole = ch 3-4, skip 1 cm / ⅜" and fasten with 1 sc in next sc. Sew on buttons. __________________________________________________________ SOCKS: Size: 0/3- 6/9- 12/18 months Sock foot length in cm: 10-11-12 cm/ 4"-4½"-4¾" DROPS needle size 2.5 mm / US 1.5 Knitting gauge: 26 sts x 35 row on needle size 2.5 mm / US 1.5 and stockinette st = 4" x 4" (10 x 10 cm). Remember needle sizes are guidelines only! Pattern: See diagram. The diagrams are showing all rows seen from the RS. Edge: Work 3 rows stockinette st with Baby Merino change to Cotton Viscose, work 1 row stockinette st, work next row from RS as follows: * K2 tog, yo *, repeat from *-* (= folding edge), work 1 row stockinette st. Change to Baby Merino, work 3 rows stockinette st. Garter st (back and forth): 1st row: K, 2nd row: K. Rib edge: * K1, P1 *, repeat from *-*. Cast on 36-36-42 sts on needle size 2.5 mm / US 1.5 with Baby Merino. Work Edge – see explanation above – forth and back on row from mid back. After Edge work M.3, then M.4, and then 11 rows of M.2. Now piece measures approx 7.5 cm / 3" (measured from folding edge). Work 2 rows rib edge, then work next row as follows: * K2 tog, yo *, repeat from *-*. Work 2 rows rib edge. Slip 13-13-14 sts on each side of piece on a holder. Work M.2 for 5-6-7 cm / 2"-2⅜"-2¾" over the middle 10-10-14 sts. Slip sts from holder onto needle at the same time as picking up 13-16-18 sts up on each side of middle piece = 62-68-78 sts on needle. Work 3-4-4 cm garter st over all sts – at the same time, after 2-2.5-2.5 cm/3/4"-⅞"-⅞" bind off on every other row: 1 st at beg and end of row - at the same time, K 2 tog on each side of 2 middle sts. Continue like this for 3-4-4 cm/ 1"-1½"-1½". Bind off and sew seam under foot and up mid back with mattress sts in the outermost loop of the outermost st. Fold top edge double towards WS and sew. Make a tie string for sock: Cut 1 strand in Cotton Viscose of approx 240 cm/ 2.5 yds. Double it. Get a friend to hold the one end and twist strands until it resists – double string and tie a knot each end (string = approx 50 cm/ 20" long), thread through the bottom hole edge. Make another tie string. _________________________________________________________________ HAT: Size: 0/3- 6/9- 12/18 months Head circumference in cm: 41-45-48 cm / 16"-17¾"-19". DROPS needle size 2.5 mm / US 1.5 Knitting gauge: 26 sts x 35 rows on needle size 2.5 mm / US 1.5 and stockinette st = 4" x 4" (10 x 10 cm). Remember needle sizes are guidelines only! Pattern: See diagram. The diagrams are showing all rows seen from the RS. Edge: Work 3 rows stockinette st with Baby Merino, change to Cotton Viscose, work 1 row stockinette st, work next row as follows – seen from RS: * K2 tog, yo *, repeat from *-* (= folding edge), 1 row stockinette st. Change to Baby Merino, work 3 rows stockinette st. Garter st (back and forth): 1st row: K, 2nd row: K. Knitted back and forth on needle from around the face and towards back and sewn tog mid back afterwards. Cast on 73-83-87 sts (includes 1 edge st each side) on needle size 2.5 mm / US 1.5 with Baby Merino, work Edge –see explanation above – but knit edge st in garter st throughout. After edge work M.2, then work 3 rows stockinette st and then 2 rows reverse stockinette st. Continue with M.2 until piece measures 11-13-14 cm/ 4½"-5"-5½" from folding edge. Now work next row as follows: 1 edge st, * K1, K2 tog *, repeat from *-*, finish with 1 edge st = 50-56-59 sts. Work 4 rows stockinette st. Work next row as follows: 1 edge st, * K1, K2 tog *, repeat from *-*, finish with 1 edge st = 34-38-40 sts. Work 4 rows stockinette st. Work next row as follows: 1 edge st, * K1, K2 tog *, repeat from *-*, finish with 1 edge st = 24-26-28 sts. Work 4 rows stockinette st. On next row K 2 tog across (not edge sts) = 13-14-15 sts. Pull a double strand through these sts and tie ends tog and fasten. Assembly: Sew hat tog from pulled tog sts mid back and 4 cm / 1½" down towards neck – sew within 1 edge st. Fold edge at front double towards WS and sew. Pick up approx 52-62 sts round bottom edge (within 1 edge st) on needle size 2.5 mm / US 1.5 with Baby Merino. Work 2 cm / ¾" stockinette st, bind off = casing. Fold casing double towards WS and sew. Make a tie string: Cut 1 strand in Cotton Viscose of approx 3 m / 3 1/4 yds. Double it. Get a friend to hold the one end and twist strands until it resists – double string and tie a knot each end (string = approx 60 cm/ 23½" long), pull through casing. __________________________________________________ BLANKET in Alaska and Cotton Viscose Measurement: approx 70 x 70 cm / 27½" x 27½". Materials: DROPS Alaska from Garnstudio 350 g color no 02, off white. and use: DROPS Cotton Viscose from Garnstudio 250 g color no 02, off white. DROPS needle size 6 mm / US 10 + crochet hook size 4 mm / G/6 Knitting gauge: 15 sts x 22 rows on needle size 6 mm / US 10 with 1 strand Alaska and 1 strand Cotton Viscose = 4" x 4" (10 x 10 cm). Remember needle sizes are guidelines only! Crochet gauge: width of 15 sc on crochet hook size 4 mm / G/6 with Alaska = approx 10 cm / 4". Garter st: 1st row: K, 2nd row: K. Lobster st: Work sc from RS but in opposite direction, i.e. from left to right. Blanket: Cast on 102 sts on needle size 6 mm / US 10 with 1 strand Alaska and 1 strand Cotton Viscose. K 2 rows garter st, continue in stockinette st but work 1 st in garter st each side throughout. Remember knitting gauge! When piece measures approx 67 cm/ 26½", K 2 rows garter st on all sts, bind off. Crochet edge: Crochet around edge on crochet hook size 4 mm / G/6 as follows: 1st row: work sc with Alaska. 2nd row: Work Lobster sts with 2 strands Cotton Viscose – see explanation above! |
||||||||||||||||||||||
Diagram explanations |
||||||||||||||||||||||
|
||||||||||||||||||||||
|
||||||||||||||||||||||
|
||||||||||||||||||||||

|
||||||||||||||||||||||
|
||||||||||||||||||||||
|
Have you made this or any other of our designs? Tag your pictures in social media with #dropsdesign so we can see them! Do you need help with this pattern?You'll find tutorial videos, a Comments/Questions area and more by visiting the pattern on garnstudio.com. © 1982-2024 DROPS Design A/S. We reserve all rights. This document, including all its sub-sections, has copyrights. Read more about what you can do with our patterns at the bottom of each pattern on our site. |
||||||||||||||||||||||


With over 40 years in knitting and crochet design, DROPS Design offers one of the most extensive collections of free patterns on the internet - translated to 17 languages. As of today we count 304 catalogs and 11422 patterns - 11417 of which are translated into English (US/in).
We work hard to bring you the best knitting and crochet have to offer, inspiration and advice as well as great quality yarns at incredible prices! Would you like to use our patterns for other than personal use? You can read what you are allowed to do in the Copyright text at the bottom of all our patterns. Happy crafting!
Comments / Questions (26)
Are the legs of the jumper knitted in the round before putting both legs on one circular needle?
03.02.2023 - 17:21DROPS Design answered:
Dear Patricia, yes, each leg is worked in the round in double pointed needles and afterwards they are joined in the same circular needle and worked together. Happy knitting!
05.02.2023 - 23:54Jeg strikker huen i den mindste størrelse og efter hver indtagnings omgang skal der strikkes 4 p glat. Så er man jo på vrangen til næste indtagnings omgang. Vil det sige at man ikke skal gøre som der står, men strikke 1 vrang, 2 vrang sammen eller...strikke 3 eller5 p glat istedet, så man kun tager ind fra retten?? Mvh Anne
03.09.2022 - 14:36DROPS Design answered:
Hei Anne. Du kan gjøre som du skriver, 3 eller 5 pinner glattstrikk. Så får du strikket maskene sammen fra retten :) mvh DROPS Design
05.09.2022 - 13:01Hei Miksi Suomenkielisessä ohjeessa ei ole neuleen kuvia tai mittoja. Myös mallineuleen ohje puutuu
15.08.2022 - 17:36Hei Miksi Suomenkielisessä ohjeessa ei ole neuleen kuvia tai mittoja. Myös mallineuleen ohje puutuu
15.08.2022 - 17:32DROPS Design answered:
Hei, nyt piirrokset avautuvat.
22.08.2022 - 17:32Hei Miksi suomenkielisessä ohjeessa ei ole neuleiden kuvia eikä mittoja. Myös kuvioneuleeseen ohje puuttuu?
03.08.2022 - 18:59Hallo. In de nederlandse beschrijving van het mutsje staat de zin "Brei na de rand M.2, brei dan 3 nld tricotsteek en 2 nld averechte tricotsteek." Ik ken wel tricotsteek maar wat is averechte tricotsteek? Ik heb het ook gegoogeld maar ik kan het nergens vinden! Alvast bedankt!
24.05.2022 - 14:55DROPS Design answered:
Dag Frouwkje,
Averechte tricotsteek is averecht aan de goede kant en recht aan de verkeerde kant.
27.05.2022 - 08:50Hej Kunne det evt være muligt at garnmængde kunne skrives ved hver del. Jeg vil nemlig gerne strikke i forskellige farver og det er lidt svært når der kun står samlet garnmængde for hele sættet. Pfh.
20.04.2021 - 11:37DROPS Design answered:
Hej Helle, Det har vi desværre ingen information om. Men her finder du lidt andre trøjer i DROPS Baby Merino som du kan sammenligne med: Baby - DROPS BabyMerino - Jakker
22.04.2021 - 09:52What yarn weight dies this pattern require please - 4ply???
10.02.2019 - 12:46DROPS Design answered:
Dear Penelope, this pattern uses Baby Merino yarn, which is 175 m / 50 gramm balls. That is ever so slightly thicker than the average sockyarn, so it falls into the sportweight category, and the DROPS yarn group A. I hope this helps. Happy Knitting!
11.02.2019 - 03:19Hei! Er det mulig å legge ut et bilde av kysa slik at man ser litt mer av den? Nå ser man kun kanten på den framfra.
01.03.2017 - 21:48DROPS Design answered:
Hej Ingrid, vi har desværre ikke flere billeder af kysen, vi håber du klarer dig med billedet i vuggen. God fornøjelse!
02.03.2017 - 09:11Ich habe die jacke fast fertig, aber die Übersetzung der anleitung des kragens ist eine Katastrophe. Ich bitte um hilfe.ich möchte die jacke gerne fertig stellen. L.g.
18.08.2015 - 21:22DROPS Design answered:
Der Absatz zum Kragen wurde nun neu übersetzt, hoffentlich ist es nun besser verständlich.
01.09.2015 - 16:10