
Popular categories
Looking for a yarn?


|
||||||||||||||||
Claire |
||||||||||||||||
 |
 |
|||||||||||||||
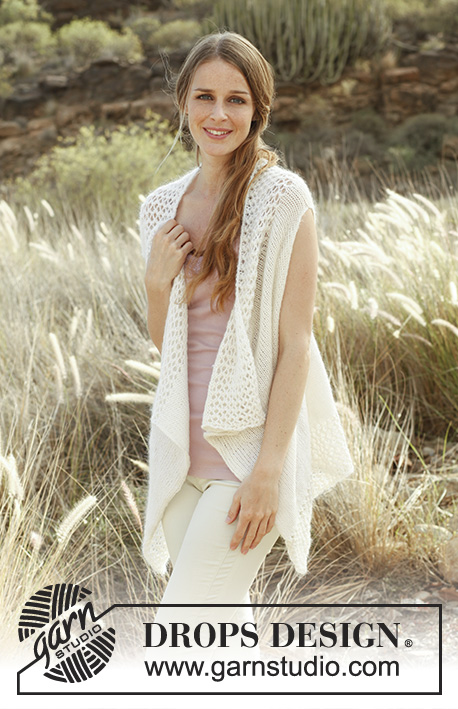
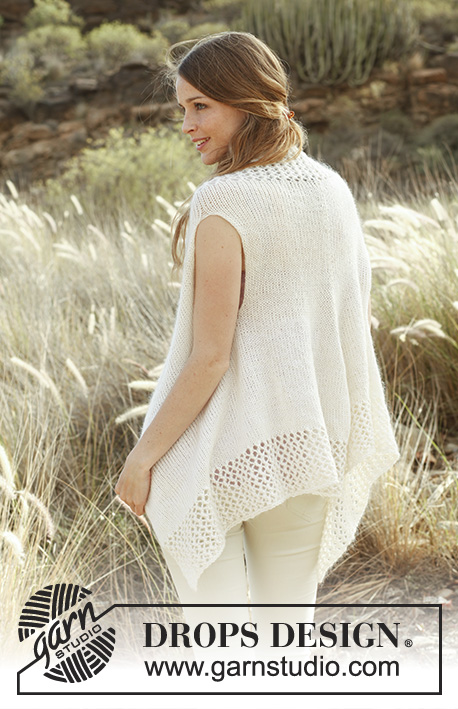
Knitted DROPS vest in ”Alpaca” and ”Kid-Silk”. Size: S - XXXL.
DROPS 147-40 |
||||||||||||||||
|
GARTER ST (back and forth on needle): K all rows. 1 ridge = 2 rows K. INCREASE TIP: Inc 1 st by making a YO. On next row P YO twisted (i.e. work in back loop of st instead of front) to avoid holes. PATTERN: See diagram A.1. Diagram shows all rows in pattern seen from RS. ---------------------------------------------------------- BODY: The vest is worked top down. Cast on 142-154-164-178-184-198 sts on circular needle size 5 mm / US 8 with 1 strand Alpaca and 1 strand Kid-Silk (= 2 strands). Work A.1 with 2 edge sts in GARTER ST - see explanation above, in each side until piece measures 12 cm / 4¾". Then work in stockinette st with 2 edge sts in garter st while AT THE SAME TIME on 1st row from RS inc 52-56-58-64-66-70 sts evenly = 194-210-222-242-250-268 sts. When piece measures 19-19-19-19-19-19 cm / 7½" for all sizes, work in garter st over armholes on next row from WS as follows: 2 sts in garter st, 31-33-34-38-41-48 sts in stockinette st, 2 sts in garter st, 124-136-146-158-160-164 sts in stockinette st, 2 sts in garter st, 31-33-34-38-41-48 sts in stockinette st, 2 sts in garter st. Work 3 rows with stockinette st over stockinette st and garter st over garter st. Piece measures approx. 21-21-21-21-21-21 cm / 8¼" for all sizes, and now divide for armhole as follows: Slip the first 34-36-37-41-44-51 sts at beg of row (seen from RS) on 1 stitch holder (= right front piece). Slip the next 126-138-148-160-162-166 sts on another stitch holder (= back piece). There are now 34-36-37-41-44-51 sts on needle for left front piece. LEFT FRONT PIECE: = 34-36-37-41-44-51 sts. Now work in stockinette st with 2 sts in garter st towards mid front and 1 st in garter st towards armhole until piece measures approx. 39-40-41-42-43-44 cm / 15¼"-15¾"-16⅛"-16½"-17"-17¼" (armhole measures 18-19-20-21-22-23 cm / 7"-7½"-8"-8¼"-8 ¾"-9"), make sure that next row to be worked is from WS. Slip sts on a stitch holder. RIGHT FRONT PIECE: Slip sts from stitch holder back on circular needle (= 34-36-37-41-44-51 sts) and work as left front piece, slip sts on a stitch holder when piece measures approx. 39-40-41-42-43-44 cm / 15¼"-15¾"-16⅛"-16½"-17"-17¼", make sure that next row is from WS. BACK PIECE: Slip sts from stitch holder back on circular needle (=126-138-148-160-162-166 sts) and work in stockinette st with 1 st in garter st in each side. When piece measures 33-35-37-35-37-39 cm / 13"-13¾"-14½"-13¾"-14½"-15¼", insert a marker on each side of the middle 2 sts on row. On next row from RS inc 2 sts by making 1 YO before 1st marker and 1 YO after 2nd marker. On next row from WS P the YOs twisted – SEE INCREASE TIP! Repeat inc on every other row (i.e. on every row from RS), 19-19-19-23-23-23 more times (= 20-20-20-24-24-24 inc in total). AT THE SAME TIME when piece measures approx. 39-40-41-42-43-44 cm / 15¼"-15¾"-16⅛"-16½"-17"-17¼" (make sure that next row is from WS), slip left and right piece on to needle and work in stockinette st BUT work the first 4 rows with 2 sts in garter st under both armholes. Continue in stockinette st with 2 sts in garter st in each side until piece measures 53-55-57-59-61-63 cm / 21"-21⅝"-22½"-23¼"-24"-24¾". On next row from RS dec 62-66-66-78-78-84 sts evenly (do not dec over the 2 sts in garter st in each side) = 172-184-196-212-220-232 sts. Work 1 row in stockinette st with 2 sts in garter st in each side. On next row from RS work A.1 with 2 edge sts in garter st in each side. When piece measures 65-67-69-71-73-75 cm / 25½"-26⅜"-27⅛"-28"-28¾"-29½" (A.1 measures approx. 12 cm / 4¾"), loosely bind off. |
||||||||||||||||
Diagram explanations |
||||||||||||||||
|
||||||||||||||||

|
||||||||||||||||
|
Have you made this or any other of our designs? Tag your pictures in social media with #dropsdesign so we can see them! Do you need help with this pattern?You'll find tutorial videos, a Comments/Questions area and more by visiting the pattern on garnstudio.com. © 1982-2024 DROPS Design A/S. We reserve all rights. This document, including all its sub-sections, has copyrights. Read more about what you can do with our patterns at the bottom of each pattern on our site. |
||||||||||||||||


With over 40 years in knitting and crochet design, DROPS Design offers one of the most extensive collections of free patterns on the internet - translated to 17 languages. As of today we count 304 catalogs and 11422 patterns - 11417 of which are translated into English (US/in).
We work hard to bring you the best knitting and crochet have to offer, inspiration and advice as well as great quality yarns at incredible prices! Would you like to use our patterns for other than personal use? You can read what you are allowed to do in the Copyright text at the bottom of all our patterns. Happy crafting!
Comments / Questions (50)
Buonasera, per realizzare il dietro è scritto che quando il lavoro misura 33 cm si deve inserire un segno da ciascun lato delle 2 m centrali. Cosa si intende? Quali sono le maglie centrali? Grazie per l'aiuto e complimenti per gli splendidi lavori che proponete!
12.07.2021 - 18:42DROPS Design answered:
Buonasera Eleonora, sono proprio le maglie centrali del lavoro. Buon lavoro!
14.07.2021 - 18:21Buonasera, non riesco a capire i simboli del diagramma. Il secondo simbolo corrisponde ad una maglia rov sul rov del lavoro come il primo simbolo. Non mi torna. Non si tratta piuttosto di un gettato dal momento che va realizzato un motivo traforato? Grazie mille
05.07.2021 - 18:03DROPS Design answered:
Buonasera Eleonora, grazie per la segnalazione: abbiamo corretto la legenda. Buon lavoro!
05.07.2021 - 19:21Bonjour, votre réponse me laisse perplexe : avec un échantillon de 17 m pour 10 cm..en jersey. si je montre 142 m, j'obtiens 83 cm (calcul de proportionnalité avec une règle de trois)..et donc pas les 114 cm indiqués. Il y a deux options: Soit les mesures indiquées en cm ne sont pas correctes, soit c'est le nombre de mailles indiqués...Alors qu'en pensez vous ?
08.10.2018 - 10:00DROPS Design answered:
Bonjour Florence, le point ajouré de A.1 va probablement jouer sur la tension, raison pour laquelle vous pouvez tricoter les explications comme indiqué, pensez juste à bien vérifier votre échantillon et à ajuster la taille de vos aiguilles si besoin. Bon tricot!
08.10.2018 - 10:05Bonjour, vous indiquez qu'il faut monter 142 m, et que ceci doit correspondre à 114 cm ( d'aprés les valeurs indiquées sur le schéma du modèle, en taille S) . Si je fais le calcul à a partir de l'échantillon 17 m = 10 cm, il faudrait que je monte 193 mailles...Je ne comprends pas. Ou est l'erreur ? Merci d'avance pour votre aide.
06.10.2018 - 13:32DROPS Design answered:
Bonjour Florence, vous montez bien 142 m, tricotez A.1 (point ajouré) pendant 12 cm puis continuez en jersey en augmentant 52 m à intervalles réguliers = vous avez ainsi les 194 m de la largeur du haut du gilet. Si votre échantillon est juste, vous devriez avoir les mesures indiquées dans le schéma. Bon tricot!
08.10.2018 - 08:28Eli wrote:
I am also confused about the armhole spacing. For the size XXL when I split the stitches 51-166-51 they hang down around the elbows when in the picture it looks like that split should be on top of the shoulder.
27.05.2017 - 20:59DROPS Design answered:
Dear Eli, jacket is worked top down, in the largest size, you first work for 23 cm over the 51 first sts, then work for 23 cm over the last 51 sts, then work for 23 cm over the 166 sts before working sts from front pieces back tog with the sts from back piece. Happy knitting!
29.05.2017 - 09:25Should the arm holes be placed around 45cm from sides (size M) instead of 21cm? The model looks like she has about that much fabric hanging loose in front of the body. And 81cm in the back means the arm holes would be hanging around the elbows. I think the arm holes are too wide apart.
18.05.2017 - 18:59DROPS Design answered:
Dear Terhi, Jacket is worked top down: armholes are placed 21 cm from the sides, ie the first 36 sts (= 2 sts in garter st, 33 sts in stocking st, 1 st in garter st) on row = left front piece then the next 138 sts (= 1 st in garter st, 136 st in stocking st, 1 st in garter st) = back piece and the last 36 sts (= 1 st in garter st, 33 sts in stocking st, 2 sts in garter st) = right front piece. After you have worked each piece separately (first the left front piece, then the right front piece then back piece) for the armholes, work all pieces tog (see under BACK PIECE: When piece measures approx. 40 cm ...). Happy knitting!
19.05.2017 - 09:14Hallo, Auch wenn die Umschläge links verschränkt abgestrickt werden, entstehen kleine Löcher. Ist das so gewollt?
16.03.2016 - 11:06DROPS Design answered:
Liebe Caro, wenn es Ihnen nicht gelingt, die Umschläge abzustricken, ohne dass ein Loch entsteht, könnten Sie auch eine Masche verschränkt aus dem Querfaden aufnehmen. Ab besten schauen Sie sich mal alle Videos zum Thema "Maschen zunehmen / aufnehmen an und probieren, was für Sie am besten passt.
16.03.2016 - 18:27Aggeliki wrote:
126 sts for back piece is wrong?There are many 74 cm for the back.
25.02.2015 - 19:18DROPS Design answered:
Dear Aggeliki, pattern is correct, the 74 cm goes from one shoulder to another (see picture of back piece) and match to the loose fitting. Happy knitting!
26.02.2015 - 14:48Aggeliki wrote:
I think the number of points on the back piece is wrong. The separation of points in three parts is certainly 34-126-34(small size);
25.02.2015 - 14:10DROPS Design answered:
Dear Aggeliki, you are correct, that's how it is explained, you slip the first 34 sts from RS on 1 st holder, slip the next 126 sts for back piece on another st holder and keep the last 34 sts on row on needle for left front piece (in 1st size). Happy knitting!
25.02.2015 - 15:33When I print the pattern I don't get the diagram A-1--how can I get it.
29.12.2014 - 18:04DROPS Design answered:
Dear Mrs Giebelhaus, diagram A.1 is at the right side of measurement chart (should be on page 3 when printing pattern), it's a small diagram with 2 sts in width and 4 rows in height. Happy knitting!
30.12.2014 - 14:15