
Popular categories
Looking for a yarn?


|
|
Ladybug in training |
|
 |
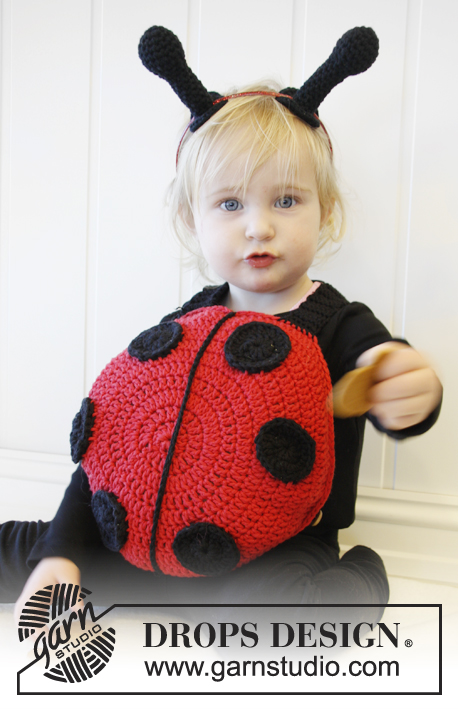 |
Crochet ladybug costume with shoulder straps for children in DROPS Paris.
DROPS Extra 0-891 |
|
|
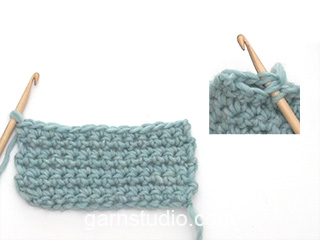
CROCHET TIP 1: Beg every round with 3 ch and these replace first dc. CROCHET TIP 2: Always replace first sc from beg of row with 1 ch. CROCHET TIP 3: Crochet 2 sc tog as follows: Work 1 sc but wait with last pull through (= 2 sts on hook), then work next sc but on last pull through, pull yarn through all sts on hook = 1 st dec. -------------------------------------------------------- UNDERSIDE OF LADY BUG: Work with black and hook size 5 mm / H/8. Ch 4 and form a ring with 1 sl st in first ch. READ CROCHET TIP 1! Round 1: 12 dc in ch-ring, finish with 1 sl st in 3rd ch from beg of round. Round 2: 2 dc in every st, finish with 1 sl st in 3rd ch from beg of round = 24 sts. Round 3: 1 dc in every st - but in every other st work 2 dc, finish with 1 sl st in 3rd ch from beg of round = 36 sts. Round 4: 1 dc in every st - but in every 3rd st work 2 dc, finish with 1 sl st in 3rd ch from beg of round = 48 sts. Continue to work 1 dc more between every time 2 dc are worked in same st. Continue like this until piece measures approx. 12-14 cm / 4¾"-5½" from the middle and out, then put piece aside. TOP SIDE OF LADY BUG: Work top side as underside but with red. When piece measures 12-14 cm / 4¾"-5½" (same no of rounds as on underside), work another 2 rounds without inc. Now place the underside and top side on top of each other and work them tog with a sc round through both layers while at the same time filling the lady bug with poly stuffing. Fasten off. LADY BUG'S DOTS: Work 6 small dots with black as follows: Ch 5 and form a ring with 1 sl st in first ch. READ CROCHET TIP 1! Round 1: 12 dc in ch-ring, finish with 1 sl st in 3rd ch from beg of round. Round 2: 2 dc in every st = 24 sts, finish with 1 sl st in 3rd ch from beg of round. Fasten off. Fasten the dots on the top side. Work a ch row of 24-28 cm / 9½"-11 with black. Fasten the row down along the middle of the top side. SHOULDER STRAPS: Ch 6 on hook size 5 mm / H/8 with black. Work 1 sc in 2nd ch from hook, then work 1 sc in every ch = 5 sc - Read CROCHET TIP 2. Then work back and forth with 1 sc in every sc until piece measures approx. 35-40 cm / 13¾"-15¾" - AT THE SAME TIME when piece measures 25 cm / 9¾" work a buttonhole by ch 1 instead of the middle sc and on next row work 1 sc in this ch. Repeat buttonhole every 4 cm / 1½" a total of 2-3 times. Fasten the shoulder straps to sc row at the top of lady bug approx. 8-10 cm / 3"-4" apart and fasten a button approx. 16-18 cm / 6¼"-7" from strap. ANTENNAS ON HEADBAND: Work 2 antennas with black on hook size 5 mm / H/8. Ch 2. Round 1: Work 6 sc in 2nd ch from hook, finish with 1 sl st in first sc on round. Round 2: ch 1, 1 sc in every st - but in every other st work 2 sc, finish with 1 sl st in first sc from beg of round = 9 sts. Round 3: ch 1, 1 sc in every st - but in every 3rd st work 2 sc, finish with 1 sl st in first ch from beg of round = 12 sts. Round 4: ch 1, 1 sc in every st - but in every 3rd st work 2 sc, finish with 1 sl st in first ch from beg of round = 16 sts. Round 5: ch 1, 1 sc in every st, finish with 1 sl st in first ch on round = 16 sts. Round 6: ch 1, 1 sc in every st - but work every 3rd and 4th st tog - read CROCHET TIP 3, finish with 1 sl st in first ch on round = 12 sts. Round 7: ch 1, 1 sc in every st - but work every 2nd and 3rd st tog, finish with 1 sl st in first ch on round = 8 sts. Round 8-16: ch 1, 1 sc in every st, finish with 1 sl st in first ch on round = 8 sts. Round 17: ch 1, 2 sc in every st, finish with 1 sl st in first ch on round = 16 sts. Round 18: ch 1, 2 sc in every st, finish with 1 sl st in first ch on round = 32 sts. Fasten off, fill the antenna with some poly stuffing and pull it on to a headband. |
|
|
Have you made this or any other of our designs? Tag your pictures in social media with #dropsdesign so we can see them! Do you need help with this pattern?You'll find tutorial videos, a Comments/Questions area and more by visiting the pattern on garnstudio.com. © 1982-2024 DROPS Design A/S. We reserve all rights. This document, including all its sub-sections, has copyrights. Read more about what you can do with our patterns at the bottom of each pattern on our site. |
|


With over 40 years in knitting and crochet design, DROPS Design offers one of the most extensive collections of free patterns on the internet - translated to 17 languages. As of today we count 304 catalogs and 11422 patterns - 11417 of which are translated into English (US/in).
We work hard to bring you the best knitting and crochet have to offer, inspiration and advice as well as great quality yarns at incredible prices! Would you like to use our patterns for other than personal use? You can read what you are allowed to do in the Copyright text at the bottom of all our patterns. Happy crafting!
Comments / Questions (7)
Die Unterseite des Rückenteils wellt sich recht stark, wenn ich wie beschrieben zunehme. Bei der Oberseite kann ich das nachvollziehen, da diese ja eine Art Kuppel darstellt.
07.01.2016 - 13:45DROPS Design answered:
Haben Sie die Maschenprobe eingehalten, auch in der Höhe? Wenn es sich zu stark wellt, probieren Sie, etwas weniger Zunahmen zu machen. An sich sollten beide Teile relativ flach werden. Die Oberseite bildet erst bei den letzten Runden eine Wölbung.
24.01.2016 - 13:45Bonjour, Je suis sur le modèle coccinelle je ne vois pas la fermeture du sac les explications pour le fermer merci.
25.09.2015 - 05:57DROPS Design answered:
Bonjour Mme Margarian, le dos et le ventre de de la coccinelle se crochètent ensemble, sur l'endroit (placez les 2 pièces envers contre envers). Il n'y a pas d'ouverture prévue, mais vous pouvez en faire une pour la transformer en sac (avec un zip par ex.). Bon crochet!
25.09.2015 - 09:44Leider stimmt bei diesem Modell die Mengenangabe für die schwarze Wolle nicht, für die Fühler musste ich 50g nachkaufen.
23.02.2014 - 10:48Hallo.Wie ich es auch mache...ich komme nicht dahinter: nach Rd.4 =geht es nun immer weiter wie in Runde 4 oder dann immer 1 St.in jede M? Welche Aufnahmen sind gemeint und wo wird dann ein weiteres St. plaziert? Ich komme wirklich nicht weiter. Herzlichen Dank für eine Antwort Kathleen kaluza
09.02.2014 - 20:49DROPS Design answered:
Liebe Kathleen, damit der Kreis wächst, wird immer 1 Stb mehr zwischen den Aufnahmen gehäkelt.
10.02.2014 - 09:12Er staat niets in het patroon over de verbinding aan de zijkante
28.12.2013 - 12:18DROPS Design answered:
Hoi Femmy. Jawel. Onder de beschrijving van de BOVENKANT VAN LIEVEHEERSBEESTJE staat er: "Lug nu onderkant en bovenkant op elkaar en haak ze samen met een v toer door beide lagen en vul TEGELIJKERTIJD lieveheersbeestje met kussenvulling. Hecht af."
28.12.2013 - 17:53..... Had to look twice at the pictures with the "antennas". Imagine them in pink, enough said! :D
11.04.2013 - 13:59Lurer på hva som menes me 4 omgang. Der det står. Hekle videre ved å hekle 1 stav mer mellom hver gang det hekles 2 staver i samme maske. Vil det si at jeg skal hekle 1-2-2 osv hele veien eller skal det være 3 staver i samme maske som det er 2 staver i.??
19.02.2013 - 18:08DROPS Design answered:
Efter 4. omgang (dvs, omgang 5, 6 osv) hekler du 1 stav mer mellom hver gang det hekles 2 staver. Dvs i omgang 5 hekler du 2 staver i hver 4. m og i omgang 6 hekler du 2 staver i hver 5. m osv
20.02.2013 - 08:58