DROPS Nepal
DROPS Nepal
65% Wool, 35% Alpaca
from 3.30 $ /50g
Get the yarn to make this pattern from 29.70$.

The yarn cost is calculated from the pattern’s smallest size and the yarn’s cheapest product type. Looking for an even better price? You might find it on the DROPS Deals!

DROPS SS24

Maple

Knitted DROPS poncho with cables and lace pattern in ”Nepal”. Size: S - XXXL.

DROPS 143-19
DROPS design: Pattern no ne-095
Yarn group C
-----------------------------------------------------------
Size: S/M - M/L - L/XL - XXL/XXXL

Materials:
DROPS NEPAL from Garnstudio
450-500-550-600 g color no 2920, orange

DROPS CIRCULAR NEEDLE (60 or 80 cm / 24" or 32") SIZE 5.5 mm/ US 9 - or size needed to get 16 sts x 20 rows in stockinette st = 10 x 10 cm / 4" x 4".
DROPS CIRCULAR NEEDLE (60 or 80 cm / 24" or 32") SIZE 4.5 mm/ US 7 - for edges in garter st.

-------------------------------------------------------

Alternative Yarn – See how to change yarns here
Yarn Groups A to F – Use the same pattern and change the yarn here
Yarn usage using an alternative yarn – Use our yarn converter here

-------------------------------------------------------

More like this:
Women Ponchoscable high neck lace
DROPS Nepal
DROPS Nepal
65% Wool, 35% Alpaca
from 3.30 $ /50g
Get the yarn to make this pattern from 29.70$.

The yarn cost is calculated from the pattern’s smallest size and the yarn’s cheapest product type. Looking for an even better price? You might find it on the DROPS Deals!

Pattern instructions

NOTE: This pattern is written in American English. All measurements in charts are in cm. For conversion from inches to cm - click here. There are different terms for crocheting in American and British English. If this pattern includes crochet, click for "crochet terms" here. For this pattern in British English, please click here.
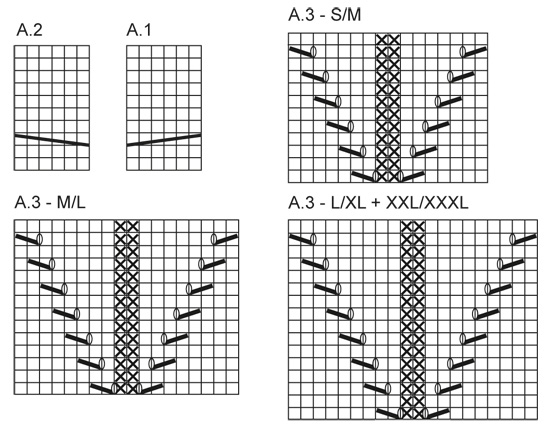
GARTER ST (back and forth on needle):
K sts on all rows.

PATTERN:
See diagrams A.1 to A.3. Diagrams show all rows seen from RS.
----------------------------------------------------------

PONCHO:
Worked in two pieces that are sewn tog when finished. Each piece is worked back and forth on circular needle.

PIECE 1: Cast on 66-74-80-86 sts on circular needle size 4.5 mm / US 7 with Nepal. Work 12 rows in GARTER ST - see explanation above (1st row = WS).
Switch to circular needle size 5.5 mm / US 9 and work next row as follows from WS: K 6-6-6-8, P 4, * 1 YO, P 1 *, repeat from *-* 2 more times (= 3 sts inc – NOTE: On next row K YO twisted to avoid holes), P until 13-13-13-15 sts remain, * P 1, 1 YO *, repeat from *-* 2 more times (= 3 sts inc) and finish with P 4 and K 6-6-6-8 = 72-80-86-92 sts.
Then work pattern as follows beg from RS: 6-6-6-8 edge sts in garter st, K 2, P 2, diagram A.1 (= 6 sts), P 2, K 2, P 3-4-5-5, K 2-3-3-4, P 3-4-5-5, diagram A.3 (= 16-18-20-20 sts - choose diagram for your size), P 3-4-5-5, K 2-3-3-4, P 3-4-5-5, K 2, P 2, diagram A.2 (= 6 sts), P 2, K 2 and 6-6-6-8 edge sts in garter st. Continue the pattern like this. REMEMBER THE GAUGE!
When piece measures approx. 61-68-74-80 cm / 24"-26¾"-29⅛"-31½" - adjust so that next row is worked from RS and that not more than 3 or 5 rows have been worked after a cable in A.1 and A.2 – K 1 row from RS while AT THE SAME TIME K sts in A.1 tog 2 by 2 and K sts in A.2 twisted tog 2 by 2 = 66-74-80-86 sts.
Switch to circular needle size 4.5 mm / US 7 and work 12 rows in garter st, then loosely bind off with K from WS, piece measures approx. 65-72-78-84 cm / 25½"-28½"-30¾"-33".


PIECE 2: Cast on and work as piece 1.

ASSEMBLY:
Place bind off edge on piece 1 towards right long side on piece 2 - bottom towards cast on edge and 41-46-50-54 cm / 16"-18"-19¾"-21¼" upwards – make sure that the piece is not stretched too much.
Sew the 2 pieces tog with neat little sts. Then sew bind off edge on piece 2 to right side on piece 1 the same way.

SOFT NECK:
Work a neck edge with a "scarf" on each side of opening at the front as follows (scarfs are sewn tog mid back at the end):
Insert 2 markers at the front of neck, approx. 5-5-6-7 cm / 2"-2"-2½"-2¾" from tip mid front and up, measure along each side of neck.
LOOSELY cast on 72-78-86-92 sts on circular needle size 4.5 mm / US 7, then pick up from RS, approx. 54 to 68 sts around the neck (beg at one marker at the front and finish at the other marker), then LOOSELY cast on 72-78-86-92 new sts at end of row = approx. 198-252 sts.
Work in garter st back and forth until neck edge measures 7-7-8-9 cm / 2¾"-2¾"-3"-3½". Now work short rows to make the edge higher at the back of neck as follows: K 68-74-82-88, slip these sts on a stitch holder, K the rest of row, turn, K 68-74-82-88, slip these sts on a stitch holder, K the rest of row, * turn, K 6-7-7-8, slip these sts on a stitch holder, K the rest of row, turn piece, K 6-7-7-8 sts, slip these sts on a stitch holder and K the rest of row *, repeat from *-* 2 more times.
Now slip sts from stitch holder back on needle and continue in garter st back and forth over all sts until neck edge measures approx. 9-9-10-11 cm / 3½"-3½"-4"-4½" at the most narrow (i.e. at the outer edge in each side).
Then very loosely bind off.
Cross the two "scarfs" mid front, over the shoulders and until mid back so that the short sides meet mid back. Sew short sides tog edge to edge in outermost sts.
Neck edge now lies soft around the opening of the poncho.

This pattern has been corrected.

Updated online: 17.01.2017
Diagrams A.1, A.2 and A.3 corrected.

Diagram

All measurements in charts are in cm.

symbols = K from RS, P from WS
symbols = P from RS, K from WS
symbols = 1 YO between 2 sts
symbols = K 2 tog
symbols = slip 1 st as if to K, K 1, psso
symbols = slip 3 sts on cable needle behind piece, K 3, K 3 from cable needle
symbols = slip 3 sts on cable needle in front of piece, K 3, K 3 from cable needle
diagram
diagram
Do you have a question? See a list of frequently asked questions (FAQ)

Knitting tension is what determines the final measurements of your work, and is usually measured per 10 x 10 cm. It is provided like so: number of stitches in width x number of rows in height - eg: 19 stitches x 26 rows = 10 x 10 cm.

The knitting tension is very individual; some people knit/crochet loosely while others work tightly. You adjust the knitting tension with the needle size, which is why the suggested needle size only serve as a guide! You need to adjust this (up or down) to ensure that YOUR knitting tension matches the knitting tension provided in the pattern. If you work with a different knitting tension than provided you will have a different yarn consumption, and your work will have different measurements than what the pattern suggests.

The knitting tension also determines which yarns can replace each other. As long as you achieve the same knitting tension you can replace one yarn with another.

See DROPS lesson: How to measure your tension/gauge

See DROPS video: How to make a gauge tension swatch

The required amount of yarn is provided in grams, eg: 450 g. To calculate how many balls you’ll need you first need to know how many grams are in 1 ball (25g, 50g or 100g). This information is available if you click on the individual yarn quality on our pages. Divide the amount required with the amount of each ball. For example, if each ball is 50g (the most common amount), the calculation will be as follows: 450 / 50 = 9 balls.

The important thing when changing from one yarn to another is that the knitting/crochet tension remains the same. This is so that the measurements of the finished piece will be the same as on the sketch provided. It is easier to achieve the same knitting tension using yarns from the same yarn group. It is also possible to work with multiple strands of a thinner yarn to achieve the knitting tension of a thicker one. Please try our yarn converter. We recommend you to always work a test swatch.

Please NOTE: when changing yarn the garment might have a different look and feel to the garment in the photo, due to individual properties and qualities of each yarn.

See DROPS lesson: Can I use a different yarn than the one mentioned in the pattern?

All our yarns are categorised into yarn groups (from A to F) according to thickness and knitting tension – group A contains the thinnest yarns and group F the thickest. This makes it easier for you to find alternative yarns to our patterns, should you wish to switch yarn. All yarns within the same group have a similar knitting tension and can easily replace each other. However, different yarn qualities have different structures and properties which will give the finished work a unique look and feel.

Click here for an overview of the yarns in each yarn group

At the top of all our patterns you’ll find a link to our yarn converter, which is a helpful tool should you wish to use a different yarn than suggested. By filling in the yarn quality you wish to replace, the amount (in your size) and number of strands, the converter will present good alternative yarns with the same knitting tension. Additionally it will tell you how much you’ll require in the new qualities and whether you’ll need to work with multiple strands. Most skeins are 50g (some are 25g or 100g).

If the pattern is worked with multiple colours, every colour will have to be converted separately. Similarly, if the pattern is worked with several strands of different yarns (for example 1 strand Alpaca and 1 strand Kid-Silk) you will have to find alternatives for each, individually.

Click here to see our yarn converter

Since different yarns have different qualities and textures we have chosen to keep the original yarn in our patterns. However, you can easily find options among our available qualities by using our yarn converter, or simply pick a yarn from the same yarn group.

It is possible that some retailers still have discontinued yarns in stock, or that someone has a few skeins at home that they would like to find patterns for.

The yarn converter will provide both alternative yarn as well as required amount in the new quality.

If you think it's hard to decide what size to make, it can be a good idea to measure a garment you own already and like the size of. Then you can pick the size by comparing those measures with the ones available in the pattern's size chart.

You'll find the size chart at the bottom of the pattern.

See DROPS lesson: How to read size chart

The needle size provided in the pattern serves only as a guide, the important thing is to follow the knitting tension. And since knitting tension is very individual, you will have to adjust the needle size to ensure that YOUR tension is the same as in the pattern – maybe you’ll have to adjust 1, or even 2 needle sizes, up or down to achieve the correct tension. For this, we recommend that you work test swatches.

Should you work with a different knitting tension than the one provided, the measurements of the finished garment might deviate from the measurement sketch.

See DROPS lesson: How to measure your tension/gauge

See DROPS video: How to make a gauge tension swatch

Working a garment top-down provides more flexibility and room for personal adjustment. For example it is easier to try the garment on while working, as well as making adjustments to length of yoke and shoulder caps.

The instructions are carefully explaining every step, in the correct order. Diagrams are adjusted to the knitting direction and are worked as usual.

The diagram depicts all rows/rounds, and every stitch seen from the right side. It is read from bottom to top, from right to left. 1 square = 1 stitch.

When working back and forth, every other row is worked from the right side and every other row is worked from the wrong side. When working from the wrong side, the diagram will have to be worked reversed: from left to right, knit stitches are purled, purl stitches are knit etc.

When working in the round every round is worked from the right side and the diagram are worked from right to left on all rounds.

See DROPS lesson: How to read knitting diagrams

The diagram depicts all rows/rounds, and every stitch seen from the right side. It is worked from bottom to top, from right to left.

When working back and forth every other row is worked from the right side: from right to left and every other row is worked from the wrong side: from left to right.

When working in the round, every row in the diagram are worked from the right side, from right to left.

When working a circular diagram you start in the middle and work your way outwards, counter clockwise, row by row.

The rows usually start with a given number of chain stitches (equivalent to the height of the following stitch), this will either be depicted in the diagram or explained in the pattern.

See DROPS lesson: How to read crochet diagrams

Instructions for working several diagrams after each other on the same row/round, will often be written like so: “work A.1, A.2, A.3 a total of 0-0-2-3-4 times". This means you work A.1 once, then A.2 is worked once, and A.3 is repeated (in width) the number of times provided for your size – in this case like so: S = 0 times, M = 0 times, L=2 times, XL= 3 times and XXL = 4 times.

The diagrams are worked as usual: begin with the first row in A.1, then work the first row in A.2 etc.

See DROPS lesson: How to read knitting diagrams

See DROPS lesson: How to read crochet diagrams

The total width of the garment (from wrist-to-wrist) will be larger in the larger sizes, despite the actual sleeves being shorter. The larger sizes have longer sleeve caps and wider shoulders, so there will be a good fit in all sizes.

The measurement sketch/schematic drawing provides information regarding the full length of the garment. If it’s a jumper or a jacket the length is measured from the highest point on the shoulder (usually closest to the neckline), and straight down to the bottom of the garment. It is NOT measured from the tip of shoulder. Similarly, the length of yoke is measured from the highest point on the shoulder and down to where yoke is split into body and sleeves.

See DROPS lesson: How to read a schematic drawing

Diagrams are often repeated on the round or in height. 1 repeat is the diagram the way it appears in the pattern. If it says to work 5 repeats of A.1 in the round, then you work A.1 a total of 5 times after/next to each other in the round. If it says to work 2 repeats of A.1 vertically/in height you work the entire diagram once, then begin again at the start and work the entire diagram one more time.

Chain stitches are slightly narrower than other stitches and to avoid working the cast-on edge too tight, we simply chain more stitches to begin with. The stitch count will be adjusted on the following row to fit the pattern and measurement sketch.

The rib edge is more elastic and will contract slightly compared to, for example, stocking stitch. By increasing before the rib edge, you avoid a visible difference in width between the rib edge and the rest of the body.

It’s very easy to cast off too tightly, and by making yarn overs while casting off (and simultaneously casting these off) you avoid a too tight cast off edge.

See DROPS video: How to bind off with yarn overs (yo)

To achieve an even increase (or decrease) you can increase on, for example: every 3rd and 4th row alternately, like so: work 2 rows and increase on the 3rd row, work 3 rows and increase on the 4th. Repeat this until the increase is complete.

See DROPS lesson: Increase or decrease 1 st on every 3rd and 4th row alternately

Should you prefer to work in the round instead of back and forth, you may of course adjust the pattern. You’ll need to add steeks mid-front (usually 5 stitches), and follow the instructions. When you would normally turn and work from the wrong side, simply work across the steek and continue in the round. At the end you’ll cut the piece open, pick up stitches to work bands, and cover the cut edges.

See DROPS video: How to knit steeks and cut open

Should you prefer to work back and forth instead of in the round, you may of course adjust the pattern so you work the pieces separately and then assemble them at the end. Divide the stitches for the body in 2, add 1 edge stitch in each side (for sewing) and work the front and back pieces separately.

See DROPS lesson: Can I adapt a pattern for circular needles into straight needles?

Pattern repeats can vary slightly in the different sizes, in order to get the correct proportions. If you’re not working the exact same size as the garment in the photo, yours might deviate slightly. This has been carefully developed and adjusted so that the complete impression of the garment is the same in all sizes.

Make sure to follow instructions and diagrams for your size!

If you have found a pattern you like which is available in women’s size it’s not very difficult to convert it to men’s size. The biggest difference will be the length of sleeves and body. Start working on the women size that you think would fit across the chest. The additional length will be worked right before you cast off for the armhole/sleeve cap. If the pattern is worked top-down you can add the length right after the armhole or before the first decrease on sleeve.

Regarding additional yarn amount, this will depend on how much length you add, but it is better with a skein too many than too few.

All yarns will have excess fibres (from production) that might come off as lint or shedding. Brushed yarns (ie hairier yarns) have more of these loose, excess fibres, causing more shedding.

Shedding also depends on what is worn under or over the garment, and whether this pulls at the yarn fibres. It’s therefore not possible to guarantee that there will be no shedding

Below are some tips on how to get the best result when working with hairier yarns:

1. When the garment is finished (before you wash it) shake it vigorously so the looser hairs come off. NOTE: do NOT use a lint roller, brush or any method that pulls at the yarn.

2. Place the garment in a plastic bag and put it in your freezer - the temperature will cause the fibres to become less attached to each other, and excess fibres will come off easier.

3. Leave in the freezer for a few hours before taking it out and shaking it again.

4. Wash the garment according to the instructions on the yarn label.

Pilling is a natural process that happens to even the most exclusive of fibers. It's a natural sign of wear and tear that is hard to avoid, and that is most visible in high friction areas of your garment like a sweater's arms and cuffs.

You can make your garment look as new by removing the pilling, using a fabric comb or a pill/lint remover.

Still can't find the answer you need? Then scroll down and leave your question so one of our experts can try to help you. This will be done normally within 5 to 10 working days.
In the meantime, you can read the questions and answers that others have left to this pattern or join the DROPS Workshop on Facebook to get help from fellow knitters/crocheters!

You might also like...

Post a comment to pattern DROPS 143-19

We would love to hear what you have to say about this pattern!

If you want to leave a question, please make sure you select the correct category in the form below, to speed up the answering process. Required fields are marked *.

Comments / Questions (25)

country flag Louise Van Wyngaard wrote:

I finished knitting my poncho, but now I'm struggling to do the last bit. Don't understand what pattern says, how the scarf is folded and worked. 🙈

03.07.2020 - 16:01

DROPS Design answered:

Dear Louise, please check the diagram at the at the bottom of the pattern. It will show you how to sew the parts together. Happy Knitting!

06.07.2020 - 03:21

country flag Louise Van Wyngaard wrote:

After Row 1 and 2 of part1, what should I knit on all the rows that are WS. The RS is all the patterns Diagram A1 to A3.

17.03.2020 - 19:37

DROPS Design answered:

Dear Mrs Van Wyngaard, from RS you read diagrams from the right towards the left, from WS you will read them from the left towards the right - read more here. Happy knitting!

18.03.2020 - 08:07

country flag Sophie wrote:

Bonjour je ne comprends pas l'explication pour le col doux pouvez vous m'aider merci de votre aide

29.10.2019 - 17:41

DROPS Design answered:

Bonjour Sophie, cette vidéo montre, pour un autre modèle, mais la technique sera la même, comment réaliser ce type de col. Bon tricot!

04.11.2019 - 13:34

country flag Sascha Van Gorkum wrote:

Bij de overgang aan het eind van deel 1 moet je een toer recht breien en dan tegelijk steken samenbreien. Toch eindigt deze toer met meer steken dan waar je mee begint. Ik begrijp dat je de kabelsteken samen moet breien?

04.01.2019 - 20:53

DROPS Design answered:

Dag Sascha,

Deel 1 eindigt en begint met hetzelfde aantal steken, namelijk: 66-74-80-86 st. Aan het begin meerder je steken waarboven de kabels gebreid worden en aan het eind minder je deze steken weer (door 2 aan 2 steken samen te breien). Dit wordt gedaan omdat door de kabel het werk wat 'krimpt' (m.a.w. voor een kabel heb je meer steken in de breedte nodig).

05.01.2019 - 12:54

country flag Marcia wrote:

According to the instructions, I start the patterns in on the first RS row. This will make the RS the odd rows in the patterns (row, 1, 3, 5, 7). I just want to check that this is correct because the cables and lacework are all shown on the even number rows in the diagrams, but the instructions in the legend are to knit, not purl. So on the 2nd row, for example, when working A.3 size M/L, I should P6, then K2 tog, YO, K2, YO, Slip 1 K1 psso, then purl 6?

28.11.2016 - 03:31

DROPS Design answered:

Dear Marcia, there are now new diagrams A.1, A.2 and A.3. Happy knitting!

17.01.2017 - 14:01

country flag Karine De Wolf wrote:

Beste, iIk begrijp de beschrijving van de sjaalkraag niet zo goed. Je neemt eerst steken op, die zitten aan voorzijde poncho. Dan moet je steken opnemen van eerste helft poncho aansluitend rugpand en tweede stuk voorpand. In beschrijving staat van kraag aan middenrug samen te naaien?

28.10.2016 - 14:41

DROPS Design answered:

Hoi Karin. Heb je deze video gezien van hoe je de hals kan breien? Dit is voor een ander patroon, maar de werkwijze voor de kraag is hetzelfde principe.

01.11.2016 - 10:38

country flag Lelletta wrote:

Buonasera! Ho eseguito le due parti, ma non è chiara la spiegazione per assemblarle. Non capisco neanche lo schema; leggo 12cm. e 41cm. a cosa si riferiscono?il lavoro misura circa 65 cm., misura che nello schema non c'è Potete spiegarmi meglio per favore? Vi ringrazio molto e Vi saluto con cordialità

19.02.2016 - 01:24

DROPS Design answered:

Buongiorno Lelletta, per la confezione, deve mettere il bordo di chiusura della parte 1, che per la taglia S misurerà circa 41 cm, contro il lato lungo della parte 2 (avanzeranno circa 24 cm) e cucirle, poi deve fare lo stesso con la parte 2 (partendo dal bordo di chiusura della parte 2). Buon lavoro!

25.02.2016 - 10:11

country flag Annika Högkvist wrote:

Hej ! Jag är färdig med min poncho men den blir stor och sitter konstigt. Jag har kanske sytt ihop den fel. Skall den inte gå ner i en snibb bak? Min ser ut som bilden fram men mycket större och är rak som en sjal bak. Hoppas på svar😉

26.07.2015 - 04:30

DROPS Design answered:

Hej Annika, jo du skall sy den så der blir ett hørn både mitt fram och mitt bak. Lycka till!

28.07.2015 - 13:40

country flag Winnie wrote:

Ik denk dat in dit patroon vanaf regel 4 een fout zit. Er staat namelijk, brei tot 13 steken, dan *1x AV 1x Meerderen* x3 (=6 steken), 4 averecht + 6 recht (=10, totaal van 16 ipv 13 steken). "om een gaatje te voorkomen.), brei av tot er 13-13-13-15 st over zijn, * 1 st av, 1 omsl *, herhaal van *-* nog 2 keer (= 3 st gemeerderd) en eindig met 4 st av en 6-6-6-8 st r = 72-80-86-92 st"

06.03.2015 - 18:32

country flag Mathilde wrote:

Je viens de terminer ce modèle. Je n'ai pas fait le col afin de pouvoir l'associer plus facilement avec un pull à col roulé. Très agréable à faire, rapide, et un résultat comme je l'espérais.

07.11.2014 - 13:49