
Popular categories
Looking for a yarn?


|
||||
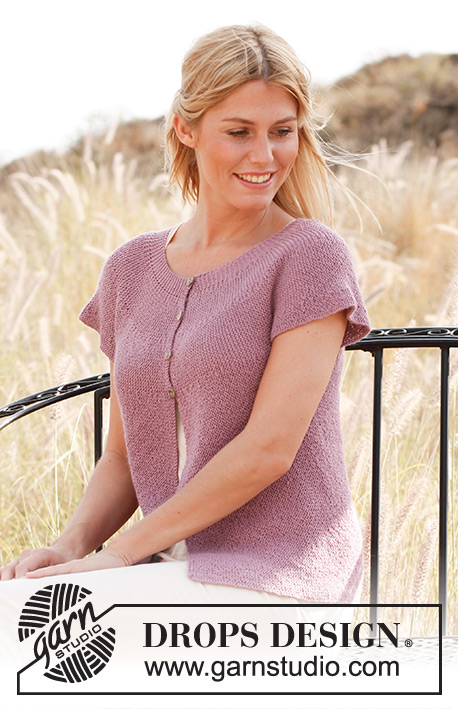
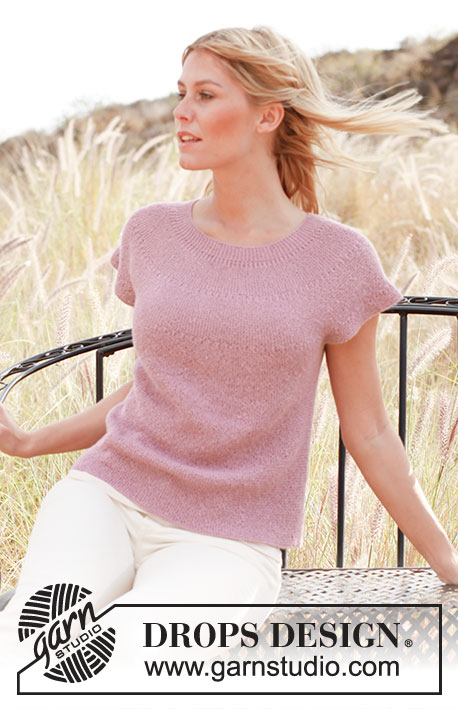
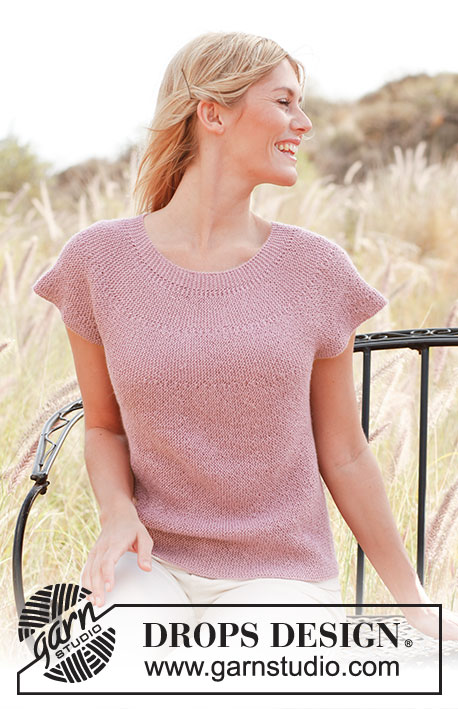
Rose of May |
||||
 |
 |
|||
Knitted DROPS top in garter st in ”Alpaca”. Size: S - XXXL.
DROPS 137-33 |
||||
|
KNITTING TIP: Every time piece is turned in the middle of piece, slip first st as if to K, tighten thread and return. This is done to avoid holes when working short rows. SHORT ROWS: Work short rows in the middle of the piece to give the garment a slight A shape. Beg working from bottom edge (= bottom) and up to neck (= top) as follows: Row 1 (= RS): K all sts. Row 2 (= WS): K all sts. Row 3 (= 1st short row): K 107-112-116-119-123-126 sts, turn piece - READ KNITTING TIP above. Row 4: K back. Row 5 (= 2nd short row): K 93-98-101-103-107-109 sts, turn piece. Row 6: K back. Row 7 (= 3rd short row): K 75-79-81-83-85-87 sts, turn piece. Row 8: K back. Repeat rows 1 to 8, i.e. 1 repetition = 2 rows at the top and 8 rows at the bottom. MEASURING TIP: Measure when piece is flat, it is important not to stretch the piece when measuring. -------------------------------------------------------- TOP: Worked back and forth on needle in garter st, i.e. K all rows. The entire garment is worked sideways in one, start and finish mid back. RIGHT BACK PIECE: Loosely cast on 115-120-125-129-134-138 sts on circular needle size 3.5 mm with Alpaca. Work SHORT ROWS - see explanation above (1st row = RS). REMEMBER THE KNITTING TENSION! Continue like this until piece measures approx. 20-22-24-27-30-32 cm from cast on edge (measured at the bottom on the widest) – Read MEASURING TIP above. Then work side piece as follows: Work 1 cm back and forth over only the 68-71-74-76-78-80 sts from bottom edge. Insert a marker (= middle of the side). Work 1 cm back and forth over the same sts, and slip them on a stitch holder (finish after 1 row from RS, sts are to be used on front piece later). Then work sleeve. RIGHT SLEEVE: = 47-49-51-53-56-58 sts on needle. Work back and forth with short rows on the same places as before until sleeve measures approx. 30-31-32-33-34-35 cm (at the bottom on the widest), finish after 1 row from WS. FRONT PIECE: Work the 68-71-74-76-78-80 sts from stitch holder back on needle (from WS) = 115-120-125-129-134-138 sts. Continue with short rows as before. When piece measures approx. 21-23-25-28-31-33 cm from marker in the side (measured at the bottom on the widest), insert another marker (= mid front). Continue with short rows until piece measures approx. 20-22-24-27-30-32 cm from marker mid front (measured at the bottom on the widest). Now work side piece as follows: Work 1 cm back and forth over only the 68-71-74-76-78-80 sts from bottom edge. Insert another new marker (= middle of the side). Work 1 cm back and forth over the same sts (finish after 1 row from RS), then slip them on a stitch holder. Work left sleeve. LEFT SLEEVE: Work as right sleeve. LEFT BACK PIECE: Work the 68-71-74-76-78-80 sts from stitch holder back on needle (from WS) = 115-120-125-129-134-138 sts. Continue with short rows as before. When the same no of rows has been worked as on right back piece, loosely cast off. ASSEMBLY: Sew tog mid back. |
||||
Diagram explanations |
||||
|
||||

|
||||
|
Have you made this or any other of our designs? Tag your pictures in social media with #dropsdesign so we can see them! Do you need help with this pattern?You'll find tutorial videos, a Comments/Questions area and more by visiting the pattern on garnstudio.com. © 1982-2024 DROPS Design A/S. We reserve all rights. This document, including all its sub-sections, has copyrights. Read more about what you can do with our patterns at the bottom of each pattern on our site. |
||||


With over 40 years in knitting and crochet design, DROPS Design offers one of the most extensive collections of free patterns on the internet - translated to 17 languages. As of today we count 304 catalogues and 11422 patterns - 11422 of which are translated into English (UK/cm).
We work hard to bring you the best knitting and crochet have to offer, inspiration and advice as well as great quality yarns at incredible prices! Would you like to use our patterns for other than personal use? You can read what you are allowed to do in the Copyright text at the bottom of all our patterns. Happy crafting!
Comments / Questions (99)
Can I make the arms a little longer.l
24.07.2023 - 17:20DROPS Design answered:
Hi Regina, The length of the sleeves is adjustable. Just continue working to your desired length before working the side piece. Happy knitting!
25.07.2023 - 06:46Sorry to ask another one. On the diagram, I cannot see a bust measurement for the finished piece. Can you please let me know the finished measurement of the S,M,L. I am a UK size 12, bust 36", 91cm. I want it to fit like in the picture, not loose, not tight. Thanks very much
02.06.2023 - 18:18DROPS Design answered:
Dear Sheree, the full bust measurement would be: 84-92-100-112-124-132 cm (the measurement is indicated at the lower part of the chart, you need to multiply it by 2). Since your bust is 91cm, then you should work the M size, which should be right, not too loose and not too tight. Take into account that the measurements and sizing are only valid if the gauge is the same as in the pattern. Happy knitting!
04.06.2023 - 19:21I don't understand the comment at the end of the short rows description. There are 8 rows in the short rows instructions. The repeat info says 'Repeat rows 1-8 i.e. 1 repetition = 2 rows at the top and 8 rows at the bottom. Can you please explain this last part after the 'i.e.' ? Thank you
31.05.2023 - 18:33DROPS Design answered:
Dear Sheree, the pattern is worked sideways. What the i.e tries to explain is that you have 2 full rows (2 rows both at the top and the bottom) and then 6 short rows, which are all at the bottom of the piece. That's why it says than in 1 repetition you will have 2 rows at the top and 8 rows at the bottom. Happy knitting!
31.05.2023 - 20:48Hola, estoy teniendo la muestra he intentando entender el patrón. No entiendo esta parte: Después tejer la pieza del lado de la manera sig: Tejer 1 cm de ida y vuelta únicamente sobre los 68-71-74-76-78-80 pts a partir de la parte de abajo... tengo que contar los primeros 68 puntos y tejer un total de 2 cms? Y donde pongo el marcador? Tengo que levantar los puntos del lateral? Creo q ayudaria mucho si el diagrama viene "plano" para ver como evoluciona el diseño. Gracias
21.04.2023 - 19:47DROPS Design answered:
Hola Susana, sí, tejes 2cm sobre los primeros 68 puntos a partir del borde inferior. Después de 1 cm, colocas el marcapuntos en la labor, en cualquier punto de la fila, para saber que esa es la mitad de la parte lateral. No tienes que levantar puntos del lateral. Trabajas sobre estos 68 puntos y después los dejas y pasas a trabajar la manga sobre el resto de puntos.
23.04.2023 - 19:15Répéter les rangs 1 à 8, c'est-à-dire 1 série = 2 rangs en haut et 8 rangs en bas. Pouvez-vous me dire si La série correspond à : 2 rang en haut, 8 rangs raccourcis, 8 rangs en bas ? Je vous remercie
16.04.2023 - 06:35DROPS Design answered:
Bonjour Mme Carrée, lorsque l'on tricote les 8 rangs de la série des rangs raccourcis, on tricote 8 rangs au plus long (côté bas du top) et seulement 2 rangs en haut (côté encolure). Bon tricot!
17.04.2023 - 09:14I have completed the right back piece. the next direction is Then work side piece as follows: Work 1 cm / 3/8'' back and forth over only the 68-71-74-76-78-80 sts from bottom edge. Insert a marker (= middle of the side). Work 1 cm / 3/8'' back and forth over the same sts, and slip them on a stitch holder (finish after 1 row from RS, sts are to be used on front piece later). Then work sleeve.
04.03.2023 - 22:17DROPS Design answered:
Dear Lisa, when the piece measures approx. 20-22-24-27-30-32 cm from cast on edge, continue working the right back piece as you have indicated. The sleeve is explained in the next section. If you have any doubts regarding this section, please indicate which part is giving you trouble. Happy knitting!
05.03.2023 - 19:51Bonjour, Pourriez-vous donner de plus amples explications pour la manche, svp. En effet, je ne comprends pas ce que vous voulez dire "rangs raccourcis au même endroit" sans donner exactement à combien de mailles, il faut raccourcir. Merci pour votre réponse car j'hésite à commencer ce travail.
14.02.2022 - 09:26DROPS Design answered:
Bonjour Mme Dachy Leemans, la manche se tricote sur les 47 à 58 mailles en haut du top, et vous continuez les mêmes rangs raccourcis qu'auparavant, autrement dit, vous tricotez le 1er rang raccourci jusqu'à ce qu'il reste 8-8-9-10-11-12 mailles en fin de rang sur l'endroit; le 2ème jusqu'à ce qu'il en reste 22-22-24-26-27-29 mailles en fin de rang sur l'endroit et le 3ème rang raccourci jusqu'à ce qu'il en reste 40-41-44-46-49-51 m . Bon tricot!
14.02.2022 - 10:44Det är väl en slätstickat topp ? Det står räta maskor hela tiden. Men man måste väl sticka räta maskor på framsidan och sen aviga maskor Första varvet räta maskor och nästa varv avigt och sen räta maskor nästkommande varv? Eller stickar man runt. Hela tiden med räta maskor. Det ser ut som att det ör en rätsticaad topp
02.02.2022 - 05:43DROPS Design answered:
Hej Sylvi. Det är lite svårt att se på bilden, men toppen är rätstickad så du ska sticka räta maskor på alla varv. Den stickas fram och tillbaka sidledes. Mvh DROPS Design
04.02.2022 - 12:01Is it possible to convert your patterns into stick needles rather than using circular needles. I am not very good at the circular method and the need to do short rows etc Thank you
25.08.2021 - 16:50DROPS Design answered:
Dear Marie, please understand that we cannot modify our patterns for each individual request. HOWEVER, we do have a lesson HERE, that helps you adapt patterns written for circulars to straight needles. Happy Stitching!
25.08.2021 - 19:42Hei. I oppskriften står det under vendinger at man skal gjenta 1.-8. p, dvs 1 rapport. Det forstår jeg, men videre står det: = 2 p øverst og 8 p nederst. Hva menes med det?
06.06.2021 - 19:17DROPS Design answered:
Hei Anne. Jo, øverst er det bare strikket 2 pinner, mens nederst er det strikket 8 pinner pga vendingene. Om du tar en titt på video: Hvordan strikke enkle forkortede pinner i riller så ser du at det er flere pinner på den ene siden enn den andre siden. mvh DROPS design
07.06.2021 - 11:25