DROPS Karisma
DROPS Karisma
100% Wool
from 2.30 £ /50g
DROPS Kid-Silk
DROPS Kid-Silk
75% Mohair, 25% Silk
from 4.60 £ /25g
Get the yarn to make this pattern from 43.70£.

The yarn cost is calculated from the pattern’s smallest size and the yarn’s cheapest product type. Looking for an even better price? You might find it on the DROPS Deals!

DROPS SS24

Lewis

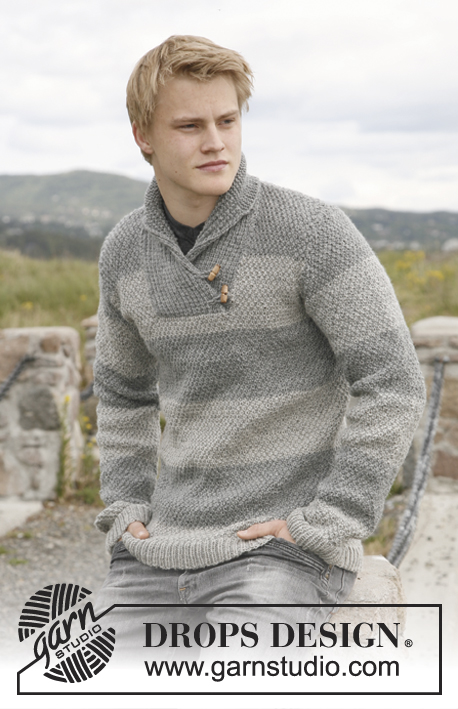
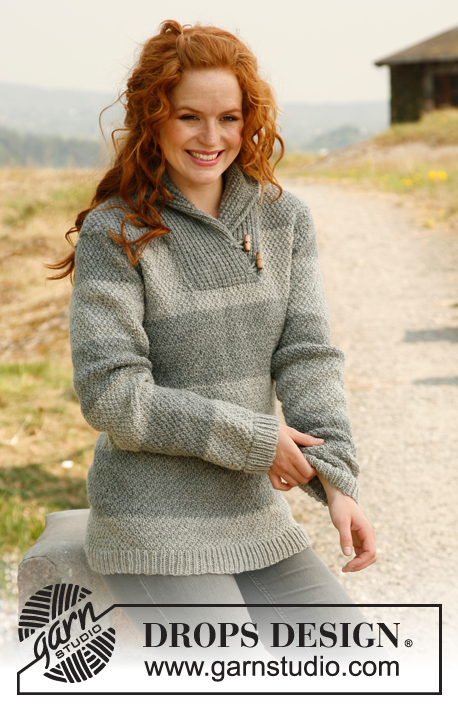
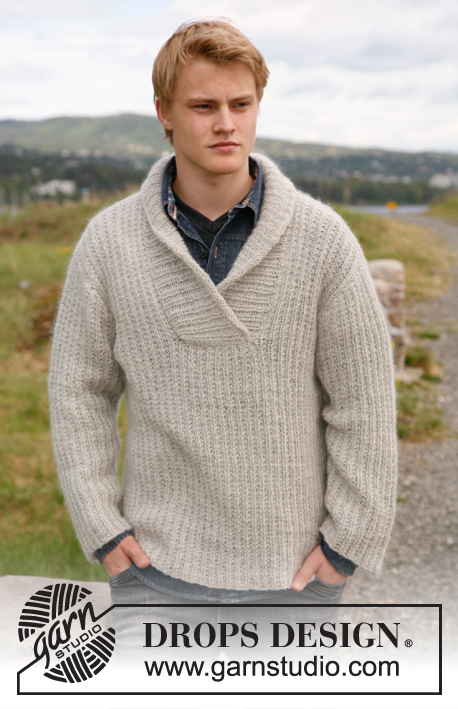
Knitted jacket for men with broad bands and shawl collar in DROPS Karisma and DROPS Kid-Silk. Size: S to XXXL.

DROPS 135-20
DROPS design: Pattern no U-648
Yarn group A and B
----------------------------------------------------------
Size: S - M - L - XL - XXL - XXXL

Materials: DROPS KARISMA from Garnstudio
Colour no 21, medium grey:
600-650-750-800-900-950 g
And use: DROPS KID-SILK from Garnstudio
Colour no 10, grey:
150-150-175-200-225-250 g

DROPS STRAIGHT NEEDLES AND CIRCULAR NEEDLE SIZE 5.5 mm – or size needed to get 18 sts x 24 rows in pattern with 1 thread Karisma and 1 thread Kid-Silk = 10 x 10 cm.
DROPS STRAIGHT NEEDLES AND CIRCULAR NEEDLE SIZE 4.5 mm - for rib

DROPS Wood buttons Duffle no 520: 5 pieces
----------------------------------------------------------

-------------------------------------------------------

Alternative Yarn – See how to change yarns here
Yarn Groups A to F – Use the same pattern and change the yarn here
Yarn usage using an alternative yarn – Use our yarn converter here

-------------------------------------------------------

DROPS Karisma
DROPS Karisma
100% Wool
from 2.30 £ /50g
DROPS Kid-Silk
DROPS Kid-Silk
75% Mohair, 25% Silk
from 4.60 £ /25g
Get the yarn to make this pattern from 43.70£.

The yarn cost is calculated from the pattern’s smallest size and the yarn’s cheapest product type. Looking for an even better price? You might find it on the DROPS Deals!

Pattern instructions

NOTE: This pattern is written in British English. All measurements in charts are in cm. For conversion from cm to inches - click here. There are different terms for crocheting in British and American English. If this pattern includes crochet, click for "crochet terms" here. For this pattern in American English, please click here.
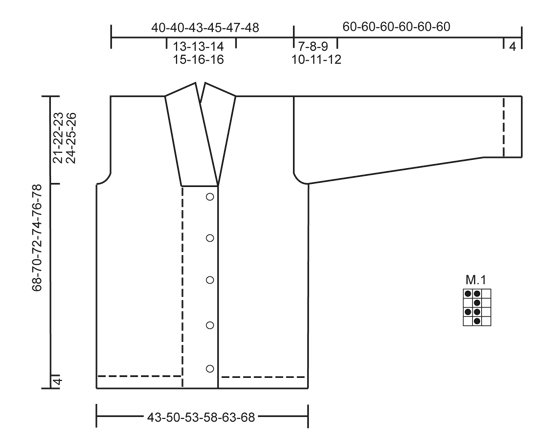
GARTER ST (back and forth on needle): K all rows.

PATTERN:
See diagram M.1 – diagram shows pattern from RS.

BUTTON HOLES:
Cast off for 5 button holes from RS on left front band. 1 button hole = cast off 5th st from mid front and cast on 1 new st on next row over this st. Cast off for button holes when piece measures:
SIZE S: 14, 22, 30, 38 and 46 cm
SIZE M: 15, 23, 31, 39 and 47 cm
SIZE L: 16, 24, 32, 40 and 48 cm
SIZE XL: 17, 25, 33, 41 and 49 cm
SIZE XXL: 18, 26, 34, 42 and 50 cm
SIZE XXXL: 19, 27, 35, 43 and 51 cm

DECREASE TIP (applies to neck):
Dec from RS inside 1 edge st in garter st. Dec AFTER 1 st as follows: Slip 1 st as if to K, K 1, psso. Dec BEFORE 1 st as follows: K 2 tog.
----------------------------------------------------------

BODY:
Worked back and forth on circular needle from mid front.
Cast on 176-200-212-227-248-263 sts (incl 20 band sts in each side towards mid front) on needle size 4.5 mm with 1 thread Karisma and 1 thread Kid-Silk. Work rib as follows (seen from from RS): 20 band sts in GARTER ST - see explanation above - * K 1, P 2 *, repeat from *-* until 21 sts remain, K 1 and 20 band sts in garter st. Then work K over K and P over P and band sts in garter st. When piece measures 4 cm, switch to needle size 5.5 mm. Continue with diagram M.1 and band sts in garter st – diagram M.1 starts and ends with 1 K st (seen from RS).
When piece measures 14-15-16-17-18-19 cm, cast off for BUTTON HOLES on left front band - see explanation above! When piece measures 47-48-49-50-51-52 cm, work next row as follows: Cast off the first 19 sts, insert a marker (this marks where to start the knit up for collar), work 27-33-36-39-45-48 sts (= right front piece), cast off 6 sts for armhole, work 72-84-90-99-108-117 sts (= back piece), cast off 6 sts for armhole and work the rest of row (= 46-52-55-58-64-67 sts on left front piece). Turn and cast off the first 19 sts, insert a marker (this marks where to end the knit up for collar), work the rest of row = 27-33-36-39-45-48 sts. Finish each part separately.

LEFT FRONT PIECE:
= 27-33-36-39-45-48 sts. Continue with diagram M.1 as before and outermost st towards mid front in garter st. AT THE SAME TIME cast off for armhole at beg of every row from the side: 2 sts 0-2-2-3-4-5 times and 1 st 0-2-2-3-4-5 times. AT THE SAME TIME when piece measures 49-50-51-52-53-54 cm, dec 1 st towards the neck - SEE DECREASE TIP! Repeat dec every 5-5-5-5-3-4 cm a total of 3-3-4-3-5-4 times. After all cast offs and dec are done, 24-24-26-27-28-29 sts remain on needle.
Cast off when piece measures 68-70-72-74-76-78 cm.

RIGHT FRONT PIECE:
Work as left front piece but reversed.

BACK PIECE:
= 72-84-90-99-108-117 sts. Continue with diagram M.1 while at the same time casting off for armholes at the beg of every row in each side as on front piece = 72-72-78-81-84-87 sts. When piece measures 66-68-70-72-74-76 cm, cast off the middle 22-22-24-25-26-27 sts for neck and finish each shoulder separately. At beg of next row from neck, dec 1 st = 24-24-26-27-28-29 sts remain on shoulder. Cast off when piece measures 68-70-72-74-76-78 cm.

SLEEVE:
Worked back and forth on needle.
Cast on 50-53-53-56-56-59 sts (incl 1 edge st in each side) on needle size 4.5 mm with 1 thread Karisma and 1 thread Kid-Silk. Work as follows (seen from from RS): 1 edge st in garter st, * K 1, P 2 *, repeat from *-* and finish with 1 edge st in garter st.
When piece measures 4 cm, switch to needle size 5.5 mm. Continue with diagram M.1 with 1 edge st in each side in garter st. AT THE SAME TIME when piece measures 10 cm, inc 1 st in each side. Repeat inc every 5-5-3½-3-2½-2½ cm a total of 9-9-12-12-15-15 times = 68-71-77-80-86-89 sts – work the inc sts gradually in diagram M.1. When piece measures 53-52-51-50-49-48 cm (shorter measurements in the larger sizes because of longer sleeve cap and broader shoulder width) cast off at beg of every row in each side: 4 sts 1 time, 2 sts 3 times and 1 st 1-2-4-5-7-8 times. Then cast off 2 sts in each side until piece measures 59 cm, then cast off 3 sts 1 time in each side. Cast off, the piece measures approx. 60 cm in all sizes.

ASSEMBLY:
Sew the shoulder seams.

SHAWL COLLAR:
Knit up sts (inside 1 edge st) on circular needle size 4.5 mm with 1 thread Karisma and 1 thread Kid-Silk - start mid front at marker on right front piece: Knit up approx. 40 to 50 sts up to shoulder, then 26 to 32 sts along the neck, and 40 to 50 sts down along left front piece until marker = 106 to 132 sts. K 1 row from WS while AT THE SAME TIME inc no of sts to 132-138-144-150-156-162. Then work rib as follows (seen from RS): 1 st in garter st, * K 1, P 2 *, repeat from *-* and finish with K 1 and 1 st in garter st.
Continue like this until collar measures approx. 5 cm.
Now inc 1 st in each of the middle 12 P-sections, seen from RS (= back of neck) = 144-150-156-162-168-174 sts. Continue with K over K and P over P until collar measures approx. 10 cm - adjust so that next row is from WS. K 3 rows over all sts, then cast off all sts with K from RS. Fasten collar with stitches in each side towards band – sew edge to edge to avoid a chunky seam.

MORE ASSEMBLY:
Sew in sleeves and sew on buttons.

This pattern has been corrected.

Updated online: 29.01.2013
SHAWL COLLAR:
....
Continue like this until collar measures approx. 5 cm.
Now inc 1 st in each of the middle 12 P-sections, seen from RS (= back of neck) = 144-150-156-162-168-174 sts.

Diagram

symbols = K from RS, P from WS
symbols = P from RS, K from WS
diagram
Do you have a question? See a list of frequently asked questions (FAQ)

Knitting tension is what determines the final measurements of your work, and is usually measured per 10 x 10 cm. It is provided like so: number of stitches in width x number of rows in height - eg: 19 stitches x 26 rows = 10 x 10 cm.

The knitting tension is very individual; some people knit/crochet loosely while others work tightly. You adjust the knitting tension with the needle size, which is why the suggested needle size is only meant as a guide! You need to adjust this (up or down) to ensure that YOUR knitting tension matches the knitting tension provided in the pattern. If you work with a different knitting tension than provided you will have a different yarn consumption, and your work will have different measurements than what the pattern suggests.

The knitting tension also determines which yarns can replace each other. As long as you achieve the same knitting tension you can replace one yarn with another.

See DROPS lesson: How to measure your tension/gauge

See DROPS video: How to make a gauge tension swatch

The required amount of yarn is provided in grams, eg: 450 g. To calculate how many balls you’ll need you first need to know how many grams are in 1 ball (25g, 50g or 100g). This information is available if you click on the individual yarn quality on our pages. Divide the amount required with the amount of each ball. For example, if each ball is 50g (the most common amount), the calculation will be as follows: 450 / 50 = 9 balls.

The important thing when changing from one yarn to another is that the knitting/crochet tension remains the same. This is so that the measurements of the finished piece will be the same as on the sketch provided. It is easier to achieve the same knitting tension using yarns from the same yarn group. It is also possible to work with multiple strands of a thinner yarn to achieve the knitting tension of a thicker one. Please try our yarn converter. We recommend you to always work a test swatch.

Please NOTE: when changing yarn the garment might have a different look and feel to the garment in the photo, due to individual properties and qualities of each yarn.

See DROPS lesson: Can I use a different yarn than the one mentioned in the pattern?

All our yarns are categorised into yarn groups (from A to F) according to thickness and knitting tension – group A contains the thinnest yarns and group F the thickest. This makes it easier for you to find alternative yarns to our patterns, should you wish to switch yarn. All yarns within the same group have a similar knitting tension and can easily replace each other. However, different yarn qualities have different structures and properties which will give the finished work a unique look and feel.

Click here for an overview of the yarns in each yarn group

At the top of all our patterns you’ll find a link to our yarn calculator, which is a helpful tool should you wish to use a different yarn than suggested. By filling in the yarn quality you wish to replace, the amount (in your size) and number of strands, the calculator will present good alternative yarns with the same knitting tension. Additionally it will tell you how much you’ll require in the new qualities and whether you’ll need to work with multiple strands. Most skeins are 50g (some are 25g or 100g).

If the pattern is worked with multiple colours, every colour will have to be calculated separately. Similarly, if the pattern is worked with several strands of different yarns (for example 1 strand Alpaca and 1 strand Kid-Silk) you will have to find alternatives for each, individually.

Click here to see our yarn calculator

Since different yarns have different qualities and textures we have chosen to keep the original yarn in our patterns. However, you can easily find options among our available qualities by using our yarn calculator, or simply pick a yarn from the same yarn group.

It is possible that some retailers still have discontinued yarns in stock, or that someone has a few skeins at home that they would like to find patterns for.

The yarn calculator will provide both alternative yarn as well as required amount in the new quality.

If you think it's hard to decide what size to make, it can be a good idea to measure a garment you own already and like the size of. Then you can pick the size by comparing those measures with the ones available in the pattern's size chart.

You'll find the size chart at the bottom of the pattern.

See DROPS lesson: How to read size chart

The needle size provided in the pattern serves only as a guide, the important thing is to follow the knitting tension. And since knitting tension is very individual, you will have to adjust the needle size to ensure that YOUR tension is the same as in the pattern – maybe you’ll have to adjust 1, or even 2 needle sizes, up or down to achieve the correct tension. For this, we recommend that you work test swatches.

Should you work with a different knitting tension than the one provided, the measurements of the finished garment might deviate from the measurement sketch.

See DROPS lesson: How to measure your tension/gauge

See DROPS video: How to make a tension/gauge swatch

Working a garment top-down provides more flexibility and room for personal adjustment. For example it is easier to try the garment on while working, as well as making adjustments to length of yoke and shoulder caps.

The instructions are carefully explaining every step, in the correct order. Diagrams are adjusted to the knitting direction and are worked as usual.

The diagram depicts all rows/rounds, and every stitch seen from the right side. It is read from bottom to top, from right to left. 1 square = 1 stitch.

When working back and forth, every other row is worked from the right side and every other row is worked from the wrong side. When working from the wrong side, the diagram will have to be worked reversed: from left to right, knit stitches are purled, purl stitches are knit etc.

When working in the round every round is worked from the right side and the diagram are worked from right to left on all rounds.

See DROPS lesson: How to read knitting diagrams

The diagram depicts all rows/rounds, and every stitch seen from the right side. It is worked from bottom to top, from right to left.

When working back and forth every other row is worked from the right side: from right to left and every other row is worked from the wrong side: from left to right.

When working in the round, every row in the diagram are worked from the right side, from right to left.

When working a circular diagram you start in the middle and work your way outwards, counter clockwise, row by row.

The rows usually start with a given number of chain stitches (equivalent to the height of the following stitch), this will either be depicted in the diagram or explained in the pattern.

See DROPS lesson: How to read crochet diagrams

Instructions for working several diagrams after each other on the same row/round, will often be written like so: “work A.1, A.2, A.3 a total of 0-0-2-3-4 times". This means you work A.1 once, then A.2 is worked once, and A.3 is repeated (in width) the number of times provided for your size – in this case like so: S = 0 times, M = 0 times, L=2 times, XL= 3 times and XXL = 4 times.

The diagrams are worked as usual: begin with the first row in A.1, then work the first row in A.2 etc.

See DROPS lesson: How to read knitting diagrams

See DROPS lesson: How to read crochet diagrams

The total width of the garment (from wrist-to-wrist) will be larger in the larger sizes, despite the actual sleeves being shorter. The larger sizes have longer sleeve caps and wider shoulders, so there will be a good fit in all sizes.

The measurement sketch/schematic drawing provides information regarding the full length of the garment. If it’s a jumper or a jacket the length is measured from the highest point on the shoulder closest to the neckline, and straight down to the bottom of the garment. It is NOT measured from the tip of shoulder. Similarly, the length of yoke is measured from the highest point on the shoulder and down to where yoke is split into body and sleeves.

On a jacket measures are never taken along bands, unless specifically stated. Always measure inside band stitches when measuring the length.

See DROPS lesson: How to read a schematic drawing

Diagrams are often repeated on the round or in height. 1 repeat is the diagram the way it appears in the pattern. If it says to work 5 repeats of A.1 in the round, then you work A.1 a total of 5 times after/next to each other in the round. If it says to work 2 repeats of A.1 vertically/in height you work the entire diagram once, then begin again at the start and work the entire diagram one more time.

Chain stitches are slightly narrower than other stitches and to avoid working the cast-on edge too tight, we simply chain more stitches to begin with. The stitch count will be adjusted on the following row to fit the pattern and measurement sketch.

The rib edge is more elastic and will contract slightly compared to, for example, stocking stitch. By increasing before the rib edge, you avoid a visible difference in width between the rib edge and the rest of the body.

It’s very easy to cast off too tightly, and by making yarn overs while casting off (and simultaneously casting these off) you avoid a too tight cast off edge.

See DROPS video: How to bind off with yarn overs (yo)

To achieve an even increase (or decrease) you can increase on, for example: every 3rd and 4th row alternately, like so: work 2 rows and increase on the 3rd row, work 3 rows and increase on the 4th. Repeat this until the increase is complete.

See DROPS lesson: Increase or decrease 1 st on every 3rd and 4th row alternately

Should you prefer to work in the round instead of back and forth, you may of course adjust the pattern. You’ll need to add steeks mid-front (usually 5 stitches), and follow the instructions. When you would normally turn and work from the wrong side, simply work across the steek and continue in the round. At the end you’ll cut the piece open, pick up stitches to work bands, and cover the cut edges.

See DROPS video: How to knit steeks and cut open

Should you prefer to work back and forth instead of in the round, you may of course adjust the pattern so you work the pieces separately and then assemble them at the end. Divide the stitches for the body in 2, add 1 edge stitch in each side (for sewing) and work the front and back pieces separately.

See DROPS lesson: Can I adapt a pattern for circular needles into straight needles?

Pattern repeats can vary slightly in the different sizes, in order to get the correct proportions. If you’re not working the exact same size as the garment in the photo, yours might deviate slightly. This has been carefully developed and adjusted so that the complete impression of the garment is the same in all sizes.

Make sure to follow instructions and diagrams for your size!

If you have found a pattern you like which is available in women’s size it’s not very difficult to convert it to men’s size. The biggest difference will be the length of sleeves and body. Start working on the women size that you think would fit across the chest. The additional length will be worked right before you cast off for the armhole/sleeve cap. If the pattern is worked top-down you can add the length right after the armhole or before the first decrease on sleeve.

Regarding additional yarn amount, this will depend on how much length you add, but it is better with a skein too many than too few.

All yarns will have excess fibres (from production) that might come off as lint or shedding. Brushed yarns (ie hairier yarns) have more of these loose, excess fibres, causing more shedding.

Shedding also depends on what is worn under or over the garment, and whether this pulls at the yarn fibres. It’s therefore not possible to guarantee that there will be no shedding

Below are some tips on how to get the best result when working with hairier yarns:

1. When the garment is finished (before you wash it) shake it vigorously so the looser hairs come off. NOTE: do NOT use a lint roller, brush or any method that pulls at the yarn.

2. Place the garment in a plastic bag and put it in your freezer - the temperature will cause the fibres to become less attached to each other, and excess fibres will come off easier.

3. Leave in the freezer for a few hours before taking it out and shaking it again.

4. Wash the garment according to the instructions on the yarn label.

Pilling is a natural process that happens to even the most exclusive of fibers. It's a natural sign of wear and tear that is hard to avoid, and that is most visible in high friction areas of your garment like a sweater's arms and cuffs.

You can make your garment look as new by removing the pilling, using a fabric comb or a pill/lint remover.

Still can't find the answer you need? Then scroll down and leave your question so one of our experts can try to help you. This will be done normally within 5 to 10 working days.
In the meantime, you can read the questions and answers that others have left to this pattern or join the DROPS Workshop on Facebook to get help from fellow knitters/crocheters!

You might also like...

Post a comment to pattern DROPS 135-20

We would love to hear what you have to say about this pattern!

If you want to leave a question, please make sure you select the correct category in the form below, to speed up the answering process. Required fields are marked *.

Comments / Questions (138)

country flag Joanna wrote:

Dzień dobry. Mam pytanie odnośnie sposobu wykonania kołnierza. We wzorze napisano, żeby kołnierz przerabiać *1 o.p., 2 o.l.* i jest to widok na prawej stronie robótki. Jednak kołnierz będzie wywinięty i będzie się go nosić lewą stroną do góry, więc wzór będzie się układał *1 o.l., 2 o.p.*. Czyli wzór kołnierza będzie odwrotny niż wzór ściągacza. Czy tak ma być, czy coś źle zrozumiałam?

26.03.2024 - 16:07

DROPS Design answered:

Witaj Joanno, dobrze zrozumiałaś. Na kołnierzu będzie widoczny wzór ściągacza 2 oczka prawe, 1 oczko lewe jak na zdjęciu. Pozdrawiamy!

26.03.2024 - 16:32

country flag Brigitte Hoepner wrote:

Was bedeutet: Die Arbeit wird von der Mitte her hin und zurück gestrickt.

21.03.2024 - 15:15

DROPS Design answered:

Liebe Frau Hoepner, man strickt das Rumpfteil bis Armausschnitt in einem Stück, in Hin- und Rückreihen so: rechtes Vorderteil, Rückenteil, linkes Vorderteil (von der Vorderseite gesehen). Viel Spaß beim Stricken!

21.03.2024 - 16:06

country flag Ida Beyer wrote:

Soll für die Armkugel von Anfang an auf beiden Seiten abgenommen werden oder nur auf einer Seite?

20.10.2023 - 09:42

DROPS Design answered:

Liebe Frau Beyer, die Maschen sollen am Anfang jeder Reihe = jeder Hin- sowie Rückreihe damit die Armkugel symmetrisch wird. Vie Spaß beim stricken!

20.10.2023 - 14:08

country flag CB wrote:

I am stuck on the sleeve and found a previous question (Laura on 01.12.2019 - 23:53) where you provided an answer but the math DOES NOT add up. If I am following gauge, how many stitches remain on your needle for the final bind off in an XXL? In your previous response you indicated 4 stitches but like Laura, my math would show 48.

13.03.2023 - 17:34

DROPS Design answered:

Dear CB, if your tension is correct with 24 rows in pattern = 10 cm, then the first cast off for sleeve should measure approx. 9 cm (a total of 22 rows), you then cast off 2 sts at the beg of next 2 rows = sleeve measures now approx. 59 cm then cast off 3 sts at the beg of next 2 rows and cast off all remaining stitches (42) - but remember that the number of remaining stitches is less important than the height of sleeve cap, so make sure to get the correct heigth on sleeve/sleeve cap.. Happy knitting!

14.03.2023 - 09:21

country flag Carine Vermoesen wrote:

Wat bedoel je met M1 patroon breien? Kan u dit simpel steek per steek uitleggen aub. alvast bedankt. mvg, Carine.

04.03.2023 - 15:10

DROPS Design answered:

Dag Carine,

Onderaan de beschrijving vind je een telpatroon M.1 (dus onder de mouw van de maattekening). Je begint rechts onder met het telpatroon en breit naar links. Je herhaalt steeds de steken in de breedte. Als je de naald uit hebt gebreid en het werk keert, dan lees je de volgende naald van het telpatroon terug. Bij de symbooluitleg staat beschreven hoe je de symbolen breit.

08.03.2023 - 12:59

country flag Sara wrote:

Buongiorno, vi scrivo perché ho terminato questo modello in taglia M col vostro filato, ma dopo il bloccaggio (ammollo in acqua tiepida, strizzato leggermente in un asciugamano e lasciato asciugare all’aria in posa su asciugamani asciutti e su un piano spazioso)) il cardigan si è lasciato leggermente andare diventando più grande di circa mezza taglia, cosa può essere successo? Posso rimediare in qualche modo? Grazie mille, Sara

11.01.2023 - 21:07

DROPS Design answered:

Buonasera Sara, il suo campione corrispondeva a quello indicato? Buon lavoro!

12.01.2023 - 21:28

country flag Christiane Plas wrote:

Bonjour j'aurai voulu savoir à quoi correspond ent les sections envers lors de la realisation du col.Merci

29.12.2022 - 08:05

country flag Pillie wrote:

Bonjour, je suis en train de démarrer ce modèle et je me demandais s’il serait possible de laisser les mailles de bordures devant au point mousse en attente sur un câble séparé plutôt que de les rabattre comme indiqué ? Afin d’éviter d’avoir ensuite à les relever pour tricoter le col châle. D’ailleurs pour le col châle vous indiquez d’utiliser des aiguilles de 4,5 alors qu’à cet endroit de l’ouvrage on tricotait en 5,5 est-ce bien correct ? Merci à vous !

11.12.2022 - 16:04

DROPS Design answered:

Bonjour Mme Pillie, pas vraiment, car les mailles du col châle seront relevées le long des derniers rangs du devant droit (après avoir rabattu les 19 m) jusqu'à l'épaule, puis le long de l'encolure dos et enfin le long du devant gauche jusqu'aux 19 mailles rabattues, et on tricote ensuite en côtes, avec les aiguilles 4,5 pour former le col châle - avec des augmentations dans les côtes. Bon tricot!

12.12.2022 - 09:43

country flag Lesley Campbell wrote:

I have knit this cardigan and was wondering because it is ribbed pattern is still best to block it \r\nThank you

08.12.2022 - 09:04

country flag Kathrin wrote:

Hallo, welche Art von Naht würden Sie für die Schulter und die Ärmel und den Kragen empfehlen? Vielen Dank.

14.10.2022 - 21:07

DROPS Design answered:

Liebe Kathrin, die Schulter können Sie mit dieser Technikk zusammennähen und dann die Ärmel mit dieser Technikk. Viel Spaß beim fertigstellen!

17.10.2022 - 09:00