DROPS 90-18
Sizes: S - M - L - XL - XXL

Finished measurements:
Bust: 82-90-98-110-120 cm
[32.25" - 35-⅜" - 38-⅝" - 43.25" - 47.25"]
Hem: 72-80-90-100-110 cm
[28.25" - 31.5" - 35-⅜" - 39-⅜" - 43.25"]

Materials: Garnstudio COTTON VISCOSE
200-250-250-300-300 gr nr 18, pearl grey

DROPS 2.5 mm [US 1] straight and short circular needles and 3 mm [US 2] straight needles, or sizes needed to obtain correct gauge.

-------------------------------------------------------

Alternative Yarn – See how to change yarns here
Yarn Groups A to F – Use the same pattern and change the yarn here
Yarn usage using an alternative yarn – Use our yarn converter here

-------------------------------------------------------

Pattern instructions

NOTE: This pattern is written in American English. All measurements in charts are in cm. For conversion from inches to cm - click here. There are different terms for crocheting in American and British English. If this pattern includes crochet, click for "crochet terms" here. For this pattern in British English, please click here.
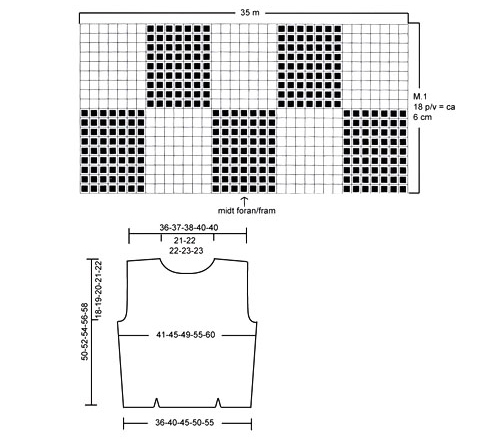
Gauge: 24 sts x 32 rows on larger in stockinette st = 10 x 10 cm

Pattern: See the chart. The pattern is seen from the right side. Midt foran/fram = center front.

Knitting tips (for armhole): All decs are made on right side rows. Dec 1 st inside of 2 edge sts knit in garter st as follows:
After 2 edge sts: Slip 1 st as if to knit, K 1, psso. Before 2 edge sts: K 2 tog.

Front: The front is knit in 3 pieces until after the splits, then joined.
Left side: Cast on 25-28-33-37-42 sts on smaller needles and knit 4 rows garter st. Change to larger needles and stockinette st, keeping the 2 outermost sts at the split edge in garter st. When the piece measures 5 cm put sts on a st holder.
Center front: Cast on 39-41-43-49-51 sts on smaller needles and knit 4 rows garter st. Change to larger needles and knit stockinette st, keeping 2 sts in garter st at each edge. When the piece measures 5 cm put sts on a st holder.
Right side: Knit the same as the left, reversing shaping.
Put the 3 sides in on the same larger needle so that the split edges meet = 89-97-109-123-135 sts. Continue in stockinette st, but for the first 4 rows continue to knit garter st over the 8 sts in garter st at each split, then knit stockinette st over all sts.
Read the entire section before continuing.
Pattern: When the piece measures 8-8-9-10-10 cm knit Pattern 1 over the center 35 sts. Repeat Pattern 1 a total of 5 times, then knit half a repeat of Pattern 1 again (9 rows).
After Pattern 1 continue in stockinette st to finished measurements.
Side incs: When the piece measures 10 cm inc 1 st at each side every 3.5-3.5-4.5-5-5 cm a total of 6-6-5-5-5 times = 101-109-119-133-145 sts.
Armhole: When the piece measures 31-32-33-34-35 cm knit 4 rows with garter st over the outermost 5-7-9-10-12 sts at each side, then bind off the outermost 3-5-7-8-10 sts at each side for armhole.
Continue to dec 1 st for armhole at each side every other row – see knitting tips above: 4-5-7-11-14 times = 87-89-91-95-97 sts.
Continue to keep 2 sts in garter st at armhole edge to finished measurements.
Neckband: When the piece measures 42-44-45-46-48 cm bind off the center 39-41-41-43-43 sts for the neck. Then bind off at each neck edge every other row: 2 sts 1 time and 1 st 4 times = 18-18-19-20-21 sts remain on each shoulder.
When the piece measures 48-50-52-54-56 cm bind off for sloped shoulder from side edge every other row: 6 sts 2 times and then the last 6-6-7-8-9 sts. The piece measures approx. 50-52-54-56-58 cm.

Back: Cast on and knit the same as the front but do not knit Pattern 1, knit in stockinette st. Bind off for armhole as on front and continue until the piece measures 48-50-52-54-56 cm. Now bind off the center 47-49-49-51-51 sts for the neck. Continue to dec 1 st at each neck edge every other row 2 times = 18-18-19-20-21 sts remain on each shoulder.
When the piece measures 48-50-52-54-56 cm bind off for shoulder as on front. The piece measures approx. 50-52-54-56-58 cm.

Assembly: Sew shoulder seams.
Neckband: Pick up approx. 125-140 sts around the neck on smaller short circular needles. Join and P 1 row, K 1 row, P 1 row, then K and bind off all sts.
Sew side seams using edge sts as seam allowance.

Diagram

All measurements in charts are in cm.

symbols = P from RS, K from WS
symbols = K from RS, P from WS
diagram
Do you have a question? See a list of frequently asked questions (FAQ)

Knitting tension is what determines the final measurements of your work, and is usually measured per 10 x 10 cm. It is provided like so: number of stitches in width x number of rows in height - eg: 19 stitches x 26 rows = 10 x 10 cm.

The knitting tension is very individual; some people knit/crochet loosely while others work tightly. You adjust the knitting tension with the needle size, which is why the suggested needle size only serve as a guide! You need to adjust this (up or down) to ensure that YOUR knitting tension matches the knitting tension provided in the pattern. If you work with a different knitting tension than provided you will have a different yarn consumption, and your work will have different measurements than what the pattern suggests.

The knitting tension also determines which yarns can replace each other. As long as you achieve the same knitting tension you can replace one yarn with another.

See DROPS lesson: How to measure your tension/gauge

See DROPS video: How to make a gauge tension swatch

The required amount of yarn is provided in grams, eg: 450 g. To calculate how many balls you’ll need you first need to know how many grams are in 1 ball (25g, 50g or 100g). This information is available if you click on the individual yarn quality on our pages. Divide the amount required with the amount of each ball. For example, if each ball is 50g (the most common amount), the calculation will be as follows: 450 / 50 = 9 balls.

The important thing when changing from one yarn to another is that the knitting/crochet tension remains the same. This is so that the measurements of the finished piece will be the same as on the sketch provided. It is easier to achieve the same knitting tension using yarns from the same yarn group. It is also possible to work with multiple strands of a thinner yarn to achieve the knitting tension of a thicker one. Please try our yarn converter. We recommend you to always work a test swatch.

Please NOTE: when changing yarn the garment might have a different look and feel to the garment in the photo, due to individual properties and qualities of each yarn.

See DROPS lesson: Can I use a different yarn than the one mentioned in the pattern?

All our yarns are categorised into yarn groups (from A to F) according to thickness and knitting tension – group A contains the thinnest yarns and group F the thickest. This makes it easier for you to find alternative yarns to our patterns, should you wish to switch yarn. All yarns within the same group have a similar knitting tension and can easily replace each other. However, different yarn qualities have different structures and properties which will give the finished work a unique look and feel.

Click here for an overview of the yarns in each yarn group

At the top of all our patterns you’ll find a link to our yarn converter, which is a helpful tool should you wish to use a different yarn than suggested. By filling in the yarn quality you wish to replace, the amount (in your size) and number of strands, the converter will present good alternative yarns with the same knitting tension. Additionally it will tell you how much you’ll require in the new qualities and whether you’ll need to work with multiple strands. Most skeins are 50g (some are 25g or 100g).

If the pattern is worked with multiple colours, every colour will have to be converted separately. Similarly, if the pattern is worked with several strands of different yarns (for example 1 strand Alpaca and 1 strand Kid-Silk) you will have to find alternatives for each, individually.

Click here to see our yarn converter

Since different yarns have different qualities and textures we have chosen to keep the original yarn in our patterns. However, you can easily find options among our available qualities by using our yarn converter, or simply pick a yarn from the same yarn group.

It is possible that some retailers still have discontinued yarns in stock, or that someone has a few skeins at home that they would like to find patterns for.

The yarn converter will provide both alternative yarn as well as required amount in the new quality.

If you think it's hard to decide what size to make, it can be a good idea to measure a garment you own already and like the size of. Then you can pick the size by comparing those measures with the ones available in the pattern's size chart.

You'll find the size chart at the bottom of the pattern.

See DROPS lesson: How to read size chart

The needle size provided in the pattern serves only as a guide, the important thing is to follow the knitting tension. And since knitting tension is very individual, you will have to adjust the needle size to ensure that YOUR tension is the same as in the pattern – maybe you’ll have to adjust 1, or even 2 needle sizes, up or down to achieve the correct tension. For this, we recommend that you work test swatches.

Should you work with a different knitting tension than the one provided, the measurements of the finished garment might deviate from the measurement sketch.

See DROPS lesson: How to measure your tension/gauge

See DROPS video: How to make a gauge tension swatch

Working a garment top-down provides more flexibility and room for personal adjustment. For example it is easier to try the garment on while working, as well as making adjustments to length of yoke and shoulder caps.

The instructions are carefully explaining every step, in the correct order. Diagrams are adjusted to the knitting direction and are worked as usual.

The diagram depicts all rows/rounds, and every stitch seen from the right side. It is read from bottom to top, from right to left. 1 square = 1 stitch.

When working back and forth, every other row is worked from the right side and every other row is worked from the wrong side. When working from the wrong side, the diagram will have to be worked reversed: from left to right, knit stitches are purled, purl stitches are knit etc.

When working in the round every round is worked from the right side and the diagram are worked from right to left on all rounds.

See DROPS lesson: How to read knitting diagrams

The diagram depicts all rows/rounds, and every stitch seen from the right side. It is worked from bottom to top, from right to left.

When working back and forth every other row is worked from the right side: from right to left and every other row is worked from the wrong side: from left to right.

When working in the round, every row in the diagram are worked from the right side, from right to left.

When working a circular diagram you start in the middle and work your way outwards, counter clockwise, row by row.

The rows usually start with a given number of chain stitches (equivalent to the height of the following stitch), this will either be depicted in the diagram or explained in the pattern.

See DROPS lesson: How to read crochet diagrams

Instructions for working several diagrams after each other on the same row/round, will often be written like so: “work A.1, A.2, A.3 a total of 0-0-2-3-4 times". This means you work A.1 once, then A.2 is worked once, and A.3 is repeated (in width) the number of times provided for your size – in this case like so: S = 0 times, M = 0 times, L=2 times, XL= 3 times and XXL = 4 times.

The diagrams are worked as usual: begin with the first row in A.1, then work the first row in A.2 etc.

See DROPS lesson: How to read knitting diagrams

See DROPS lesson: How to read crochet diagrams

The total width of the garment (from wrist-to-wrist) will be larger in the larger sizes, despite the actual sleeves being shorter. The larger sizes have longer sleeve caps and wider shoulders, so there will be a good fit in all sizes.

The measurement sketch/schematic drawing provides information regarding the full length of the garment. If it’s a jumper or a jacket the length is measured from the highest point on the shoulder (usually closest to the neckline), and straight down to the bottom of the garment. It is NOT measured from the tip of shoulder. Similarly, the length of yoke is measured from the highest point on the shoulder and down to where yoke is split into body and sleeves.

See DROPS lesson: How to read a schematic drawing

Diagrams are often repeated on the round or in height. 1 repeat is the diagram the way it appears in the pattern. If it says to work 5 repeats of A.1 in the round, then you work A.1 a total of 5 times after/next to each other in the round. If it says to work 2 repeats of A.1 vertically/in height you work the entire diagram once, then begin again at the start and work the entire diagram one more time.

Chain stitches are slightly narrower than other stitches and to avoid working the cast-on edge too tight, we simply chain more stitches to begin with. The stitch count will be adjusted on the following row to fit the pattern and measurement sketch.

The rib edge is more elastic and will contract slightly compared to, for example, stocking stitch. By increasing before the rib edge, you avoid a visible difference in width between the rib edge and the rest of the body.

It’s very easy to cast off too tightly, and by making yarn overs while casting off (and simultaneously casting these off) you avoid a too tight cast off edge.

See DROPS video: How to bind off with yarn overs (yo)

To achieve an even increase (or decrease) you can increase on, for example: every 3rd and 4th row alternately, like so: work 2 rows and increase on the 3rd row, work 3 rows and increase on the 4th. Repeat this until the increase is complete.

See DROPS lesson: Increase or decrease 1 st on every 3rd and 4th row alternately

Should you prefer to work in the round instead of back and forth, you may of course adjust the pattern. You’ll need to add steeks mid-front (usually 5 stitches), and follow the instructions. When you would normally turn and work from the wrong side, simply work across the steek and continue in the round. At the end you’ll cut the piece open, pick up stitches to work bands, and cover the cut edges.

See DROPS video: How to knit steeks and cut open

Should you prefer to work back and forth instead of in the round, you may of course adjust the pattern so you work the pieces separately and then assemble them at the end. Divide the stitches for the body in 2, add 1 edge stitch in each side (for sewing) and work the front and back pieces separately.

See DROPS lesson: Can I adapt a pattern for circular needles into straight needles?

Pattern repeats can vary slightly in the different sizes, in order to get the correct proportions. If you’re not working the exact same size as the garment in the photo, yours might deviate slightly. This has been carefully developed and adjusted so that the complete impression of the garment is the same in all sizes.

Make sure to follow instructions and diagrams for your size!

If you have found a pattern you like which is available in women’s size it’s not very difficult to convert it to men’s size. The biggest difference will be the length of sleeves and body. Start working on the women size that you think would fit across the chest. The additional length will be worked right before you cast off for the armhole/sleeve cap. If the pattern is worked top-down you can add the length right after the armhole or before the first decrease on sleeve.

Regarding additional yarn amount, this will depend on how much length you add, but it is better with a skein too many than too few.

All yarns will have excess fibres (from production) that might come off as lint or shedding. Brushed yarns (ie hairier yarns) have more of these loose, excess fibres, causing more shedding.

Shedding also depends on what is worn under or over the garment, and whether this pulls at the yarn fibres. It’s therefore not possible to guarantee that there will be no shedding

Below are some tips on how to get the best result when working with hairier yarns:

1. When the garment is finished (before you wash it) shake it vigorously so the looser hairs come off. NOTE: do NOT use a lint roller, brush or any method that pulls at the yarn.

2. Place the garment in a plastic bag and put it in your freezer - the temperature will cause the fibres to become less attached to each other, and excess fibres will come off easier.

3. Leave in the freezer for a few hours before taking it out and shaking it again.

4. Wash the garment according to the instructions on the yarn label.

Pilling is a natural process that happens to even the most exclusive of fibers. It's a natural sign of wear and tear that is hard to avoid, and that is most visible in high friction areas of your garment like a sweater's arms and cuffs.

You can make your garment look as new by removing the pilling, using a fabric comb or a pill/lint remover.

Still can't find the answer you need? Then scroll down and leave your question so one of our experts can try to help you. This will be done normally within 5 to 10 working days.
In the meantime, you can read the questions and answers that others have left to this pattern or join the DROPS Workshop on Facebook to get help from fellow knitters/crocheters!

Post a comment to pattern DROPS 90-18

We would love to hear what you have to say about this pattern!

If you want to leave a question, please make sure you select the correct category in the form below, to speed up the answering process. Required fields are marked *.

Comments / Questions (21)

country flag Retha Scholtz wrote:

I just love this pattern! Thank you for the clear instructions, much appreciated. Maybe you can call it "Spring sensation"

14.10.2023 - 18:02

country flag Isabel wrote:

Gerne würde ich an dieses Relief-Top Ärmel anstricken. Wie müsste ich hier vorgehen? Danke für Ihre Antwort.

04.09.2023 - 12:51

DROPS Design answered:

Liebe Isabel, lassen Sie sich bei Modellen mit den gewünschten Ärmellänge (und selbe Maschenprobe) inspieren - hier finden Sie z.B. die mit Kürzen Ärmel. Viel Spaß beim stricken!

04.09.2023 - 15:18

country flag Jutta wrote:

Guten Morgen, strickt man ab dem abketten für das Armloch weiter in runden oder in hin-und Rückreihen?

14.07.2020 - 09:22

DROPS Design answered:

Liebe Jutta, Vorder- und Rückenteil werden separat in Hin- und Rückreihen und nicht in Runden gestrickt. Beide Teilen werden später an den Seiten zusammengenäht. Viel Spaß beim stricken!

14.07.2020 - 12:36

country flag Petra wrote:

Hallo, ein sehr schönes Top, welches ich gerne nacharbeiten möchte. Kraus rechts bedeutet doch normalerweise Hin- und Rückreihe rechte Maschen - oder? Was ist denn jetzt mit KrausRippe gemeint? Und was bedeutet: Krausrippe (hin und zurück): Eine Krausrippe = 2 Ndl. re. Ndl. steht doch eigentlich für Nadel, aber in der Anleitung sind nur Nadeln mit 2,5 und 3 genannt. Vielen Dank für eine kurze Erläuterung. Gruß Petra

22.06.2020 - 11:43

DROPS Design answered:

Liebe Petra, 1 Krausrippe bekommt mann wenn man 2 Reihen mit rechten Maschen strickt. Wenn Sie 2 Krausrippen mit Nadeln Nr 2,5 stricken sollen, stricken Sie 4 Reihen mit rechten Maschen, dann stricken Sie glatt rechts mit den Nadeln Nr 3. Viel Spaß beim stricken!

22.06.2020 - 14:30

country flag Ribault Martine wrote:

Bonjour, Je vous remercie pour votre réponse. Je n'ai jamais relevé des mailles sur un tricot pour former une encolure après avoir cousu les épaules. Mais surtout est-ce qu'il y a une vidéo montrant comment assembler les mailles relevées sur l'encolure pour tricoter en rond quelques rangs en jersey sur l'aiguille circulaire ?? Je vous remercie par avance de bien vouloir me répondre. Cordialement. Mme Ribault Martine

22.05.2020 - 11:42

DROPS Design answered:

Bonjour Mme Ribault, vous tricotez les mailles de l'encolure en rond sur l'aiguille circulaire, vous allez tricoter comme indiqué: 1 tour en mailles envers, 1 tour en mailles endroit, 1 tour en mailles envers, 1 tour en mailles endroit et rabattre au tour suivant, il n'y a pas de couture. Nous avons différentes vidéos où l'on tricote en rond, mais pas spécifiquement une encolure - par ex. du jersey tricoté en rond. Bon tricot!

22.05.2020 - 12:35

country flag Ribault Martine wrote:

Bonjour, Je bloque pour relever les 125-140 m pour réaliser l'encolure et tricoté ensuite en rond avec l'aiguille circulaire 2.5. Il y a t'il une vidéo montrant comment relever les mailles pour une encolure et tricoté en rond ensuite quelques rangs de jersey ? J'ai une deuxième question : combien de maille faut il relever précisément pour la taille M ? Je vous remercie par avance de bien vouloir me répondre. Je reste dans l'attente de votre réponse. Cordialement. Mme Ribault

21.05.2020 - 23:28

DROPS Design answered:

Bonjour Mme Ribault, le nombre de mailles à relever va dépendre de la tension de chacune en hauteur et n'est donc pas important, veillez seulement à en relever un peu plus de 125 m en M. Ces vidéos vous montrent comment procéder: le long des mailles rabattues et le long d'un côté. Bon tricot!

22.05.2020 - 10:02

country flag Ribault Martine wrote:

Désolé 🙏 vous ne semblez pas avoir saisi ma dernière question concernant la précision de la 1ère diminution de l\'encolure! Je voudrais savoir exactement si je finis le rang sur l' endroit après avoir rabattue les 41 m centrales et par la force des choses, je fais un rang retour sur l'envers ? Enfin je commence la 1ère diminution côté encolure du côté droit du tricot et non si je VEUX !Je vous remercie de bien vouloir me répondre précisément. Cordialement. Martine Ribault

05.05.2020 - 12:20

DROPS Design answered:

Bonjour Mme Ribault, vous pouvez tout à fait procéder ainsi: tricotez 1 rang sur l'endroit en rabattant les mailles centrales pour l'encolure = terminez le rang après ces mailles. tournez, tricotez le rang suivant sur l'envers. Tournez et à partir du rang suivant sur l'endroit, commencez à rabattre pour l'encolure. Pour l'autre côté, tricotez le 1er rang sur l'endroit, tournez et commencez à rabattre pour l'encolure au rang suivant sur l'envers. Bon tricot!

05.05.2020 - 15:22

country flag Ribault Martine wrote:

Bonjour, je vous remercie pour vos réponses. Néanmoins j'ai besoin de savoir si je finis le rang après avoir rabattue les 41 m centrales ? Et dans ce cas, je fais un rang retour sur l'envers, pour me trouver ensuite sur l'endroit et enfin commencer la 1ère diminution côté droit du tricot ? Donc, si tel est le cas je ferai le même travail inverse pour le côté gauche 👈 ? Je vous remercie de bien vouloir me préciser ceci. Cordialement. Martine Ribault

05.05.2020 - 11:39

DROPS Design answered:

Bonjour Mme Ribault, vous pouvez terminer votre rang si vous le souhaitez, si c'est un rang sur l'endroit, alors effectivement, vous commencerez par le côté gauche (vu sur l'endroit de l'ouvrage) et donc les mailles de l'encolure seront rabattues pour ce côté là en début de rang sur l'envers (= début du rang commençant par le côté encolure). Bon tricot!

05.05.2020 - 12:01

country flag Ribault Martine wrote:

Bonjour, j'ai posé 3 questions hier, le 3 mai et je n'ai pas reçu de réponse. Depuis je suis bloquée à partir du rabattage des mailles centrales. Je ne sais pas si je dois de suite commencer les diminutions côtes encolure par exemple, donc sur le même rang à l'endroit du tricot. Je vous remercie de bien vouloir répondre à mes questions précédentes. Cordialement. Martine Ribault

04.05.2020 - 20:46

DROPS Design answered:

Bonjour Mme Ribault, désolée pour le retard, nous allons répondre à vos questions de suite. Bonne continuation!

05.05.2020 - 10:37

country flag Ribault Martine wrote:

Bonjour, Formation des épaules. À 50 cm de hauteur totale, rabattre pour les épaules tous les 2 rangs 2 fois 6 m puis les dernières 6 m. Côté gauche du tricot, est-ce que l'on rabat les 1ère m sur l'envers du tricot et l'inverse pour le côté droit ? Il n'y a aucune précision à ce sujet. Je vous remercie pour votre réponse. Cordialement. Martine Ribault

03.05.2020 - 16:54

DROPS Design answered:

Bonjour Mme Ribault, pour former les épaules, vous rabattez les 6 premières mailles en début de rang à partir de l'emmanchure (et non à partir de l'encolure), tricotez le rang jusqu'à la fin, tournez et tricotez le rang suivant. Répétez ces 2 rangs encore 1 fois, et rabattez les 6 dernières mailles au rang suivant = vous aurez rabattu 2 fois 6 m tous les 2 rangs + les 6 dernières mailles. Bon tricot!

05.05.2020 - 10:44